What You'll Need
Prerequisites and permissions before starting
Quick Path
Condensed steps for fast setup
First-Time Connection
Complete walkthrough for your first Meta connection
Connecting Additional Accounts
Walkthrough for subsequent connections
Managing Your Meta Services
Enable, disable, and reset your Meta integration
Quick Checklist
Verify your setup is complete
Troubleshooting & FAQs
Common issues and fixes
🔓 What This Integration Unlocks
You’ve invested in a strong Facebook presence and you’re running Meta ad campaigns — but right now, every Messenger conversation and every lead form submission requires manual follow-up. Leads go cold while you’re busy, and messages pile up unanswered. Connecting your Meta assets to Irelia changes everything. Your AI agent takes over Messenger conversations automatically, and leads captured through get contacted instantly — with zero manual work. Here’s what each connection enables:| Asset Connected | What You Can Do |
|---|---|
| Business Manager | 📝 Access Instant Forms and automatically send WhatsApp templates to leads captured from your Meta ad campaigns |
| Facebook Page | 💬 Let Irelia handle Messenger conversations — both inbound (when prospects message you first) and outbound (auto-reply in DMs when someone comments specific keywords on your posts) |
✅ Your Business Manager connected for Instant Form lead capture
✅ Your desired Meta services enabled and ready to use
✅ The knowledge to connect additional accounts in the future
What You’ll Do
- Navigate to Irelia settings and open the Meta connection flow (~30 seconds)
- Log in with Facebook and authorize the connection (~30 seconds)
- Select one Facebook Page and one Business Manager (~30 seconds)
- Complete authorization and enable services (~30 seconds)
📋 What You’ll Need
- Full control (Admin) access — including finance permissions — to the Business Manager that manages your Facebook Page and runs your lead campaigns Required
- A Facebook account that has this level of access on the Business Manager Required
For agency accounts: If you’re a marketer or agency setting up for a client, you need to be added as an Admin with full control — including finance permissions — on your client’s Business Manager. Being added as a “Partner” — which is what Meta’s own guidelines recommend — is not sufficient for the process. See Issue 1 in Troubleshooting for how to fix this before you begin.
One Page, one Business Manager — no exceptions. Select exactly one Facebook Page and one Business Manager per Irelia account. Selecting multiple causes erratic behavior (e.g., Irelia responding from the wrong page or showing the wrong Instant Forms) and requires a full reset across every Irelia account linked to that Facebook profile. Already seeing issues? Jump to Issue 2 in Troubleshooting.
⚡ Quick Path (Experienced Users)
Already comfortable with Meta integrations? Here’s the condensed version. Which path do you need? If you’ve never connected Meta to any Irelia account with your current Facebook profile, follow the first-time connection steps below. If you’ve connected before (even to a different Irelia account), follow the subsequent connection steps.- First-Time Connection
- Subsequent Connections
- Irelia: Go to “Settings” → “Channels Configuration” → Click the “Connect Meta” button
- Meta: Log in → Select ONE Facebook Page → Select ONE Business Manager
- Irelia: Enable desired services with toggles
🔌 First-Time Connection
Follow these steps if this is your first time connecting Meta assets to any Irelia account using your Facebook profile.Access Your Channel Settings
1 minuteNavigate to your Irelia settings page: 👉 https://irelia.ai/settings?menu=settings&settings_tab=generaleYou’ll see the “Channels Configuration” section.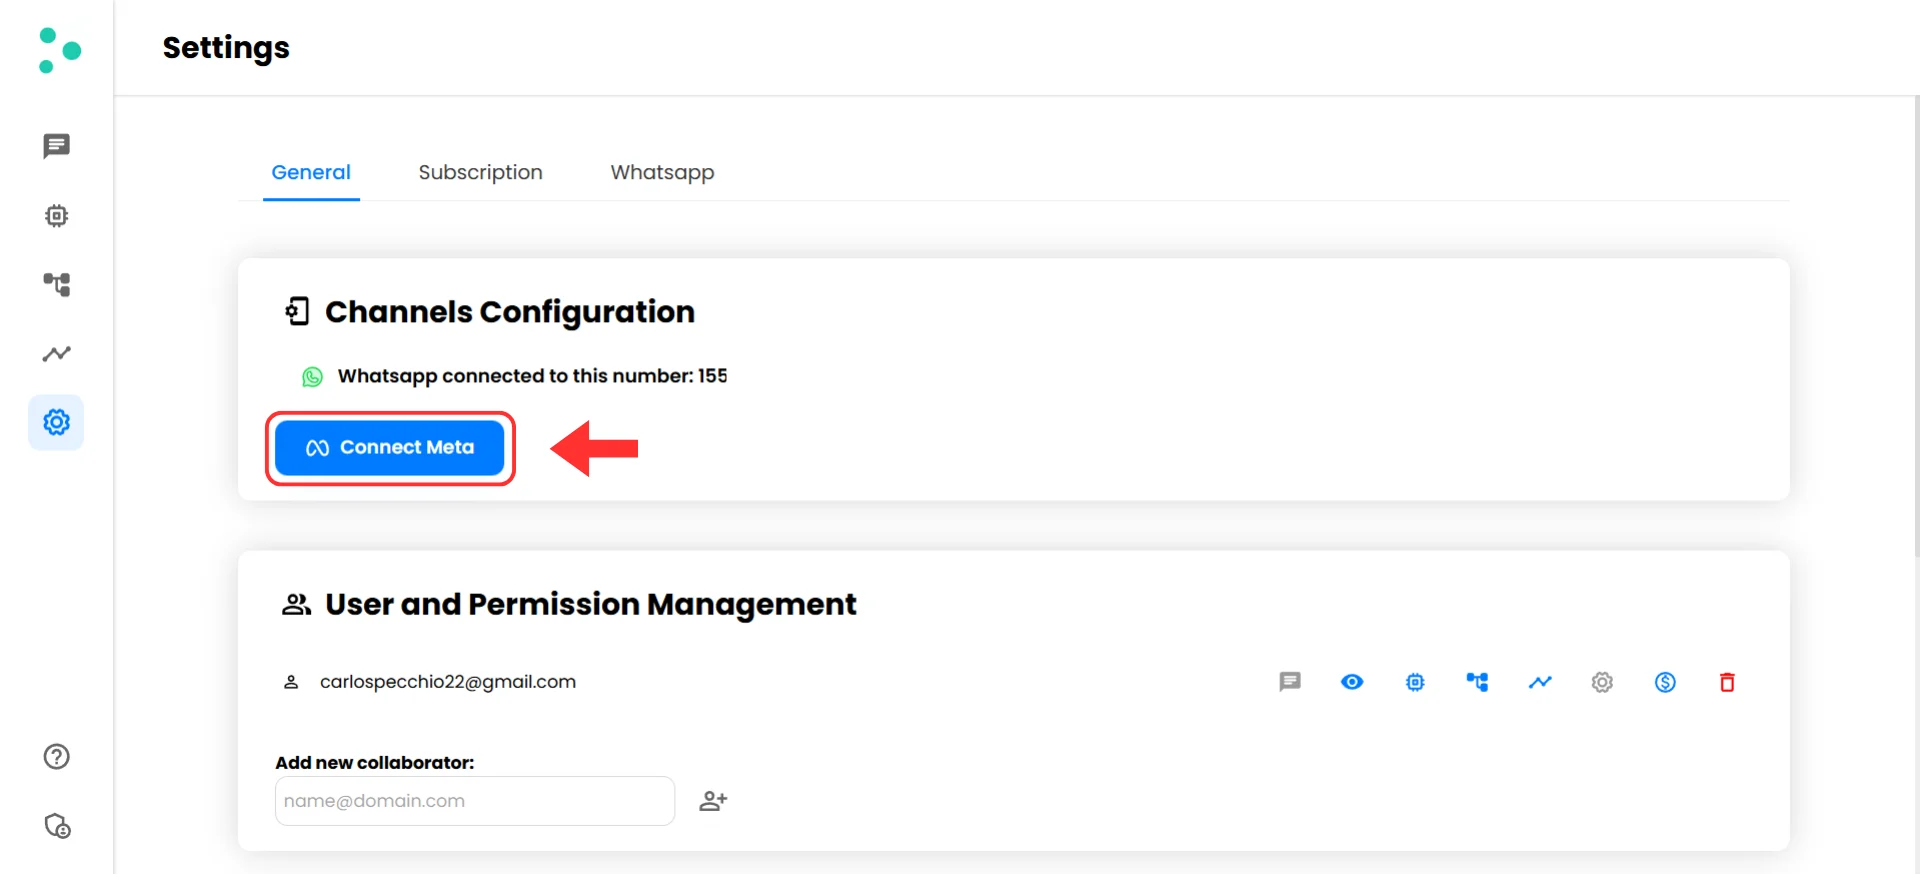
Start the Meta Connection
Click the blue “Connect Meta” button. A new browser tab will open with Meta’s Embedded Signup authorization flow.
Log In with Facebook
If prompted, log in with your Facebook account that has full control (Admin) access to your Business Manager.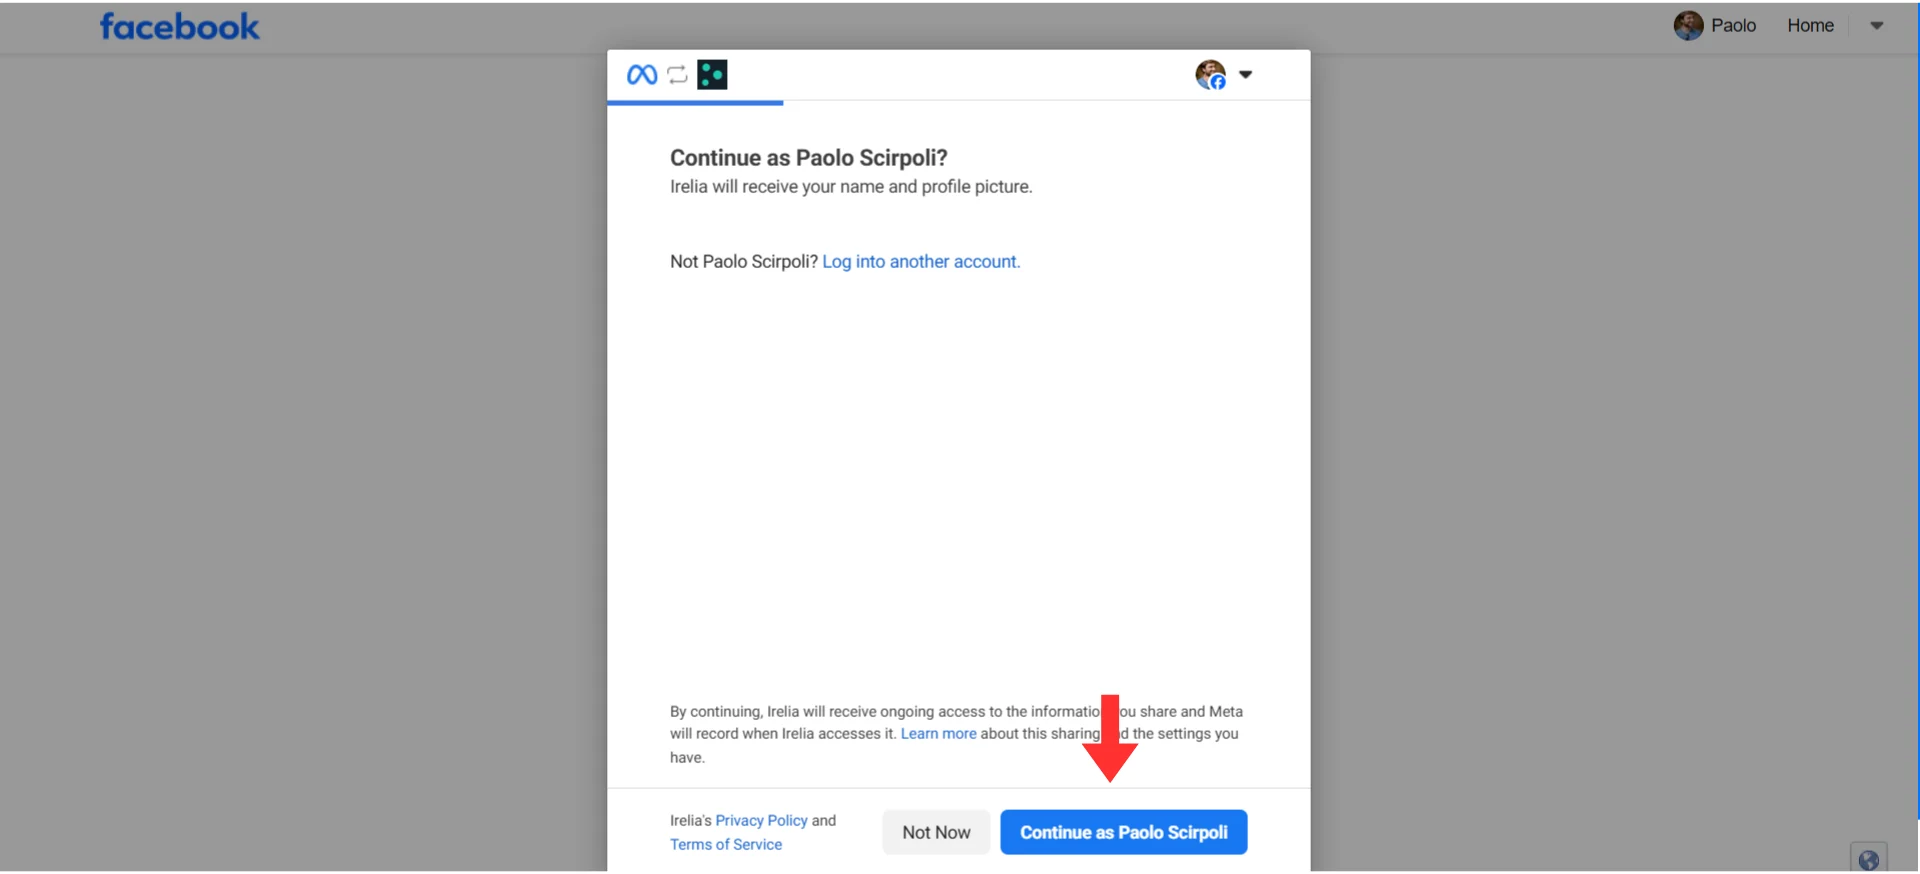
Select Your Facebook Page
1 minuteYou’ll be asked to choose which Facebook Page to connect.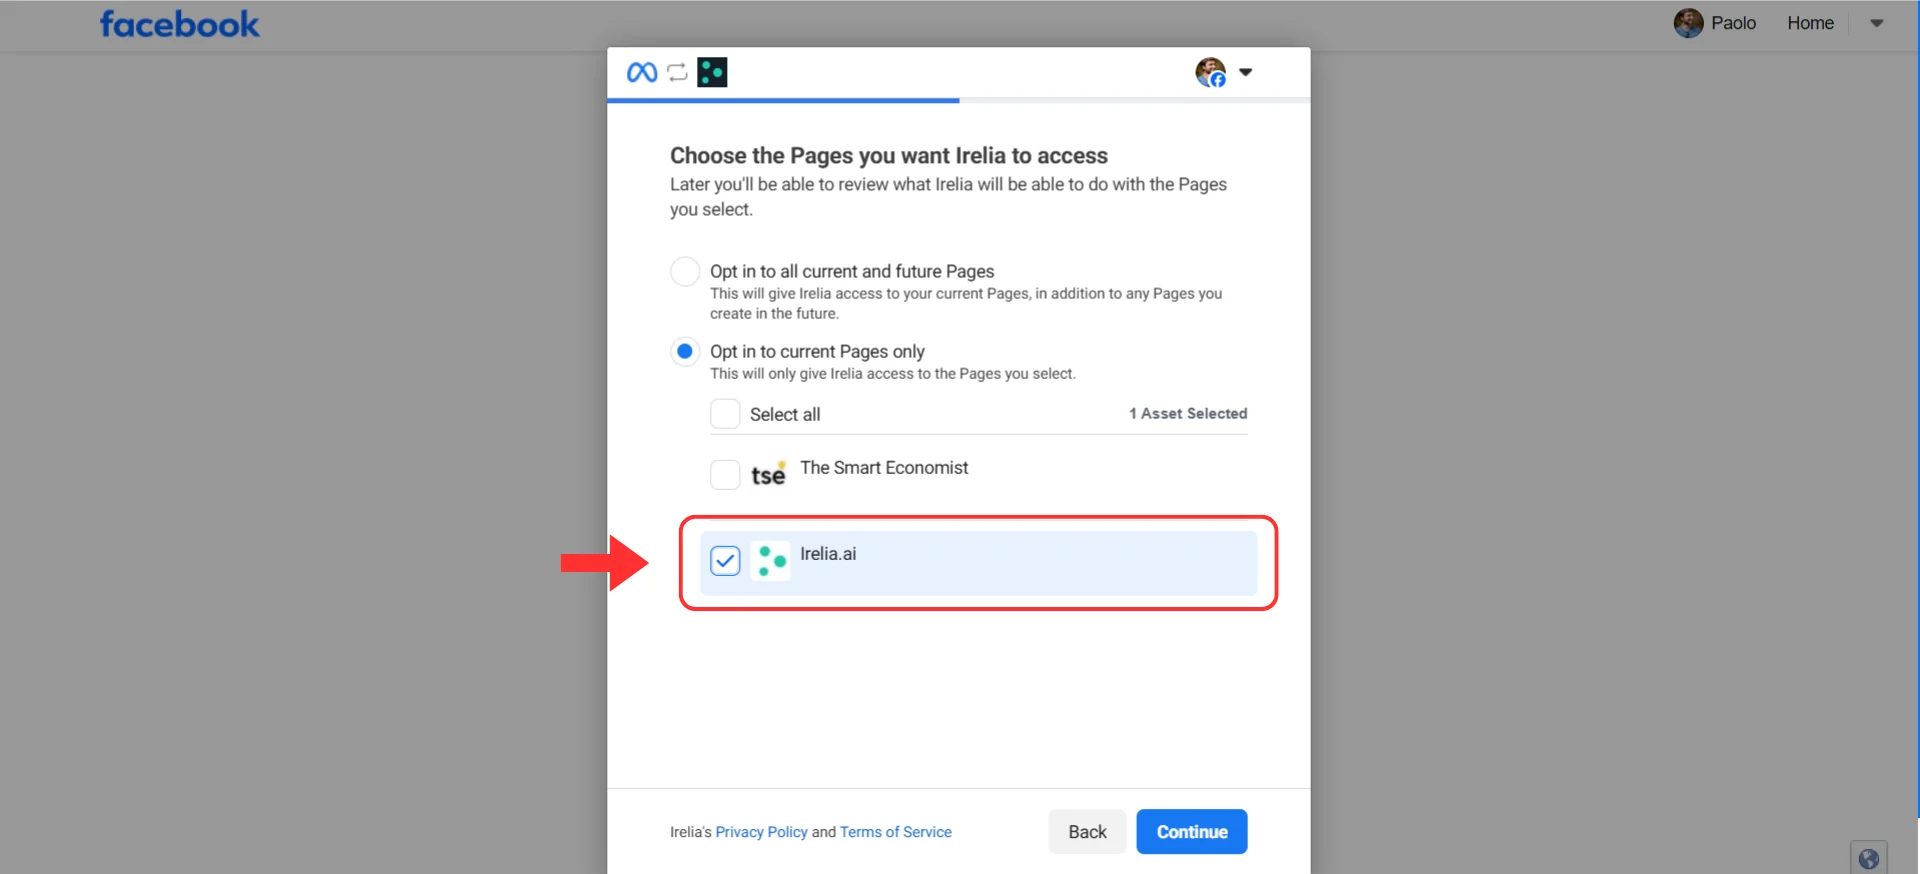
- Find your Facebook Page in the list
- Check the box next to one Page only
- Click “Next” or “Continue”
Select Your Business Manager
1 minuteNext, you’ll choose which Business Manager to connect.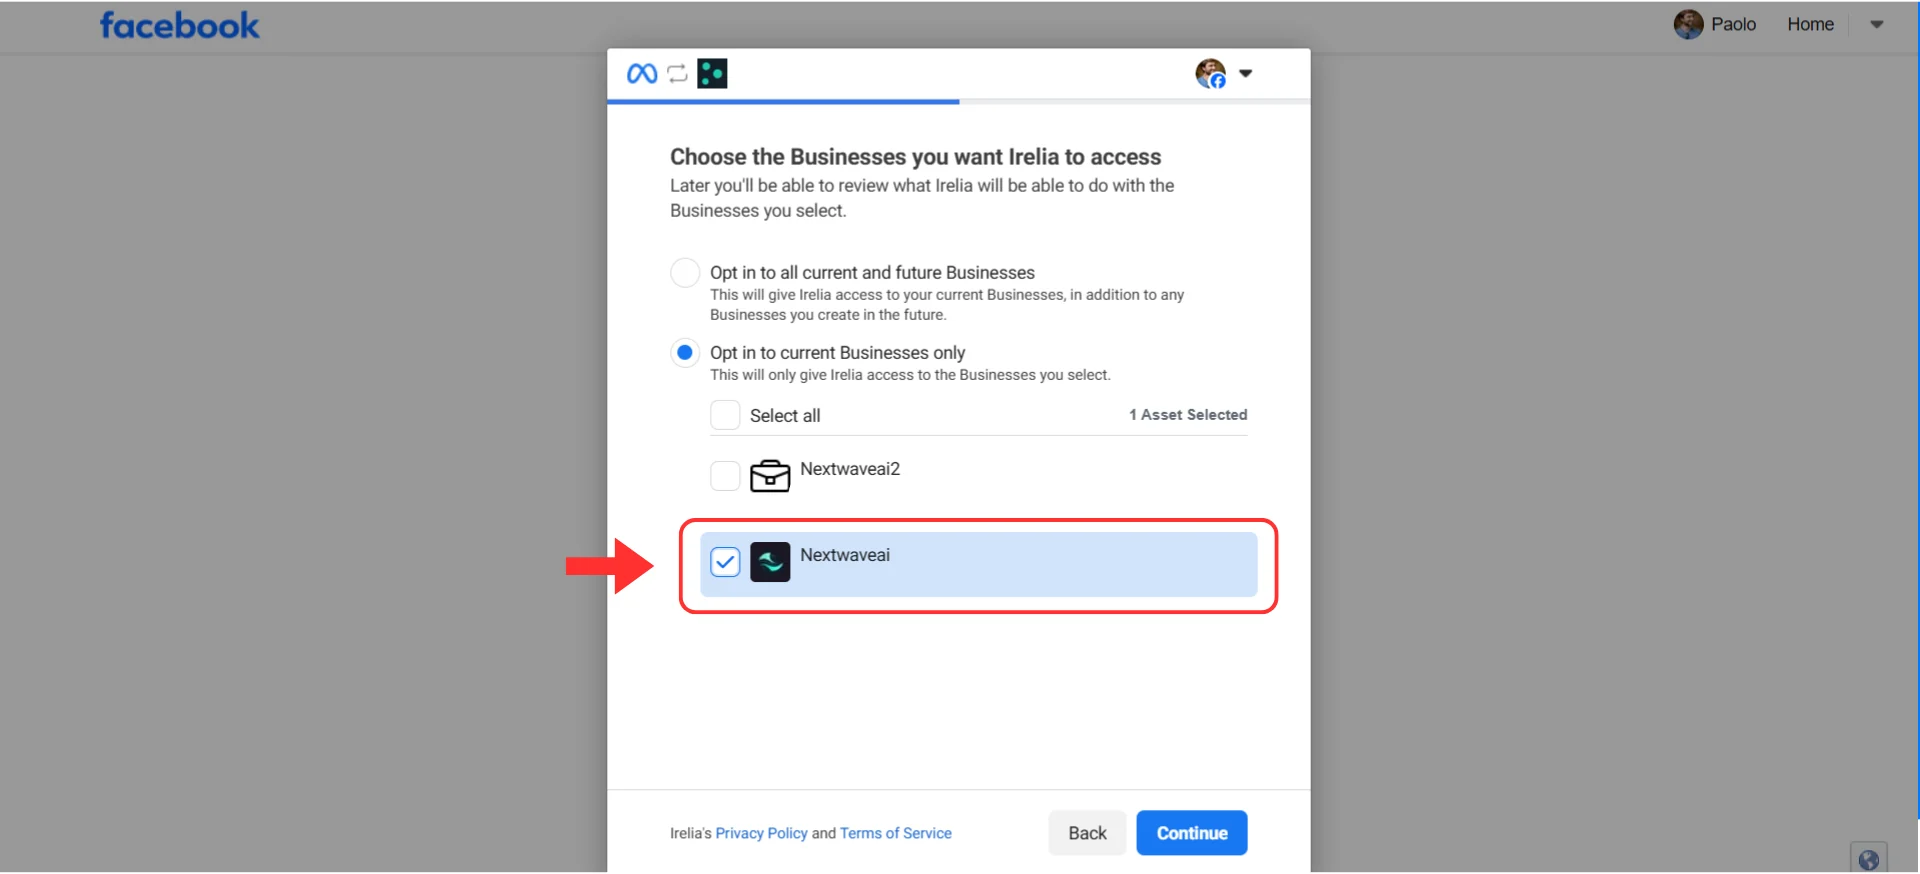
- Find your Business Manager in the list
- Check the box next to one BM only
- Click “Next” or “Continue”
🎉 Congratulations! Your Meta Connection Is Live!
Take a moment to appreciate what you just set up: ✅ Your Facebook Page is connected to Irelia for automated Messenger conversations✅ Your Business Manager is linked for Instant Form lead capture
✅ Your AI agent is ready to handle conversations and contacts automatically What happens now: Head to Managing Your Meta Services to enable the specific services you need — Messenger, Instant Forms, or both.
🔄 Connecting Additional Accounts
Follow these steps if you’re connecting a second (or subsequent) Irelia account using the same Facebook profile you’ve used before.Start the Connection
Go to your new Irelia account’s settings and click the “Connect Meta” button, just like before.
Identify the Reconnection Screen
Since you’ve connected before, Meta will show you a different screen asking if you want to reconnect with your previous settings.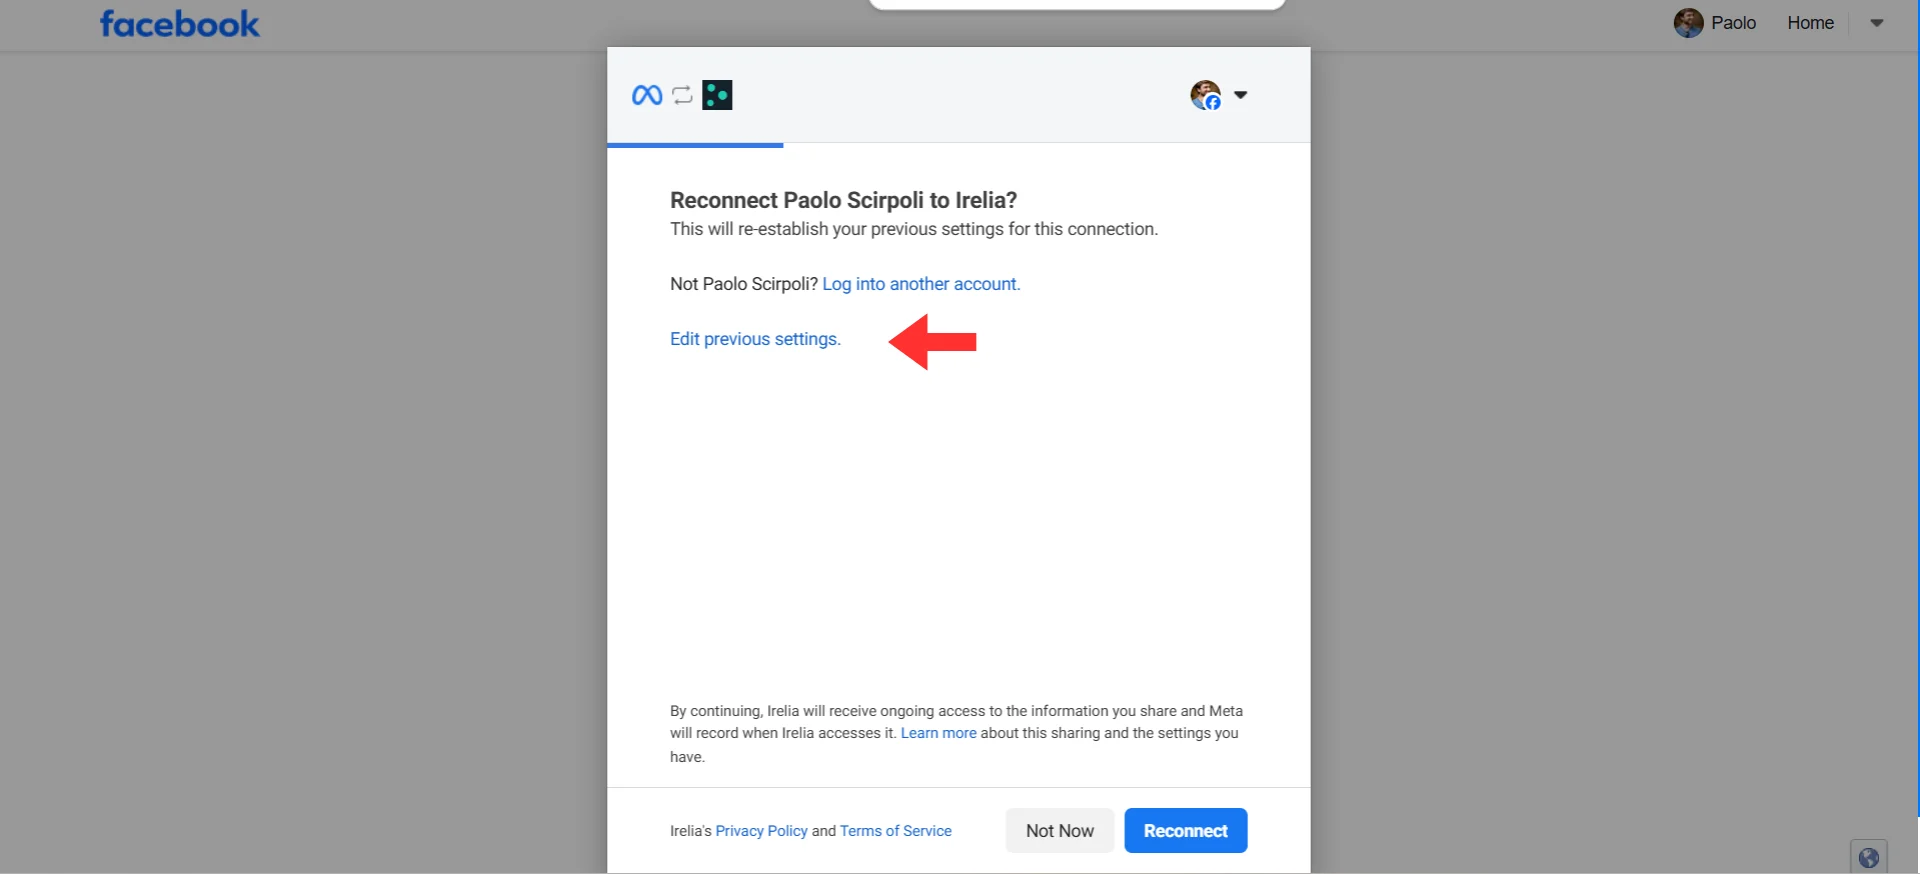
Edit Your Previous Settings
1 minuteDo not click “Reconnect” — that would reuse your old settings.Instead, click the blue “Edit previous settings” link.
Add Your New Facebook Page
1 minuteYou’ll see your previously selected Page(s) already checked.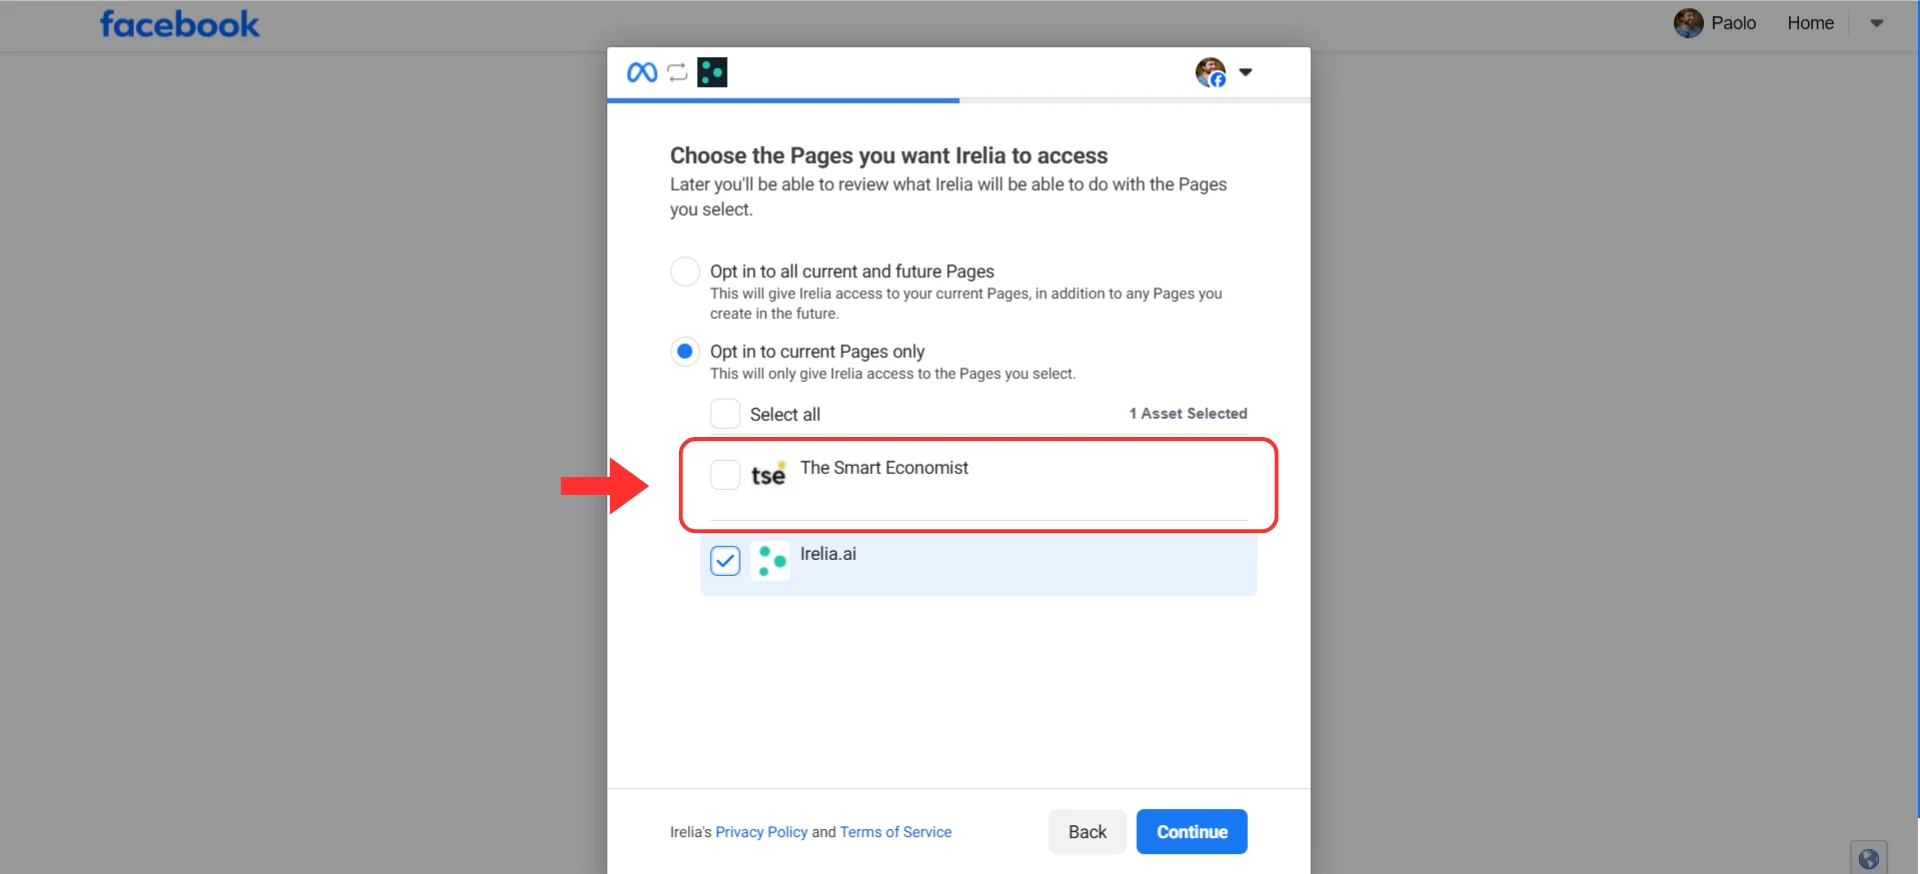
- Verify your previously selected page(s) are still checked — do not uncheck them
- Add a checkmark to one new page for this Irelia account
- Do not select multiple new pages
Add Your New Business Manager
1 minuteThe same rule applies for Business Manager.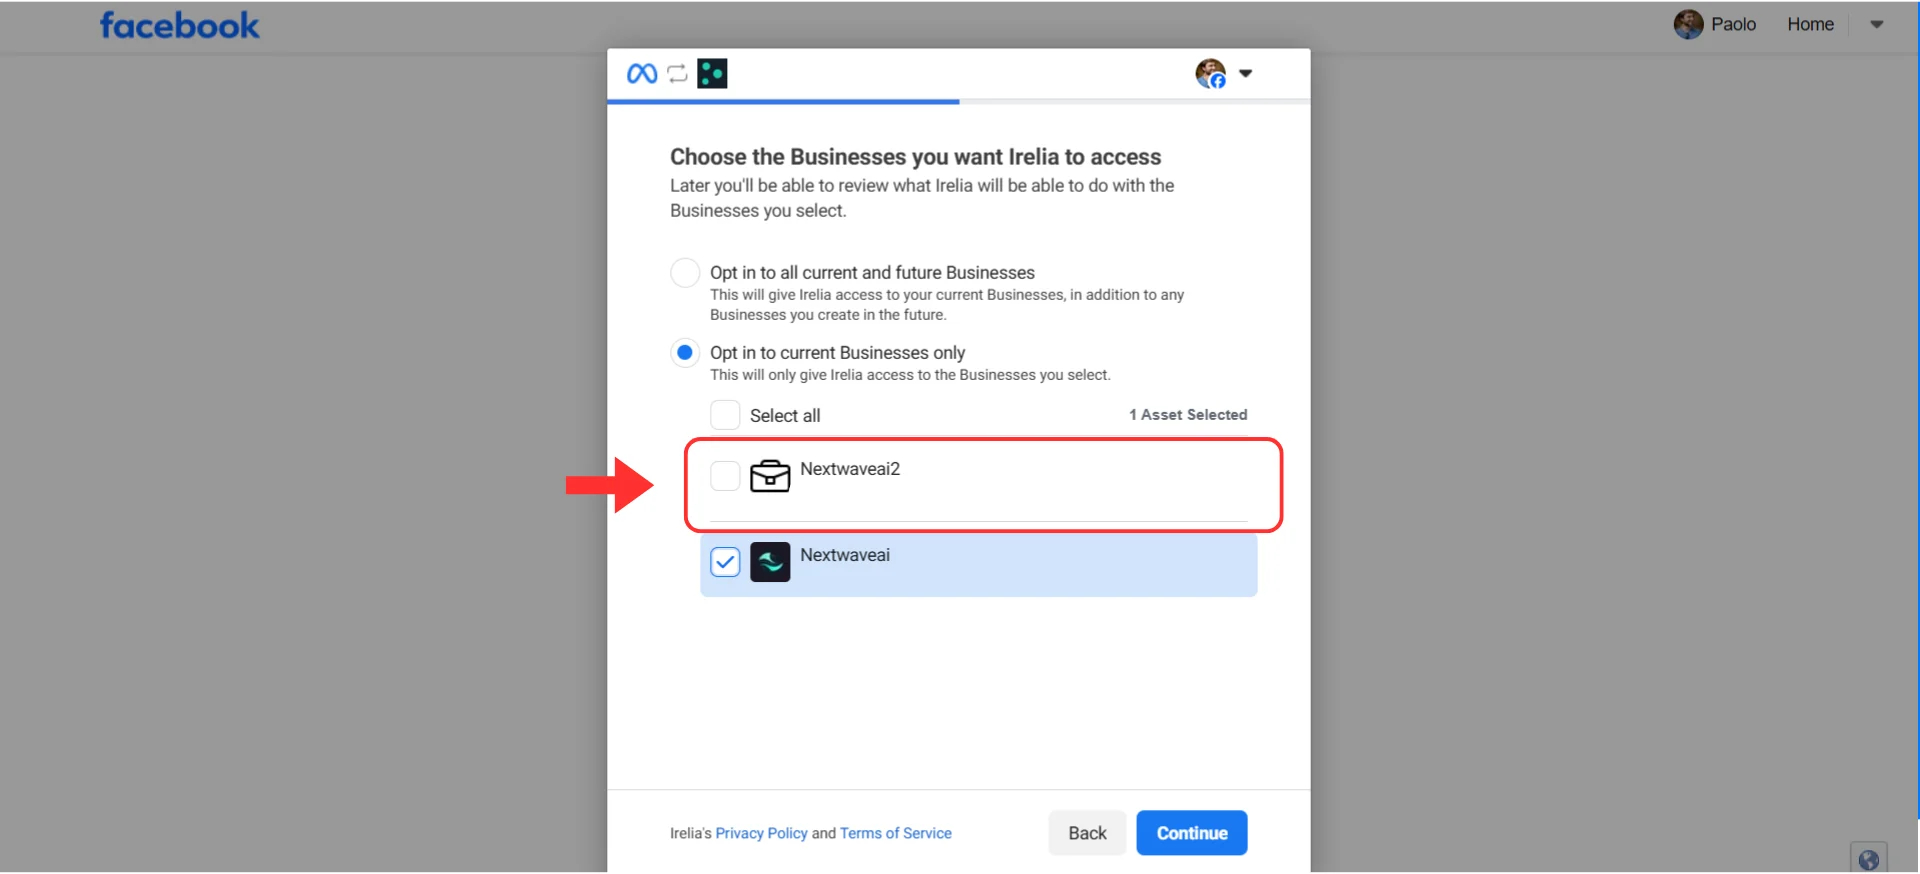
- Verify your previously selected BM(s) are still checked — do not uncheck them
- Add a checkmark to one new BM for this Irelia account
- Do not select multiple new BMs
⚙️ Managing Your Meta Services
After a successful connection, you’ll be redirected to the “Channels Configuration” screen where you can manage your Meta services.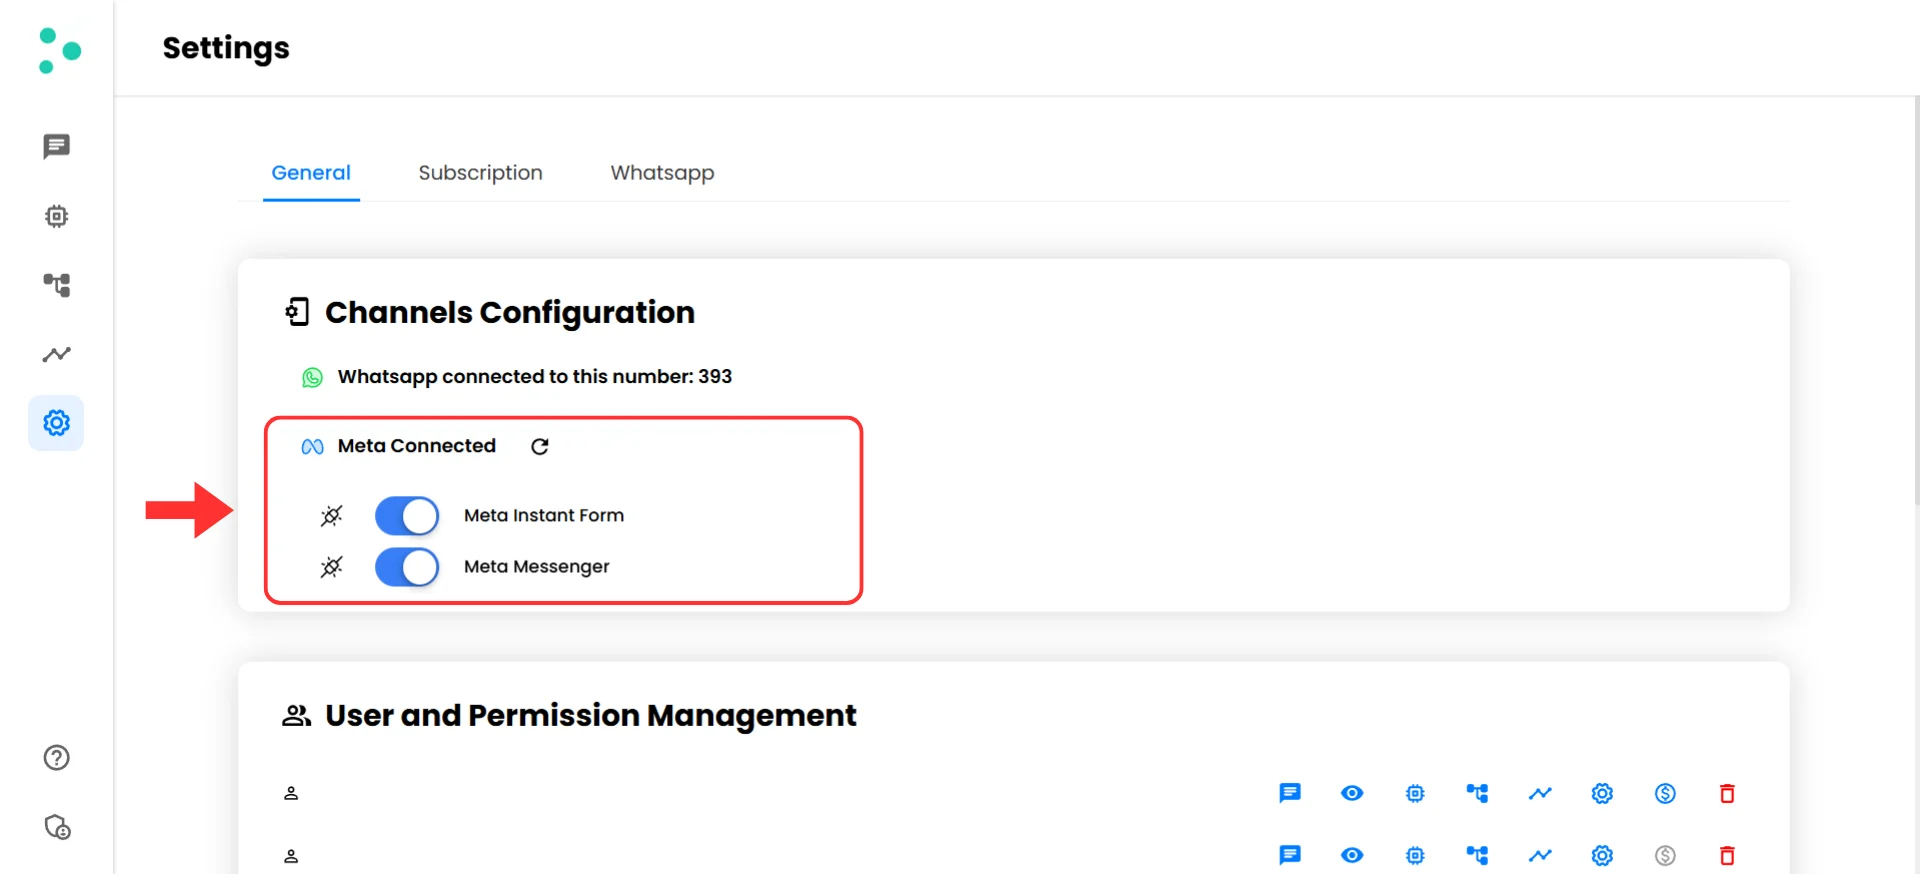
Available Controls
| Element | Function |
|---|---|
| 🔵 “Meta Instant Form” toggle | Enable or disable automatic lead sync from your Meta campaigns |
| 🔵 “Meta Messenger” toggle | Enable or disable Irelia’s ability to handle Messenger conversations |
| 🔄 reset icon (next to “Meta Connected”) | Disconnect your current Meta connection and start fresh |
Enabling and Disabling Services
- To enable a service: Click the toggle so it turns blue
- To disable a service: Click the toggle so it turns white
Resetting Your Connection
If you need to start over with a completely new connection:- Click the reset icon next to “Meta Connected”
- Confirm the reset
- Click the “Connect Meta” button again to set up a new connection
➕ Adding New Meta Services
We continuously add new Meta integration capabilities. When new services become available, you’ll see an “Add missing Meta service” button on your “Channels Configuration” screen.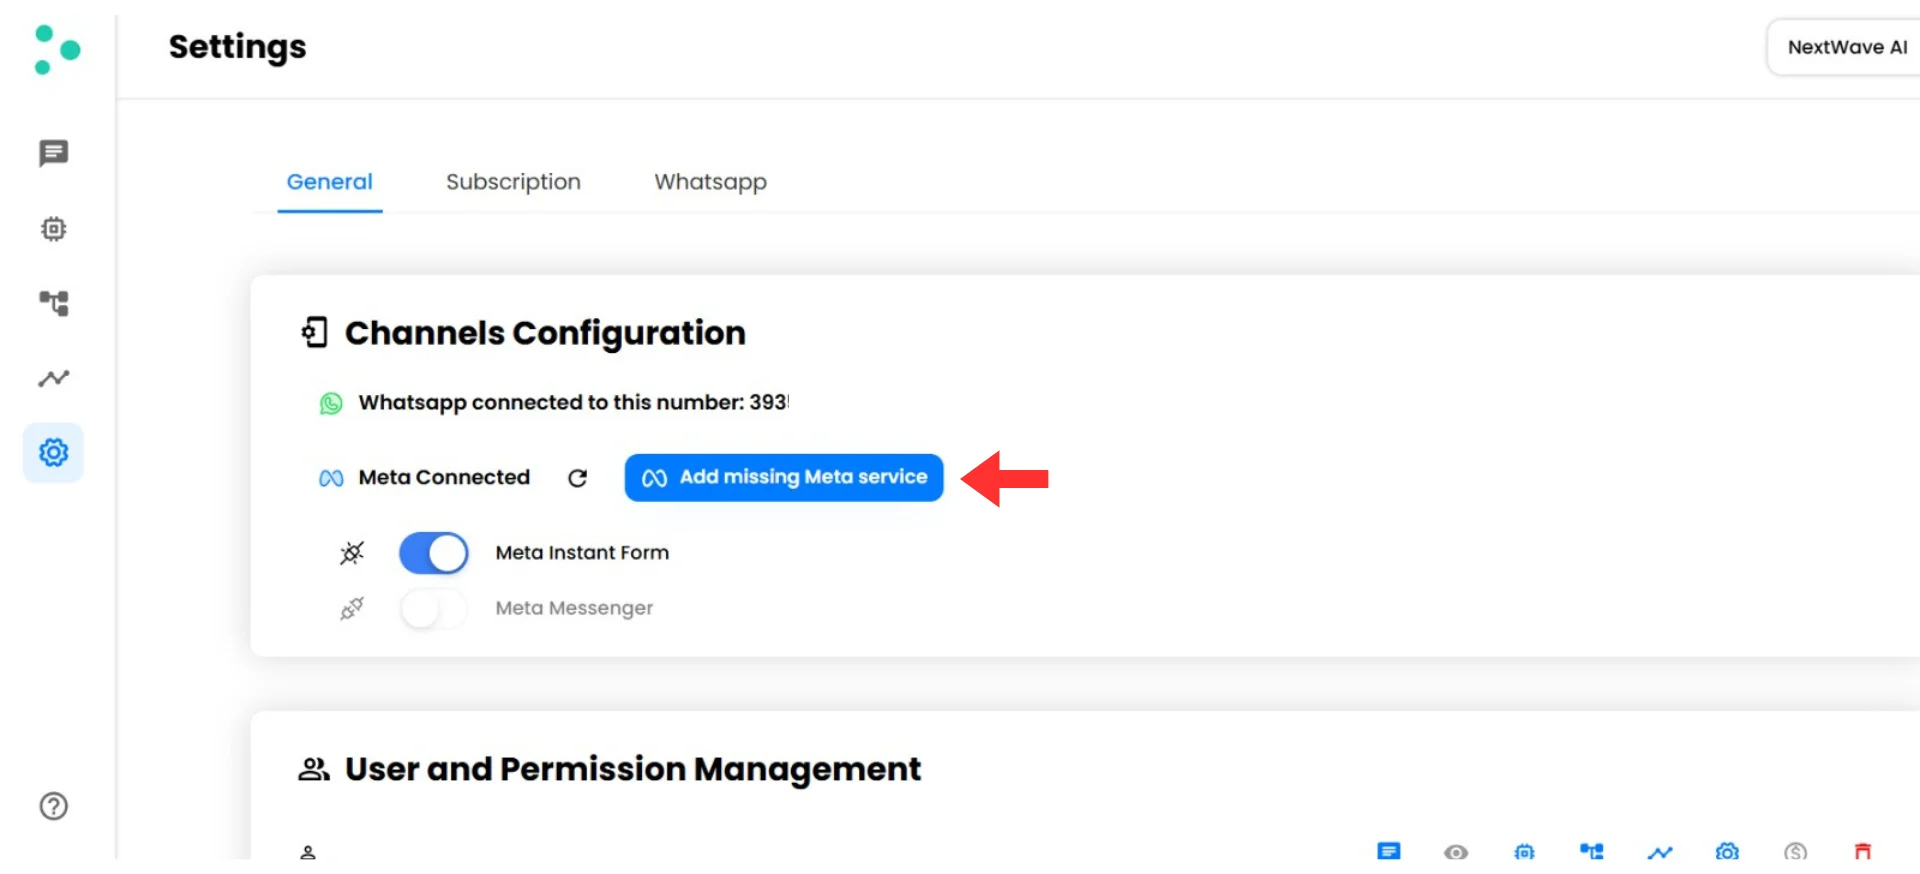
- Click the blue “Add missing Meta service” button
- Follow the same Meta authorization flow
- Grant permissions for the new service
- Return to Irelia and enable the new service with its toggle
✅ Quick Checklist
Use this checklist for every connection:Essential Setup
Essential Setup
- Navigated to “Settings” → “Channels Configuration”
- Clicked the “Connect Meta” button
- Logged in with Facebook (if prompted)
- Selected ONE Facebook Page only
- Selected ONE Business Manager only
- Completed the authorization
- Enabled desired services with toggles
Verification
Verification
- Confirmed “Meta Connected” status appears
- Tested your integration
🛠️ Troubleshooting & FAQs
The Page or BM you need doesn't appear in the selection screen
The Page or BM you need doesn't appear in the selection screen
What this means: During the Meta authorization flow, the Facebook Page or Business Manager you need doesn’t show up in the selection screen — usually because your Facebook account doesn’t have the right permission level on the Business Manager.How to fix it:Step 1: Verify you’re logged into the correct Facebook account
- The selection screen only shows assets where your logged-in Facebook account has the required permissions.
- If you have multiple Facebook accounts, make sure you’re using the right one.
| Access Level | BM & its Pages Appear? |
|---|---|
| Partner (Meta’s recommendation for agencies) | ❌ No |
| Partial access (Employee) | ❌ No |
| Full control without finance permissions | ❌ No |
| Full control (Admin) with finance permissions | ✅ Yes — this is what you need |
- How to check: Go to “Meta Business Suite” → “Settings” → “People” → Find your name → Verify your role is Admin with full control and that finance permissions are enabled.
Instructions for your client
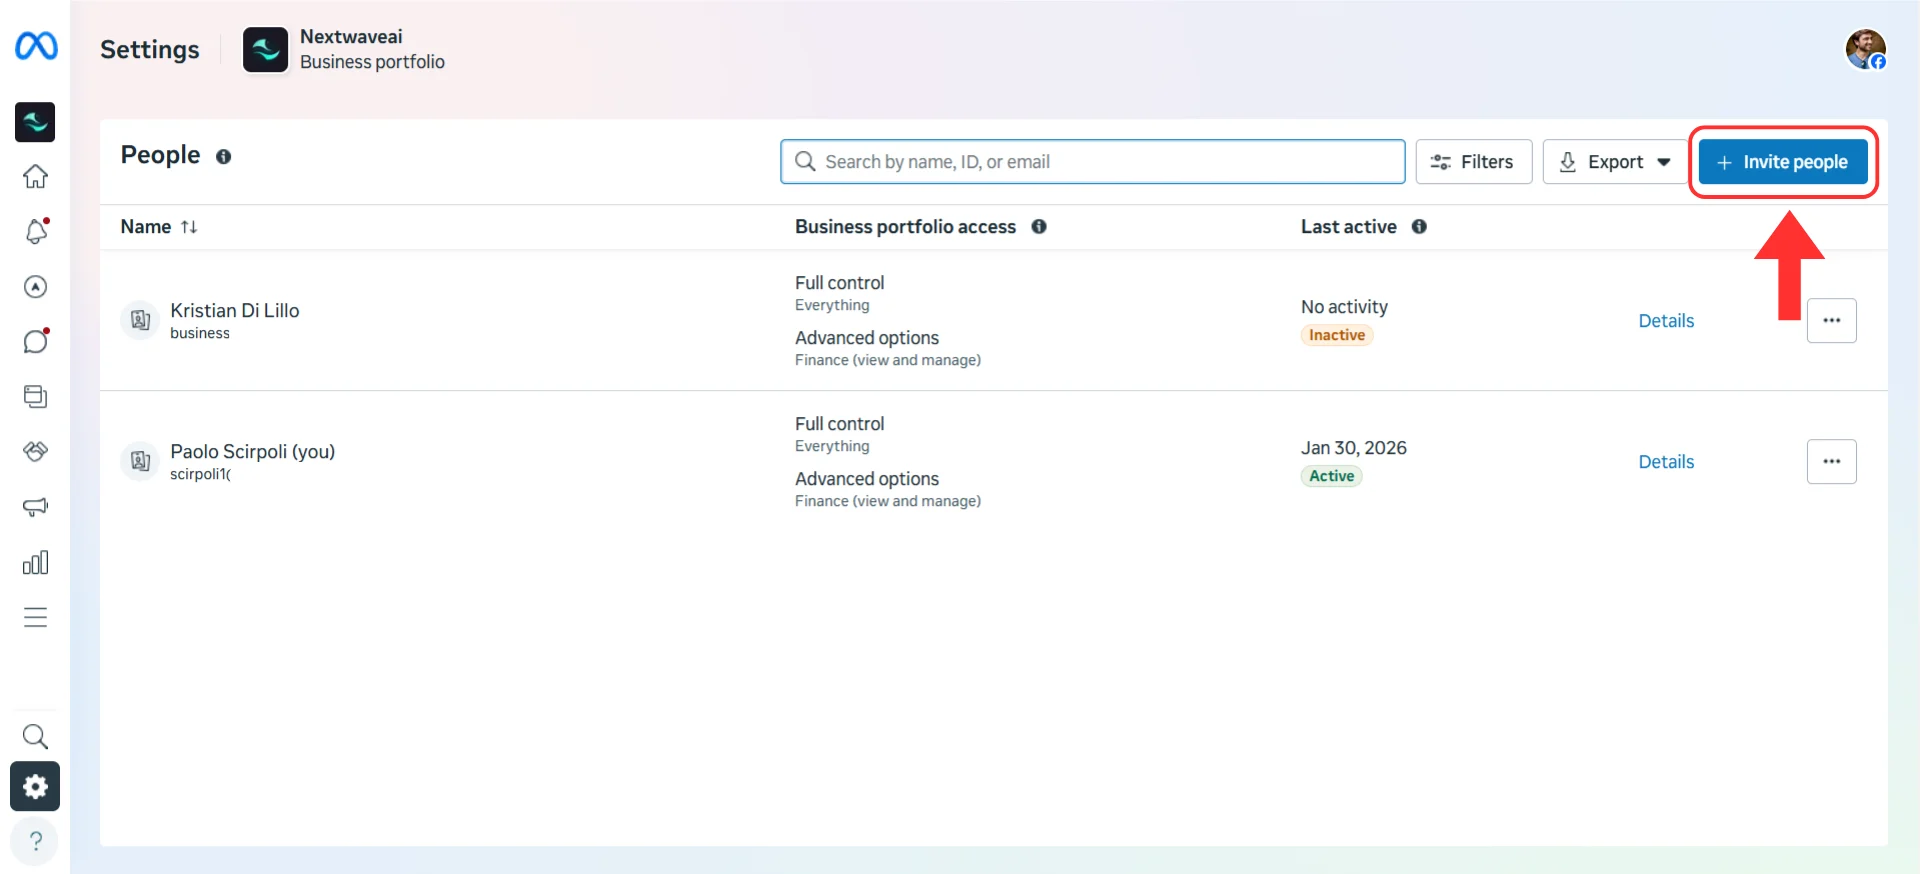
- Go to Meta Business Suite and click the gear icon to open “Business Settings”
-
In the left sidebar, click “People”, then click the blue “Invite People” button
- Enter the email address associated with the marketer or agency’s Facebook account
-
Select “Full control” (Admin access) and ensure finance permissions are enabled — this is critical, do not select “Partial access”
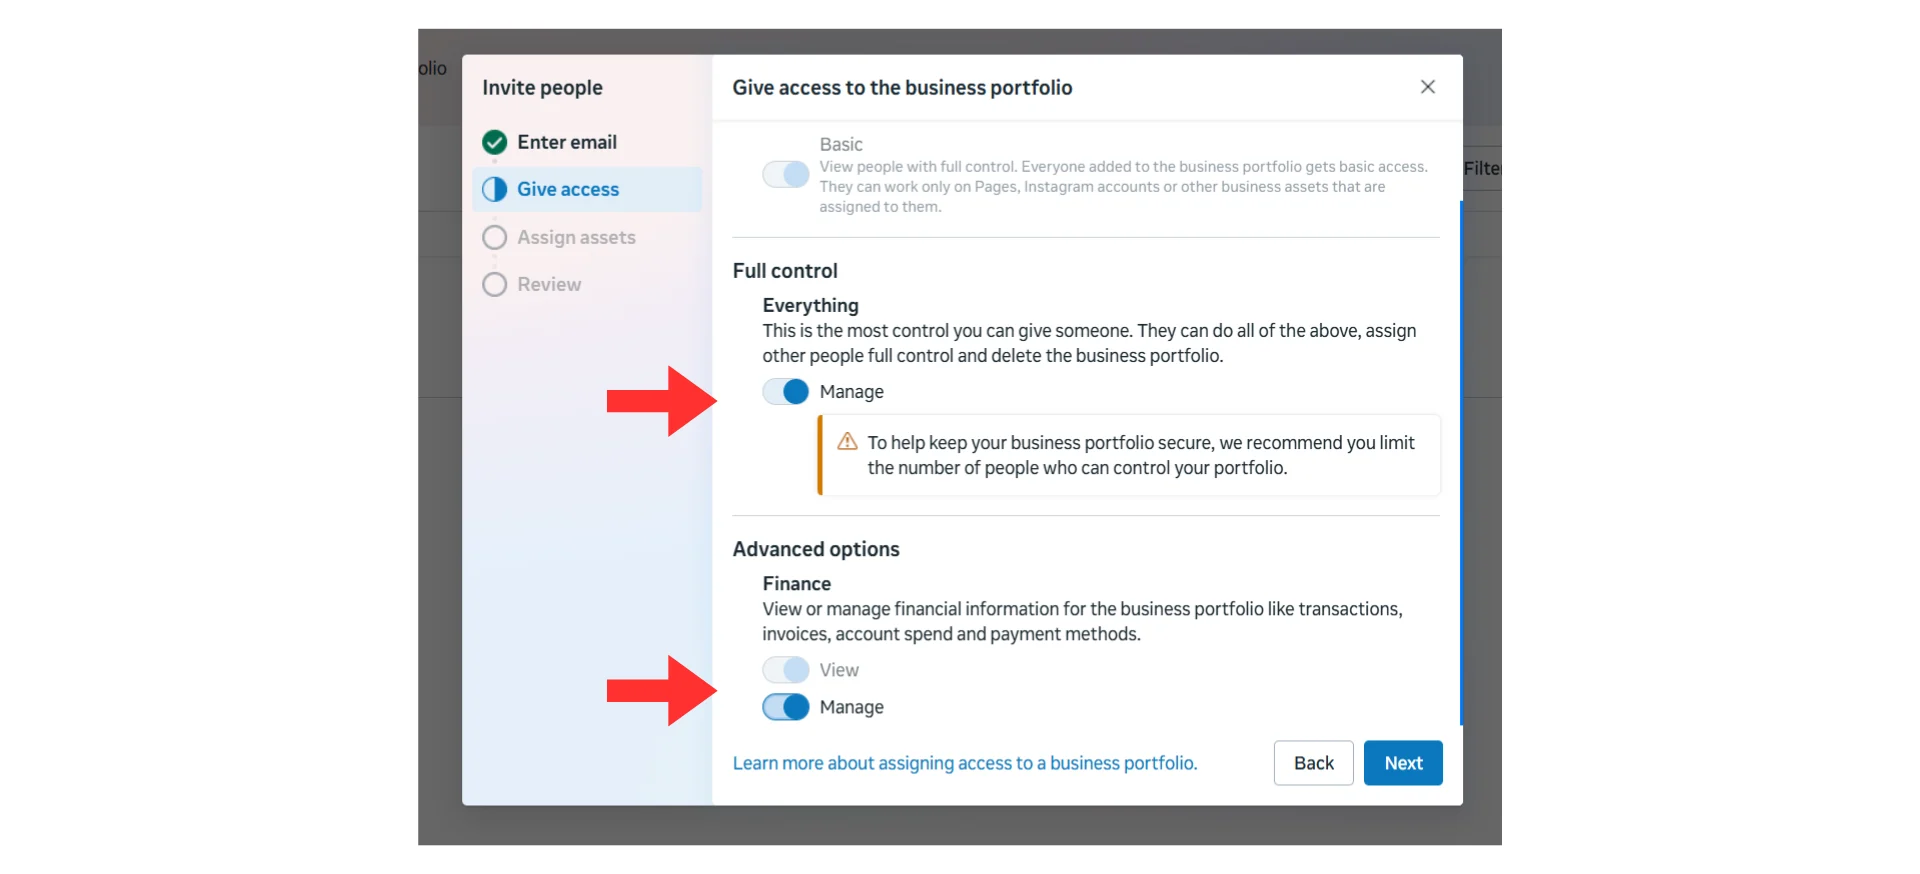
- Click the “Send Invitation” button
After your client sends the invitation
- Check your email and Facebook notifications for the invitation
- Accept the invitation
- Restart the Meta connection process from Step 1 of First-Time Connection
- Your client’s Page and Business Manager should now appear in the selection screens
Multiple Pages or BMs were selected, causing cross-account behavior
Multiple Pages or BMs were selected, causing cross-account behavior
What this means: Multiple Pages or multiple Business Managers were selected during the connection flow — either in this account or in another Irelia account that shares the same Facebook profile.Symptoms:
- Irelia sends Messenger replies from a Page that doesn’t belong to this account
- The “Meta Instant Form” module displays forms from the wrong Business Manager
- Generally unpredictable behavior across connected accounts
- Find every Irelia account that was connected using the same Facebook profile.
- In each affected account, go to “Settings” → “Channels Configuration” → Click the reset icon next to “Meta Connected” and confirm.
- Wait until all connections are removed before proceeding. All the connections made from the same Facebook account must be resetted before moving to step 3.
- First account: Follow First-Time Connection (Steps 1–6) — select one Page and one BM.
- Each subsequent account: Follow Connecting Additional Accounts (Steps 1–6) — keep previous selections checked, add one new Page and one new BM.
How do I connect a different Page to this Irelia account?
How do I connect a different Page to this Irelia account?
Solution:
- Click the reset icon next to “Meta Connected” to disconnect
- Click the “Connect Meta” button again
- Select your new Page and BM
"Meta Connected" appears but services aren't functioning
"Meta Connected" appears but services aren't functioning
What this means: The connection process completed successfully and “Meta Connected” appears in Irelia, but the integration isn’t functioning — services appear broken or unresponsive.This is usually caused by Irelia not being automatically registered in your Business Manager’s CRM access. It normally happens automatically during the connection process, but in some cases it doesn’t.How to fix it:Step 1: Check CRM access in Meta
- In Meta Business Suite, go to Business Settings → Integrations and locate the Leads Access (or CRM) section
- Look for Irelia in the list of connected platforms
- Click the option to add or connect a new CRM platform
- Search for and add Irelia manually
Messaging may not be enabled on your Facebook Page
Messaging may not be enabled on your Facebook Page
What this means: Irelia can’t manage Messenger conversations because messaging isn’t enabled on your Facebook Page itself.How to fix it:Step 1: Enable messaging on your Facebook Page
- Go to your Facebook Page “Settings” → “Messaging” and make sure messaging is turned on.
- Go to “Settings” → “Channels Configuration” and enable the “Meta Messenger” toggle.
Lead data from Meta ad forms is not reaching Irelia
Lead data from Meta ad forms is not reaching Irelia
What this means: Irelia isn’t receiving lead data from your Meta ad campaign forms.How to fix it:Step 1: Verify the form is attached to an active campaign
- Open Meta Ads Manager and confirm the campaign using your Instant Form is active and running.
- Make sure the BM you connected to Irelia contains the ad account running the campaign.
- Go to “Settings” → “Channels Configuration” and make sure the “Meta Instant Form” toggle is enabled (blue).
Irelia receives leads but can't send WhatsApp messages
Irelia receives leads but can't send WhatsApp messages
What this means: Irelia is receiving lead data from your forms but can’t send WhatsApp messages to the captured leads.How to fix it:Step 1: Check phone number format
- Leads may be entering their phone number without the correct country code or with an incorrect format.
- If possible, set a default country prefix in your Meta form based on the country where you’re advertising.
- Your Instant Form might not include a phone number field, so Irelia can’t contact leads.
- Edit your form in Meta Ads Manager and add a phone number field.
- Irelia pulls data from Meta’s default fields (name and phone number). If you’re using custom fields, Irelia won’t recognize them.
- Use Meta’s standard “Name” and “Phone Number” fields in your Instant Form. Irelia uses the name for personalization and the phone number to send messages.
🆘 Need Help?
Irelia.ai Support:
- Contact support in the WhatsApp priority support group or send an email to info@irelia.ai
- Include: screenshots of your configuration, the error message, and what you expected vs. what happened
- Visit: Meta Business Help Center
- Check: Meta Platform Status for outages