> ## Documentation Index
> Fetch the complete documentation index at: https://docs.irelia.ai/llms.txt
> Use this file to discover all available pages before exploring further.

# How to Set Up the Irelia.ai WhatsApp Widget on Your Website

> Add a WhatsApp chat widget to your website that captures every visitor's phone number automatically — no forms, no popups, no friction — while your AI agent handles the conversation on WhatsApp.

## <Badge color="blue" size="md" shape="pill" icon="clock">\~10 minutes setup</Badge>

<Columns cols={3}>
  <Card title="What You'll Need" icon="clipboard-list" href="#-what-you%E2%80%99ll-need">
    Prerequisites before you start
  </Card>

  <Card title="WhatsApp Widget vs. Traditional Webchat" icon="scale-balanced" href="#-whatsapp-widget-vs.-traditional-webchat">
    Understand the tradeoffs and why this wins for lead gen
  </Card>

  <Card title="Quick Path" icon="bolt" href="#-quick-path-experienced-users">
    Condensed steps for experienced users
  </Card>

  <Card title="Step-by-Step Setup" icon="wrench" href="#-step-by-step-setup">
    Full walkthrough (Steps 1–5)
  </Card>

  <Card title="Quick Checklist" icon="check" href="#-quick-checklist">
    Verify everything is working
  </Card>

  <Card title="Troubleshooting & FAQs" icon="screwdriver-wrench" href="#-troubleshooting-%26-faqs">
    Common issues and answers
  </Card>
</Columns>

***

### Introduction

You're investing time and budget to drive traffic to your website. Visitors land, browse, maybe have a question — and then leave. No name, no number, no way to follow up. They're gone.
Traditional webchat widgets (live chat) try to solve this, but they create a different problem: anonymous conversations that vanish the moment someone closes their browser tab. Your sales team ends up with half-finished chats and zero contact information to pick things back up.
The Irelia.ai WhatsApp Widget takes a smarter approach. It looks and feels like a familiar chat bubble on your site, but instead of trapping the conversation inside a browser window, it bridges the visitor directly to WhatsApp — where your AI agent continues the conversation and you automatically capture their phone number.
**By the end of this guide, you'll have:**
✅ A WhatsApp chat widget live on your website<br />
✅ Your AI agent automatically responding to every visitor who reaches out<br />
✅ Every visitor's WhatsApp number captured in Irelia — ready for your sales team

### How This Works

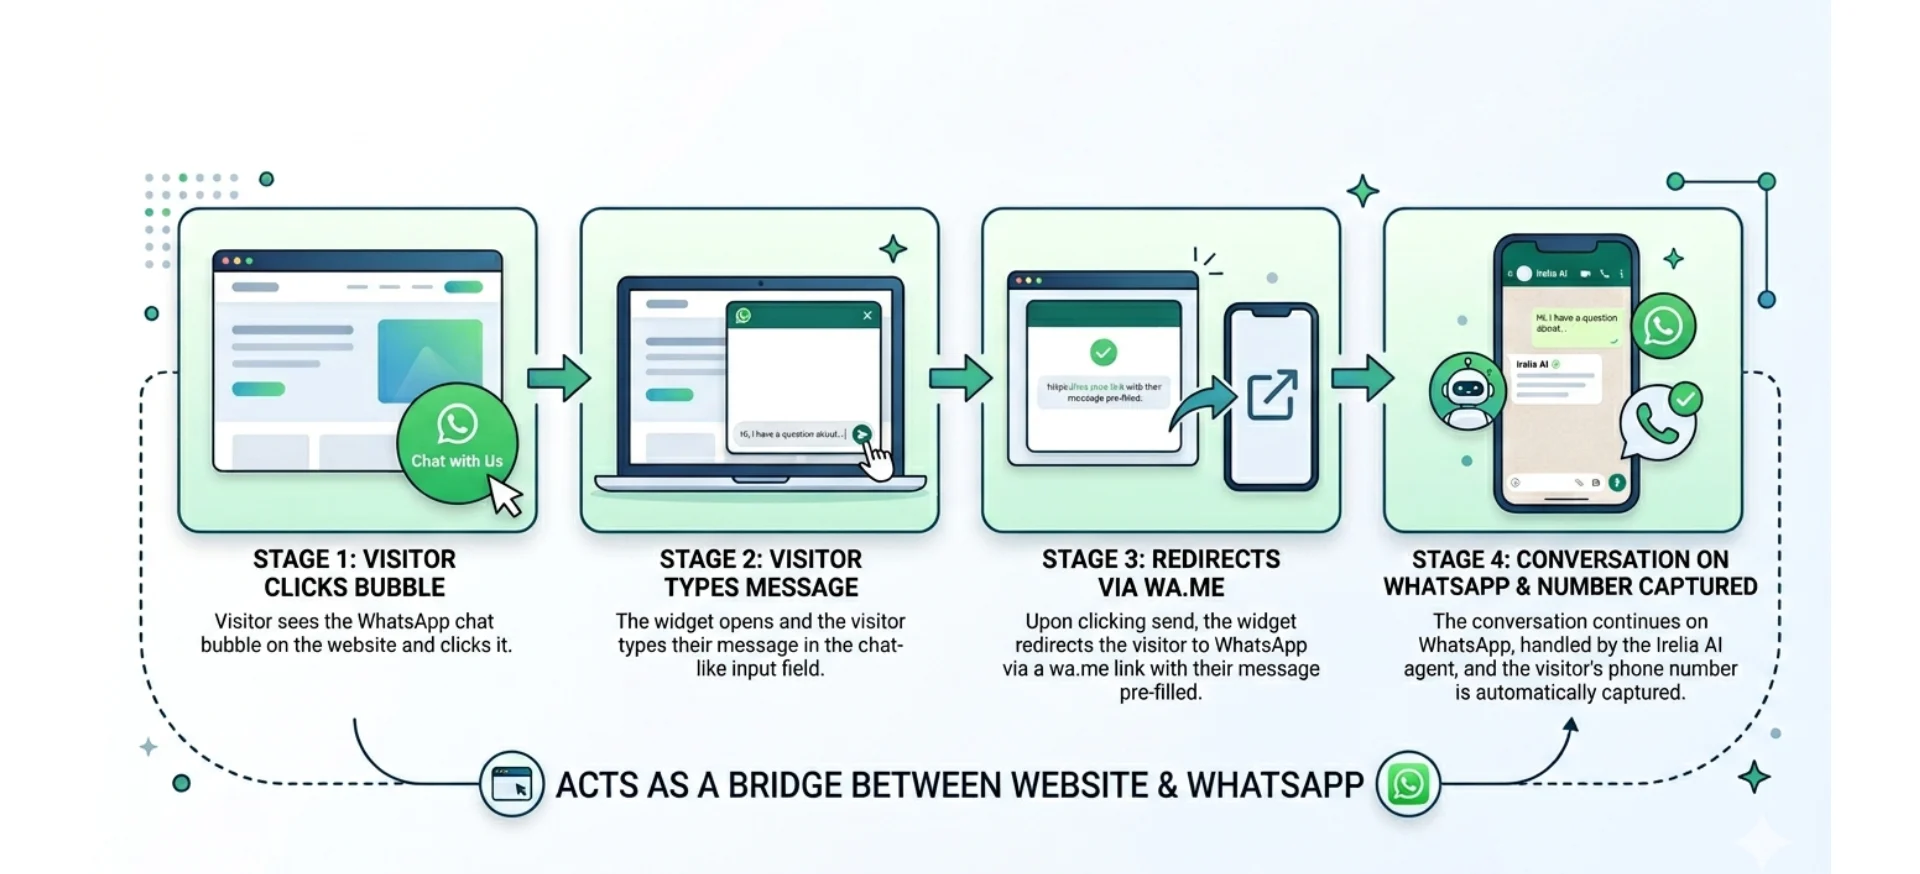
The WhatsApp Widget isn't a traditional webchat — it's a smart bridge between your website and WhatsApp. Here's what the experience looks like from your visitor's perspective:

1. They see a green WhatsApp chat bubble in the bottom-right corner of your site
2. They click it, and a chat-like window pops up with your business name and a welcome message
3. They type their question in the input field — just like they would in any webchat
4. They hit **Send**
   Here's where it gets clever. Instead of starting an on-site chat, the widget redirects the visitor to WhatsApp using a `wa.me` link with their message already pre-filled. WhatsApp opens (the app on mobile, WhatsApp Web on desktop), and the visitor taps send one more time to deliver their message. From that point on, the entire conversation happens on WhatsApp — handled by your Irelia AI agent.
   The key insight: **by sending that first WhatsApp message, the visitor hands you their phone number.** No forms. No email popups. No extra steps. Your sales team gets a real contact to follow up with, and the conversation lives on WhatsApp — where it won't disappear when the visitor closes their browser.

<Info>
  **In short:** The widget *emulates* a webchat on your site for that very first interaction, then seamlessly moves the conversation to WhatsApp. It's the best of both worlds — the familiar feel of a chat bubble with the persistence and contact capture of WhatsApp.
</Info>

<Frame caption="Four-stage flow showing how the widget bridges your website to WhatsApp">
  <img src="https://mintcdn.com/irelia/AUUdMjaLY04qk7ps/images/Guida-webchat-wa/154.png?fit=max&auto=format&n=AUUdMjaLY04qk7ps&q=85&s=e8dee6c6e64c34aa3bbf4af161bccc0a" width="1920" height="874" data-path="images/Guida-webchat-wa/154.png" />
</Frame>

### What You'll Do

Here's a quick roadmap of the setup process:

1. **Open your WhatsApp settings** in Irelia (\~1 minute)
2. **Customize your widget text** — title and welcome message (\~2 minutes)
3. **Copy the widget code** (\~30 seconds)
4. **Add the code to your website** (\~5 minutes)
5. **Verify your default inbound agent** is configured (\~1 minute)

## 📋 What You'll Need

* An Irelia.ai account with WhatsApp already connected — [How to Connect WhatsApp](/Guide-eng/How-to-Connect-WhatsApp-Business-to-Irelia.ai) if you haven't done this yet <Badge color="orange" size="md" shape="pill">Required</Badge>
* At least one active AI agent configured in Irelia <Badge color="orange" size="md" shape="pill">Required</Badge>
* Access to your website's HTML or a plugin that lets you add code (like WPCode for WordPress) <Badge color="orange" size="md" shape="pill">Required</Badge>
  **No coding required.** The widget code is ready-made — you just need to copy and paste it. If you can copy text and paste it somewhere, you can do this.

## ⚖️ WhatsApp Widget vs. Traditional Webchat

Before setting up the widget, it helps to understand how it compares to a traditional webchat — and why the tradeoffs work in your favor for lead generation.

| Feature                                                                                                                                                                                                                                                                            | 💬 Traditional Webchat                    | ✅ WhatsApp Widget                               |
| :--------------------------------------------------------------------------------------------------------------------------------------------------------------------------------------------------------------------------------------------------------------------------------- | :---------------------------------------- | :---------------------------------------------- |
| **Visitor experience on site**                                                                                                                                                                                                                                                     | Chat stays entirely on the page           | Redirects to WhatsApp after the first message   |
| **Contact capture**                                                                                                                                                                                                                                                                | ❌ Anonymous — unless visitor fills a form | ✅ Automatic — you get their WhatsApp number     |
| **Conversation persistence**                                                                                                                                                                                                                                                       | ❌ Lost when the visitor closes the tab    | ✅ Continues on WhatsApp indefinitely            |
| **Sales follow-up**                                                                                                                                                                                                                                                                | ❌ No way to re-contact the visitor        | ✅ Rep can message them directly on WhatsApp     |
| **Mobile notifications**                                                                                                                                                                                                                                                           | ❌ None — visitor must stay on the page    | ✅ WhatsApp push notifications keep them engaged |
| **Smooth on-site chat**                                                                                                                                                                                                                                                            | ✅ Fully embedded, never leaves the page   | ❌ Visitor is redirected away from the site      |
| **Requires WhatsApp**                                                                                                                                                                                                                                                              | ✅ No — works for anyone with a browser    | ❌ Yes — visitor needs WhatsApp installed        |
| **The bottom line:** Traditional webchats keep the experience on your site but leave you with anonymous, disposable conversations. The WhatsApp Widget trades a small redirect for something far more valuable — **a real phone number and a conversation that never disappears.** |                                           |                                                 |
| For most sales and lead generation scenarios, the WhatsApp Widget wins decisively. The slight friction of the redirect is vastly outweighed by your ability to capture contact information and continue conversations long after the visitor leaves your site.                     |                                           |                                                 |

<Tip>
  **When might a traditional webchat be better?** If your audience primarily uses desktop and is unlikely to have WhatsApp (uncommon in most markets), or if you need conversations to stay strictly on-page (e.g., support for logged-in users), a traditional webchat could be a better fit. For lead generation though, the WhatsApp Widget is the stronger choice.
</Tip>

## ⚡ Quick Path (Experienced Users)

Already comfortable with Irelia and adding code to your website? Here's the condensed version:

1. **Irelia:** Go to **"Settings"** → scroll to the **"WhatsApp Widget"** section at the bottom
2. **Customize:** Set your **"Chat Title"** and **"Message text"**
3. **Copy:** Click **"Copy widget code"**
4. **Website:** Paste the code into your site's footer code — directly before `</body>` in HTML, or via your platform's custom code feature (WPCode for WordPress, Custom Code for Wix, Code Injection for Squarespace, etc.)
5. **Inbound agent:** Confirm you have a default agent assigned for inbound WhatsApp conversations — [Set Up Your Default Inbound Agent](/Guide-eng/How-to-Set-Your-Default-Inbound-Agent)
   Need more detail? Continue with the full guide below.

## 🔧 Step-by-Step Setup

<Steps>
  <Step title="Open Your WhatsApp Settings in Irelia" id="step-1-open-settings">
    <Badge color="blue" size="md" shape="pill" icon="clock">\~1 minute</Badge>

    1. Log into your Irelia.ai account
    2. Click the **Settings** icon (gear icon) in the left sidebar
    3. Click the **Whatsapp** tab
    4. Scroll down to the bottom of the Settings page
    5. You'll find the **"WhatsApp Widget"** section

    <Note>
      **Don't see the WhatsApp tab?** It only appears after you've connected your WhatsApp number to Irelia. If it's missing, [connect WhatsApp first](/Guide-eng/How-to-Connect-WhatsApp-Business-to-Irelia.ai) and then come back to this guide.
    </Note>

    You'll see the widget configuration panel: two text fields on the left and a live preview of your widget on the right.

    <Frame caption="The WhatsApp Widget configuration panel with live preview">
      <img src="https://mintcdn.com/irelia/AUUdMjaLY04qk7ps/images/Guida-webchat-wa/147.png?fit=max&auto=format&n=AUUdMjaLY04qk7ps&q=85&s=51ff47df0b3e5a6035ff184ab235f534" width="1920" height="874" data-path="images/Guida-webchat-wa/147.png" />
    </Frame>
  </Step>

  <Step title="Customize Your Widget Text" id="step-2-customize-text">
    <Badge color="blue" size="md" shape="pill" icon="clock">\~2 minutes</Badge>
    The widget has two text fields you can customize. These shape the first impression visitors get when they interact with the chat bubble on your site.

    1. Set your **"Chat Title"** — this appears in the widget's green header bar. Use your business name or something friendly and recognizable.
       Good examples:

    * Your business name (e.g., `Acme Solutions`)
    * A department name (e.g., `Sales Team`)
    * Something inviting (e.g., `Ask Us Anything`)

    2. Set your **"Message text"** — this appears as a chat bubble inside the widget, simulating a welcome message from your business. It's the first thing visitors read, so make it conversational and action-oriented.
       Good examples:

    * `How can I help you?`
    * `Hi! Ask me anything about our services.`
    * `Looking for something specific? Type your question below.`
      The live preview on the right side of the screen updates as you type, so you can see exactly how your widget will look before adding it to your site.

    <Tip>
      **Set the right tone.** Remember — this welcome message kicks off a WhatsApp conversation. Keep it warm and conversational, like you're greeting someone who just walked into your store. Skip the corporate jargon.
    </Tip>
  </Step>

  <Step title="Copy the Widget Code" id="step-3-copy-code">
    <Badge color="blue" size="md" shape="pill" icon="clock">\~30 seconds</Badge>

    1. Once you're happy with your title and message, click the **"Copy widget code"** button below the text fields
    2. A green confirmation banner will appear at the bottom of the screen: **"Code copied! You can now paste it into your website as HTML code"**

    <Frame caption="Green confirmation banner appears after copying the widget code">
      <img src="https://mintcdn.com/irelia/AUUdMjaLY04qk7ps/images/Guida-webchat-wa/148.png?fit=max&auto=format&n=AUUdMjaLY04qk7ps&q=85&s=a7c5a1a3718f0ac2f8afeeded4acdee5" width="1920" height="874" data-path="images/Guida-webchat-wa/148.png" />
    </Frame>

    The widget code is now in your clipboard — ready to paste into your website.

    <Tip>
      **What's in the code?** The widget is built with pure HTML, CSS, and JavaScript. No external dependencies, no heavy libraries. It's lightweight, fast, and won't slow down your site.
    </Tip>

    <Note>
      **Want a fully custom design?** Because the widget is standard HTML, CSS, and JS, a developer can modify every aspect of its appearance — colors, fonts, size, position, animations, button shape, everything. The code you copy from Irelia is your starting point. With some development help, you can make it look however you want.
    </Note>
  </Step>

  <Step title="Add the Widget to Your Website" id="step-4-add-to-website">
    <Badge color="blue" size="md" shape="pill" icon="clock">\~5 minutes</Badge>
    Now paste the copied code into your website. The core principle is the same regardless of your platform: **the widget code needs to load on every page of your site, placed just before the closing `</body>` tag** (or in the "footer" code area — which is the same thing).
    How you do this depends on your website platform. Find yours below.

    <Tabs>
      <Tab title="Direct HTML">
        If you or your developer have direct access to your website's HTML files:

        1. Open your website's HTML file (or template/layout file) in a code editor
        2. Find the closing `</body>` tag — it's usually at the very end of the file
        3. Paste the widget code **directly before** the `</body>` tag
        4. Save the file and refresh your website
        5. You should see the green WhatsApp bubble appear in the bottom-right corner

        <Tip>
          **Using a templating system?** Most websites use a shared layout or template file that wraps every page. Paste the widget code there so it appears site-wide. If you're unsure which file that is, ask your developer — they'll know exactly where to put it.
        </Tip>
      </Tab>

      <Tab title="WordPress">
        If your site runs on WordPress, the free **WPCode** plugin is the easiest approach — no theme file editing required:

        1. In your WordPress dashboard, go to **"Plugins"** → **"Add New"**
        2. Search for `WPCode` and install the **"WPCode — Insert Headers and Footers + Custom Code Snippets"** plugin
        3. Click **"Activate"**
        4. In the left sidebar, go to **"Code Snippets"** → **"+ Add Snippet"**
        5. Hover over **"Add Your Custom Code (New Snippet)"** and click the **"Use Snippet"** button

        <Frame caption="WPCode's Add Snippet screen with the Use Snippet button">
          <img src="https://mintcdn.com/irelia/AUUdMjaLY04qk7ps/images/Guida-webchat-wa/149.png?fit=max&auto=format&n=AUUdMjaLY04qk7ps&q=85&s=24fbd6cfcec3bec52206f1e679767f28" width="1920" height="874" data-path="images/Guida-webchat-wa/149.png" />
        </Frame>

        6. Give your snippet a descriptive name (e.g., `Irelia WhatsApp Widget`)
        7. In the **"Code Type"** dropdown, select **"HTML Snippet"**
        8. Paste your widget code into the code editor area

        <Frame caption="WPCode snippet editor with code pasted and Code Type set to HTML Snippet">
          <img src="https://mintcdn.com/irelia/AUUdMjaLY04qk7ps/images/Guida-webchat-wa/150.png?fit=max&auto=format&n=AUUdMjaLY04qk7ps&q=85&s=c734f8c56a77748c53a7666f22863dcf" width="1920" height="874" data-path="images/Guida-webchat-wa/150.png" />
        </Frame>

        9. Scroll down to the **"Insertion"** section and set it to **"Site Wide Footer"**
        10. Toggle the snippet to **"Active"**
        11. Click the **"Save Snippet"** button

        <Frame caption="WPCode insertion settings with Site Wide Footer selected and the snippet active">
          <img src="https://mintcdn.com/irelia/AUUdMjaLY04qk7ps/images/Guida-webchat-wa/151.png?fit=max&auto=format&n=AUUdMjaLY04qk7ps&q=85&s=befb2231f2fddbd722b0bf4db4ef4dad" width="1920" height="874" data-path="images/Guida-webchat-wa/151.png" />
        </Frame>

        <Warning>
          **Important:** Make sure you select **"HTML Snippet"** as the code type — not "JavaScript" or "PHP." The widget code includes HTML, CSS, and JavaScript together, and the HTML Snippet option handles all three correctly.
        </Warning>
      </Tab>

      <Tab title="Wix">
        If your site is built on Wix, you can add the widget through Wix's Custom Code feature:

        1. Go to your **Wix Dashboard**
        2. In the left sidebar, click **"Settings"**
        3. Scroll down to the **"Advanced"** section and click **"Custom Code"**
        4. Click the **"+ Add Custom Code"** button
        5. Paste your widget code into the code box
        6. Give it a name (e.g., `Irelia WhatsApp Widget`)
        7. Under **"Add Code to Pages"**, select **"All pages"**
        8. Under **"Place Code in"**, select **"Body - end"**

        <Frame caption="Wix Add Custom Code modal configured for site-wide footer placement">
          <img src="https://mintcdn.com/irelia/AUUdMjaLY04qk7ps/images/Guida-webchat-wa/152.png?fit=max&auto=format&n=AUUdMjaLY04qk7ps&q=85&s=550d14660a61afc27610b1e19cb56284" width="1920" height="874" data-path="images/Guida-webchat-wa/152.png" />
        </Frame>

        9. Click **"Apply"**

        <Note>
          If you don't see the **"Custom Code"** option in your Wix settings, you may need a Wix Premium plan. Free Wix plans have limited access to custom code injection.
        </Note>
      </Tab>

      <Tab title="Other platforms">
        Every modern website platform has a way to inject custom code into the footer. Look for one of these in your platform's settings:

        * **Squarespace:** **"Settings"** → **"Advanced"** → **"Code Injection"** → paste in the **"Footer"** field
        * **Shopify:** **"Online Store"** → **"Themes"** → **"Edit Code"** → open `theme.liquid` → paste before `</body>`
        * **Webflow:** **"Project Settings"** → **"Custom Code"** → paste in the **"Footer Code"** field

        <Tip>
          **General rule for any platform:** Look for settings labeled "Custom Code," "Code Injection," "Header & Footer Scripts," or "Tracking Code." Choose the **footer** placement option and paste your widget code there. If you're unsure, your platform's help docs will have a guide on adding custom HTML — or ask your developer.
        </Tip>
      </Tab>
    </Tabs>

    #### Verify the widget is live

    After saving on any platform, open your website in a new browser tab (or an incognito/private window to bypass cache). You should see the green WhatsApp bubble in the bottom-right corner of every page.

    <Check>
      Your widget is now live on your website!
    </Check>
  </Step>

  <Step title="Verify Your Default Inbound Agent" id="step-5-verify-agent">
    <Badge color="blue" size="md" shape="pill" icon="clock">\~1 minute</Badge>
    There's one more crucial piece to make everything work end-to-end.
    When a visitor uses your WhatsApp Widget, **they're the ones starting the conversation** — they write the first message. In messaging terms, this is called an **inbound conversation** (the message comes *in* to you, initiated by the visitor).
    For your AI agent to automatically respond to these incoming messages, Irelia needs to know *which* agent should handle them. This is configured through the "Manage inbound conversations with this agent" section in the **trigger** tab of an agent.
    **Here's what to do:** Follow our [Setting Up Your Default Inbound Agent](/Guide-eng/How-to-Set-Your-Default-Inbound-Agent) guide to assign the right agent. It takes about a minute.

    <Warning>
      **Important:** Without a default inbound agent configured, your widget will work perfectly — visitors will be redirected to WhatsApp and their message will be sent — but **no AI agent will respond.** The conversation will sit unanswered until someone on your team manually replies. Don't skip this step.
    </Warning>
  </Step>
</Steps>

***

**🎉 You're all set!**
Your WhatsApp Widget is live and your AI agent is ready to handle conversations. Here's what happens now:
✅ A visitor lands on your site and sees a familiar chat bubble<br />
✅ They type a question and click send<br />
✅ They're seamlessly redirected to WhatsApp with their message pre-filled<br />
✅ Your AI agent responds instantly — answering questions, qualifying leads, collecting information<br />
✅ Your sales team gets a real WhatsApp number for every conversation — ready for follow-up
**Every single conversation gives you a contact.** No more anonymous visitors slipping away.

### What's Next?

Now that your widget is live, here are some ways to get even more value from it:

1. 🧪 **Test the full experience yourself** — Open your website in an incognito window, click the widget, type a question, and walk through the entire flow as a visitor would. Confirm your AI agent responds correctly on WhatsApp.
2. 🎨 **Customize the design** — Work with a developer to match the widget's colors, fonts, and positioning to your brand. Since it's pure HTML, CSS, and JS, everything is customizable.
3. 📲 **Connect more entry points** — The website widget is just one way prospects can reach your AI agent. Set up additional inbound channels (like Facebook Messenger) and outbound conversations (where your agent reaches out first) to engage leads across multiple touchpoints. See our [Entry Points & Conversation Channels guide](/Guide-eng/How-to-Start-Conversations-with-Irelia).
4. 📊 **Monitor your conversations** — Check your Irelia chat panel to see how visitors engage and how your AI agent performs. Look for patterns in the questions people ask — they're gold for improving your agent.
5. 🔗 **Push leads to your CRM automatically** — Use Irelia's webhook events to send every new WhatsApp lead straight to your CRM, spreadsheets, or team chat. See our [Zapier Integration Guide](/Guide-eng/How-to-Connect-Irelia.ai-to-Zapier) or [Make.com Integration Guide](/Guide-eng/How-to-Connect-Irelia.ai-to-Make.com-Using-Webhooks) to set this up.

## ✅ Quick Checklist

Use this to verify your setup is complete:

<AccordionGroup>
  <Accordion title="Setup" icon="list-check" defaultOpen={true}>
    * WhatsApp connected to Irelia
    * **"Chat Title"** customized with your business name or label
    * **"Message text"** set to a clear, inviting welcome message
    * Widget code copied from Irelia
    * Code pasted into your website (before `</body>` tag or via WPCode)
    * Default inbound agent configured in Irelia
  </Accordion>

  <Accordion title="Verification" icon="circle-check">
    * Green WhatsApp bubble appears on your website (bottom-right corner)
    * Clicking the bubble opens the chat window with your title and message
    * Typing a message and hitting send redirects to WhatsApp
    * Your message appears pre-filled in the WhatsApp chat
    * AI agent responds after you send the message on WhatsApp
  </Accordion>
</AccordionGroup>

✅ **All checked? You're good to go!**

## 🛠️ Troubleshooting & FAQs

<AccordionGroup>
  <Accordion title={`❌ Issue 1: "I don't see the WhatsApp Widget section in Settings"`} description={`Your WhatsApp number isn't connected to Irelia yet — the widget section only appears after connection`}>
    **How to fix it:**
    **Step 1: Connect WhatsApp first**

    * Follow our [How to Connect WhatsApp](/Guide-eng/How-to-Connect-WhatsApp-Business-to-Irelia.ai) guide to link your WhatsApp Business number to Irelia
    * Once connected, return to **"Settings"** and scroll to the bottom — the **"WhatsApp Widget"** section will appear
  </Accordion>

  <Accordion title={`❌ Issue 2: "The widget doesn't appear on my website"`} description={`The widget code isn't loading properly on your site`}>
    **How to fix it:**
    **Step 1: Check code placement**

    * Verify the code is placed inside the `<body>` section of your HTML (ideally just before `</body>`)
    * If using WPCode, confirm the snippet is set to **"Active"** and the insertion method is **"Site Wide Footer"**
      **Step 2: Clear your cache**
    * Clear your browser cache, or open the site in an incognito/private window
    * If your site uses a caching plugin (like WP Super Cache or W3 Total Cache), clear the site-level cache as well
      **Step 3: Check for JavaScript errors**
    * Right-click anywhere on your page → click **"Inspect"** → go to the **"Console"** tab
    * Look for red error messages — if you see any related to the widget, share them with your developer
  </Accordion>

  <Accordion title={`❌ Issue 3: "Clicking send doesn't open WhatsApp"`} description="The redirect to WhatsApp is being blocked, usually by a popup blocker or browser extension">
    **How to fix it:**
    **Step 1: Check popup and ad blockers**

    * Temporarily disable any ad blocker or popup blocker extensions in your browser
    * Try the widget again
      **Step 2: Test in a different browser**
    * Open your site in a different browser (e.g., Chrome, Firefox, Safari) to rule out browser-specific issues
      **Step 3: Verify your WhatsApp connection**
    * Go to Irelia **"Settings"** and confirm your WhatsApp number is properly connected and active
  </Accordion>

  <Accordion title={`❌ Issue 4: "The widget works, but the AI doesn't respond on WhatsApp"`} description={`The visitor's message reaches WhatsApp successfully, but no AI agent replies`}>
    **Possible causes:**

    * No default inbound agent is configured, so Irelia doesn't know which AI agent should respond
    * Your Irelia account has run out of credits, so the AI agent can't process new conversations
      **How to fix it:**
      **Step 1: Check your default inbound agent**
    * Follow the [Setting Up Your Default Inbound Agent](/Guide-eng/How-to-Set-Your-Default-Inbound-Agent) guide
    * Make sure the correct agent is selected for inbound WhatsApp conversations
      **Step 2: Check your credit balance**
    * In Irelia, look at your credit balance in the **"Subscription"** section under **"Settings"**
    * If your credits are depleted, the AI agent won't respond to new conversations even though everything else is configured correctly
    * Activate your subscription or anticipate the renewal to restore automatic responses
      **Step 3: Verify the agent is configured for inbound conversations**
    * Open your agent's configuration in Irelia and confirm one of the agents are configured as default for inbound conversations
  </Accordion>

  <Accordion title="Can I have different widgets on different pages?">
    Yes. Since the widget is standard HTML code, you can customize and paste different versions on different pages. Either generate a new code from Irelia each time you change the text, or directly edit the title and message values in the copied HTML code itself.
  </Accordion>

  <Accordion title={`Can I change the widget's colors, position, or design?`}>
    Absolutely. The widget code is pure HTML, CSS, and JavaScript — completely customizable. A developer can modify the colors, size, position, fonts, animations, and any other visual aspect. The code from Irelia is your starting point — from there, the design is entirely in your hands.
  </Accordion>

  <Accordion title="Does the widget work on mobile devices?">
    Yes. On mobile, clicking send opens the WhatsApp app directly (if installed). On desktop, it opens WhatsApp Web in the browser or the WhatsApp desktop app if installed. The experience is smooth on both.
  </Accordion>
</AccordionGroup>

<div id="need-help" />

<Card title="🆘 Need Help?" icon="life-ring">
  **Irelia.ai Support:**

  * Contact support in the WhatsApp priority support group or send an email to [info@irelia.ai](mailto:info@irelia.ai)
  * Include: screenshots of your widget configuration, the issue you're experiencing, and what you expected vs. what happened
</Card>
