> ## Documentation Index
> Fetch the complete documentation index at: https://docs.irelia.ai/llms.txt
> Use this file to discover all available pages before exploring further.
# How to Use Irelia Forms to Capture Leads and Start WhatsApp Conversations
> Create a branded landing page with a contact form that automatically sends your WhatsApp template to anyone who submits it — no API, no automations, no coding required.
\~10 minutes setup
***
Prerequisites before starting
Condensed steps for experienced users
Complete walkthrough (Steps 1–4)
Verify everything is working
Common issues, answers, and fixes
***
### Introduction
You've built your AI agent, written the perfect WhatsApp template, and it just got approved. Now you want to start sending it to real prospects. But how do you actually get their phone numbers and trigger that first outbound message?
If you already have traffic flowing from landing pages, email campaigns, Google Ads, or your website — and you're not ready to dive into the Irelia API or configure third-party automation tools — **Irelia Forms is the fastest way to go from "template approved" to "prospects receiving WhatsApp messages."** In about ten minutes, not hours.
Irelia Forms lets you create a simple, customizable landing page with a contact form. When a prospect fills in their name and phone number, Irelia automatically sends your WhatsApp template message to them — the first outbound message that kicks off a conversation handled entirely by your AI agent. No webhooks, no Zapier, no Make.com, no code.
Irelia Forms is ideal when your traffic comes from web-based sources like landing pages, email marketing, Google Ads, QR codes, or website CTAs. If you're running **Meta ad campaigns** (Facebook or Instagram), the fastest approach is Irelia's native integration with Meta Instant Forms — which captures leads directly from your ads and triggers WhatsApp messages without needing a landing page at all. [Learn how to set up Meta Instant Forms here](/Guide-eng/Connect-Meta-Instant-Forms).
**By the end of this guide, you'll have:**
✅ A live landing page with a contact form connected to your WhatsApp template
✅ Full control over the form's look and feel — headlines, colors, images, and fonts
✅ A shareable URL you can start driving traffic to immediately
✅ The option to embed the form on your own website if you prefer
### How This Works
Think of Irelia Forms as a one-click bridge between your web traffic and WhatsApp.
Here's the flow a prospect experiences:
1. They click a link in your email, ad, website, or social post — and land on your Irelia Form page (or your website with the embedded form)
2. They type in their name and phone number and hit submit
3. Irelia instantly sends them your connected WhatsApp template — the first outbound message
4. Your AI agent picks up the conversation from there, automatically qualifying and assisting the prospect
The key concept: **each Irelia Form is linked to exactly one WhatsApp template** — a one-to-one relationship. The form doesn't exist on its own; it lives inside a specific template's configuration. When someone submits the form, *that* template is what gets sent.
This means if you want different forms for different offers or campaigns, you'll create separate WhatsApp templates, each with its own Irelia Form.
**Template placeholder limit:** Irelia Forms supports templates with **no placeholders or a single `X` placeholder**. If your template includes a `X` placeholder, it will be automatically filled with the **name** the prospect enters in the form. Templates with multiple placeholders (e.g., `X` and `X`) are not supported through Irelia Forms — use the [API or an automation integration](/Guide-eng/How-to-Start-Conversations-with-Irelia) for those.
**Multiple sending methods can coexist.** Enabling Irelia Forms doesn't disable other methods. You can have Irelia Forms active for your landing page traffic while also using API automations or Meta Instant Forms for other channels — all triggering the same template.
### What You'll Do
1. **Select Irelia Forms** for your approved WhatsApp template (\~2 minutes)
2. **Customize your form's** content and style (\~5 minutes)
3. **Save and publish** your form (\~1 minute)
4. **Share your form URL** or embed it on your website (\~2 minutes)
## 📋 What You'll Need
* An Irelia.ai account with at least one active AI agent Required
* An approved WhatsApp template **with at most one placeholder** (`X`) — [learn how to create one here](/Guide-eng/How-to-Create-a-WhatsApp-Template-in-Irelia) if you don't have one yet Required
* Sufficient Irelia credits to send outbound messages (each form submission consumes a credit) Required
* Your landing page copy ready (headline, sub-headline, button text) Required
* A logo or image to display on the form Optional
* Access to your website's code (only if you want to embed the form on your own site) Optional
**No coding required for the basic setup.** If you can type into text fields and click a save button, you can do this. Embedding on your website involves pasting one code snippet — and we'll walk you through that too.
## ⚡ Quick Path (Experienced Users)
Already comfortable with Irelia? Here's the condensed version:
1. **Open your approved template** → In the **"Set up the sending of the WhatsApp template"** popup, click the **"Irelia Forms"** card under **"Configure form"**
2. **Create the form** → Click the **"Create your Irelia form"** button → A new tab opens with the form editor
3. **Customize** → Fill in the **"Content"** tab (headline, sub-headline, image, button text, footer, thank-you page copy) → Switch to the **"Style"** tab (background color, button color, typography, font)
4. **Save** → Click **"Save and update content"** and/or **"Save and update style"**
5. **Distribute** → Copy the form URL directly from the editor tab, *or* go back to the template popup and click **"Copy Irelia Form URL"** or **"Copy the code to insert on your website"**
6. **Finalize** → Click **"I completed the configuration"** in the template popup
Need more detail? Continue with the full guide below.
## 🔧 Step-by-Step Setup
\~2 minutes
Before you can create an Irelia Form, you need an approved WhatsApp template. If you haven't created one yet, follow our [guide to creating a WhatsApp template](/Guide-eng/How-to-Create-a-WhatsApp-Template-in-Irelia) first.
1. In your Irelia dashboard, navigate to your WhatsApp templates
2. Click on the approved template you want to connect to a form
3. The **"Set up the sending of the WhatsApp template"** popup will appear
You'll see your template details on the left side — template name, approval status, message preview, and the associated AI agent. On the right side, you'll find the available sending methods.
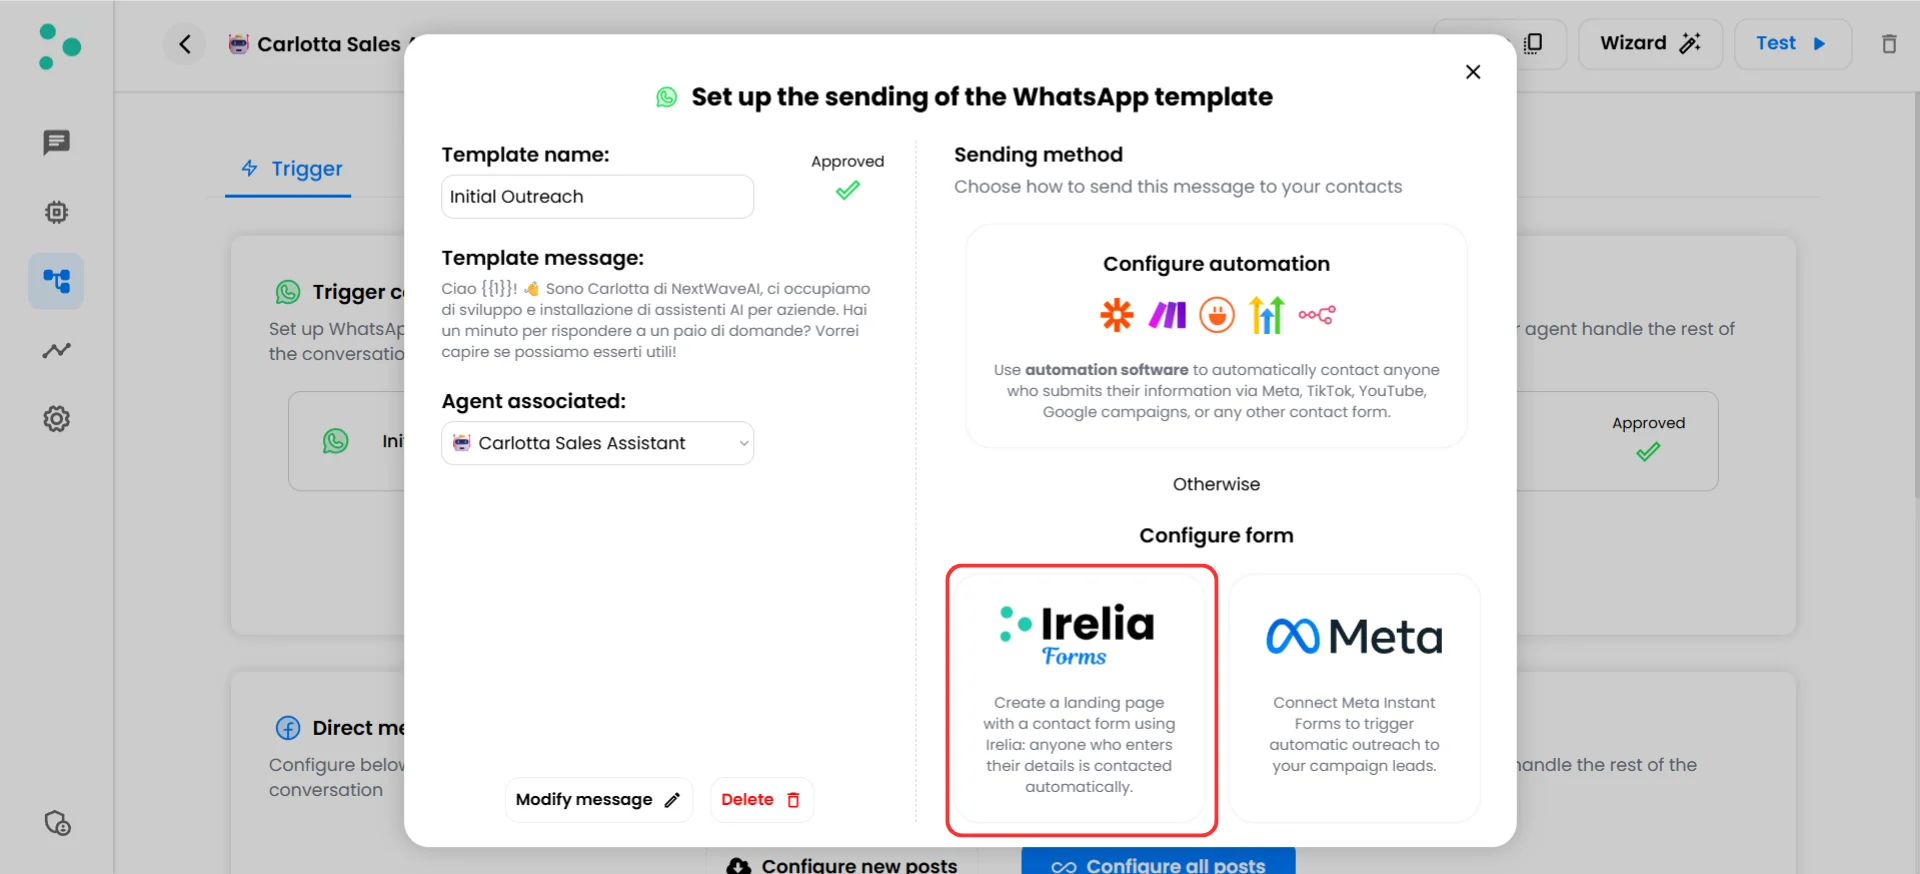 4. Scroll down to the **"Configure form"** section
5. Click the **"Irelia Forms"** card
The popup will update to show the **"Configure the landing page"** screen.
4. Scroll down to the **"Configure form"** section
5. Click the **"Irelia Forms"** card
The popup will update to show the **"Configure the landing page"** screen.
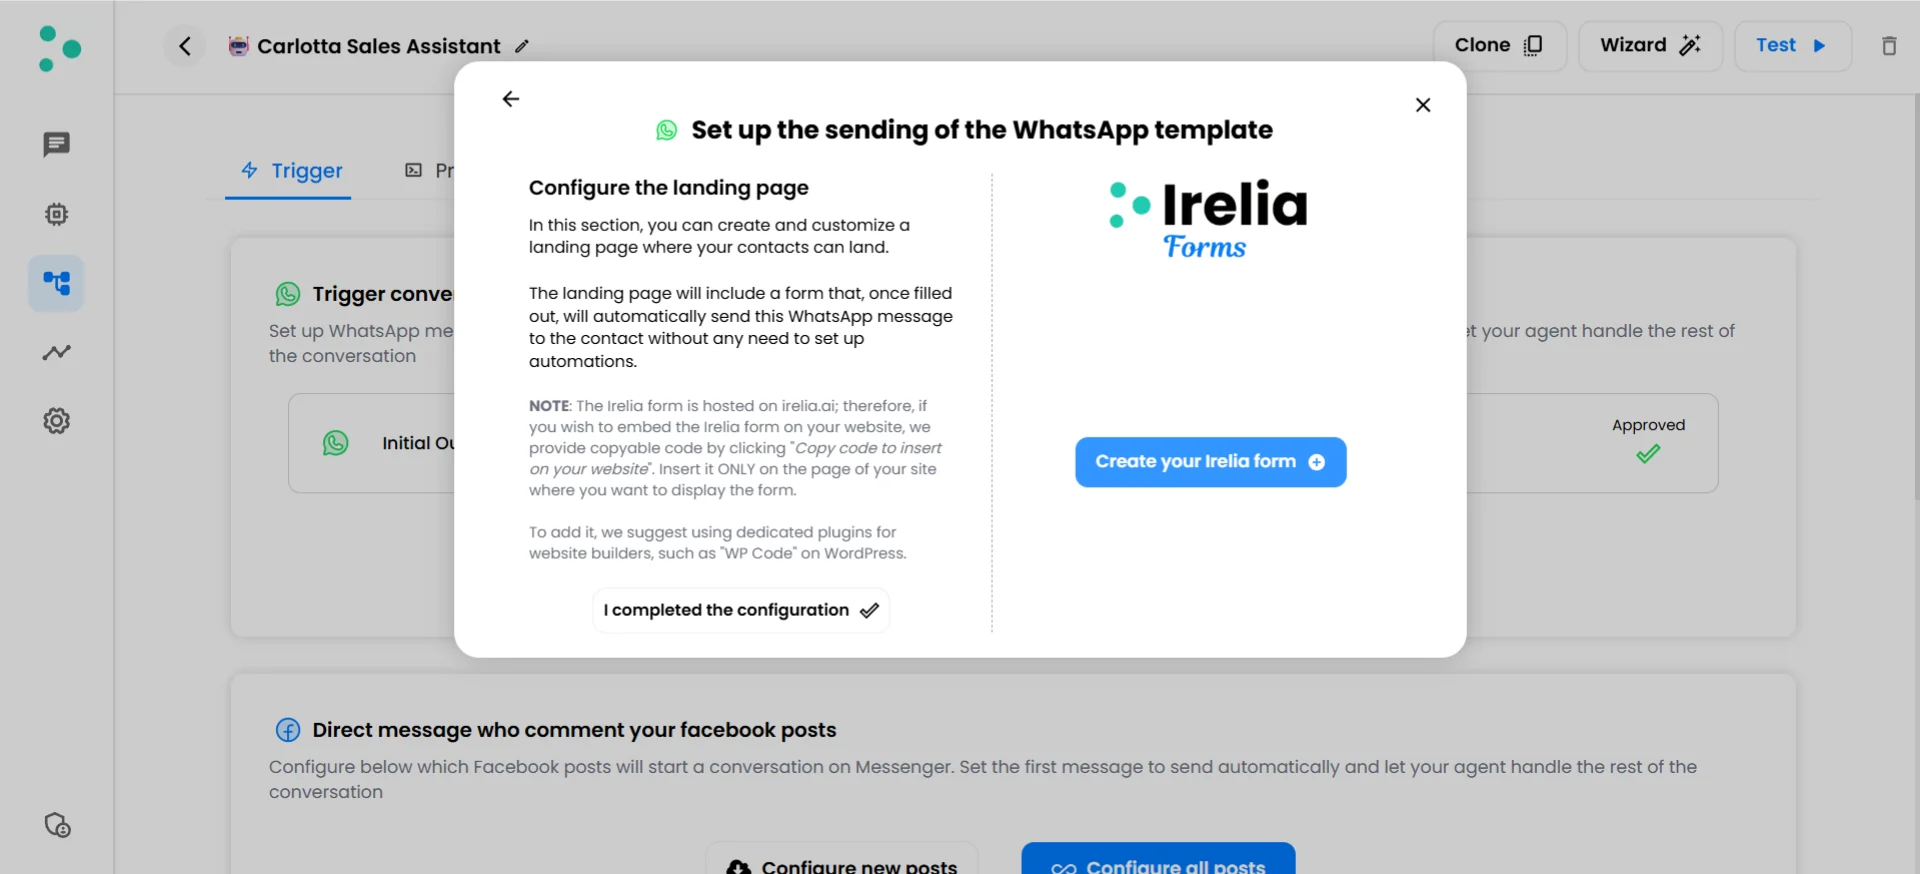 6. Click the blue **"Create your Irelia form"** button
A new browser tab will open with the Irelia Forms editor — this is where you'll customize your form.
\~5 minutes
The form editor opens in a new tab. You'll see a **live preview** of your form on the right side, and a **settings sidebar** on the left with two tabs: **"Content"** and **"Style"**.
6. Click the blue **"Create your Irelia form"** button
A new browser tab will open with the Irelia Forms editor — this is where you'll customize your form.
\~5 minutes
The form editor opens in a new tab. You'll see a **live preview** of your form on the right side, and a **settings sidebar** on the left with two tabs: **"Content"** and **"Style"**.
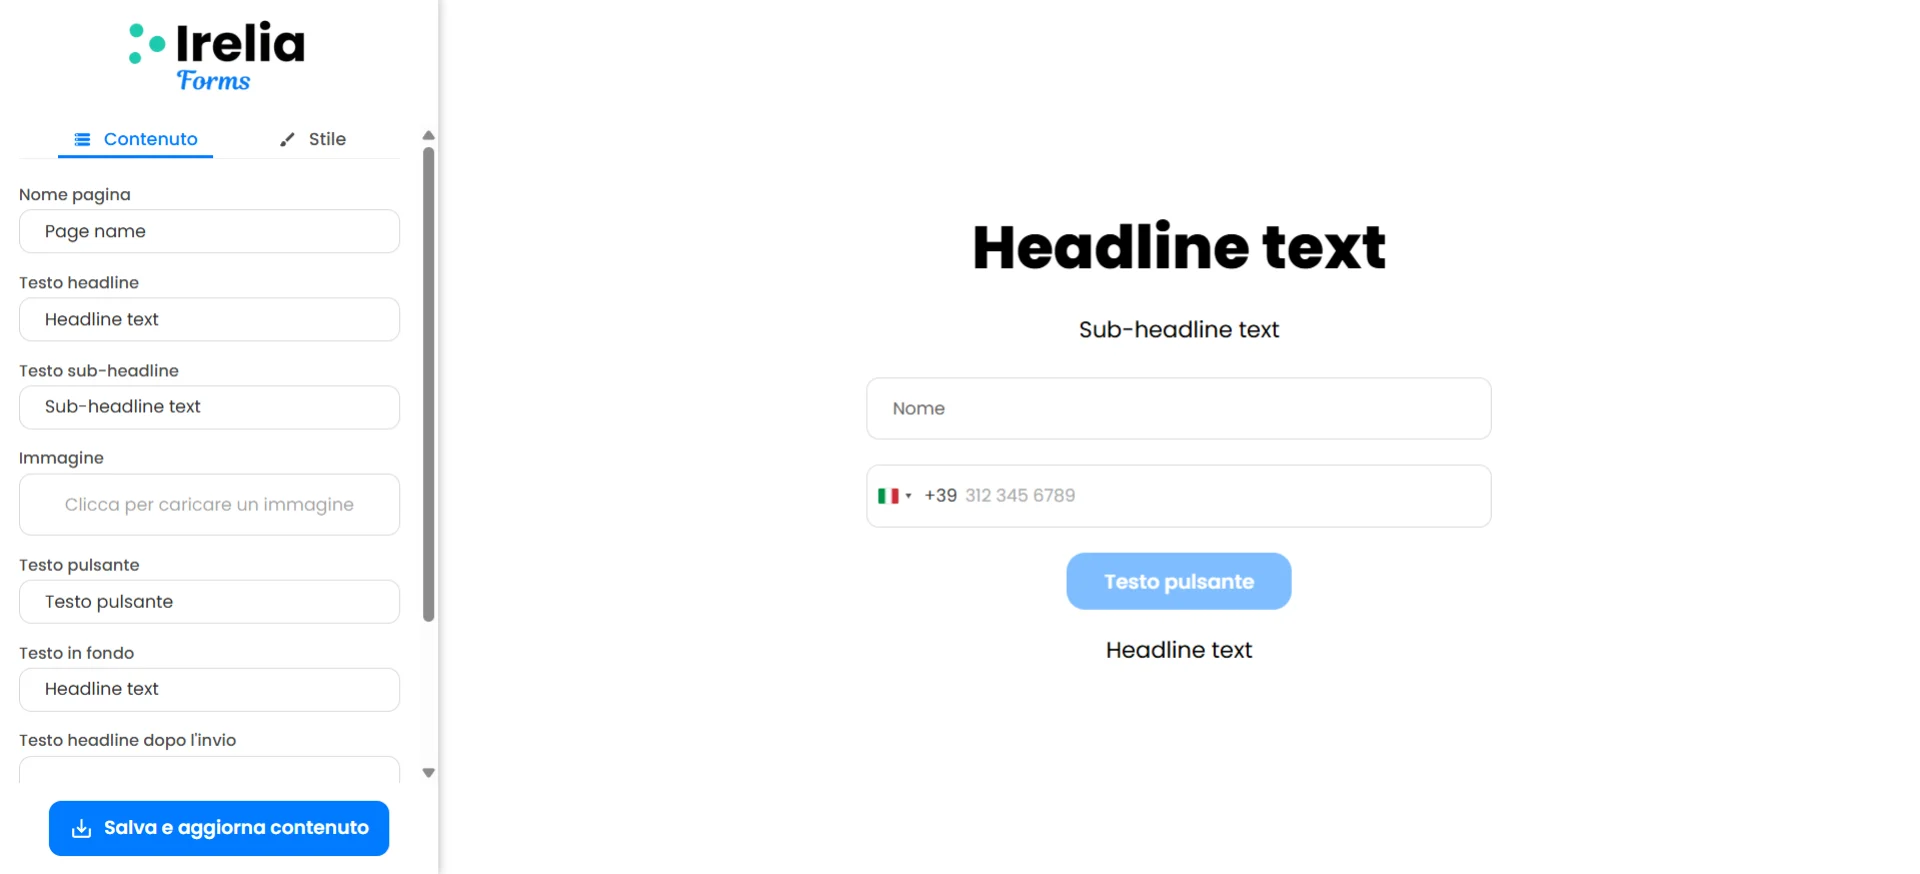 Every change you make in the sidebar updates the preview in real time, so you'll always see exactly what your prospects will see.
The editing sidebar is only visible when you're logged into the Irelia account that owns this form. Anyone else visiting the page URL — like your prospects — will see only the clean landing page with the form.
#### Customize the content
The **"Content"** tab controls all the text and media on your form. Here's what each field does:
| Field | What It Controls | Tips |
| :-------------------------------- | :---------------------------------------------------- | :--------------------------------------------------------------------- |
| **"Page name"** | Internal name for this form (for your reference only) | Use something descriptive, like "Summer Promo Lead Form" |
| **"Headline text"** | The large, bold headline at the top of the page | Keep it clear and benefit-focused (e.g., "Get Your Free Consultation") |
| **"Sub-headline text"** | Smaller supporting text below the headline | Add context or reinforce your value proposition |
| **"Image"** | An optional image displayed on the form | Upload your logo, a product photo, or a campaign visual |
| **"Button text"** | The text on the submit button | Use action-oriented language (e.g., "Get Started", "Claim My Spot") |
| **"Footer text"** | Text displayed below the form | Set expectations about the WhatsApp message they're about to receive |
| **"Thank-you page headline"** | Headline shown after successful submission | Confirm the action and tell them what's coming |
| **"Thank-you page sub-headline"** | Supporting text on the thank-you page | Reinforce that they'll be contacted on WhatsApp shortly |
**The footer text is your secret weapon.** Use it to create anticipation and reduce friction. Something like: *"Once you submit this form, you'll receive a WhatsApp message from our AI assistant to help you find the perfect solution."* This sets clear expectations so prospects aren't surprised when the message arrives — and they're more likely to respond.
**Don't overlook the thank-you page.** After submitting, the prospect sees this confirmation screen. Use it to bridge the gap between form and WhatsApp — something like: *"Check your WhatsApp! We just sent you a message to get started."* The clearer the instruction, the higher your response rate.
#### Customize the style
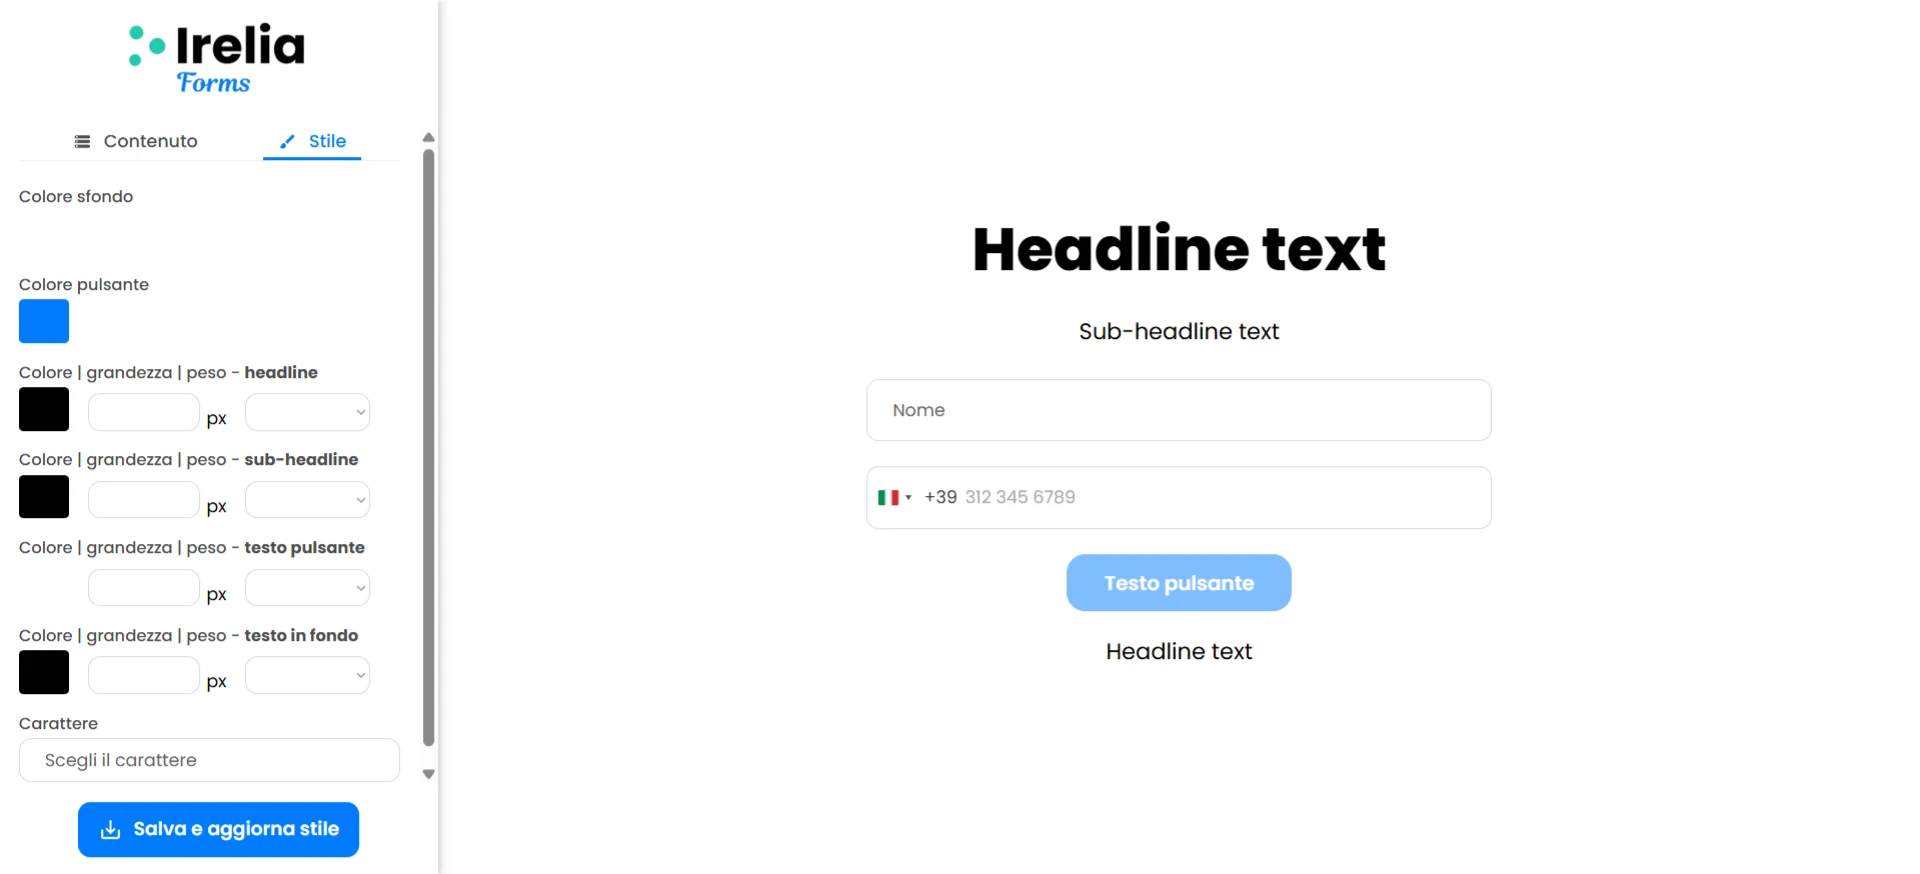
Click the **"Style"** tab at the top of the sidebar to control the visual appearance of your form:
| Setting | What It Controls |
| :-------------------------------------------- | :------------------------------------------ |
| **"Background color"** | The full-page background color |
| **"Button color"** | The fill color of the submit button |
| **"Headline"** — color, size (px), weight | Typography for the main headline |
| **"Sub-headline"** — color, size (px), weight | Typography for the supporting text |
| **"Button text"** — color, size (px), weight | Typography for the button label |
| **"Footer text"** — color, size (px), weight | Typography for the footer text |
| **"Font"** | The font family used across the entire form |
Every change you make in the sidebar updates the preview in real time, so you'll always see exactly what your prospects will see.
The editing sidebar is only visible when you're logged into the Irelia account that owns this form. Anyone else visiting the page URL — like your prospects — will see only the clean landing page with the form.
#### Customize the content
The **"Content"** tab controls all the text and media on your form. Here's what each field does:
| Field | What It Controls | Tips |
| :-------------------------------- | :---------------------------------------------------- | :--------------------------------------------------------------------- |
| **"Page name"** | Internal name for this form (for your reference only) | Use something descriptive, like "Summer Promo Lead Form" |
| **"Headline text"** | The large, bold headline at the top of the page | Keep it clear and benefit-focused (e.g., "Get Your Free Consultation") |
| **"Sub-headline text"** | Smaller supporting text below the headline | Add context or reinforce your value proposition |
| **"Image"** | An optional image displayed on the form | Upload your logo, a product photo, or a campaign visual |
| **"Button text"** | The text on the submit button | Use action-oriented language (e.g., "Get Started", "Claim My Spot") |
| **"Footer text"** | Text displayed below the form | Set expectations about the WhatsApp message they're about to receive |
| **"Thank-you page headline"** | Headline shown after successful submission | Confirm the action and tell them what's coming |
| **"Thank-you page sub-headline"** | Supporting text on the thank-you page | Reinforce that they'll be contacted on WhatsApp shortly |
**The footer text is your secret weapon.** Use it to create anticipation and reduce friction. Something like: *"Once you submit this form, you'll receive a WhatsApp message from our AI assistant to help you find the perfect solution."* This sets clear expectations so prospects aren't surprised when the message arrives — and they're more likely to respond.
**Don't overlook the thank-you page.** After submitting, the prospect sees this confirmation screen. Use it to bridge the gap between form and WhatsApp — something like: *"Check your WhatsApp! We just sent you a message to get started."* The clearer the instruction, the higher your response rate.
#### Customize the style
Click the **"Style"** tab at the top of the sidebar to control the visual appearance of your form:
| Setting | What It Controls |
| :-------------------------------------------- | :------------------------------------------ |
| **"Background color"** | The full-page background color |
| **"Button color"** | The fill color of the submit button |
| **"Headline"** — color, size (px), weight | Typography for the main headline |
| **"Sub-headline"** — color, size (px), weight | Typography for the supporting text |
| **"Button text"** — color, size (px), weight | Typography for the button label |
| **"Footer text"** — color, size (px), weight | Typography for the footer text |
| **"Font"** | The font family used across the entire form |
 **Match your brand.** Use your brand's colors for the background and button, and choose a font consistent with your website. If you're running ads that link to this form, visual consistency builds trust and improves conversion rates.
\~1 minute
Once you're happy with your form:
1. On the **"Content"** tab, click the **"Save and update content"** button at the bottom of the sidebar
2. If you made changes on the **"Style"** tab, switch to it and click the **"Save and update style"** button
Your form is now live! The URL in your browser's address bar is your form's public URL — you can already start sending people there.
Make sure you save on **both** tabs if you changed settings on both. Content and style are saved separately.
\~2 minutes
You have two ways to put your form in front of prospects. Pick whichever fits your situation — or use both.
#### Option A: Use the hosted Irelia Form URL (fastest)
Your form is already live and hosted on irelia.ai. To get the URL:
* **From the editor tab:** Copy the URL directly from your browser's address bar — that's your public form URL.
* **From the template popup:** Switch back to the tab where you started, and click the **"Copy Irelia Form URL"** button.
**Match your brand.** Use your brand's colors for the background and button, and choose a font consistent with your website. If you're running ads that link to this form, visual consistency builds trust and improves conversion rates.
\~1 minute
Once you're happy with your form:
1. On the **"Content"** tab, click the **"Save and update content"** button at the bottom of the sidebar
2. If you made changes on the **"Style"** tab, switch to it and click the **"Save and update style"** button
Your form is now live! The URL in your browser's address bar is your form's public URL — you can already start sending people there.
Make sure you save on **both** tabs if you changed settings on both. Content and style are saved separately.
\~2 minutes
You have two ways to put your form in front of prospects. Pick whichever fits your situation — or use both.
#### Option A: Use the hosted Irelia Form URL (fastest)
Your form is already live and hosted on irelia.ai. To get the URL:
* **From the editor tab:** Copy the URL directly from your browser's address bar — that's your public form URL.
* **From the template popup:** Switch back to the tab where you started, and click the **"Copy Irelia Form URL"** button.
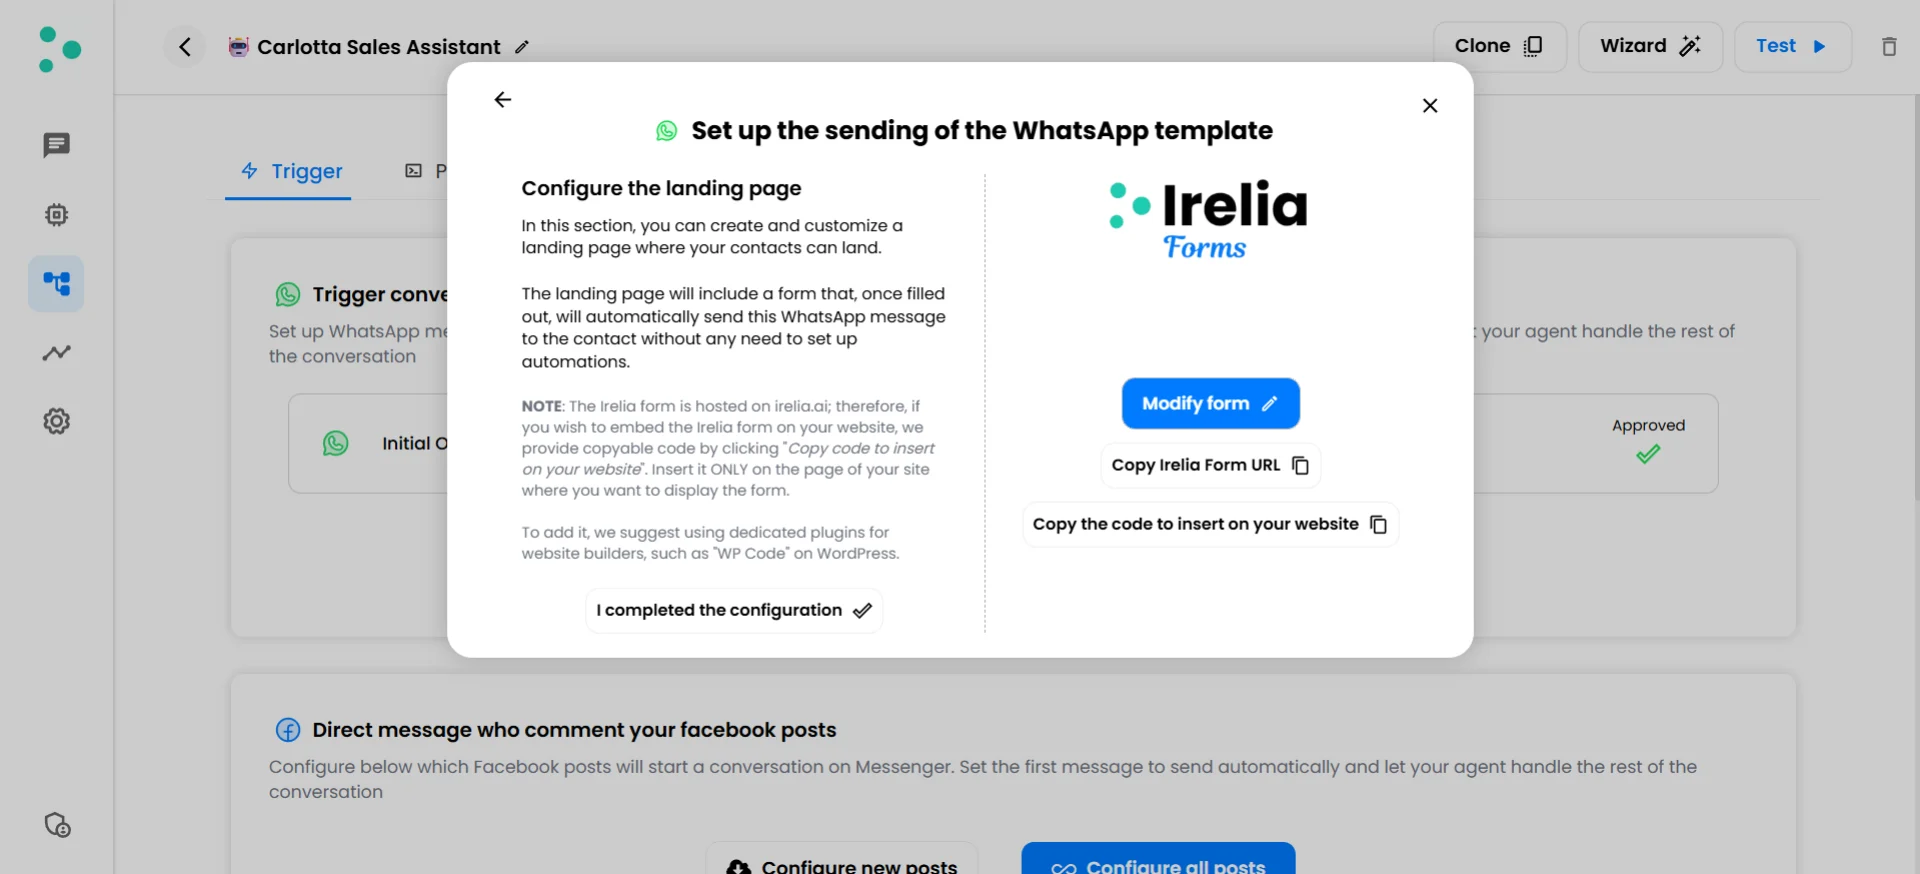 Share this URL anywhere you want: email campaigns, Google Ads landing pages, social media posts, QR codes at events, bio links — any web-based channel that drives traffic.
Once you're done, click **"I completed the configuration"** at the bottom left of the template popup to finalize.
**This is the fastest way to test outbound messaging.** Share the link, get submissions, and your AI agent starts conversations automatically. No website needed, no technical setup.
#### Option B: Embed the form on your own website
If you'd rather have the form appear on your own domain — for brand consistency or to capture existing website visitors — you can embed it using a code snippet.
1. Go back to the template popup tab
2. Click the **"Copy the code to insert on your website"** button
3. Paste this code into a dedicated page on your website (platform-specific instructions below)
4. Once everything is set up, click **"I completed the configuration"** at the bottom left
##### How the embed code works
The embed code is a `
```
Because the form takes over the entire page, **you should place this code on a dedicated page** — one specifically created for the form. Any existing content on that page will be hidden behind the form once it loads.
##### For any website (direct HTML access)
If you or your developer have direct access to your website's HTML files:
1. Create a new, dedicated HTML page for the form (e.g., `get-started.html`)
2. Paste the Irelia Form embed code **just before** the closing `` tag
3. Save the file and upload it to your server
4. Visit the page — you should see your Irelia Form filling the screen
Share this URL anywhere you want: email campaigns, Google Ads landing pages, social media posts, QR codes at events, bio links — any web-based channel that drives traffic.
Once you're done, click **"I completed the configuration"** at the bottom left of the template popup to finalize.
**This is the fastest way to test outbound messaging.** Share the link, get submissions, and your AI agent starts conversations automatically. No website needed, no technical setup.
#### Option B: Embed the form on your own website
If you'd rather have the form appear on your own domain — for brand consistency or to capture existing website visitors — you can embed it using a code snippet.
1. Go back to the template popup tab
2. Click the **"Copy the code to insert on your website"** button
3. Paste this code into a dedicated page on your website (platform-specific instructions below)
4. Once everything is set up, click **"I completed the configuration"** at the bottom left
##### How the embed code works
The embed code is a `
```
Because the form takes over the entire page, **you should place this code on a dedicated page** — one specifically created for the form. Any existing content on that page will be hidden behind the form once it loads.
##### For any website (direct HTML access)
If you or your developer have direct access to your website's HTML files:
1. Create a new, dedicated HTML page for the form (e.g., `get-started.html`)
2. Paste the Irelia Form embed code **just before** the closing `` tag
3. Save the file and upload it to your server
4. Visit the page — you should see your Irelia Form filling the screen