> ## Documentation Index
> Fetch the complete documentation index at: https://docs.irelia.ai/llms.txt
> Use this file to discover all available pages before exploring further.
# Send WhatsApp Templates Automatically with Zapier, Make.com & Go High Level
> Connect your Irelia.ai WhatsApp templates to any automation platform — so that every form submission, CRM event, or purchase instantly triggers a personalized WhatsApp message handled by your AI agent, with zero manual work.
\~15–20 minutes setup
***
Prerequisites before starting
Find your automation scenario
Condensed steps for technical users
Complete walkthrough (Steps 1–5)
Verify your setup is complete
Common issues & fixes
***
### Introduction
You've built your AI agent, created a WhatsApp template, and it got approved — now what? The real power of Irelia kicks in when messages are sent *automatically*. Instead of manually reaching out to every new lead, you can connect Irelia to your existing tools and let automations do the heavy lifting.
*Imagine this:* a prospect fills out a contact form on your landing page at 2 AM. Within seconds, they receive a personalized WhatsApp message from your AI agent — who qualifies them, answers their questions, and books a meeting. All while you sleep.
This guide walks you through exactly how to set that up using Zapier, Make.com, or Go High Level (GHL).
**Using Meta Instant Forms?** This guide is **not** for Meta Instant Forms (Facebook/Instagram Lead Ads). Irelia has a [dedicated native integration](/Guide-eng/Connect-Meta-Instant-Forms) for those that's much easier to set up. This guide covers every *other* trigger source — website forms, CRM events, purchases, and more.
**By the end of this guide, you'll have:**
✅ A working automation that sends WhatsApp templates whenever your chosen trigger fires
✅ A clear understanding of every piece of information Irelia needs to send a message
✅ The ability to test messages directly from Irelia's built-in panel
✅ The confidence to build unlimited automation scenarios across any platform
### How This Works
Think of it like a relay race between your automation platform and Irelia:
1. **Something happens** in one of your tools (a form is submitted, a CRM deal moves, a tag is added)
2. **Your automation platform** (Zapier, Make.com, or GHL) detects that event and grabs the contact's details
3. **Your platform sends those details to Irelia** — the contact's name, phone number, and a few settings
4. **Irelia receives the details**, sends your approved WhatsApp template to the contact, and your AI agent takes over the conversation from there
If you've built automations before — like *"when a form is submitted, add a row to Google Sheets"* — this follows the exact same pattern. The only difference is that instead of sending data to Google Sheets, you're sending it to Irelia. The *how* of that connection is what this guide covers, step by step.
### What You'll Do
1. **Find your template's send panel** — Locate the URL and fields Irelia needs (\~2 minutes)
2. **Test from Irelia** — Send a test message to verify everything works (\~2 minutes)
3. **Understand the fields** — Learn what each piece of information means (\~3 minutes)
4. **Build the automation** — Connect your trigger to Irelia in your platform (\~8 minutes)
5. **Verify end-to-end** — Confirm the full flow works together (\~3 minutes)
## 📋 What You'll Need
* An Irelia.ai account with an active AI agent Required
* An **approved** WhatsApp template — [follow this guide to create one](/Guide-eng/How-to-Create-a-WhatsApp-Template-in-Irelia) if you haven't yet Required
* Sufficient credits in your Irelia account (each template send costs **10 credits**) Required
* A Zapier account ([sign up here](https://zapier.com)), a Make.com account ([sign up here](https://make.com)), or a Go High Level account — depending on which platform you use Required
* A trigger source (e.g., a form, a CRM, an ad platform) that will start the automation Required
* A phone number to test with (your own is perfect) Required
**No coding required.** If you can copy and paste, you can do this.
**Note:** You won't find a pre-built Irelia app in Zapier, Make.com, or GHL. Instead, you'll use a universal connector that every platform provides — this guide walks you through every click.
## 🎯 Common Use Cases
Not sure what to automate? Here are the most popular scenarios Irelia users set up:
| Scenario | Trigger | Result |
| :----------------------------- | :------------------------------------------------- | :-------------------------------- |
| 📝 **Website form submission** | Contact submits a form (Typeform, WordPress, etc.) | AI agent reaches out via WhatsApp |
| 🔄 **CRM pipeline movement** | Deal moves to a new stage | Follow-up WhatsApp message sent |
| 🏷️ **Tag added in CRM** | Contact is tagged "Hot Lead" | Instant WhatsApp outreach |
| 🛒 **New purchase** | Stripe/Shopify payment received | Post-purchase WhatsApp engagement |
All of these follow the same pattern: **trigger event → contact details sent to Irelia → WhatsApp message delivered → AI takes over**.
Pick your scenario and keep it in mind as you follow the steps below. The trigger changes, but the Irelia setup is always the same.
## ⚡ Quick Path (Experienced Users)
Already comfortable with HTTP requests and JSON? Here's the condensed version:
1. **Irelia:** Open your approved WhatsApp template → Click **"Configure automation"** → Copy the POST URL and note the body structure
2. **Your platform:** Create an automation with your desired trigger → Add an HTTP/webhook action → Method: `POST` → URL: paste Irelia's endpoint → Body type: `raw JSON (application/json)`
3. **Body:**
```json theme={null}
{
"userName": "{{lead name from trigger}}",
"userNumber": "{{phone number from trigger}}",
"skipIfAlreadyContacted": false,
"skipIfAIOff": false,
"skipIfAgentChanged": false,
"country": "IT",
"templateParameters": ["{{dynamic value 1}}", "{{dynamic value 2}}"]
}
```
4. **Test:** Run the automation → Verify WhatsApp message is received → Check the conversation appears in Irelia
5. **Activate:** Turn on the automation
Need more detail? Continue with the full guide below.
## 🔧 Step-by-Step Setup
### Step 1: Open Your Template and Access the API Panel
\~2 minutes
Let's start inside Irelia, where you'll find everything you need to connect your automation platform.
1. Log into your Irelia.ai dashboard
2. Go to the WhatsApp template (inside one of your agents) you want to automate
3. Click on the template to open its configuration popup
4. On the right side, under **"Sending method"**, you'll see two options: **"Configure automation"** and **"Configure form"**
5. Click **"Configure automation"**
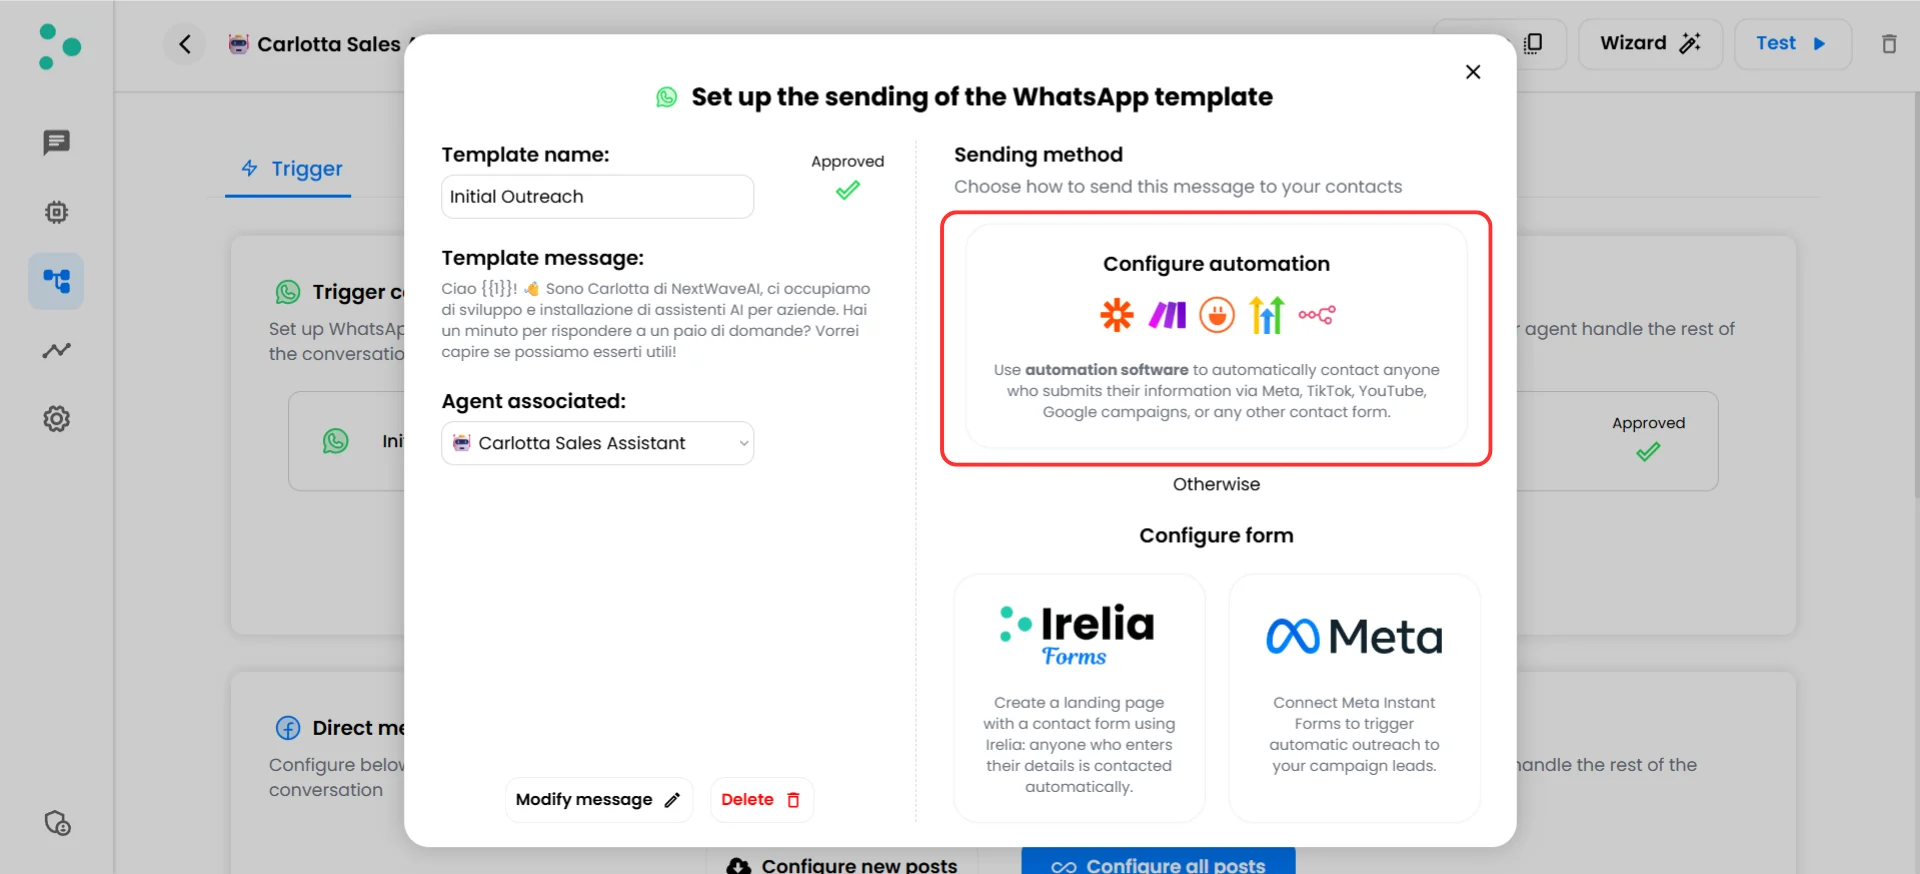 6. You'll see the **API panel**. *"API"* just means *"the connection point between apps"* — in this case, between your automation platform and Irelia. The panel shows two things:
* A **URL** at the top — your template's unique address, where your automation platform will send contact details
* **Fields** below it — the pieces of information Irelia needs to send a message (name, phone number, etc.)
6. You'll see the **API panel**. *"API"* just means *"the connection point between apps"* — in this case, between your automation platform and Irelia. The panel shows two things:
* A **URL** at the top — your template's unique address, where your automation platform will send contact details
* **Fields** below it — the pieces of information Irelia needs to send a message (name, phone number, etc.)
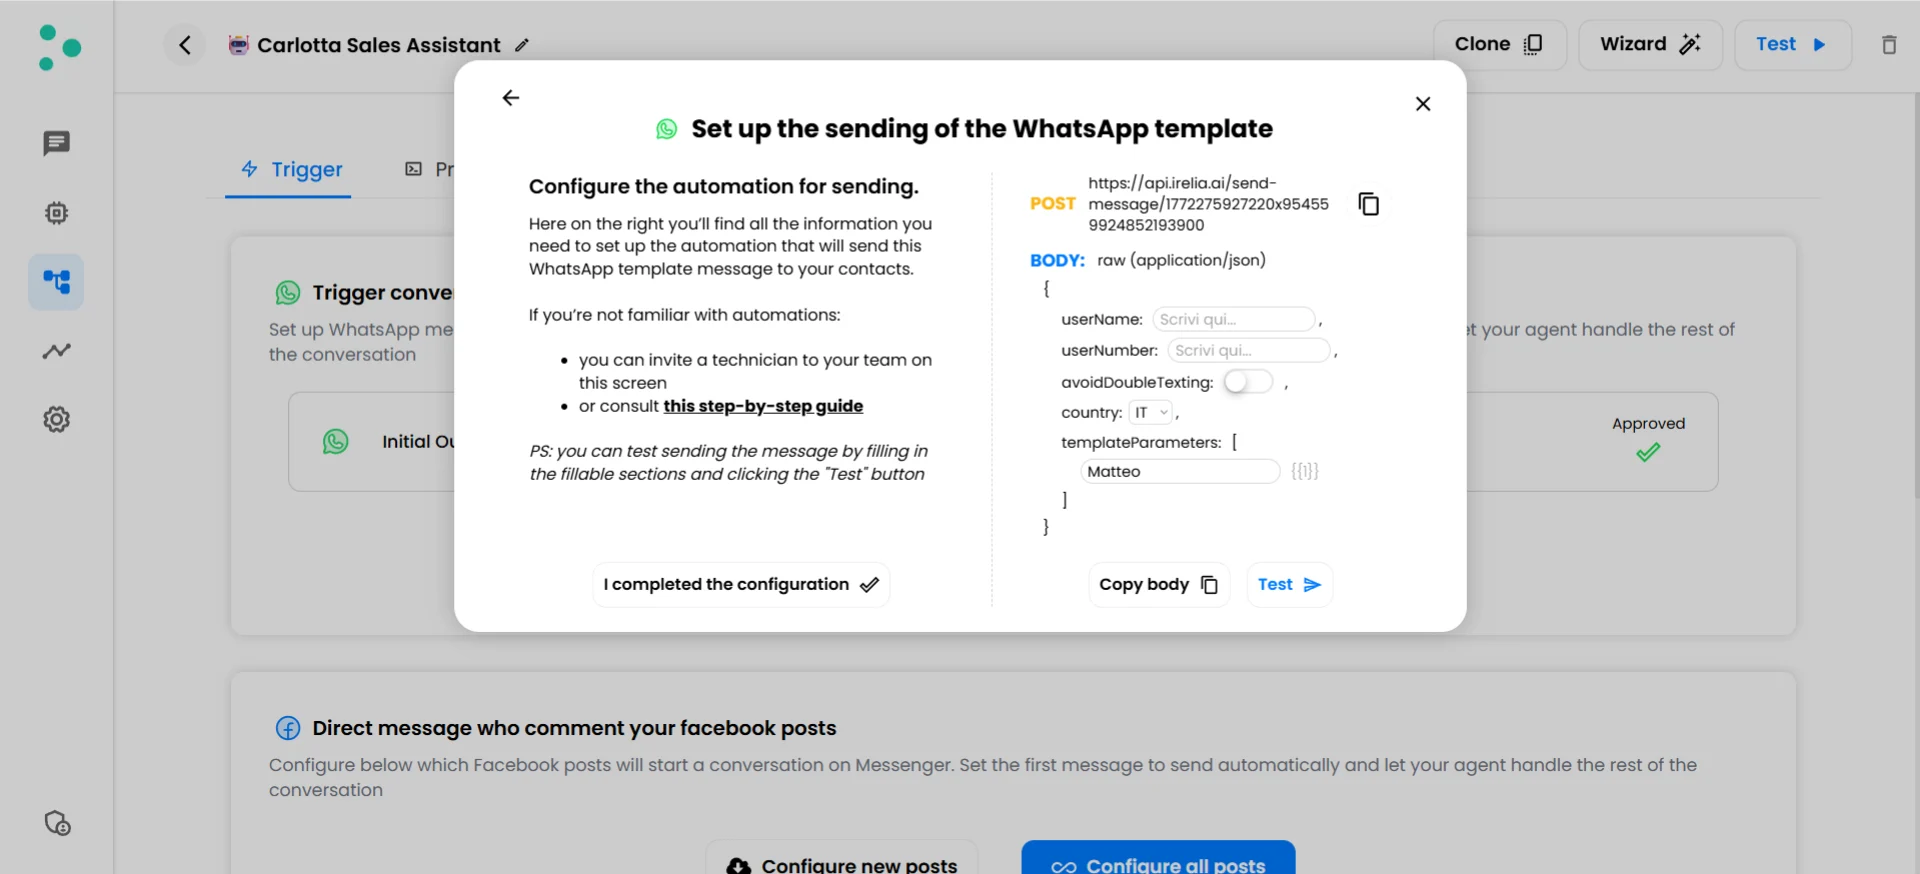 **Important:** This panel is a **reference and testing tool only**. It doesn't save or store anything you type here. The actual automation configuration happens in your platform (Zapier, Make.com, or GHL) in Step 4.
7. Click the **copy icon** next to the URL at the top to copy it to your clipboard. Save it somewhere — you'll need it in Step 4.
**Treat this URL like a password.** Anyone with this URL can send messages on your behalf. Don't share it publicly or include it in screenshots you post online.
You now have your template's unique URL copied and ready.
### Step 2: Send a Test Message from Irelia
\~2 minutes
Before connecting any automation platform, let's verify that everything works by sending a test message directly from Irelia's panel.
1. In the API panel (from Step 1), type a contact name in the **"userName"** field (e.g., `Test`)
2. Type your own phone number (with country prefix) in the **"userNumber"** field (e.g., `+393334622758`)
3. Leave the **"skipIfAlreadyContacted"**, **"skipIfAIOff"**, and **"skipIfAgentChanged"** dropdowns set to `false` (we'll explain these fields in Step 3)
4. Select the appropriate **"country"** from the dropdown
5. If your template has dynamic variables, type test values in the **"templateParameters"** field (e.g., `Test value`)
6. Click the **"Test"** button
**Important:** This panel is a **reference and testing tool only**. It doesn't save or store anything you type here. The actual automation configuration happens in your platform (Zapier, Make.com, or GHL) in Step 4.
7. Click the **copy icon** next to the URL at the top to copy it to your clipboard. Save it somewhere — you'll need it in Step 4.
**Treat this URL like a password.** Anyone with this URL can send messages on your behalf. Don't share it publicly or include it in screenshots you post online.
You now have your template's unique URL copied and ready.
### Step 2: Send a Test Message from Irelia
\~2 minutes
Before connecting any automation platform, let's verify that everything works by sending a test message directly from Irelia's panel.
1. In the API panel (from Step 1), type a contact name in the **"userName"** field (e.g., `Test`)
2. Type your own phone number (with country prefix) in the **"userNumber"** field (e.g., `+393334622758`)
3. Leave the **"skipIfAlreadyContacted"**, **"skipIfAIOff"**, and **"skipIfAgentChanged"** dropdowns set to `false` (we'll explain these fields in Step 3)
4. Select the appropriate **"country"** from the dropdown
5. If your template has dynamic variables, type test values in the **"templateParameters"** field (e.g., `Test value`)
6. Click the **"Test"** button
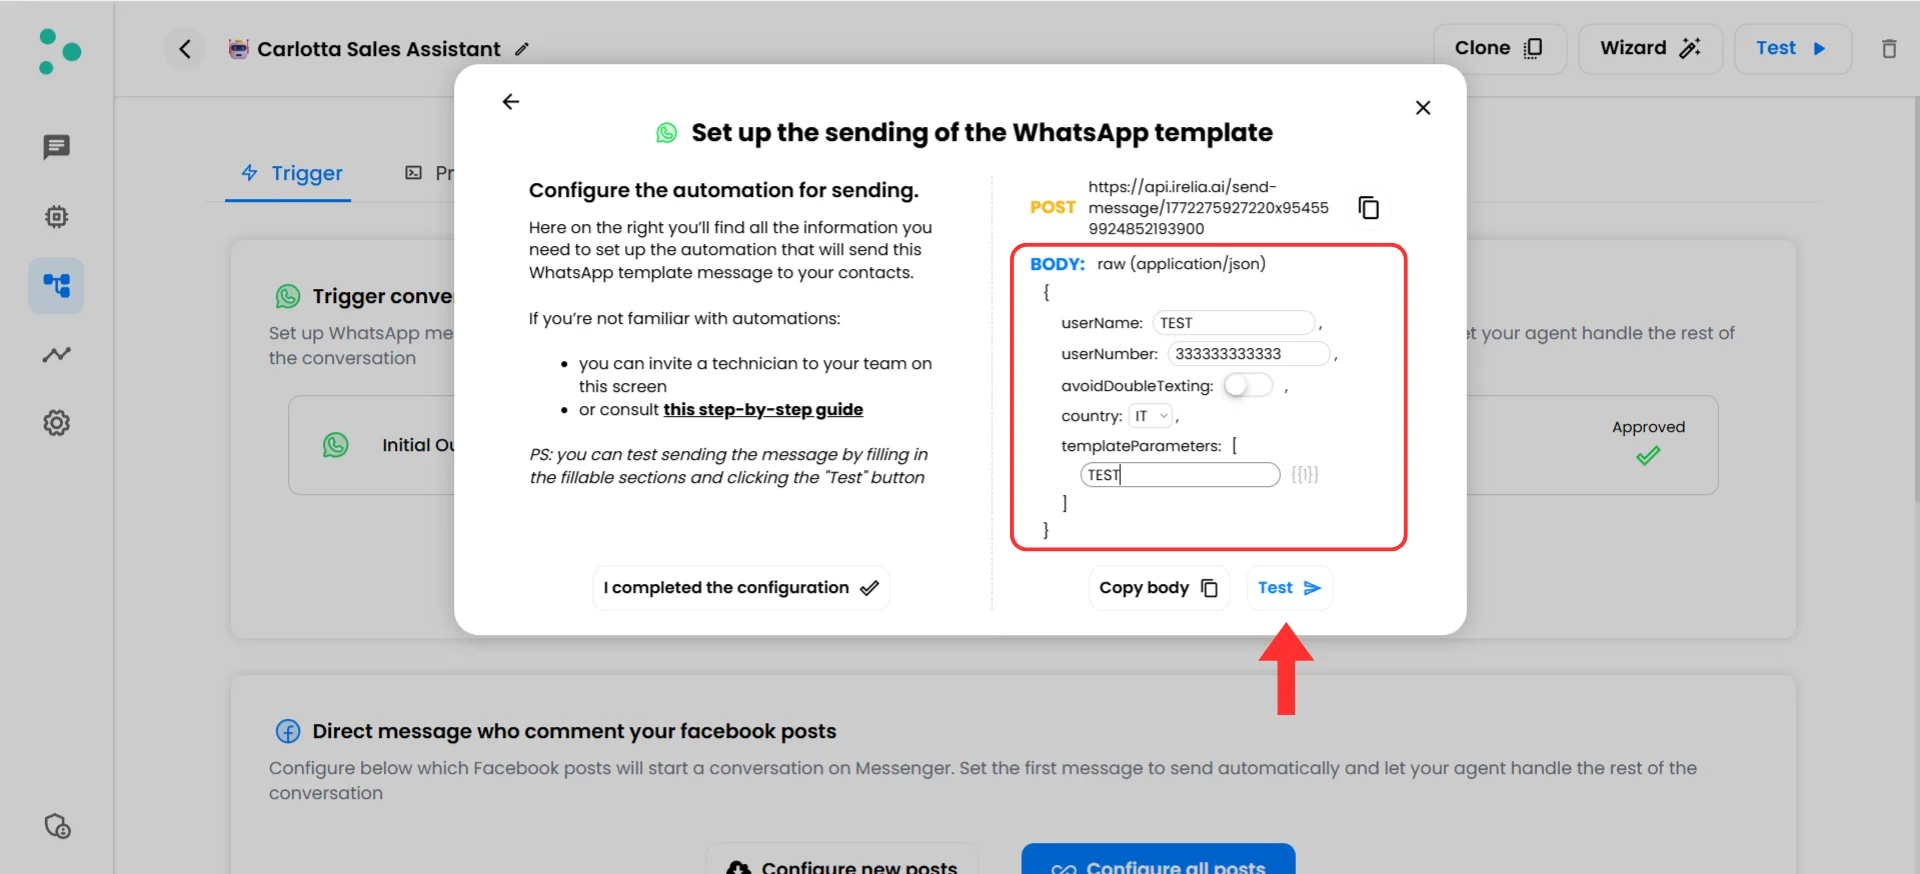 7. Check your phone — you should receive the WhatsApp template message within a few seconds
8. Open Irelia's [conversation list](/Guide-eng/the-Chat-Panel) — you should see the new conversation appear
Your template is working! If you received the message, Irelia's side is ready.
**Message didn't arrive?** The most common causes are an incorrect phone number format (make sure it includes the country prefix like `+39` or `+1`), or insufficient credits in your Irelia account. Since this panel only appears for approved templates, template status is never the issue here. See [Troubleshooting](#-troubleshooting-%26-faqs) for more help.
### Step 3: Understand What You're Sending to Irelia
\~3 minutes
You just sent a test message by filling in fields and clicking a button. In Step 4, your automation platform will fill in those same fields automatically every time your trigger fires. Before building that automation, let's make sure you understand what each field does — this makes the setup much easier.
#### The fields Irelia needs
Here's a quick overview, followed by deeper explanations where needed:
| Field | What it is | Required? |
| :----------------------- | :------------------------------------------------------------------------------------------------- | :---------------------------------- |
| `userName` | The name of the person you're contacting. | ✅ Yes |
| `userNumber` | The phone number to message. Include the country prefix when possible (e.g., `+393334622758`). | ✅ Yes |
| `skipIfAlreadyContacted` | Controls whether to skip contacts who've already been reached by your agent. | Optional (default: `false`) |
| `skipIfAIOff` | Controls whether to skip contacts whose AI is currently turned off. | Optional (default: `false`) |
| `skipIfAgentChanged` | Controls whether to skip contacts currently in conversation with a different agent. | Optional (default: `false`) |
| `country` | A fallback country code (e.g., `IT`, `US`, `UK`) used when the phone number is missing its prefix. | ✅ Yes |
| `templateParameters` | Values that replace dynamic variables in your template (e.g., the contact's name, a product name). | Only if your template has variables |
#### skipIfAlreadyContacted
This tells Irelia what to do if the person you're about to message has **already had a conversation** through your agent.
* **`false`** (default) → The message is sent regardless of whether they've been contacted before.
* **`true`** → If the contact already exists in your agent's conversations, the message is **skipped**.
**Our recommendation:** Leave this at `false` so no lead gets left behind. Your funnel may revolve around this specific template — if a lead already exists in Irelia and the message gets skipped, they'd miss a key part of the experience. Only set to `true` if you have a specific need, such as avoiding duplicate outreach for a particular campaign.
**Legacy note:** This field replaces the older `avoidDoubleTexting` parameter, which still works and behaves identically. If your existing automations use `avoidDoubleTexting`, no changes are needed.
#### skipIfAIOff
This tells Irelia what to do if the contact you're about to message has **AI turned off** in their conversation.
* **`false`** (default) → The message is sent regardless of the contact's AI status.
* **`true`** → If AI is currently off for this contact, the message is **skipped**.
**When to use this:** Set to `true` if you want to avoid sending automated messages to contacts that a human operator has taken over. For example, if a team member manually disabled AI to handle a conversation personally, you probably don't want an automation interrupting that.
#### skipIfAgentChanged
This tells Irelia what to do if the contact you're about to message is **currently in conversation with a different agent** than the one this template belongs to.
* **`false`** (default) → The message is sent regardless of which agent the contact is currently talking to.
* **`true`** → If the contact has moved to a different agent's conversation, the message is **skipped**.
**When to use this:** Set to `true` if you have multiple agents and want to avoid sending a template from one agent to a contact who's already engaged with another. This prevents confusing the contact with messages from different agents.
#### country
The country prefix (e.g., `+39` for Italy, `+1` for the US) is essential for WhatsApp to deliver a message to the right number. The `country` field acts as a **safety net** for phone numbers that arrive without one.
Here's how it works:
* If `userNumber` is `"3334622758"` and `country` is `"IT"` → Irelia adds `+39` automatically and sends to `+393334622758` ✅
* If `userNumber` is `"+393334622758"` → the prefix is already there, so Irelia ignores the `country` field ✅
**Tip:** Always try to pass the full phone number with prefix from your trigger. Set `country` to where most of your leads are located, as a fallback.
#### templateParameters
This is where you pass values for the **dynamic variables** in your WhatsApp template. It's a list of text values, matched **in order** to the variables in your template.
* **No variables** in your template → skip this field entirely, or leave it empty: `[]`
* **One variable** → `["John"]`
* **Multiple variables** → `["John", "Premium Plan", "Friday at 3 PM"]`
The first value replaces `X`, the second replaces `X`, and so on. Make sure the order matches your template.
#### What the data looks like for your automation platform
Now you know what each field means. When your automation platform sends these details to Irelia, it packages them in a standard text format called **JSON**. Here's what the same information you just filled in during Step 2 looks like as JSON:
```json theme={null}
{
"userName": "Marco",
"userNumber": "+393334622758",
"skipIfAlreadyContacted": false,
"skipIfAIOff": false,
"skipIfAgentChanged": false,
"country": "IT",
"templateParameters": ["value for variable 1", "value for variable 2"]
}
```
It might look unfamiliar, but don't worry — you'll copy and paste this structure in the next step and simply replace the example values with data from your trigger.
You now understand every field Irelia needs. Time to build the automation.
### Step 4: Build the Automation in Your Platform
\~8 minutes
This is where everything comes together. You'll connect your trigger to Irelia so that contact details are sent automatically every time the trigger fires.
**Before you start — one concept to know:**
In your automation platform, you're used to adding action steps like *"Send an email"* or *"Add a row to Google Sheets."* These use pre-built connectors — someone built a ready-made integration for that specific app.
Since Irelia doesn't have a pre-built connector in these platforms yet, you'll use a **universal connector** that every platform provides. Think of it as a blank action step where you tell the platform: *"Send this data to this URL."* Each platform calls it something slightly different — **Webhooks by Zapier** in Zapier, **HTTP Module** in Make.com, and **Custom Webhook** in GHL — but the concept is identical.
That's all there is to it. Pick your platform below and follow along:
In Zapier, an automation is called a **Zap**. You'll create a Zap with your chosen trigger and a **Webhooks by Zapier** action to send data to Irelia.
#### Set up your trigger
1. Log into [Zapier](https://zapier.com) and click **"Create"** → **"Zaps"**
2. Click on the **"Trigger"** step
3. Search for and select the app that starts your automation (e.g., **"Typeform"**, **"HubSpot"**, **"Google Sheets"**, or whatever tool fires the event)
4. Choose the specific trigger event (e.g., **"New Entry"** for Typeform)
5. Connect your account and configure the trigger as prompted
6. Click **"Test trigger"** and confirm that sample data loads (you should see test fields like name, phone number, email, etc.)
7. Check your phone — you should receive the WhatsApp template message within a few seconds
8. Open Irelia's [conversation list](/Guide-eng/the-Chat-Panel) — you should see the new conversation appear
Your template is working! If you received the message, Irelia's side is ready.
**Message didn't arrive?** The most common causes are an incorrect phone number format (make sure it includes the country prefix like `+39` or `+1`), or insufficient credits in your Irelia account. Since this panel only appears for approved templates, template status is never the issue here. See [Troubleshooting](#-troubleshooting-%26-faqs) for more help.
### Step 3: Understand What You're Sending to Irelia
\~3 minutes
You just sent a test message by filling in fields and clicking a button. In Step 4, your automation platform will fill in those same fields automatically every time your trigger fires. Before building that automation, let's make sure you understand what each field does — this makes the setup much easier.
#### The fields Irelia needs
Here's a quick overview, followed by deeper explanations where needed:
| Field | What it is | Required? |
| :----------------------- | :------------------------------------------------------------------------------------------------- | :---------------------------------- |
| `userName` | The name of the person you're contacting. | ✅ Yes |
| `userNumber` | The phone number to message. Include the country prefix when possible (e.g., `+393334622758`). | ✅ Yes |
| `skipIfAlreadyContacted` | Controls whether to skip contacts who've already been reached by your agent. | Optional (default: `false`) |
| `skipIfAIOff` | Controls whether to skip contacts whose AI is currently turned off. | Optional (default: `false`) |
| `skipIfAgentChanged` | Controls whether to skip contacts currently in conversation with a different agent. | Optional (default: `false`) |
| `country` | A fallback country code (e.g., `IT`, `US`, `UK`) used when the phone number is missing its prefix. | ✅ Yes |
| `templateParameters` | Values that replace dynamic variables in your template (e.g., the contact's name, a product name). | Only if your template has variables |
#### skipIfAlreadyContacted
This tells Irelia what to do if the person you're about to message has **already had a conversation** through your agent.
* **`false`** (default) → The message is sent regardless of whether they've been contacted before.
* **`true`** → If the contact already exists in your agent's conversations, the message is **skipped**.
**Our recommendation:** Leave this at `false` so no lead gets left behind. Your funnel may revolve around this specific template — if a lead already exists in Irelia and the message gets skipped, they'd miss a key part of the experience. Only set to `true` if you have a specific need, such as avoiding duplicate outreach for a particular campaign.
**Legacy note:** This field replaces the older `avoidDoubleTexting` parameter, which still works and behaves identically. If your existing automations use `avoidDoubleTexting`, no changes are needed.
#### skipIfAIOff
This tells Irelia what to do if the contact you're about to message has **AI turned off** in their conversation.
* **`false`** (default) → The message is sent regardless of the contact's AI status.
* **`true`** → If AI is currently off for this contact, the message is **skipped**.
**When to use this:** Set to `true` if you want to avoid sending automated messages to contacts that a human operator has taken over. For example, if a team member manually disabled AI to handle a conversation personally, you probably don't want an automation interrupting that.
#### skipIfAgentChanged
This tells Irelia what to do if the contact you're about to message is **currently in conversation with a different agent** than the one this template belongs to.
* **`false`** (default) → The message is sent regardless of which agent the contact is currently talking to.
* **`true`** → If the contact has moved to a different agent's conversation, the message is **skipped**.
**When to use this:** Set to `true` if you have multiple agents and want to avoid sending a template from one agent to a contact who's already engaged with another. This prevents confusing the contact with messages from different agents.
#### country
The country prefix (e.g., `+39` for Italy, `+1` for the US) is essential for WhatsApp to deliver a message to the right number. The `country` field acts as a **safety net** for phone numbers that arrive without one.
Here's how it works:
* If `userNumber` is `"3334622758"` and `country` is `"IT"` → Irelia adds `+39` automatically and sends to `+393334622758` ✅
* If `userNumber` is `"+393334622758"` → the prefix is already there, so Irelia ignores the `country` field ✅
**Tip:** Always try to pass the full phone number with prefix from your trigger. Set `country` to where most of your leads are located, as a fallback.
#### templateParameters
This is where you pass values for the **dynamic variables** in your WhatsApp template. It's a list of text values, matched **in order** to the variables in your template.
* **No variables** in your template → skip this field entirely, or leave it empty: `[]`
* **One variable** → `["John"]`
* **Multiple variables** → `["John", "Premium Plan", "Friday at 3 PM"]`
The first value replaces `X`, the second replaces `X`, and so on. Make sure the order matches your template.
#### What the data looks like for your automation platform
Now you know what each field means. When your automation platform sends these details to Irelia, it packages them in a standard text format called **JSON**. Here's what the same information you just filled in during Step 2 looks like as JSON:
```json theme={null}
{
"userName": "Marco",
"userNumber": "+393334622758",
"skipIfAlreadyContacted": false,
"skipIfAIOff": false,
"skipIfAgentChanged": false,
"country": "IT",
"templateParameters": ["value for variable 1", "value for variable 2"]
}
```
It might look unfamiliar, but don't worry — you'll copy and paste this structure in the next step and simply replace the example values with data from your trigger.
You now understand every field Irelia needs. Time to build the automation.
### Step 4: Build the Automation in Your Platform
\~8 minutes
This is where everything comes together. You'll connect your trigger to Irelia so that contact details are sent automatically every time the trigger fires.
**Before you start — one concept to know:**
In your automation platform, you're used to adding action steps like *"Send an email"* or *"Add a row to Google Sheets."* These use pre-built connectors — someone built a ready-made integration for that specific app.
Since Irelia doesn't have a pre-built connector in these platforms yet, you'll use a **universal connector** that every platform provides. Think of it as a blank action step where you tell the platform: *"Send this data to this URL."* Each platform calls it something slightly different — **Webhooks by Zapier** in Zapier, **HTTP Module** in Make.com, and **Custom Webhook** in GHL — but the concept is identical.
That's all there is to it. Pick your platform below and follow along:
In Zapier, an automation is called a **Zap**. You'll create a Zap with your chosen trigger and a **Webhooks by Zapier** action to send data to Irelia.
#### Set up your trigger
1. Log into [Zapier](https://zapier.com) and click **"Create"** → **"Zaps"**
2. Click on the **"Trigger"** step
3. Search for and select the app that starts your automation (e.g., **"Typeform"**, **"HubSpot"**, **"Google Sheets"**, or whatever tool fires the event)
4. Choose the specific trigger event (e.g., **"New Entry"** for Typeform)
5. Connect your account and configure the trigger as prompted
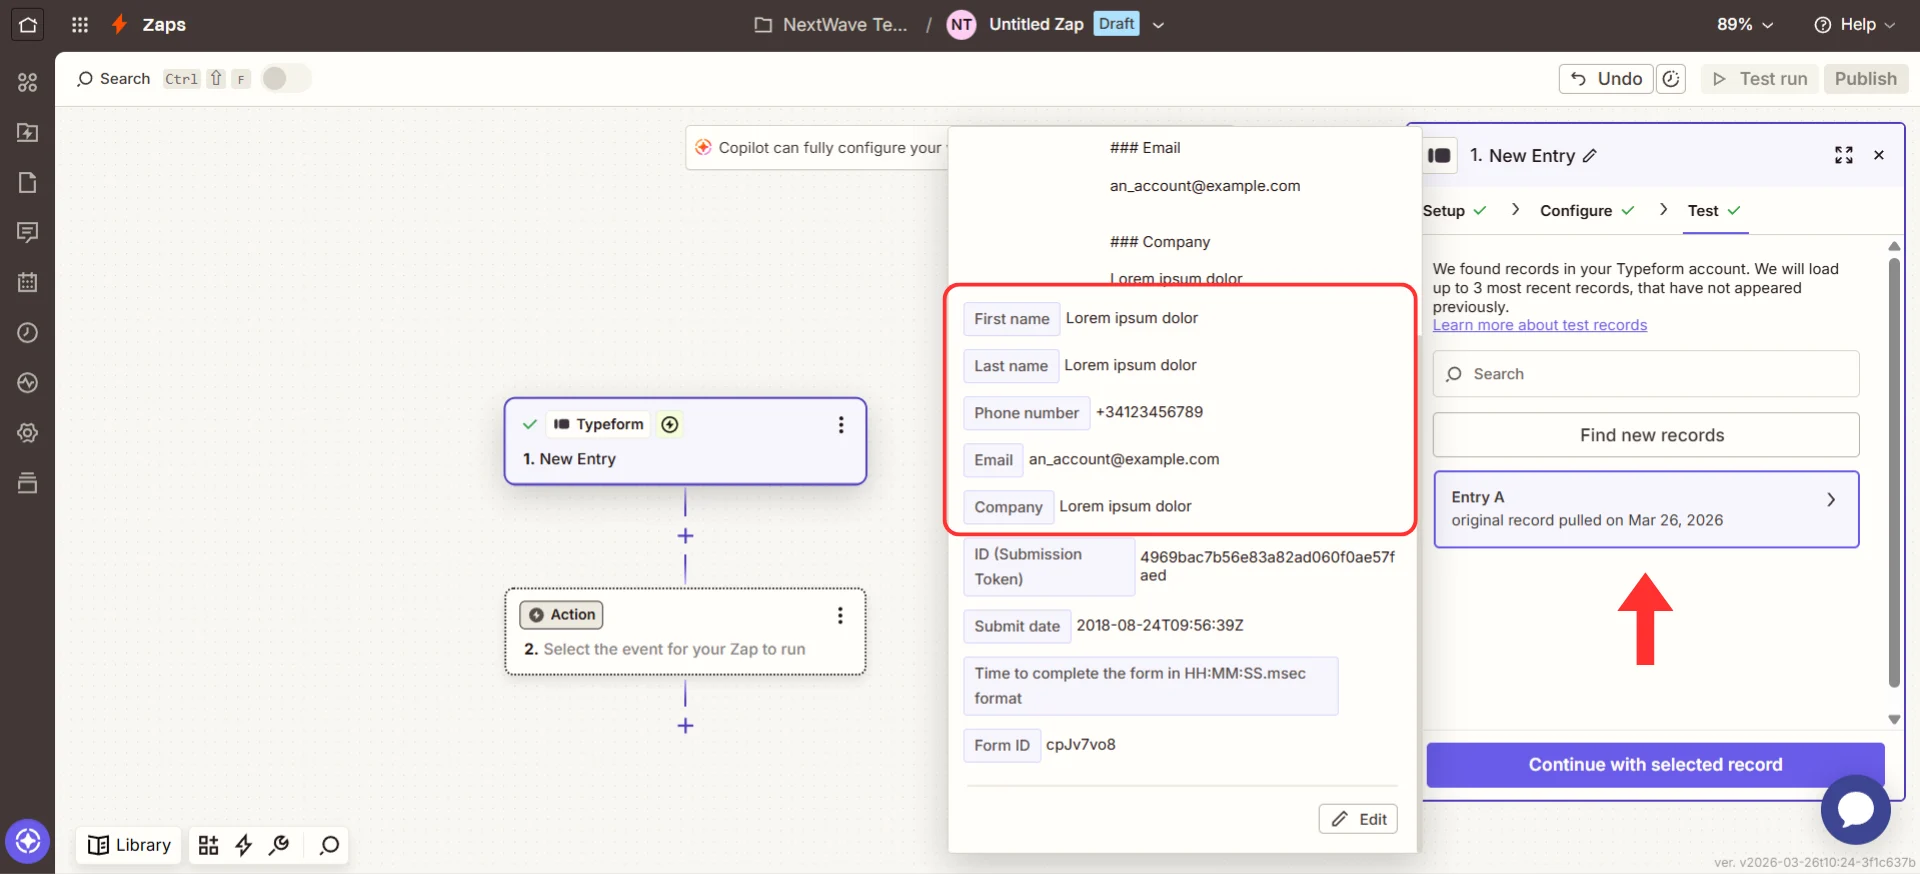
6. Click **"Test trigger"** and confirm that sample data loads (you should see test fields like name, phone number, email, etc.)
 #### Add the action that sends data to Irelia
7. Click the **plus (+) icon** below your trigger to add an action step
8. Search for `Webhooks by Zapier` and select it
9. Click the **"Event"** dropdown and select **"POST"**
#### Add the action that sends data to Irelia
7. Click the **plus (+) icon** below your trigger to add an action step
8. Search for `Webhooks by Zapier` and select it
9. Click the **"Event"** dropdown and select **"POST"**
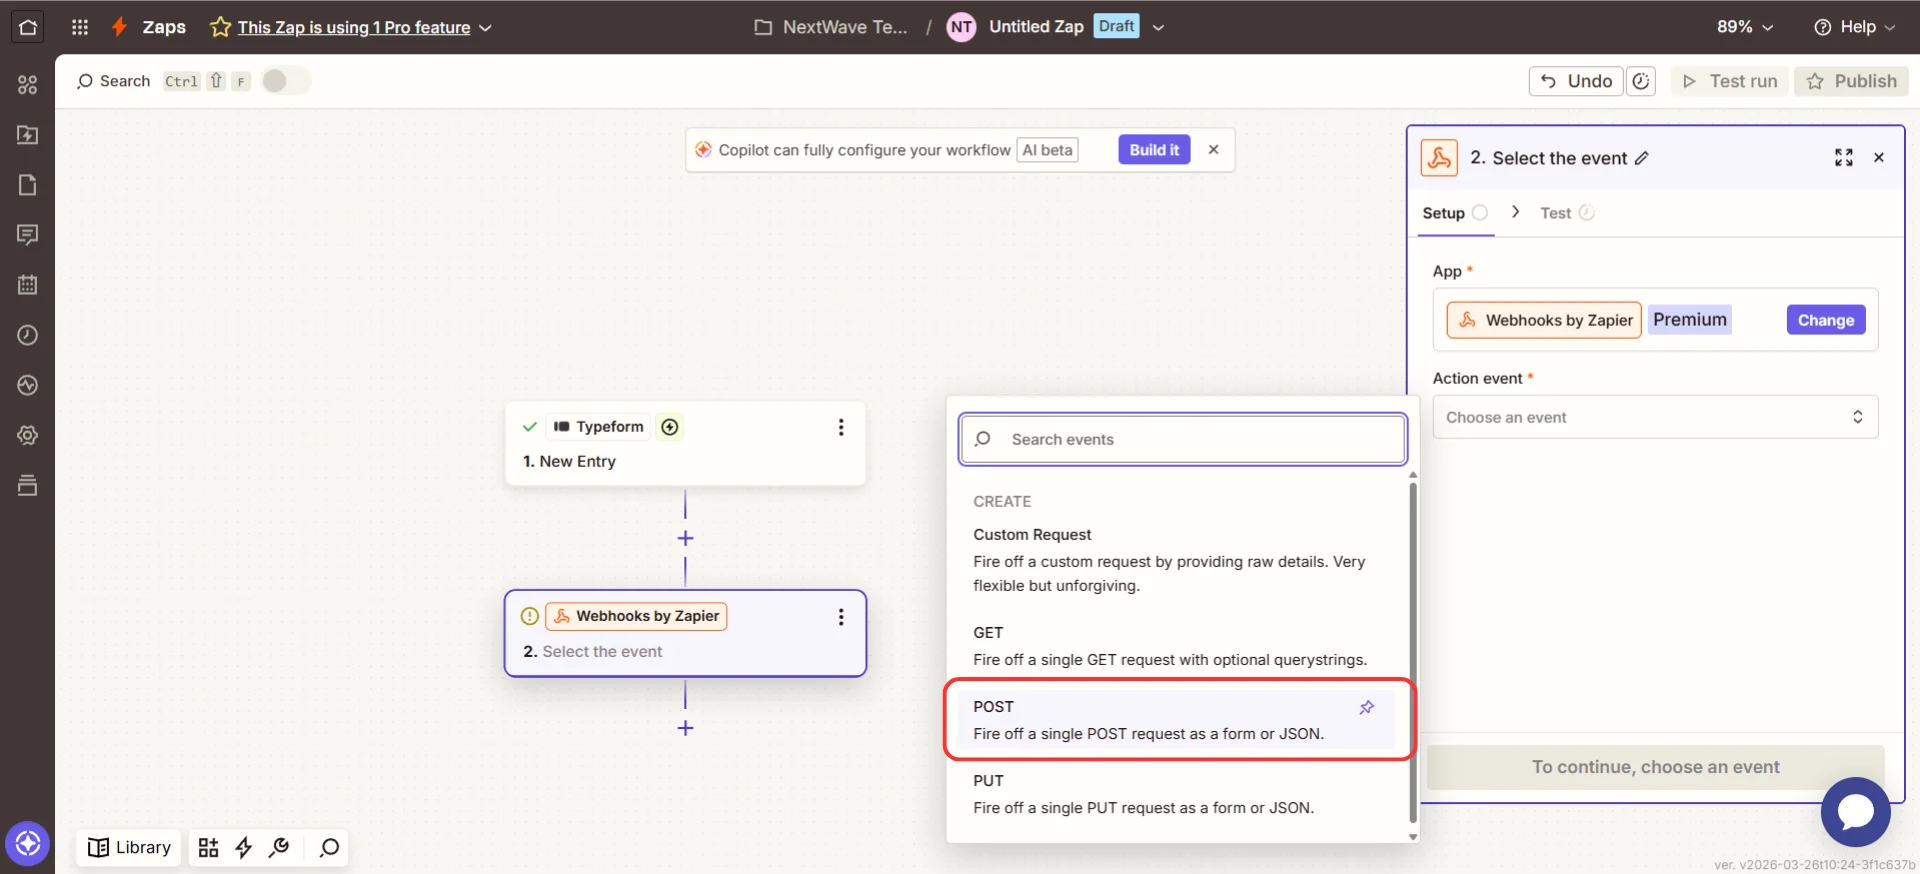 10. Click **"Continue"**
#### Configure the request
11. In the **"URL"** field, paste the URL you copied in Step 1 (e.g., `https://api.irelia.ai/send-message/1772216707789x385682060741759040`)
12. From the **"Payload Type"** dropdown, select **"Json"** — this tells Zapier to send the data in the format Irelia expects.
13. In the **"Data"** section, you'll create key-value pairs. Enter the field name on the left and the value on the right. Add the following rows:
| Key (left side) | Value (right side) |
| :----------------------- | :------------------------------------------------------------------------------------------------------------------------------------------------ |
| `userName` | *Map the name field from your trigger* (click the **plus (+) icon** and select the name field) |
| `userNumber` | *Map the phone number field from your trigger* |
| `skipIfAlreadyContacted` | `false` |
| `skipIfAIOff` | `false` |
| `skipIfAgentChanged` | `false` |
| `country` | `IT` (or your default country code) |
| `templateParameters` | `["mapped value 1", "mapped value 2"]` — map dynamic values from your trigger inside the quotes. Skip this row if your template has no variables. |
10. Click **"Continue"**
#### Configure the request
11. In the **"URL"** field, paste the URL you copied in Step 1 (e.g., `https://api.irelia.ai/send-message/1772216707789x385682060741759040`)
12. From the **"Payload Type"** dropdown, select **"Json"** — this tells Zapier to send the data in the format Irelia expects.
13. In the **"Data"** section, you'll create key-value pairs. Enter the field name on the left and the value on the right. Add the following rows:
| Key (left side) | Value (right side) |
| :----------------------- | :------------------------------------------------------------------------------------------------------------------------------------------------ |
| `userName` | *Map the name field from your trigger* (click the **plus (+) icon** and select the name field) |
| `userNumber` | *Map the phone number field from your trigger* |
| `skipIfAlreadyContacted` | `false` |
| `skipIfAIOff` | `false` |
| `skipIfAgentChanged` | `false` |
| `country` | `IT` (or your default country code) |
| `templateParameters` | `["mapped value 1", "mapped value 2"]` — map dynamic values from your trigger inside the quotes. Skip this row if your template has no variables. |
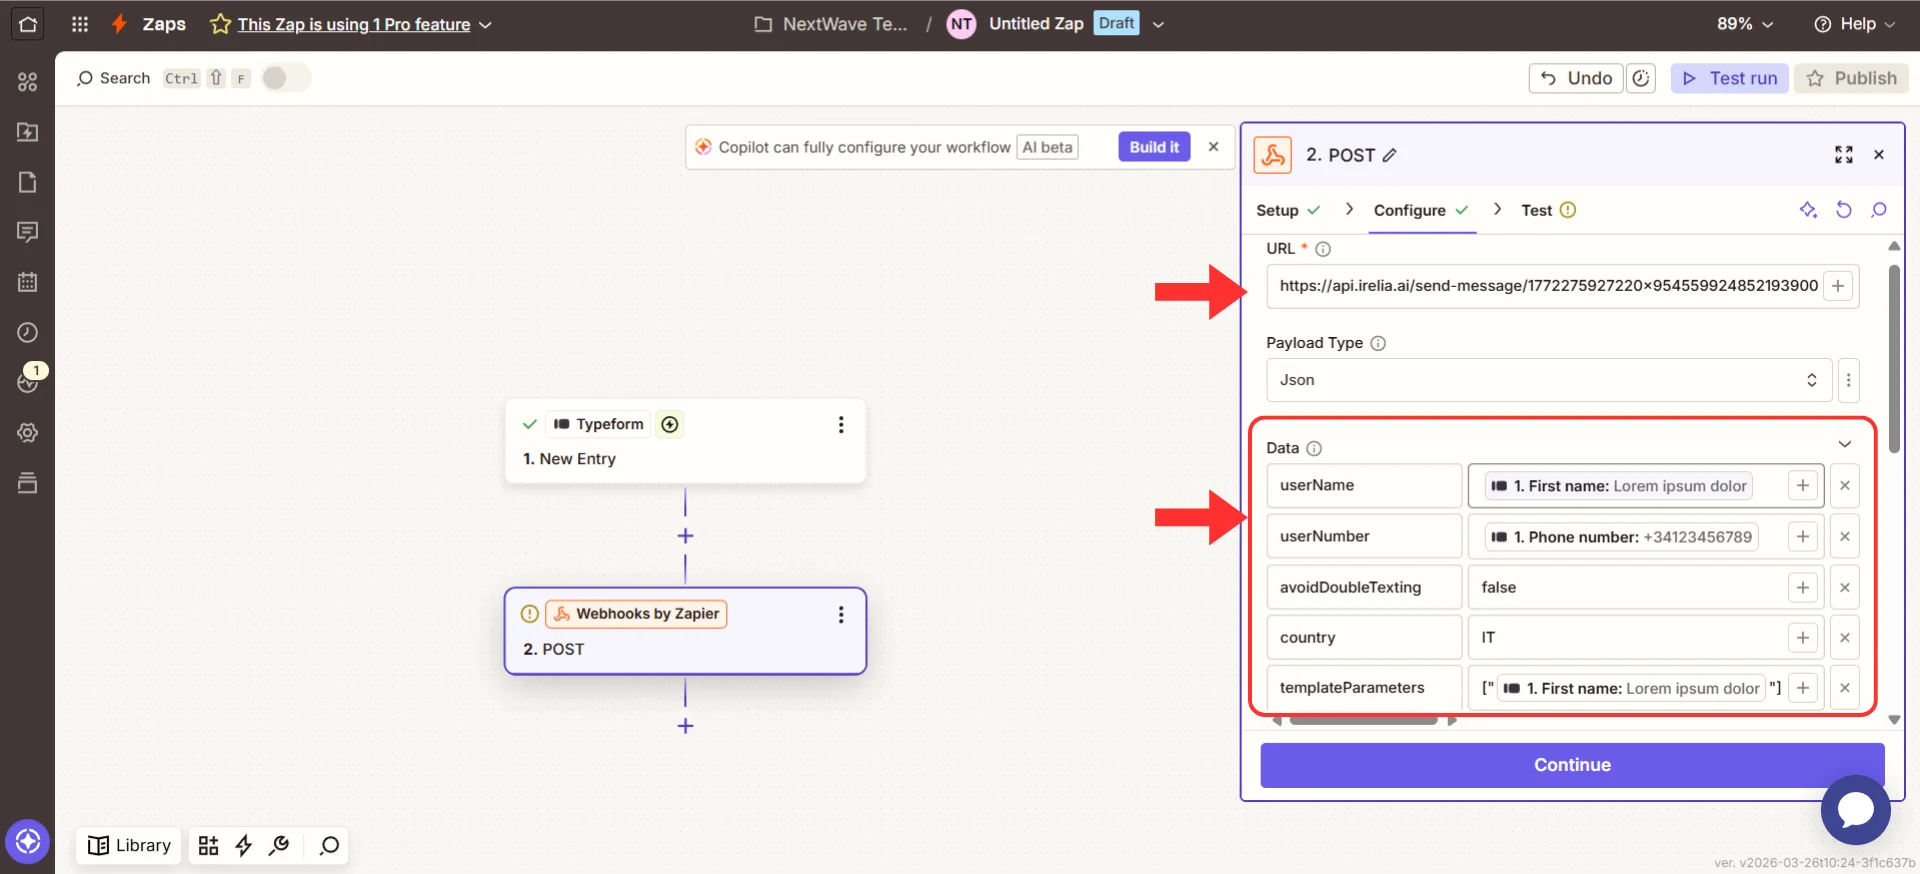 **Tip:** For `templateParameters`, type the brackets and quotes literally — `["`, `"]` — and use Zapier's field mapper to insert dynamic values from your trigger between the quotes. For example: `["John", "Premium Plan"]`. If your template has no variables, skip the `templateParameters` row entirely.
14. Click **"Continue"**
15. Click **"Test step"** — Zapier will send the data to Irelia
**What just happened:** Zapier sent the test data to Irelia. If successful, you should receive a WhatsApp message on the test phone number. Check your phone and check Irelia's [conversation list](/Guide-eng/the-Chat-Panel) to confirm.
16. If the test succeeds, click **"Publish"** to activate your Zap
Your Zapier automation is live! Every time your trigger fires, Irelia will send the WhatsApp template automatically.
In Make.com, an automation is called a **Scenario**. You'll build a Scenario with your trigger Module and an **HTTP** Module to send data to Irelia.
#### Set up your trigger
1. Log into [Make.com](https://make.com) and click **"Create a new scenario"**
2. Click the **large plus (+) icon** in the center of the canvas to add your first Module
3. Search for and select the app that starts your automation (e.g., **"Typeform"**, **"Google Forms"**, **"HubSpot"**, etc.)
4. Choose the trigger event (e.g., **"Watch Responses"**)
5. Connect your account and configure the trigger as prompted
6. Click **"OK"** to save the Module, then click **"Run once"** to pull in sample data
**Tip:** For `templateParameters`, type the brackets and quotes literally — `["`, `"]` — and use Zapier's field mapper to insert dynamic values from your trigger between the quotes. For example: `["John", "Premium Plan"]`. If your template has no variables, skip the `templateParameters` row entirely.
14. Click **"Continue"**
15. Click **"Test step"** — Zapier will send the data to Irelia
**What just happened:** Zapier sent the test data to Irelia. If successful, you should receive a WhatsApp message on the test phone number. Check your phone and check Irelia's [conversation list](/Guide-eng/the-Chat-Panel) to confirm.
16. If the test succeeds, click **"Publish"** to activate your Zap
Your Zapier automation is live! Every time your trigger fires, Irelia will send the WhatsApp template automatically.
In Make.com, an automation is called a **Scenario**. You'll build a Scenario with your trigger Module and an **HTTP** Module to send data to Irelia.
#### Set up your trigger
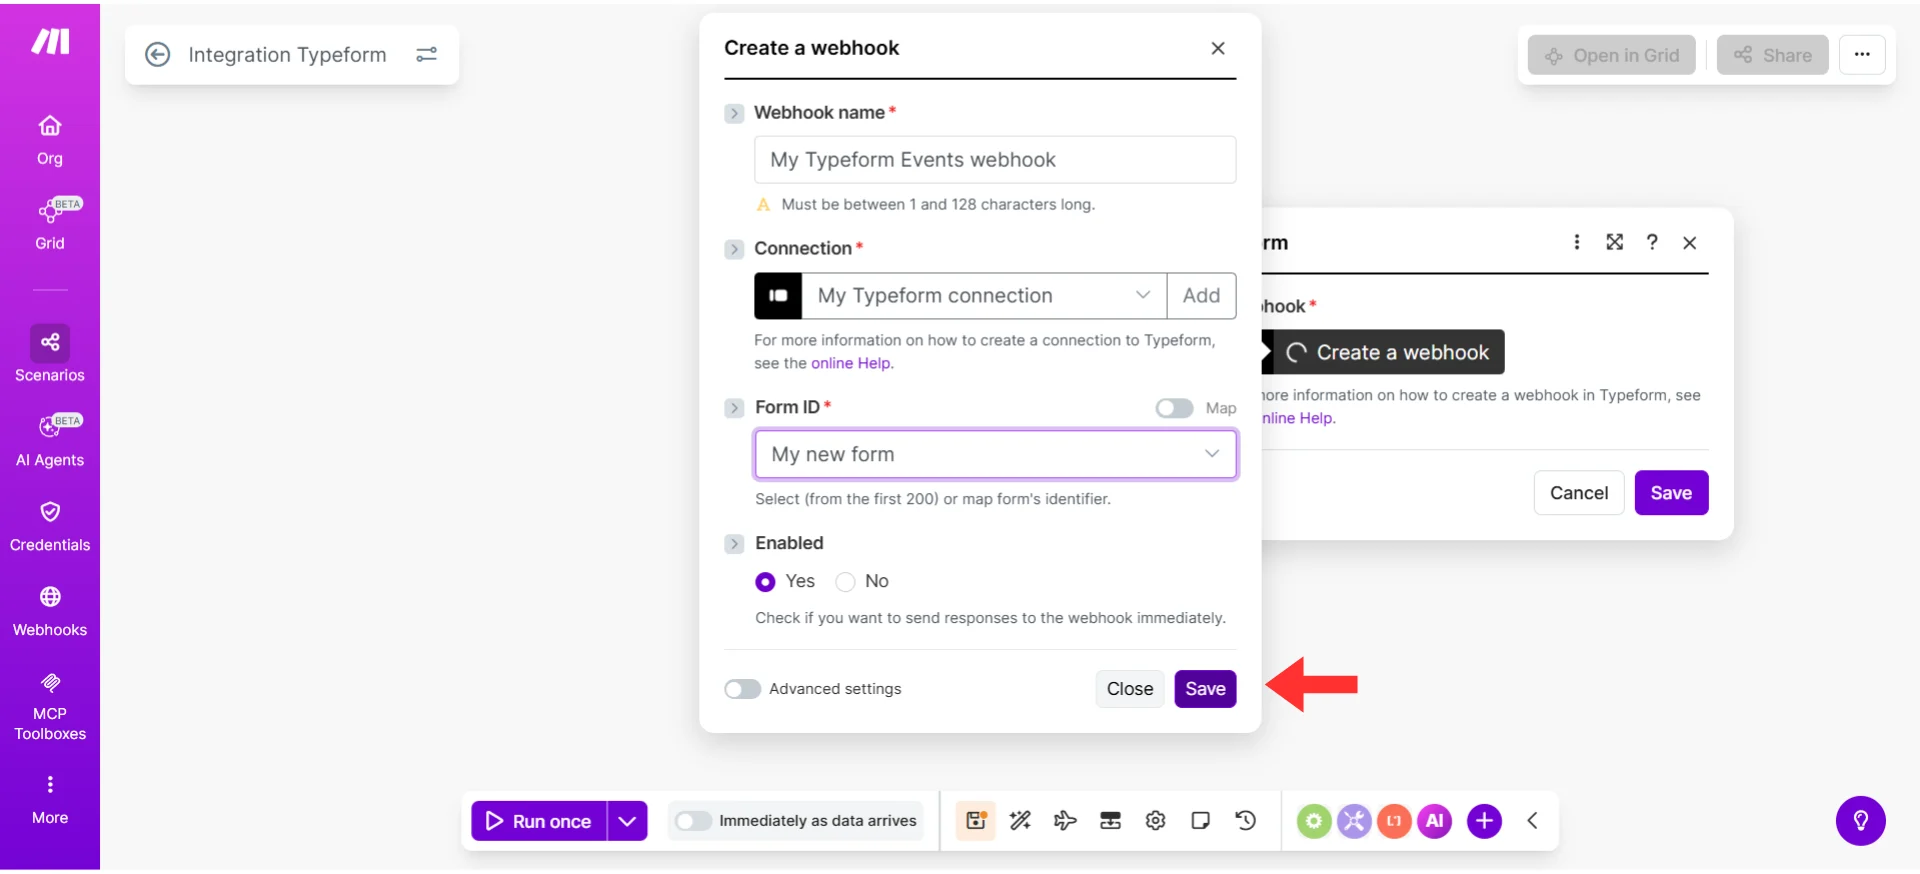
1. Log into [Make.com](https://make.com) and click **"Create a new scenario"**
2. Click the **large plus (+) icon** in the center of the canvas to add your first Module
3. Search for and select the app that starts your automation (e.g., **"Typeform"**, **"Google Forms"**, **"HubSpot"**, etc.)
4. Choose the trigger event (e.g., **"Watch Responses"**)
5. Connect your account and configure the trigger as prompted
6. Click **"OK"** to save the Module, then click **"Run once"** to pull in sample data
 #### Add the action that sends data to Irelia
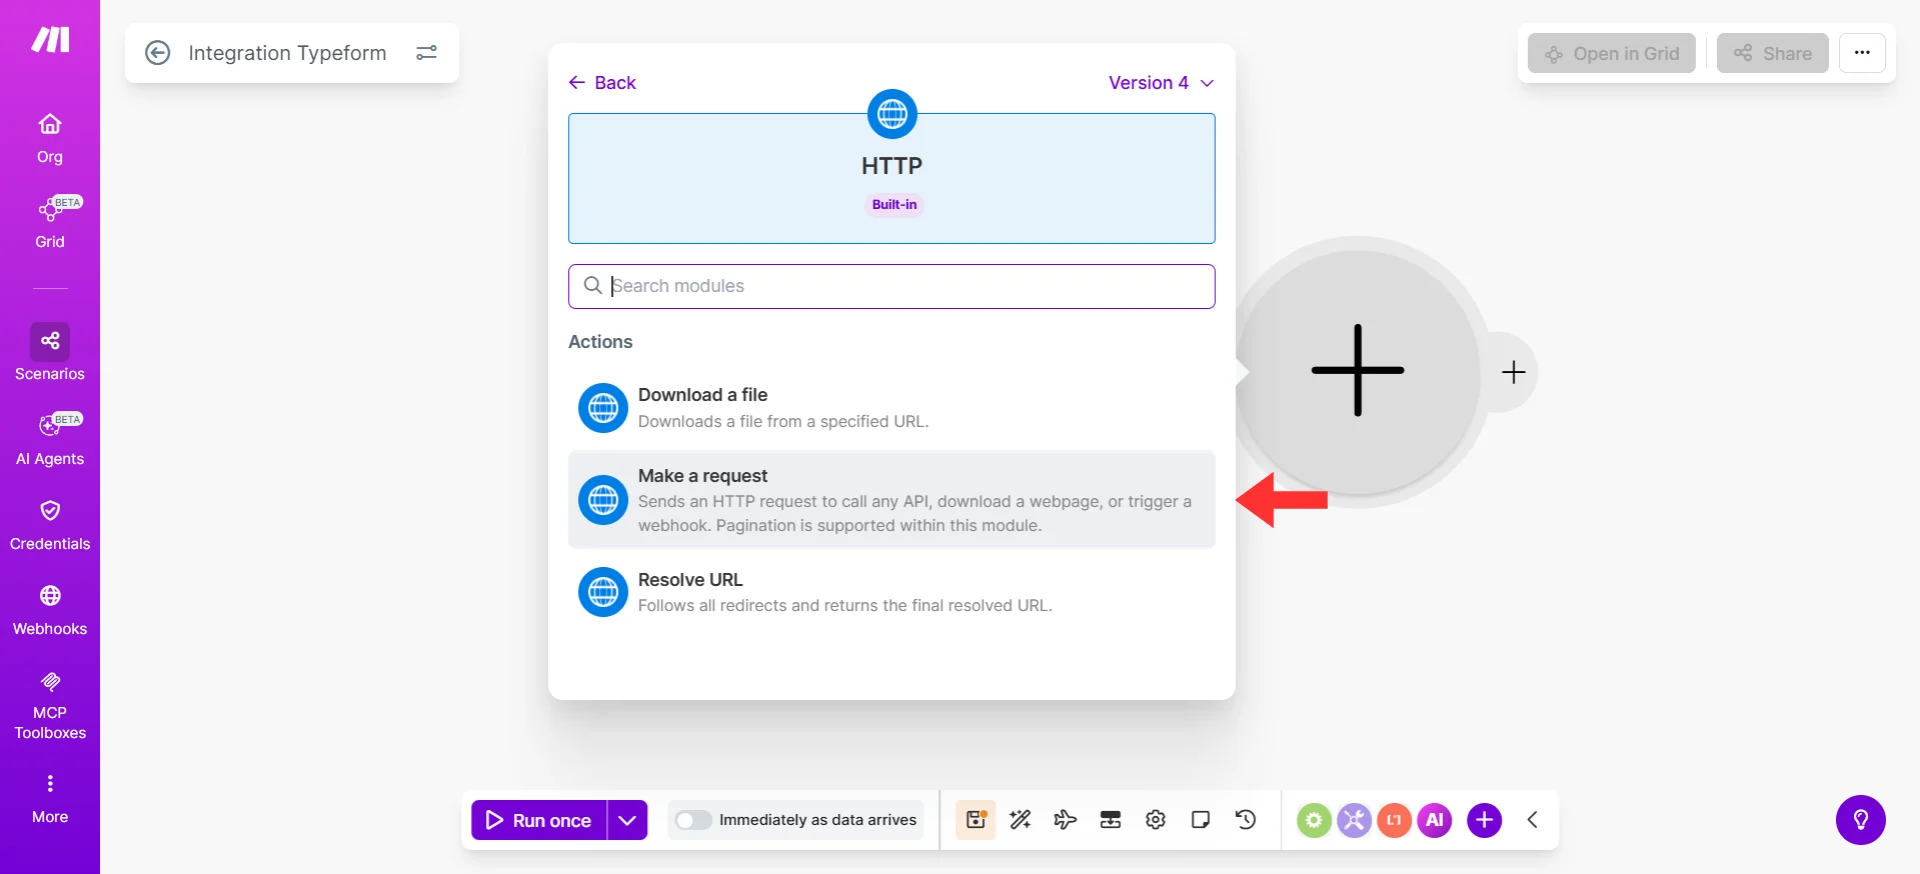
7. Click the **small plus (+) icon** on the right side of your trigger Module
8. Search for `HTTP` and select the **"HTTP"** app
9. Select the **"Make a request"** action
#### Add the action that sends data to Irelia
7. Click the **small plus (+) icon** on the right side of your trigger Module
8. Search for `HTTP` and select the **"HTTP"** app
9. Select the **"Make a request"** action
 #### Configure the request
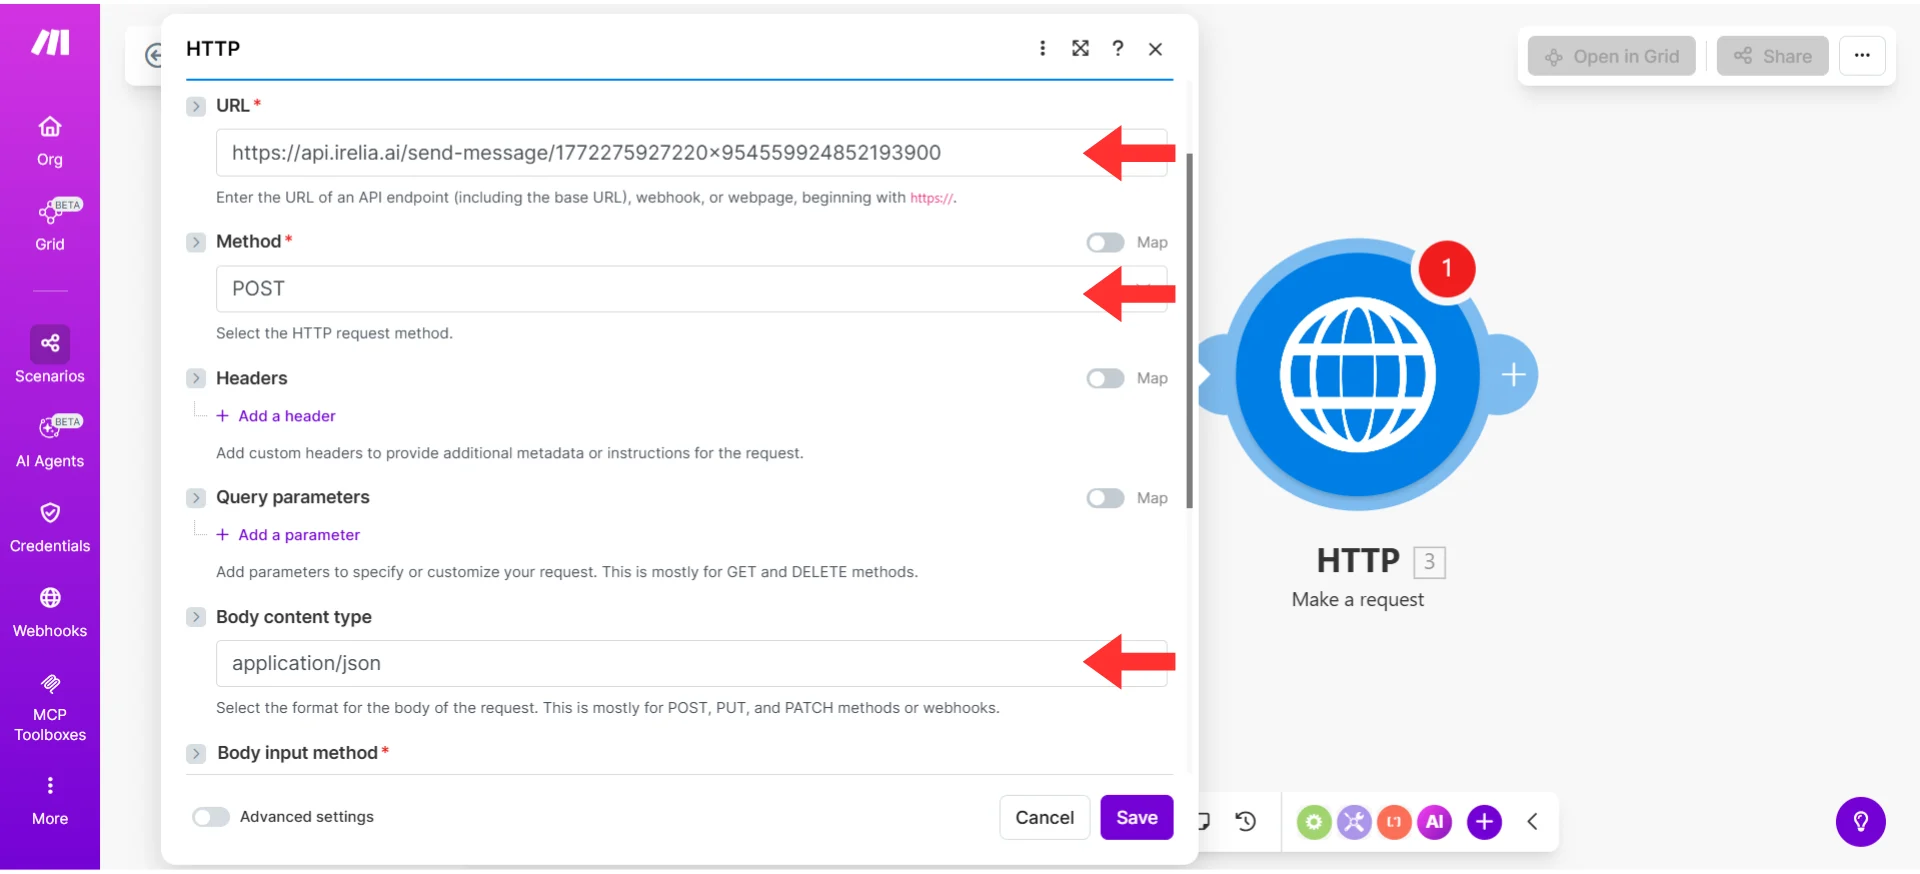
10. In the **"URL"** field, paste the URL you copied in Step 1 (e.g., `https://api.irelia.ai/send-message/1772216707789x385682060741759040`)
11. Set **"Method"** to **"POST"**
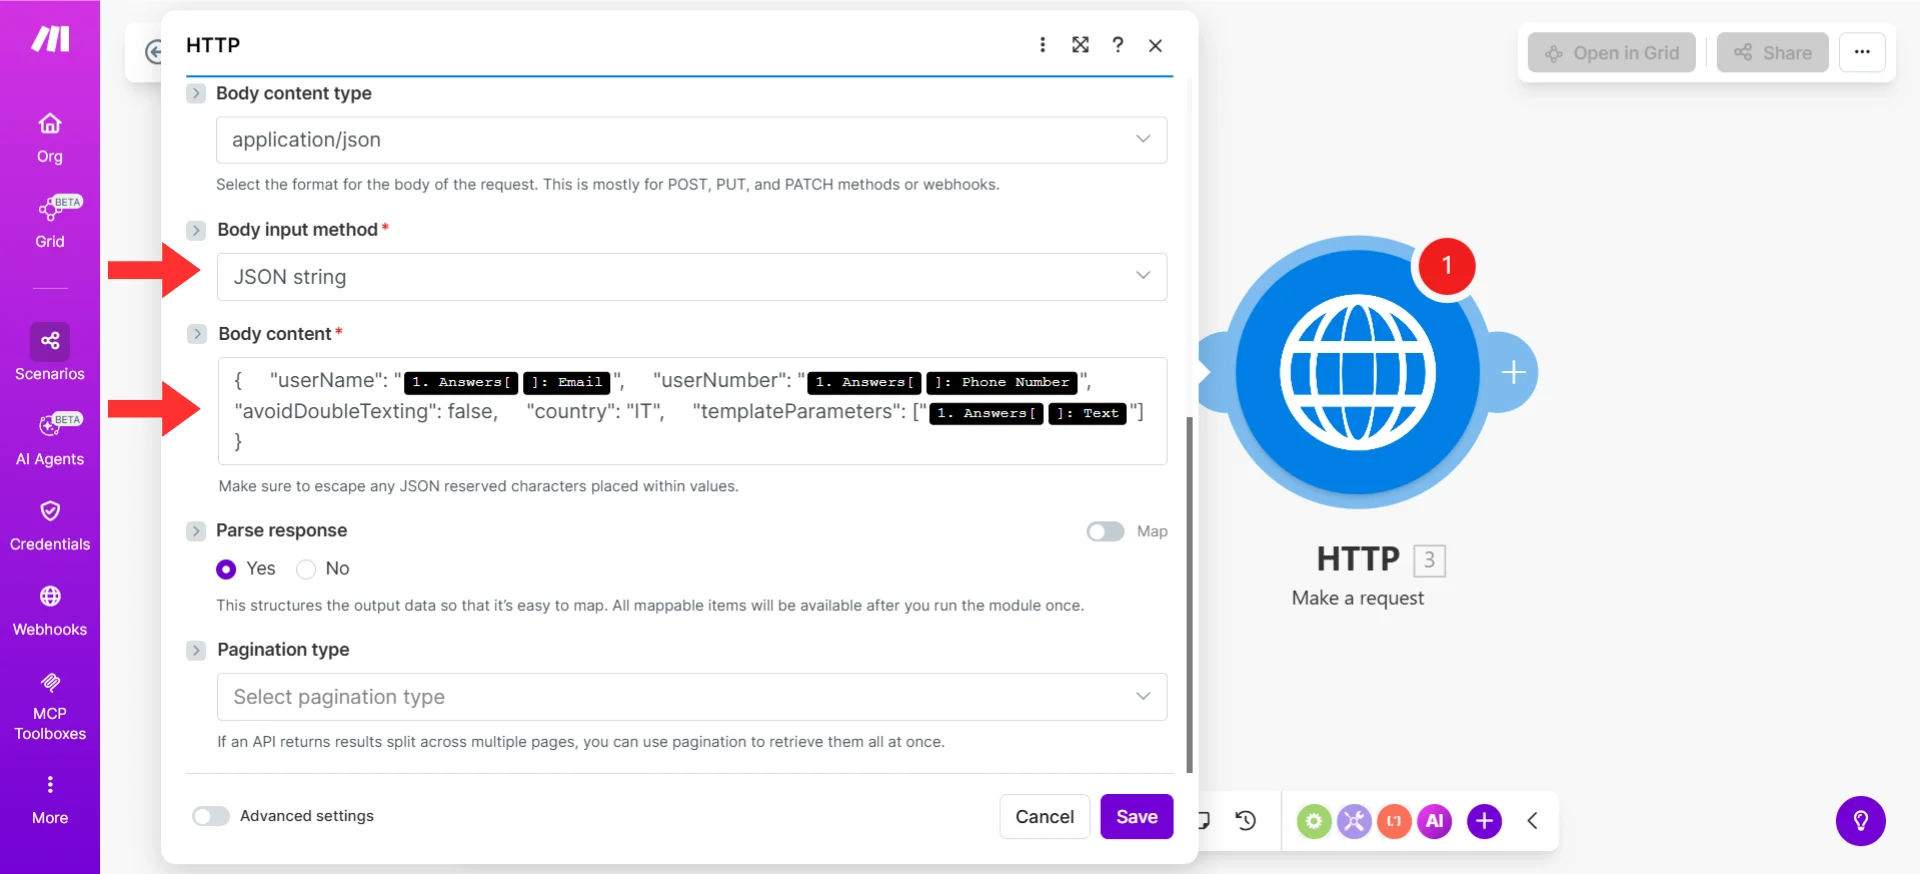
12. Select **"Raw"** as the body type and choose **"JSON (application/json)"** as the content type
13. In the **"Request content"** field, paste the following JSON structure:
```json theme={null}
{
"userName": "",
"userNumber": "",
"skipIfAlreadyContacted": false,
"skipIfAIOff": false,
"skipIfAgentChanged": false,
"country": "IT",
"templateParameters": [""]
}
```
14. Place your cursor inside the empty quotes for `"userName"` and click the variable from your trigger Module (the contact's name will appear in the mapping panel on the left)
15. Do the same for `"userNumber"` — map the phone number field from your trigger
16. For `"templateParameters"`, map each dynamic value inside the quotes, separated by commas (e.g., `["mapped value 1", "mapped value 2"]`)
17. Set **"Parse response"** to **"Yes"** — this lets Make.com read Irelia's response for debugging
#### Configure the request
10. In the **"URL"** field, paste the URL you copied in Step 1 (e.g., `https://api.irelia.ai/send-message/1772216707789x385682060741759040`)
11. Set **"Method"** to **"POST"**
12. Select **"Raw"** as the body type and choose **"JSON (application/json)"** as the content type
13. In the **"Request content"** field, paste the following JSON structure:
```json theme={null}
{
"userName": "",
"userNumber": "",
"skipIfAlreadyContacted": false,
"skipIfAIOff": false,
"skipIfAgentChanged": false,
"country": "IT",
"templateParameters": [""]
}
```
14. Place your cursor inside the empty quotes for `"userName"` and click the variable from your trigger Module (the contact's name will appear in the mapping panel on the left)
15. Do the same for `"userNumber"` — map the phone number field from your trigger
16. For `"templateParameters"`, map each dynamic value inside the quotes, separated by commas (e.g., `["mapped value 1", "mapped value 2"]`)
17. Set **"Parse response"** to **"Yes"** — this lets Make.com read Irelia's response for debugging
 **Tip:** Double-check your quotation marks, brackets, and commas. Invalid JSON is the #1 cause of failed requests. If you're unsure, paste your JSON into [jsonlint.com](https://jsonlint.com) to validate it before saving.
18. Click **"OK"** to save the Module
19. Click **"Run once"** to test the full Scenario
**What just happened:** Make.com fired your trigger, grabbed the sample data, and sent a request to Irelia. If successful, the HTTP Module will show a green checkmark and a `200` status code. Check your phone for the WhatsApp message.
20. If the test succeeds, click the **"Scheduling"** toggle at the bottom-left to activate your Scenario
Your Make.com Scenario is live!
In Go High Level (GHL), automations are called **Workflows**. You'll use the **Custom Webhook** action to send contact details to Irelia.
**Note:** The Custom Webhook action is an LC Premium Action — make sure Premium Actions & Triggers are enabled in your agency settings.
#### Set up your trigger
1. Log into your GHL account
2. Go to **"Automation"** → **"Workflows"** and open the Workflow where you want to add Irelia, or create a new one
3. Add a **trigger** that matches your use case (e.g., **"Form Submitted"**, **"Pipeline Stage Changed"**, **"Tag Added"**, **"Appointment Booked"**, etc.)
4. Configure the trigger as needed
**Tip:** Double-check your quotation marks, brackets, and commas. Invalid JSON is the #1 cause of failed requests. If you're unsure, paste your JSON into [jsonlint.com](https://jsonlint.com) to validate it before saving.
18. Click **"OK"** to save the Module
19. Click **"Run once"** to test the full Scenario
**What just happened:** Make.com fired your trigger, grabbed the sample data, and sent a request to Irelia. If successful, the HTTP Module will show a green checkmark and a `200` status code. Check your phone for the WhatsApp message.
20. If the test succeeds, click the **"Scheduling"** toggle at the bottom-left to activate your Scenario
Your Make.com Scenario is live!
In Go High Level (GHL), automations are called **Workflows**. You'll use the **Custom Webhook** action to send contact details to Irelia.
**Note:** The Custom Webhook action is an LC Premium Action — make sure Premium Actions & Triggers are enabled in your agency settings.
#### Set up your trigger
1. Log into your GHL account
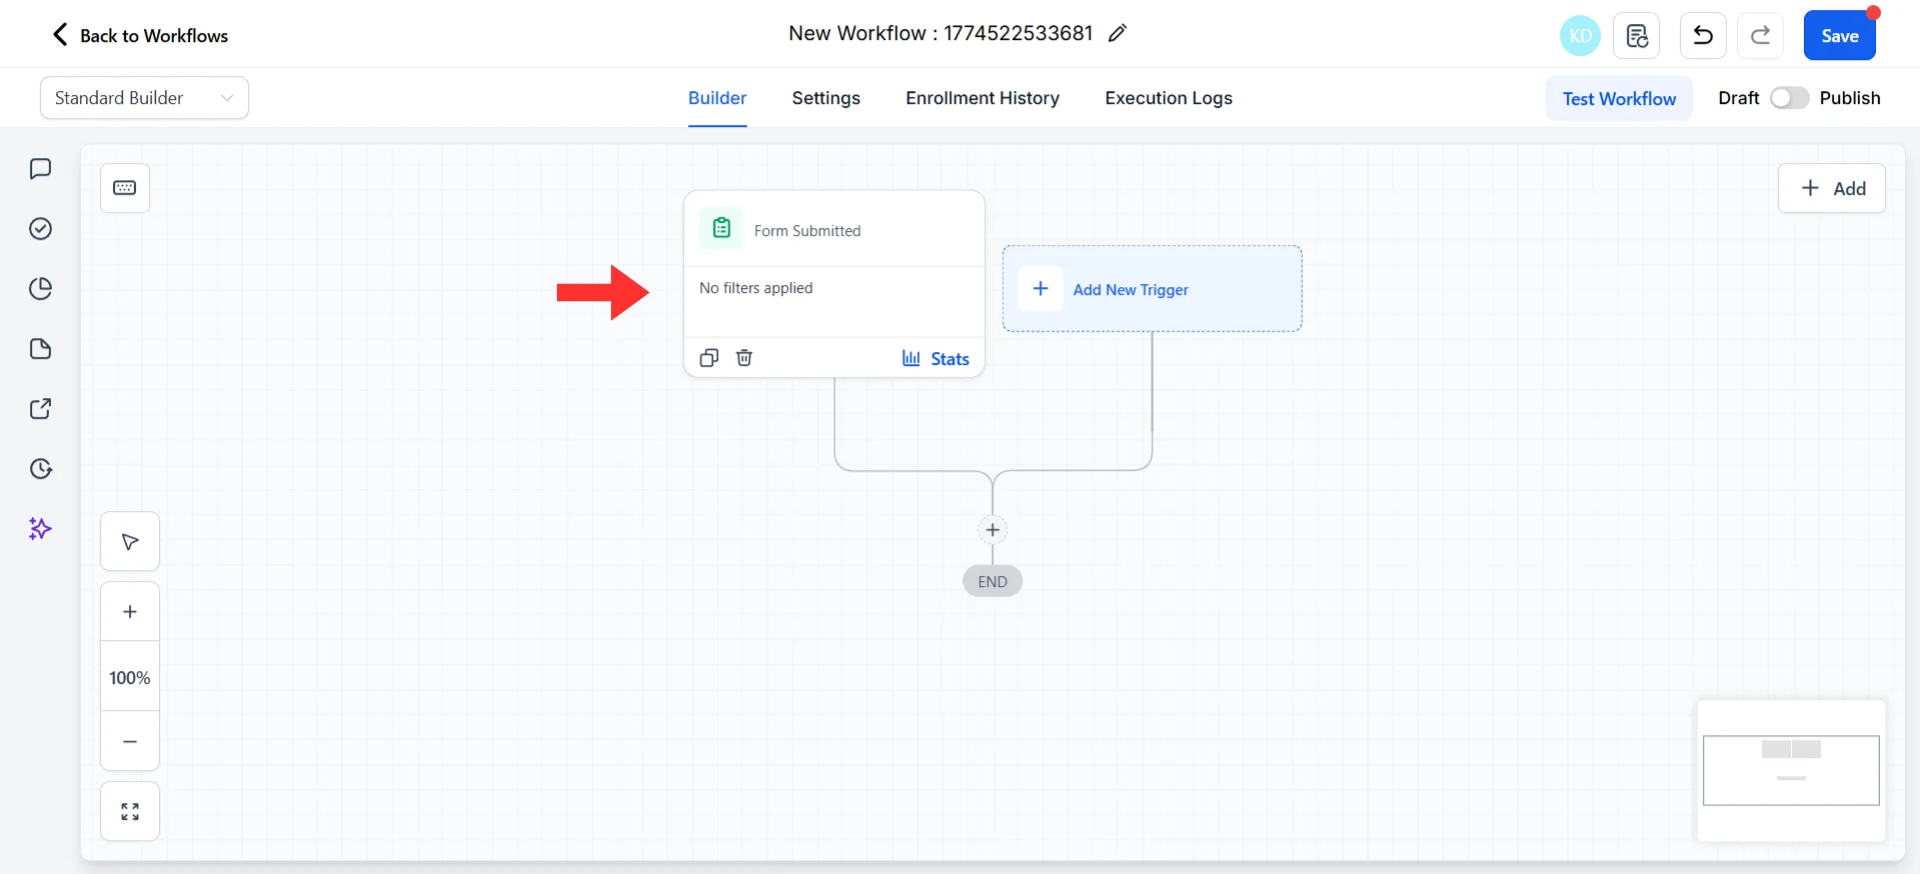
2. Go to **"Automation"** → **"Workflows"** and open the Workflow where you want to add Irelia, or create a new one
3. Add a **trigger** that matches your use case (e.g., **"Form Submitted"**, **"Pipeline Stage Changed"**, **"Tag Added"**, **"Appointment Booked"**, etc.)
4. Configure the trigger as needed
 #### Add the action that sends data to Irelia
5. Click the **plus (+) icon** below your trigger to add an action
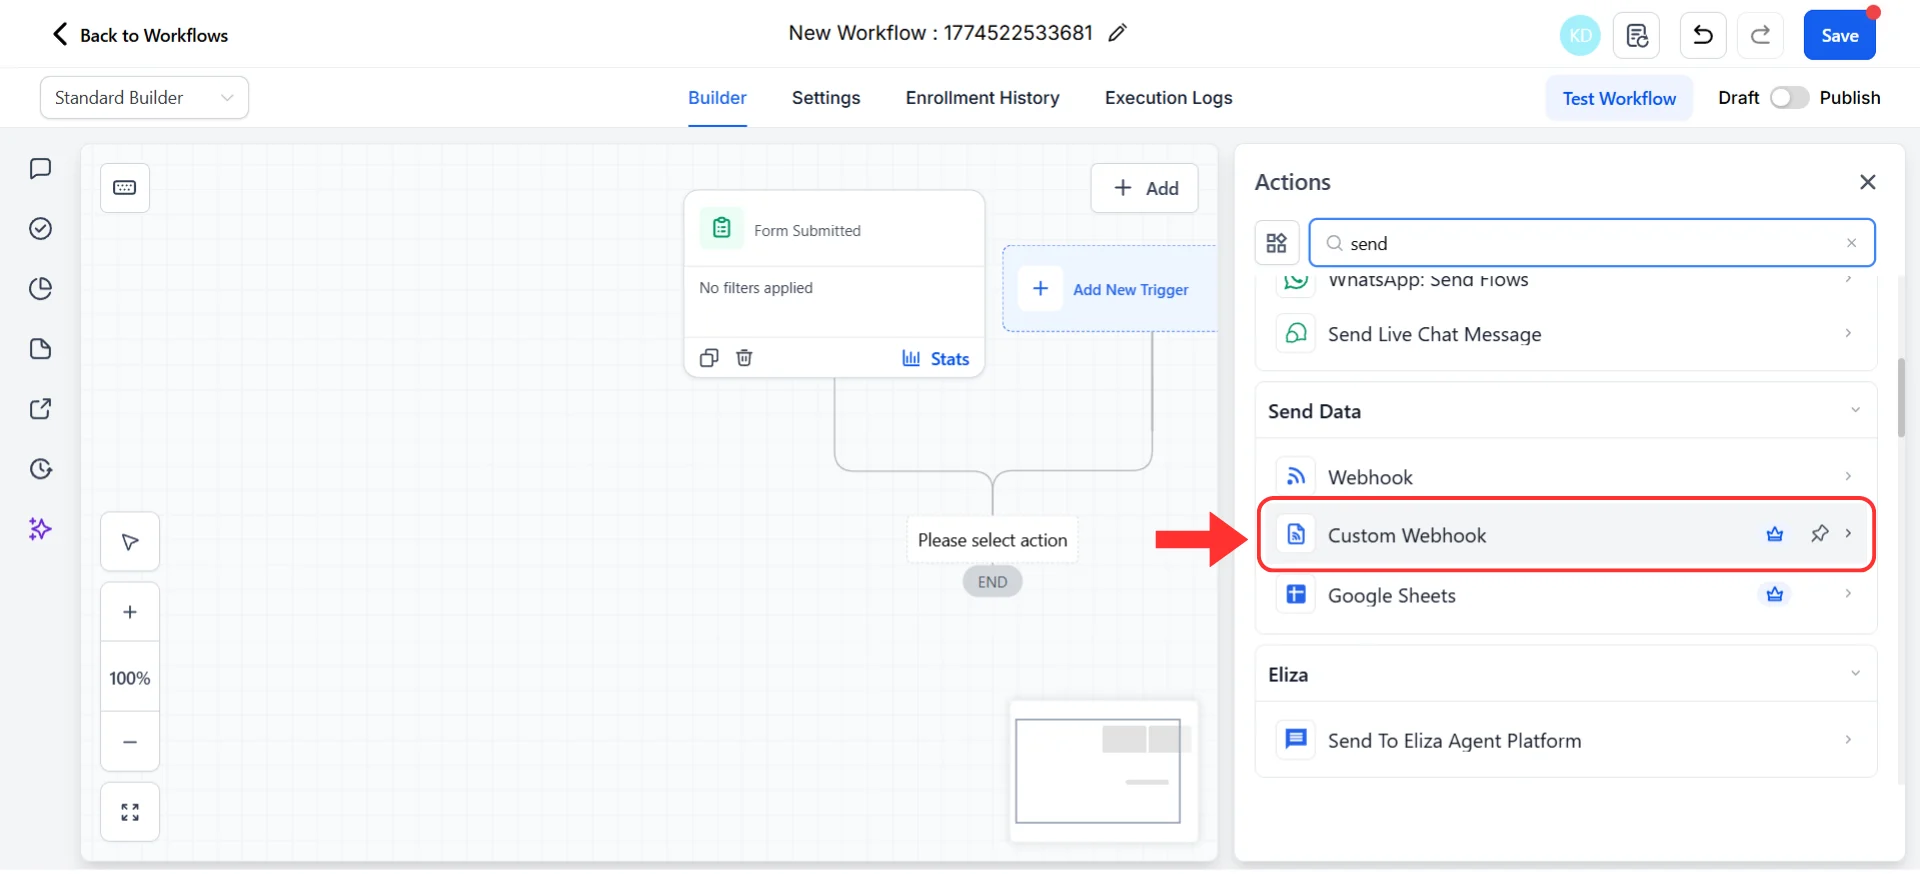
6. Click **"+ Add action"** → **"Send Data"** → **"Custom Webhook"**
#### Add the action that sends data to Irelia
5. Click the **plus (+) icon** below your trigger to add an action
6. Click **"+ Add action"** → **"Send Data"** → **"Custom Webhook"**
 #### Configure the webhook
7. Give the action a descriptive name (e.g., `Send Irelia WhatsApp Template`)
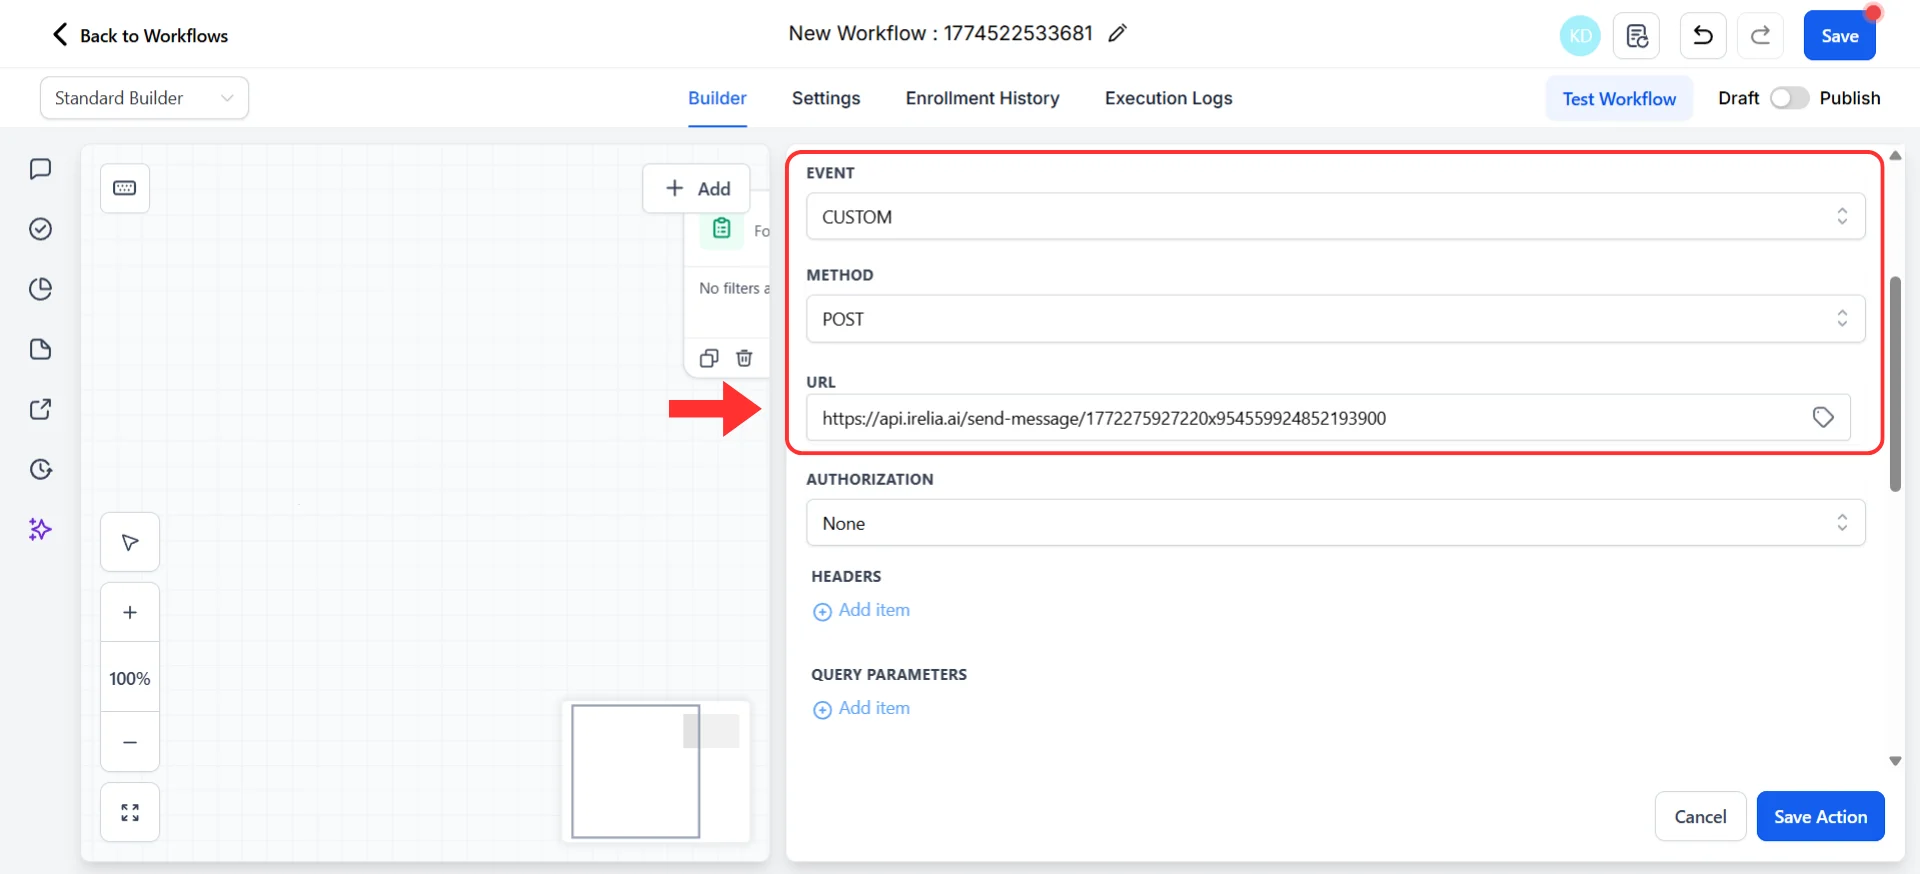
8. In the **"URL"** field, paste the URL you copied in Step 1
9. For the **"Event"** setting, select **"CUSTOM"** — this gives you full control over the request format
10. Set **"Method"** to **"POST"**
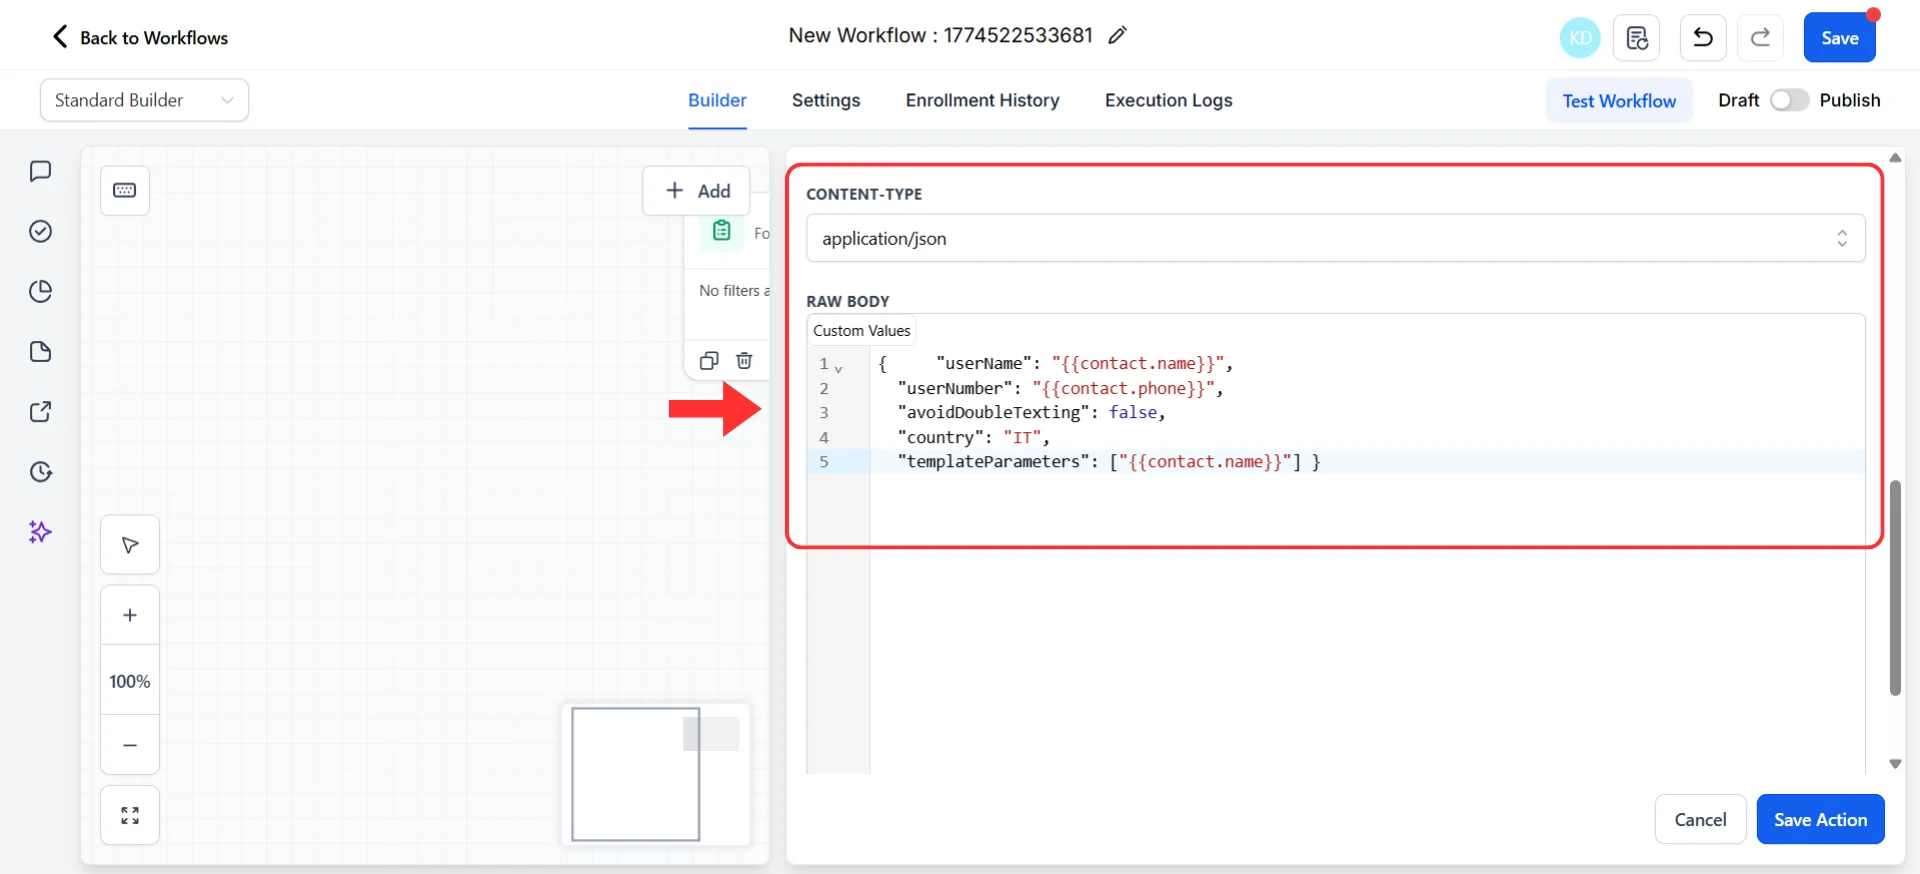
11. Set **"Content-Type"** to `application/json`
12. In the **"Raw Body"** editor, paste the following JSON structure:
```json theme={null}
{
"userName": "X",
"userNumber": "X",
"skipIfAlreadyContacted": false,
"skipIfAIOff": false,
"skipIfAgentChanged": false,
"country": "IT",
"templateParameters": ["X"]
}
```
13. To insert dynamic contact fields, place your cursor where the value should go and use GHL's merge field selector (the `X` autocomplete). Use the field selector to insert data from the contact record, such as name, email, or phone.
#### Configure the webhook
7. Give the action a descriptive name (e.g., `Send Irelia WhatsApp Template`)
8. In the **"URL"** field, paste the URL you copied in Step 1
9. For the **"Event"** setting, select **"CUSTOM"** — this gives you full control over the request format
10. Set **"Method"** to **"POST"**
11. Set **"Content-Type"** to `application/json`
12. In the **"Raw Body"** editor, paste the following JSON structure:
```json theme={null}
{
"userName": "X",
"userNumber": "X",
"skipIfAlreadyContacted": false,
"skipIfAIOff": false,
"skipIfAgentChanged": false,
"country": "IT",
"templateParameters": ["X"]
}
```
13. To insert dynamic contact fields, place your cursor where the value should go and use GHL's merge field selector (the `X` autocomplete). Use the field selector to insert data from the contact record, such as name, email, or phone.
 14. Click **"Save Action"**
#### Test the Workflow
15. Use **"Test Workflow"** (draft mode) with a sample record to trigger the action
16. Select a test contact (make sure they have a valid phone number)
17. Click **"Run Test"**
18. Check Execution Logs / run history to confirm the action fired. A `200` status means success.
19. Check your phone for the WhatsApp message
20. If the test succeeds, click the **"Publish"** toggle to set your Workflow live
Your GHL Workflow is live!
### Step 5: Verify the Full Automation
\~3 minutes
Regardless of which platform you chose, let's verify the complete flow end-to-end.
1. Trigger a real event (or a realistic test): submit your form, move a CRM contact, or perform whatever action starts your automation
2. Wait 10–30 seconds
3. Check the following:
* Your phone received the WhatsApp template message
* The conversation appears in Irelia's [conversation list](/Guide-eng/the-Chat-Panel)
* The AI agent responded correctly when you replied to the message
* Your automation platform shows a successful run in its history/logs
Once everything is verified, make these final adjustments:
* **Name your automation clearly** — give your Zap/Scenario/Workflow a descriptive name like `"Typeform Leads → Irelia WhatsApp Follow-Up"` so you can find it later
* **Review the skip settings** — `skipIfAlreadyContacted`, `skipIfAIOff`, and `skipIfAgentChanged` all default to `false`. Review the [field explanations in Step 3](#skipifalreadycontacted) to decide if any should be `true` for your use case
* **Check `country` accuracy** — if your leads come from multiple countries, make sure the `country` value covers the majority, or ensure your trigger passes phone numbers with the full prefix
* **Verify `templateParameters` mapping** — if your template says *"Hi X, thanks for your interest in X"*, make sure the first value is the contact's name and the second is the product/service name
### 🎉 Congratulations! You did it!
Take a moment to appreciate what you just built:
✅ Every new lead, form submission, or CRM event now triggers an instant WhatsApp message
14. Click **"Save Action"**
#### Test the Workflow
15. Use **"Test Workflow"** (draft mode) with a sample record to trigger the action
16. Select a test contact (make sure they have a valid phone number)
17. Click **"Run Test"**
18. Check Execution Logs / run history to confirm the action fired. A `200` status means success.
19. Check your phone for the WhatsApp message
20. If the test succeeds, click the **"Publish"** toggle to set your Workflow live
Your GHL Workflow is live!
### Step 5: Verify the Full Automation
\~3 minutes
Regardless of which platform you chose, let's verify the complete flow end-to-end.
1. Trigger a real event (or a realistic test): submit your form, move a CRM contact, or perform whatever action starts your automation
2. Wait 10–30 seconds
3. Check the following:
* Your phone received the WhatsApp template message
* The conversation appears in Irelia's [conversation list](/Guide-eng/the-Chat-Panel)
* The AI agent responded correctly when you replied to the message
* Your automation platform shows a successful run in its history/logs
Once everything is verified, make these final adjustments:
* **Name your automation clearly** — give your Zap/Scenario/Workflow a descriptive name like `"Typeform Leads → Irelia WhatsApp Follow-Up"` so you can find it later
* **Review the skip settings** — `skipIfAlreadyContacted`, `skipIfAIOff`, and `skipIfAgentChanged` all default to `false`. Review the [field explanations in Step 3](#skipifalreadycontacted) to decide if any should be `true` for your use case
* **Check `country` accuracy** — if your leads come from multiple countries, make sure the `country` value covers the majority, or ensure your trigger passes phone numbers with the full prefix
* **Verify `templateParameters` mapping** — if your template says *"Hi X, thanks for your interest in X"*, make sure the first value is the contact's name and the second is the product/service name
### 🎉 Congratulations! You did it!
Take a moment to appreciate what you just built:
✅ Every new lead, form submission, or CRM event now triggers an instant WhatsApp message
✅ Your AI agent takes over the conversation automatically — qualifying leads, answering questions, and booking meetings
✅ No manual follow-up needed — your system works 24/7, even while you sleep
✅ You can duplicate this setup for any trigger, any template, any audience
**What happens from here:**
Every time your trigger event occurs → your automation platform sends the contact details to Irelia → Irelia delivers the WhatsApp template → the contact receives a personalized message → your AI agent handles the rest of the conversation. All without you lifting a finger.
### What's Next?
Now that you have one working automation, the possibilities are endless.
**Your options from here:**
1. 🎯 **Want to automate another template?** Repeat this guide with a different WhatsApp template — each has its own unique URL
2. ➕ **Want multiple triggers for the same template?** Create additional automations in your platform — they can all point to the same Irelia URL
3. 🔄 **Want to combine methods?** You can use automation, [Irelia Forms](/Guide-eng/How-to-Use-Irelia-Forms-to-Capture-Leads-and-Start-WhatsApp-Conversations), AND [Meta Instant Forms](/Guide-eng/Connect-Meta-Instant-Forms) simultaneously — they all work independently
4. 📊 **Want to enrich the data?** Add intermediate steps in your automation (e.g., look up the contact in your CRM, add tags, log to a spreadsheet) before sending to Irelia
## ✅ Quick Checklist
Use this to verify your setup is complete:
* WhatsApp template is in **"Approved"** status
* Template URL copied from Irelia's **"Configure automation"** panel
* Test message sent successfully from Irelia's panel
* URL stored securely (not shared publicly)
* Sufficient credits available in your Irelia account
* Trigger configured and pulling sample data correctly
* HTTP/webhook action added and set to `POST`
* URL field contains the correct Irelia URL
* Body type set to `raw JSON` / `application/json`
* `userName` mapped to the contact's name from trigger
* `userNumber` mapped to the contact's phone number from trigger
* `skipIfAlreadyContacted`, `skipIfAIOff`, `skipIfAgentChanged` set intentionally (all `false` recommended to start)
* `country` set to the correct default country code
* `templateParameters` correctly mapped (if template has variables)
* Full automation test completed end-to-end
* WhatsApp message received on test phone
* Conversation visible in Irelia's [conversation list](/Guide-eng/the-Chat-Panel)
* AI agent responds when replying to the message
* Automation platform shows successful run in history/logs
* Automation is turned ON / published
✅ **All checked? You're good to go!**
## 🛠️ Troubleshooting & FAQs
**How to fix it:**
**Step 1: Check your values**
* Make sure the phone number includes the country prefix (e.g., `+39` for Italy, `+1` for US)
* If the prefix is missing, verify that the `country` field is set correctly
* Remove any spaces, dashes, or parentheses from the number
* Confirm that all required fields (`userName`, `userNumber`, `country`) are present and not empty
**Step 2: Check your credit balance**
* Each template send costs **10 credits**. If your account has insufficient credits, the message won't be sent.
* Check your credit balance in the Irelia dashboard and top up if needed.
**Step 3: Check your skip settings**
* If `skipIfAlreadyContacted` is `true` and you've already contacted this number through Irelia, the message will be intentionally skipped
* If `skipIfAIOff` is `true` and AI is turned off for this contact, the message will be skipped
* If `skipIfAgentChanged` is `true` and the contact is in conversation with a different agent, the message will be skipped
* Set all three to `false` for testing, or whenever you want to ensure every lead receives the message
**How to fix it:**
**Step 1: Validate your JSON**
* Copy your JSON body and paste it into [jsonlint.com](https://jsonlint.com)
* Look for missing quotes, extra commas, or mismatched brackets
* Every text value must be in double quotes: `"value"`, not `value`
**Step 2: Check Content-Type**
* Make sure the request is sending `application/json` as the Content-Type
* In Zapier: the **"Payload Type"** dropdown should be set to **"Json"**
* In Make.com: select **"Raw"** body type → **"JSON (application/json)"**
* In GHL: set **"Event"** to **"CUSTOM"** and **"Content-Type"** to `application/json`
**Step 3: Check the URL**
* Make sure you copied the full URL from Irelia (it's long — don't truncate it)
* Confirm there are no extra spaces before or after the URL
**How to fix it:**
**Step 1: Verify the format**
* `templateParameters` must be a list of text values in this format: `["value1", "value2"]`
* Each value must be in double quotes
* The order must match the order of variables in your template (`X` first, `X` second, etc.)
**Step 2: Check for empty values**
* If a mapped field from your trigger is empty (e.g., the lead didn't provide their name), the variable will be replaced with a blank space
* Add a fallback value in your automation platform, or use a default value
Yes! Your URL is tied to a specific WhatsApp template and AI agent. You can use it from as many automations as you want — Zapier, Make.com, GHL, or even all three simultaneously. Each one works independently.
Once the template message is delivered, the contact can reply. When they do, your Irelia AI agent automatically takes over the conversation — qualifying the lead, answering questions, and following your configured conversation flow. You don't need to set up anything extra for this — it's handled by the agent associated with the template.
Each template sent via automation consumes **10 credits** — the same as any other send method. Check your credit balance in the Irelia dashboard to ensure you have enough for your expected volume.
Yes. If your trigger provides phone numbers with the full country prefix (e.g., `+1`, `+44`, `+39`), Irelia will deliver to any country. The `country` field only matters as a fallback when the prefix is missing. If your leads come from multiple countries, encourage the form to capture the full international number.
The universal connector approach (HTTP/webhook) is the standard method for connecting to any app that doesn't have a dedicated integration. It gives you full flexibility and works identically across all platforms.
**Irelia.ai Support:**
* Contact support in the WhatsApp priority support group or send an email to [info@irelia.ai](mailto:info@irelia.ai)
* Include: screenshots of your automation configuration, the error message (or status code), your JSON body, and what you expected vs. what happened
**Zapier Support:**
* Visit: [help.zapier.com](https://help.zapier.com)
* Check: [status.zapier.com](https://status.zapier.com) for outages
**Make.com Support:**
* Visit: [make.com/en/help](https://www.make.com/en/help)
* Community forum: [community.make.com](https://community.make.com)
**Go High Level Support:**
* Visit: [help.gohighlevel.com](https://help.gohighlevel.com)
* Check: [status.gohighlevel.com](https://status.gohighlevel.com) for outages