> ## Documentation Index
> Fetch the complete documentation index at: https://docs.irelia.ai/llms.txt
> Use this file to discover all available pages before exploring further.
# How to Connect Irelia.ai to Zapier Using Webhooks: A Step-by-Step Guide
> Connect your Irelia.ai conversational agents to Zapier using webhooks — so that every qualified lead, collected data point, or completed goal automatically flows to your CRM, spreadsheets, or team chat in real time, with zero manual work.
\~20 minutes setup
***
Prerequisites before starting
Start here, find your own use case
Condensed steps for experienced users
Complete walkthrough (Steps 1–6)
Filters, paths & real-world examples
Verify your setup is complete
Common issues & fixes
***
### Introduction
You've built your conversational AI agent on [Irelia.ai](/en/How-Irelia.ai-Works), and it's actively chatting with prospects on [WhatsApp](/en/How-to-Connect-WhatsApp-Business-to-Irelia.ai), [Facebook, and Instagram](/en/How-to-Connect-Meta-Messenger-and-Instant-Forms-to-Irelia.ai). But what happens when something important occurs — like when a lead gets qualified, when your agent collects key information, or when someone [books a meeting](/en/How-to-Set-Up-Calendar-Booking-in-Irelia)?
Right now, you might be manually checking your [Irelia dashboard](/en/the-Chat-Panel) and copying information to other tools. There's a better way.
This guide shows you how to automatically send information from Irelia to your other business tools the instant something important happens — no manual work, no delays, no checking dashboards.
**By the end of this guide, you'll have:**
✅ A working automation that triggers when important moments happen in your Irelia conversations
✅ Data flowing automatically from Irelia to your CRM, spreadsheets, or team chat
✅ The knowledge to build unlimited additional automations
### How This Works
Think of this connection like a smart doorbell system:
| Doorbell System | Your Automation |
| :------------------------------------------------------------------ | :------------------------------------------------------------------------------------ |
| 🏠 Something happens at your door (doorbell rings, package arrives) | Your AI agent has an important moment (lead qualified, goal achieved, data collected) |
| 📹 Doorbell camera captures it and sends info | Irelia's webhook packages the details (who, what, when) |
| 📱 Your phone receives the notification | Zapier receives the data instantly |
| ⚡ Automatic action triggers (save video, alert family) | Your apps do their thing (add to CRM, send Slack message, update spreadsheet) |
**The magic:** Everything happens automatically in seconds. No manual work. No delays. No checking dashboards.
### 📡 What Events Can Irelia Notify You About?
As your AI agent chats with prospects, Irelia tracks important milestones called **events** — the "moments that matter" in your conversations.
Below are a few examples of Irelia events:
| Event | What It Means | Example Use |
| :---------------------------- | :--------------------------------------------- | :------------------------ |
| 💬 **New Inbound Contact** | Someone messages you first | → Notify sales team |
| 🎯 **Lead Qualified** | Prospect meets your criteria | → Add to CRM |
| ❌ **Lead Disqualified** | Prospect doesn't fit | → Add to nurture campaign |
| ✅ **Goal Achieved** | Prospect completed an objective | → Send confirmation email |
| 📝 **Data Gathered** | Agent collected specific information | → Update spreadsheet |
| ❓ **Question Lacking Answer** | Prospect asked something agent couldn't answer | → Create task for team |
When an event triggers, Irelia packages all the relevant information — prospect details, conversation history, qualification status, custom data — and sends it to Zapier instantly.
**For this guide, we'll use "New Inbound Contact"** because it's easy to trigger and perfect for learning. Once you understand how it works, you can easily set up other events.
### 📝 What You'll Do
1. 🔗 **Get a webhook URL from Zapier** — 3 min
2. 📋 **Paste the URL into Irelia** — 2 min
3. 🧪 **Send test data** — 2 min
4. ⚡ **Set up your action** (Google Sheets, Slack, etc.) — 5 min
5. ✅ **Test everything end-to-end** — 3 min
6. 🚀 **Turn it on and name it** — 1 min
**Total: \~15–20 minutes**
## 📋 What You'll Need
* An Irelia.ai account with at least one active agent Required
* A Zapier account (free tier works fine) — [Sign up here](https://zapier.com) if needed Required
* A destination for your data (Google Sheets, Slack, or your CRM) Required
**No coding required.** If you can copy and paste, you can do this.
## 🎯 Common Use Cases
**80% of readers need one of these two setups.** Find yours, note the guidance, then follow the [Step-by-Step Setup](#-step-by-step-setup) below — you'll just make different selections at Step 2 and Step 4.
*Examples: lead marked as qualified → update HubSpot status · meeting booked → log it in your sheet · goal completed → notify your sales team*
📡 **Select this event in Step 2:** `Lead Qualified` or `Goal Achieved`
**Which steps do I follow?**
* **Contact already exists** in your CRM or spreadsheet → Follow Steps 1–3, then use the [Search & Update](#search-and-update-existing-records) pattern for Step 4.
* **Contact is brand new** (not yet in your system) → Follow Steps 1–6 as written (Example A, B, or C in Step 4).
```mermaid actions placement="bottom-right" theme={null}
flowchart TD
A["Lead qualifies or goal is completed"] --> B{"Does this contact already exist in your CRM / spreadsheet?"}
B -->|Yes| C["Follow Steps 1-3, then go to Search & Update for Step 4"]
B -->|No| D["Follow Steps 1-6 as written"]
```
**Most common mistake:** The contact likely already exists in your system (you probably added them on first contact). If you use "Create Row" or "Create Contact" again, you'll get **duplicates**. Use the [Search and Update Existing Records](#search-and-update-existing-records) pattern for Step 4 instead.
*Examples: agent collects budget → populate CRM field · company size gathered → update spreadsheet row · timeline captured → segment lead automatically*
📡 **Select this event in Step 2:** `Data Gathered`
**Which steps do I follow?**
* **Contact already exists** in your CRM or spreadsheet → Follow Steps 1–3, then use the [Search & Update](#search-and-update-existing-records) pattern for Step 4.
* **Contact is brand new** (not yet in your system) → Follow Steps 1–6 as written (Example A, B, or C in Step 4).
```mermaid actions placement="bottom-right" theme={null}
flowchart TD
A["Agent collects a piece of information"] --> B{"Does this contact already exist in your CRM / spreadsheet?"}
B -->|Yes| C["Follow Steps 1-3, then go to Search & Update for Step 4"]
B -->|No| D["Follow Steps 1-6 as written"]
```
**Don't see your use case?** No problem — review the [full events table](#-what-events-can-irelia-notify-you-about) and follow the guide using "New Inbound Contact" as your learning event. The process is identical for every event; only your selections at Step 2 and Step 4 change.
## ⚡ Quick Path (Experienced Users)
Already comfortable with Zapier? Here's the condensed version:
1. **Zapier:** Create Zap → Trigger: "Webhooks by Zapier" → Event: "Catch Hook" → Copy webhook URL
2. **Irelia:** Settings → Select Agent → Events and Notifications → Paste URL into desired event field
3. **Test:** Click "Test" button in Irelia → Return to Zapier → Verify data received
4. **Action:** Add your action app → Map fields → Test → Publish
Need more detail? Continue with the full guide below.
## 🔧 Step-by-Step Setup
### Step 1: Set Up Zapier to Receive Irelia Notifications
\~3 minutes
In this step, you'll create a new automation and configure it to listen for events from Irelia.
#### Create your Zap
1. Log into your Zapier account at [zapier.com](https://zapier.com)
2. Click the **"Create Zap"** button (top left or center of your dashboard)
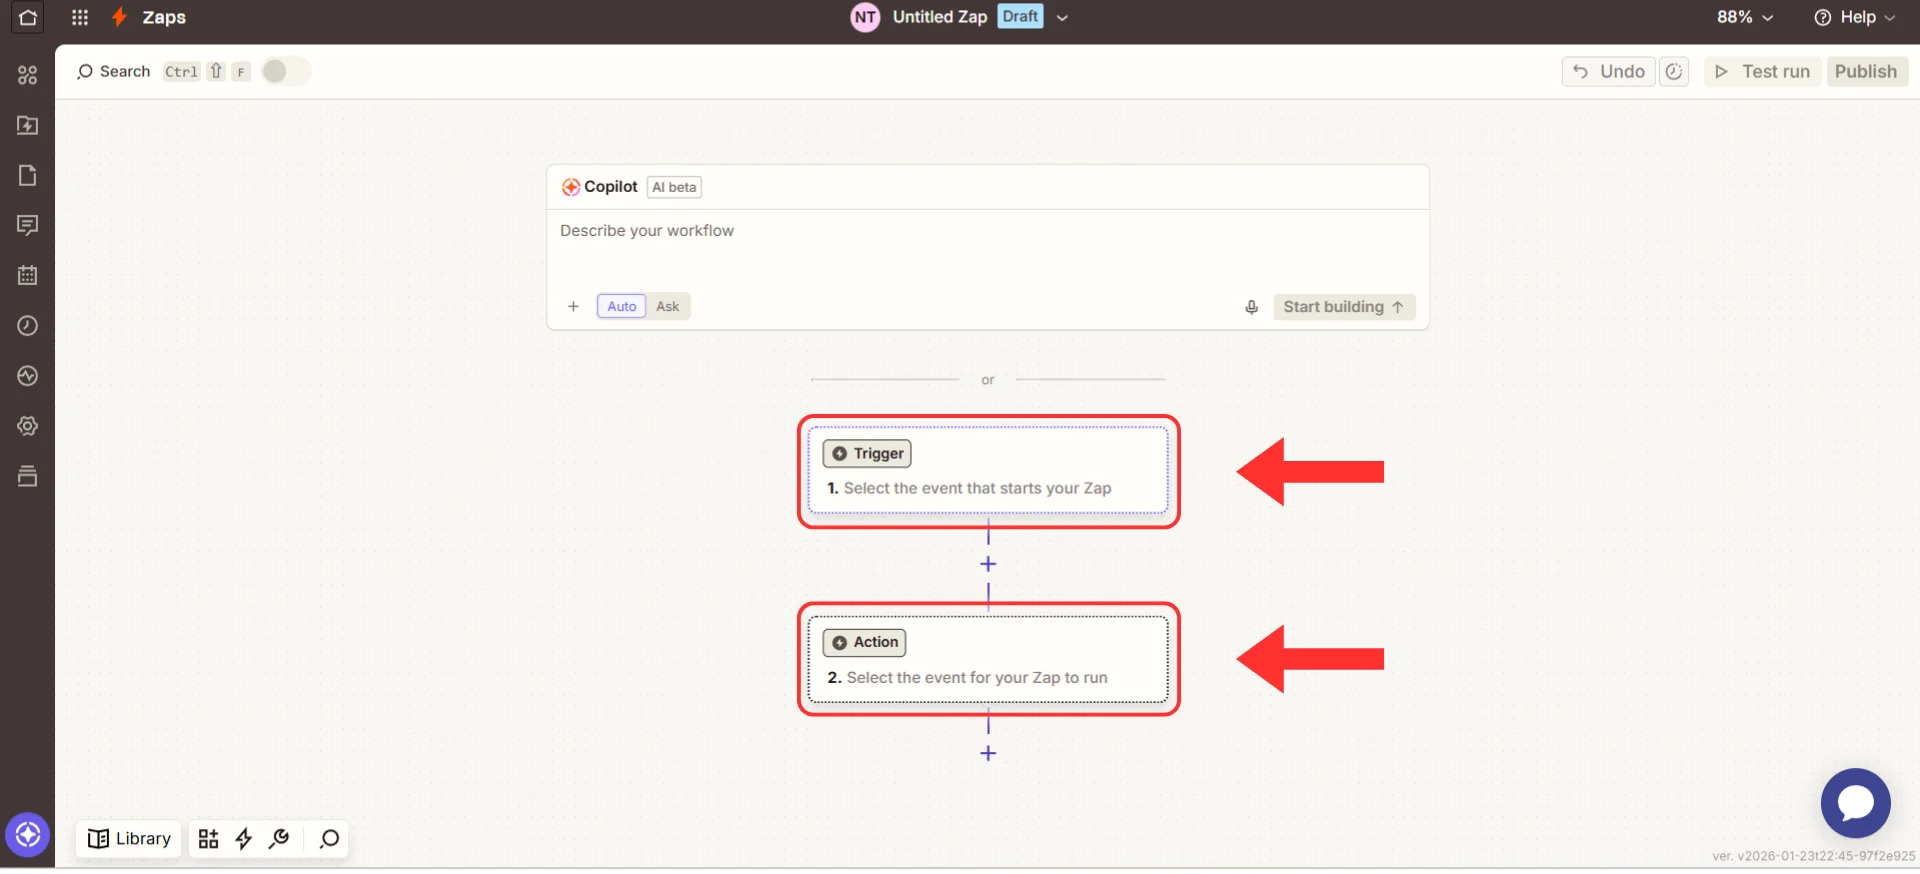
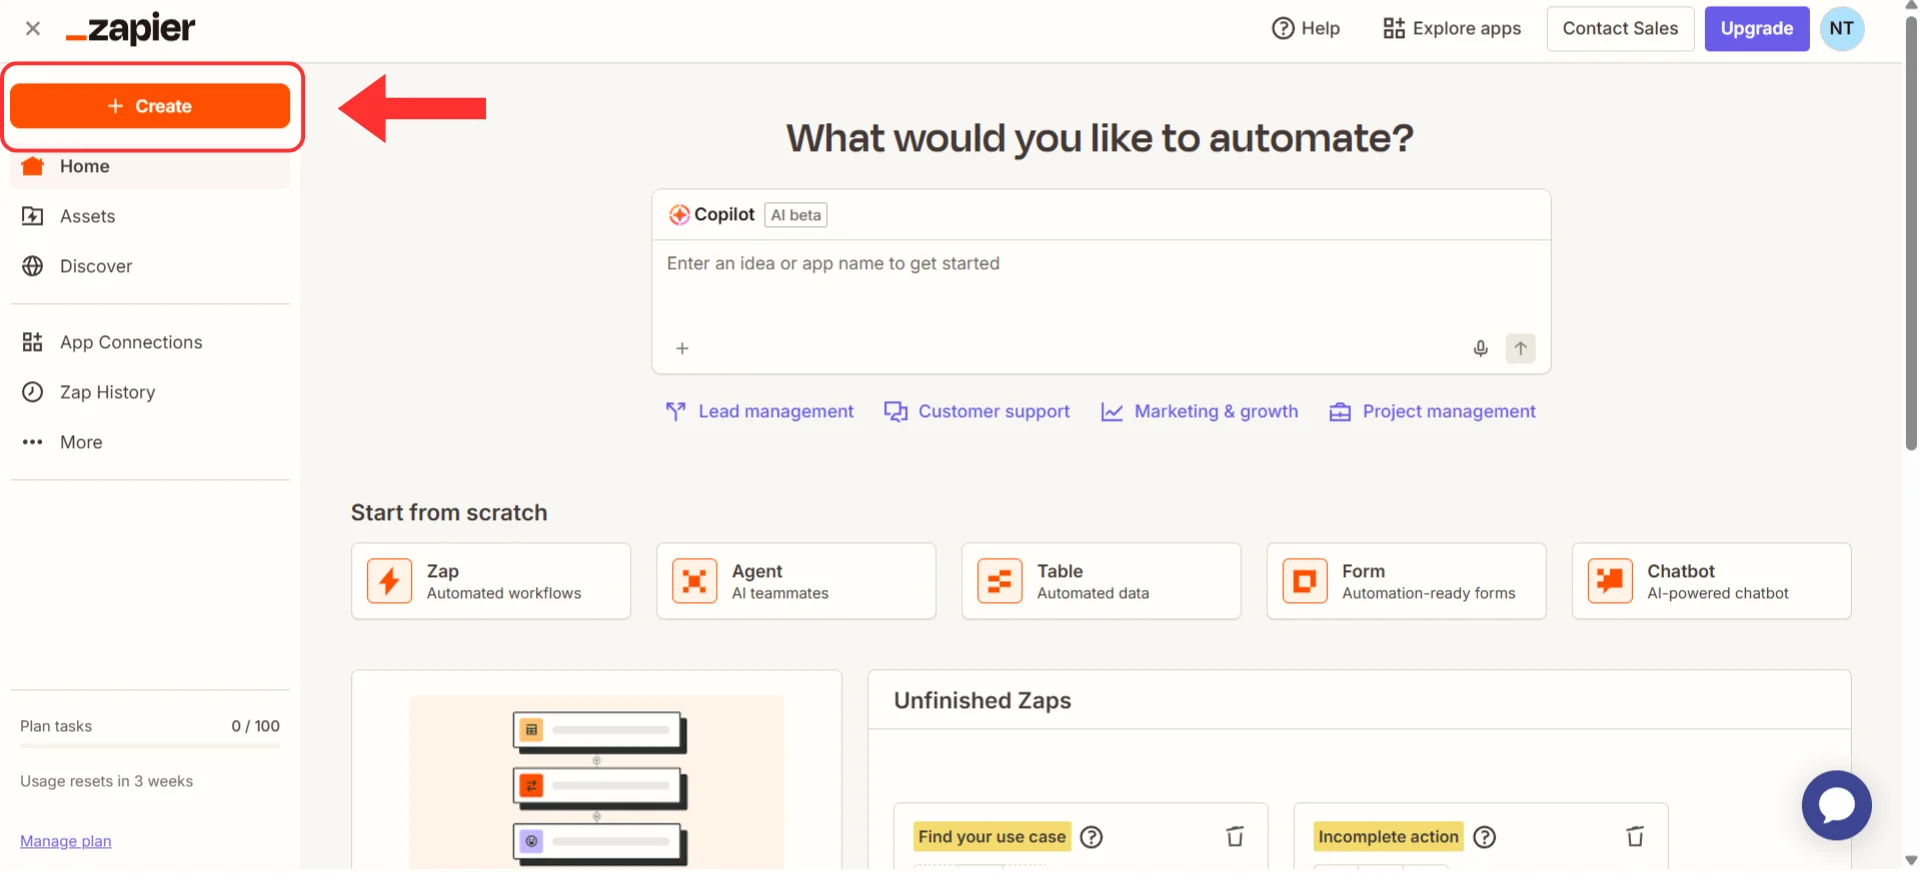 3. You'll see the Zap editor with two main sections:
* **"Trigger"** (what starts the automation) ← you'll set this up now
* **"Action"** (what happens next) ← you'll set this up in Step 4
3. You'll see the Zap editor with two main sections:
* **"Trigger"** (what starts the automation) ← you'll set this up now
* **"Action"** (what happens next) ← you'll set this up in Step 4
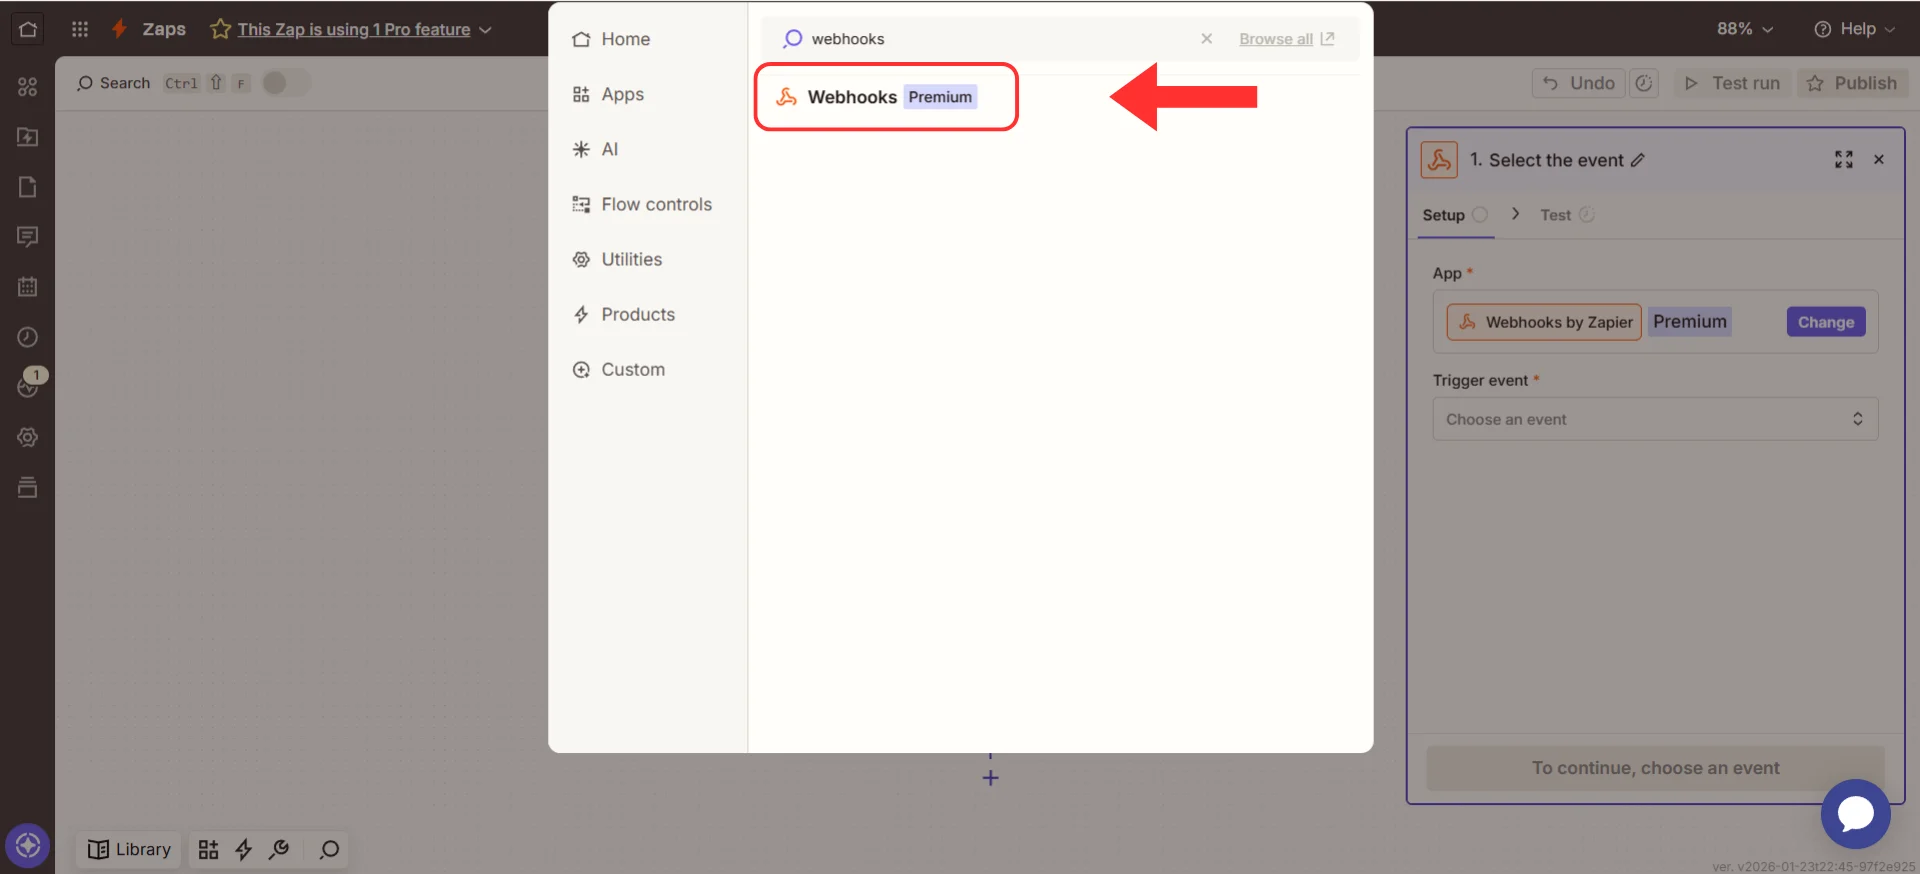
 #### Choose webhooks as your trigger
4. Click the search box in the **"Trigger"** section
5. Type `webhooks` and select **"Webhooks by Zapier"**
#### Choose webhooks as your trigger
4. Click the search box in the **"Trigger"** section
5. Type `webhooks` and select **"Webhooks by Zapier"**
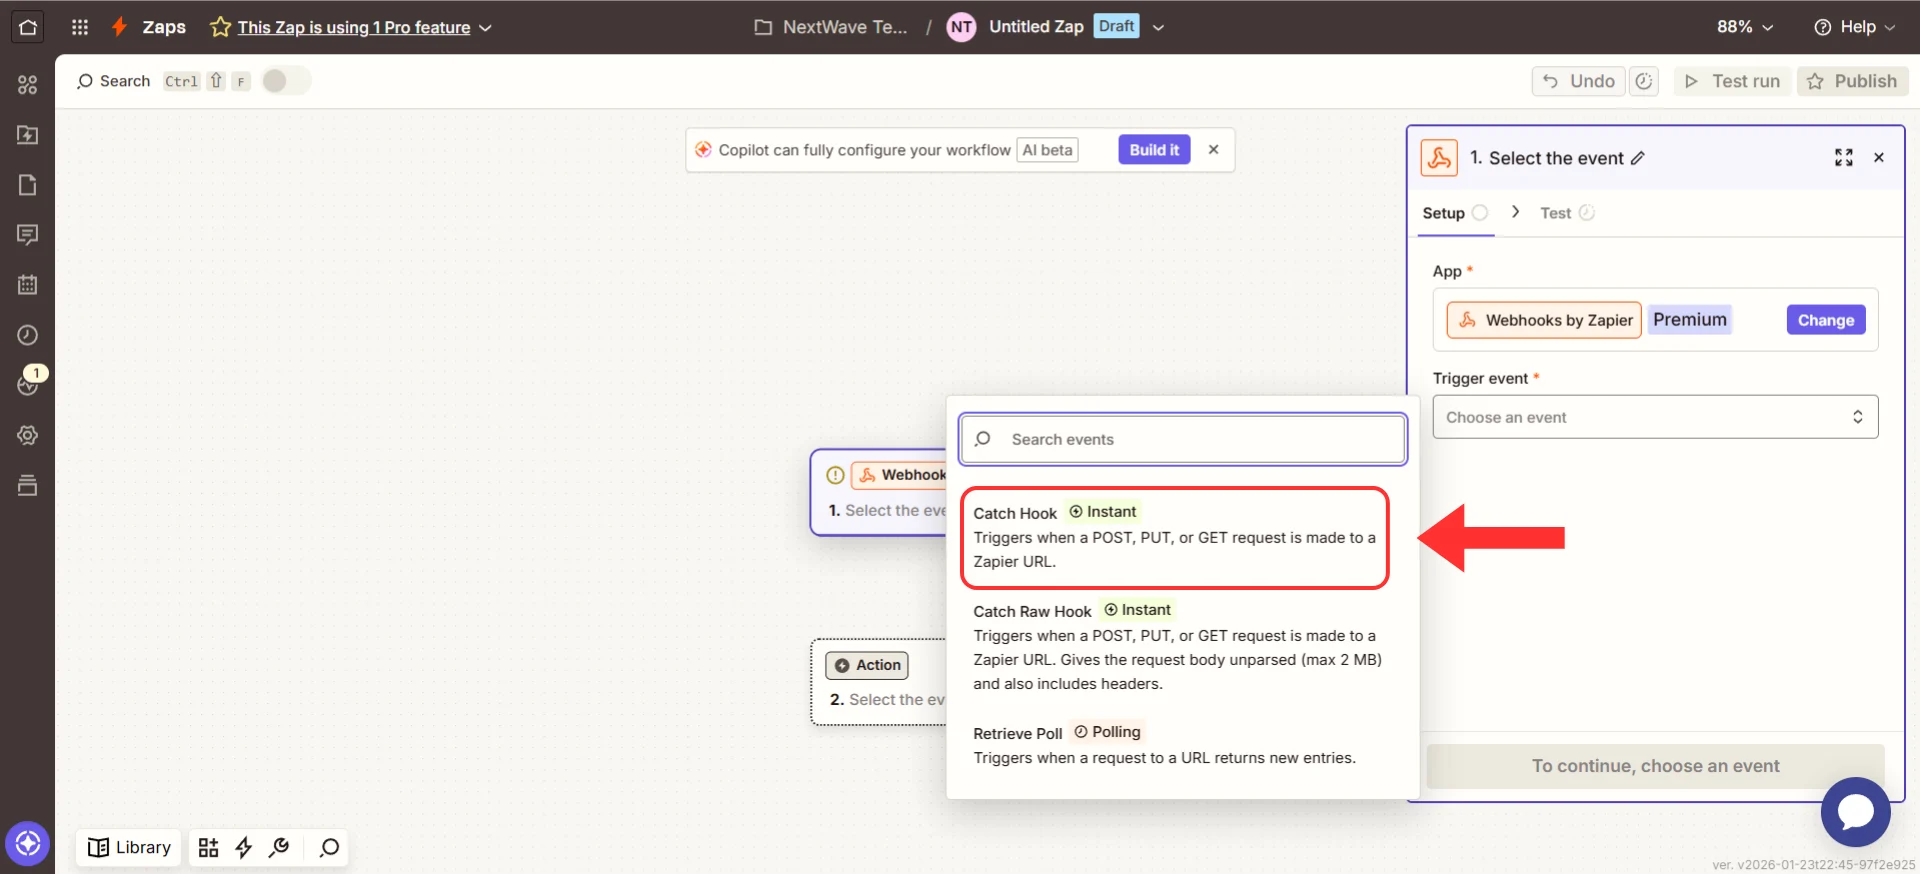
 6. For the **"Event"**, select **"Catch Hook"**
 7. Click the **"Continue"** button twice (through the **"Setup"** and **"Configure"** sections)
#### Get your webhook URL
This is the **most important part** — you're getting a unique URL that tells Irelia exactly where to send information.
8. Zapier will display a **Custom Webhook URL** that looks like: `https://hooks.zapier.com/hooks/catch/123456/abcdef/`
9. Click the **"Copy"** button next to the URL
7. Click the **"Continue"** button twice (through the **"Setup"** and **"Configure"** sections)
#### Get your webhook URL
This is the **most important part** — you're getting a unique URL that tells Irelia exactly where to send information.
8. Zapier will display a **Custom Webhook URL** that looks like: `https://hooks.zapier.com/hooks/catch/123456/abcdef/`
9. Click the **"Copy"** button next to the URL
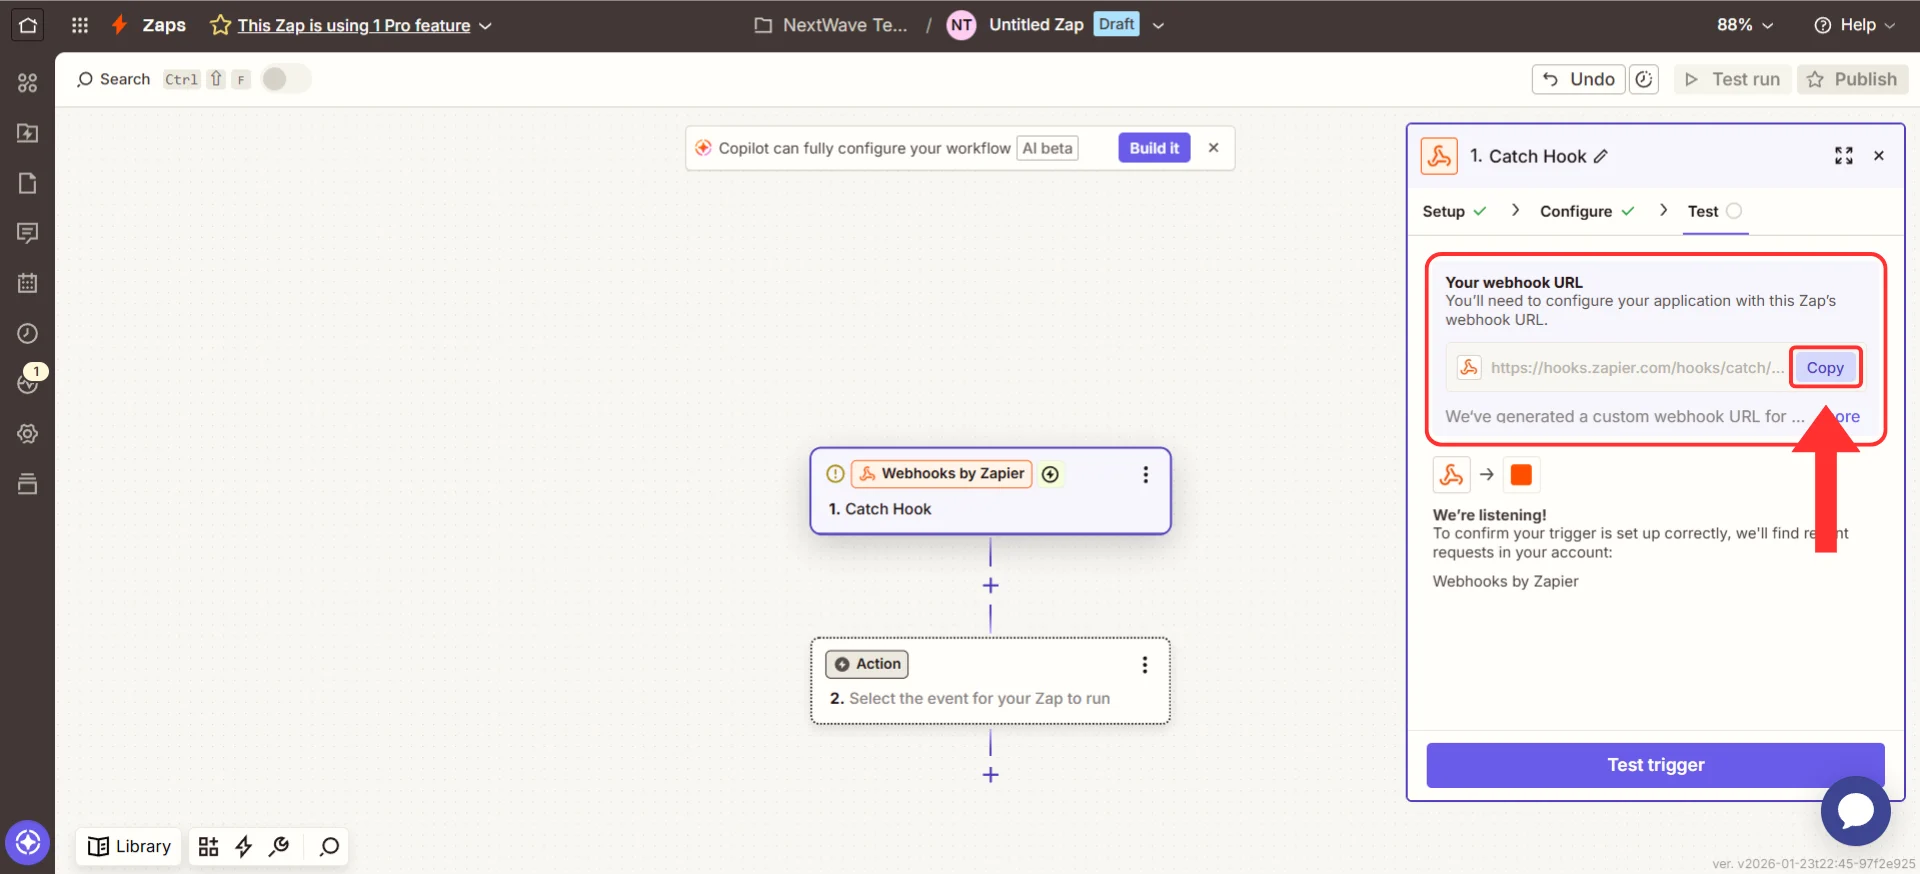 **Treat this URL like a password.** Anyone with your webhook URL can send data to your Zapier account. Don't share it publicly or include it in screenshots you post online.
**Keep this Zapier tab open!** You'll need to return here in a few minutes.
### Step 2: Tell Irelia Where to Send Notifications
\~2 minutes
Now you'll log into Irelia and paste the webhook URL you just copied.
**Quick context:** In Irelia, each AI agent can have its own automations. For this guide, you'll configure one event for one agent. Once you understand how it works, you can easily set up more.
#### Access your agent settings
1. Log into your Irelia.ai settings dashboard
2. Select the agent you want to connect to Zapier
**Treat this URL like a password.** Anyone with your webhook URL can send data to your Zapier account. Don't share it publicly or include it in screenshots you post online.
**Keep this Zapier tab open!** You'll need to return here in a few minutes.
### Step 2: Tell Irelia Where to Send Notifications
\~2 minutes
Now you'll log into Irelia and paste the webhook URL you just copied.
**Quick context:** In Irelia, each AI agent can have its own automations. For this guide, you'll configure one event for one agent. Once you understand how it works, you can easily set up more.
#### Access your agent settings
1. Log into your Irelia.ai settings dashboard
2. Select the agent you want to connect to Zapier
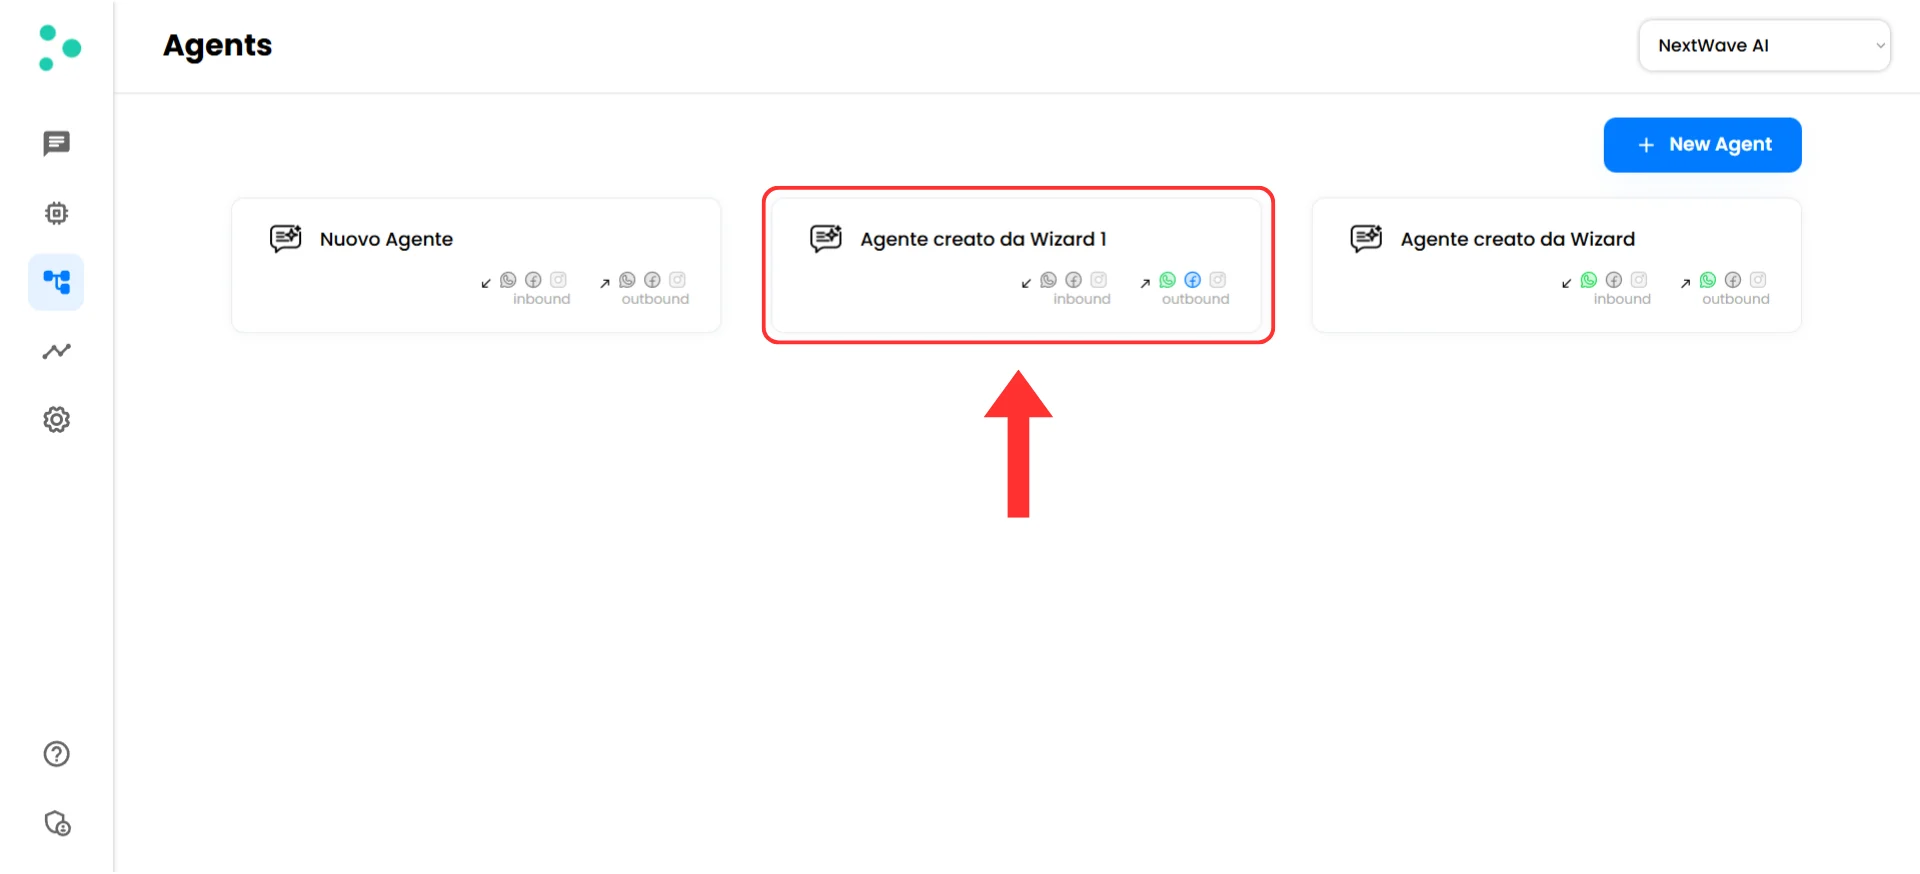 3. Go to **"Events and Notifications"**
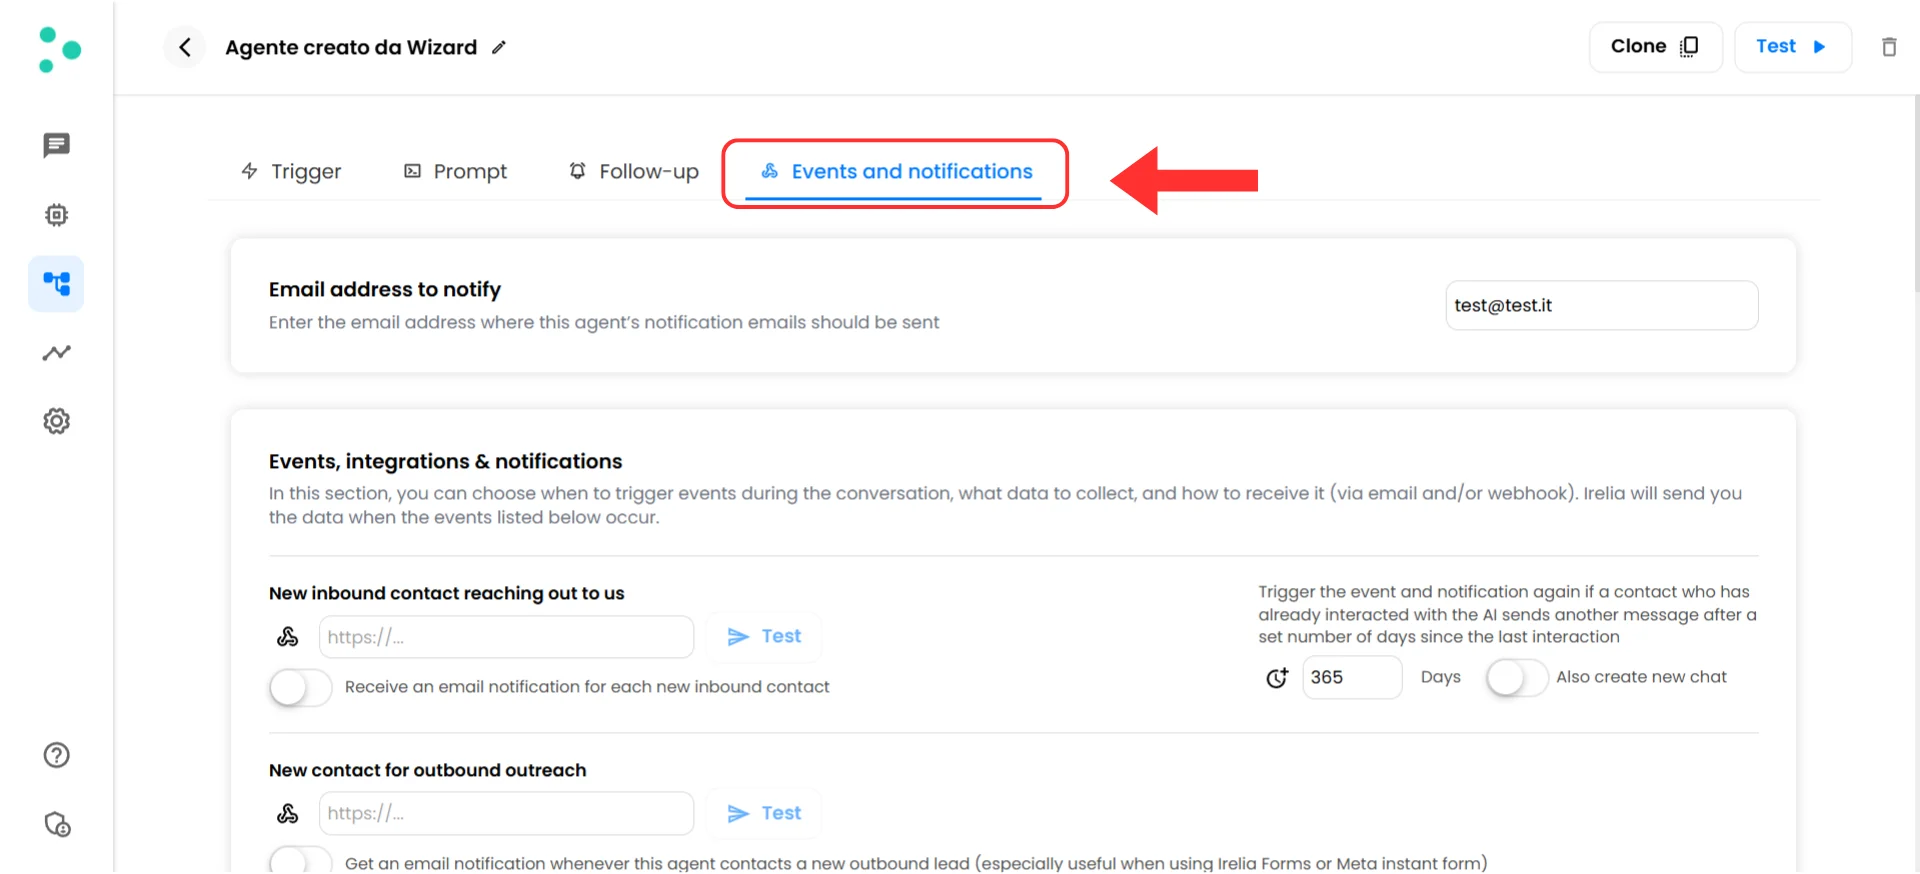 #### Configure your webhook
4. You'll see a list of available events
#### Configure your webhook
4. You'll see a list of available events
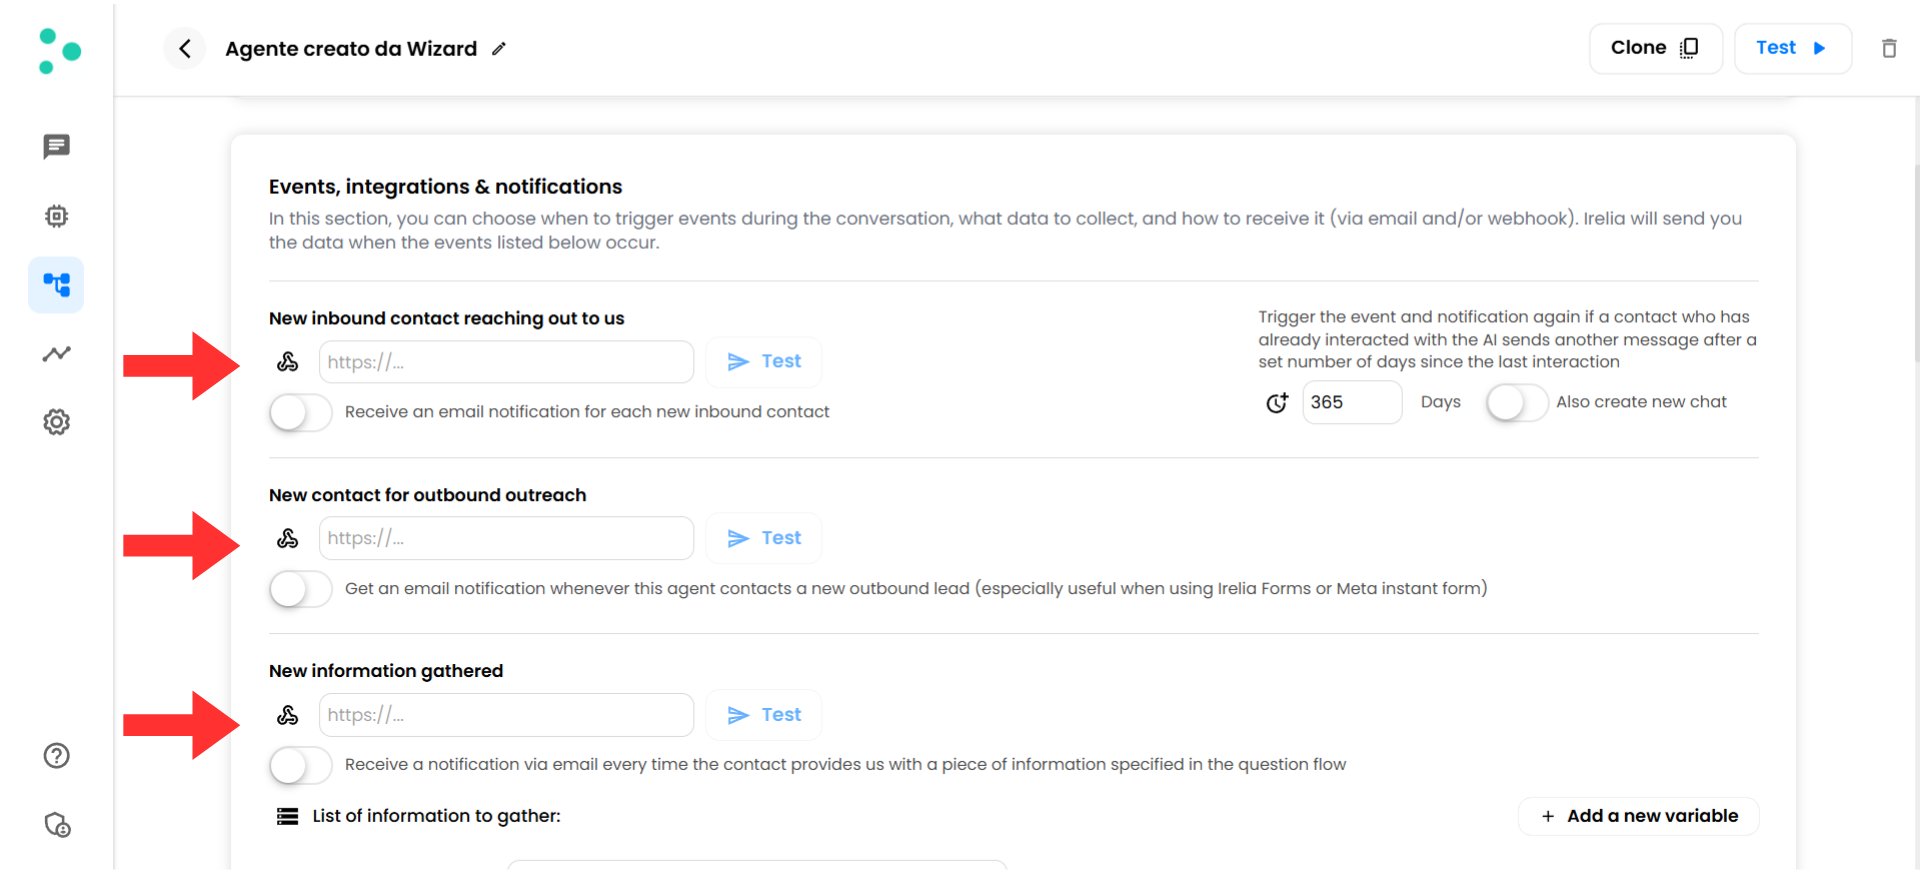 5. Find **"New inbound contact reaching out to us"** (or the event you want to configure)
**Picking the right event?** If you're following a specific [use case from above](#-common-use-cases), select the event listed there instead of "New inbound contact."
6. Click the **"URL"** field next to this event
7. **Paste** the webhook URL you copied from Zapier (the URL will auto-save)
5. Find **"New inbound contact reaching out to us"** (or the event you want to configure)
**Picking the right event?** If you're following a specific [use case from above](#-common-use-cases), select the event listed there instead of "New inbound contact."
6. Click the **"URL"** field next to this event
7. **Paste** the webhook URL you copied from Zapier (the URL will auto-save)
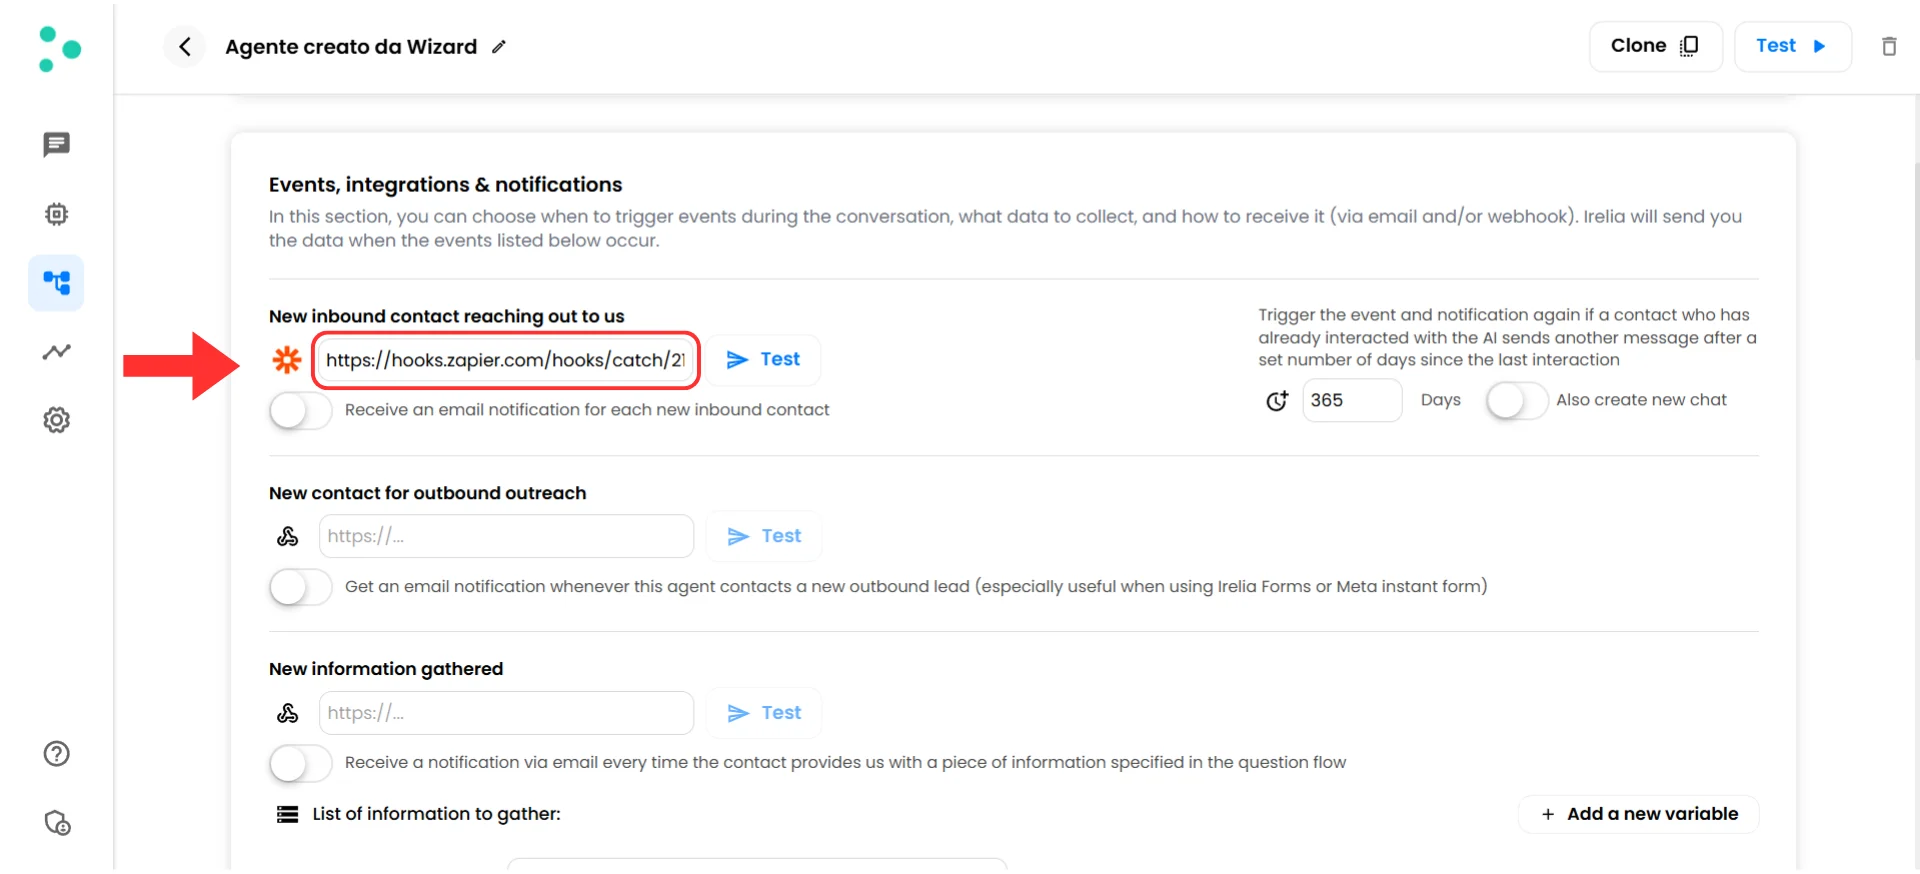 **Need to change the URL later?** You can update it anytime — just paste the new one and click **"Test"** again. The old URL will stop working, and the new one will take over immediately.
**Success!** This event will now send data to Zapier whenever someone first contacts this agent.
### Step 3: Test the Connection
\~2 minutes
Now let's verify that Irelia and Zapier can talk to each other.
#### Send test data from Irelia
1. In your Irelia webhook configuration (where you just pasted the URL), find the blue **"Test"** button next to the webhook URL field
2. Click **"Test"**
**Need to change the URL later?** You can update it anytime — just paste the new one and click **"Test"** again. The old URL will stop working, and the new one will take over immediately.
**Success!** This event will now send data to Zapier whenever someone first contacts this agent.
### Step 3: Test the Connection
\~2 minutes
Now let's verify that Irelia and Zapier can talk to each other.
#### Send test data from Irelia
1. In your Irelia webhook configuration (where you just pasted the URL), find the blue **"Test"** button next to the webhook URL field
2. Click **"Test"**
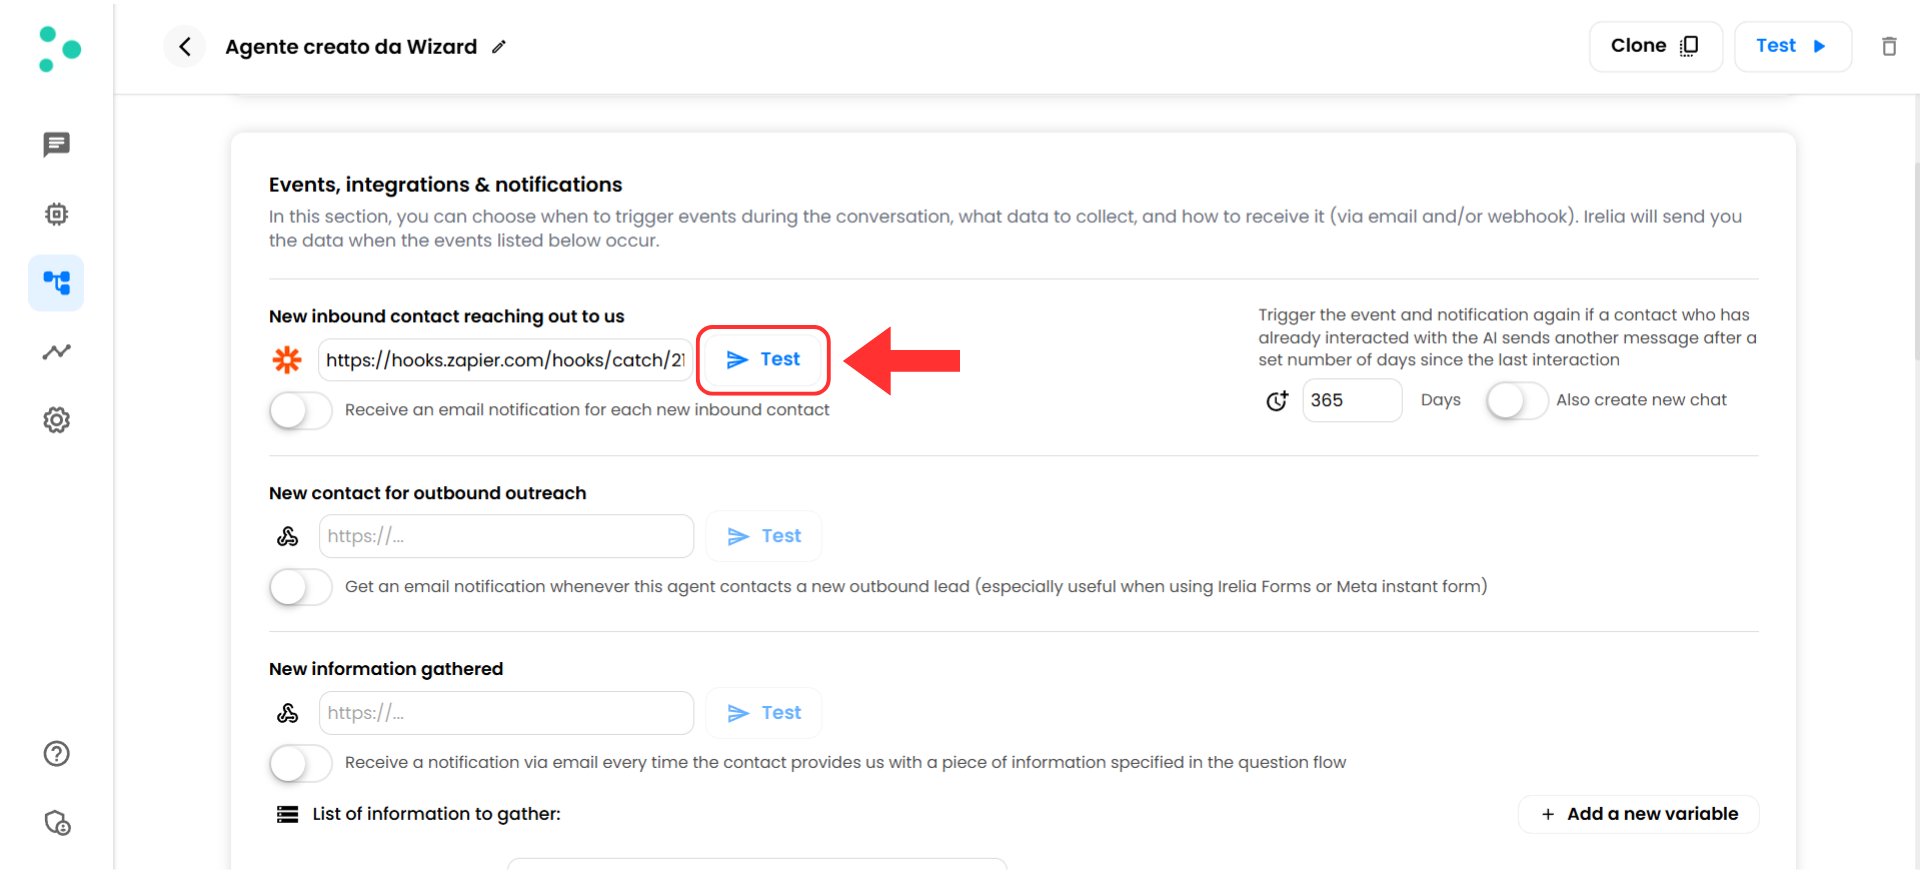 3. You should see a green success indicator that says **"Just sent a data sample successfully"**
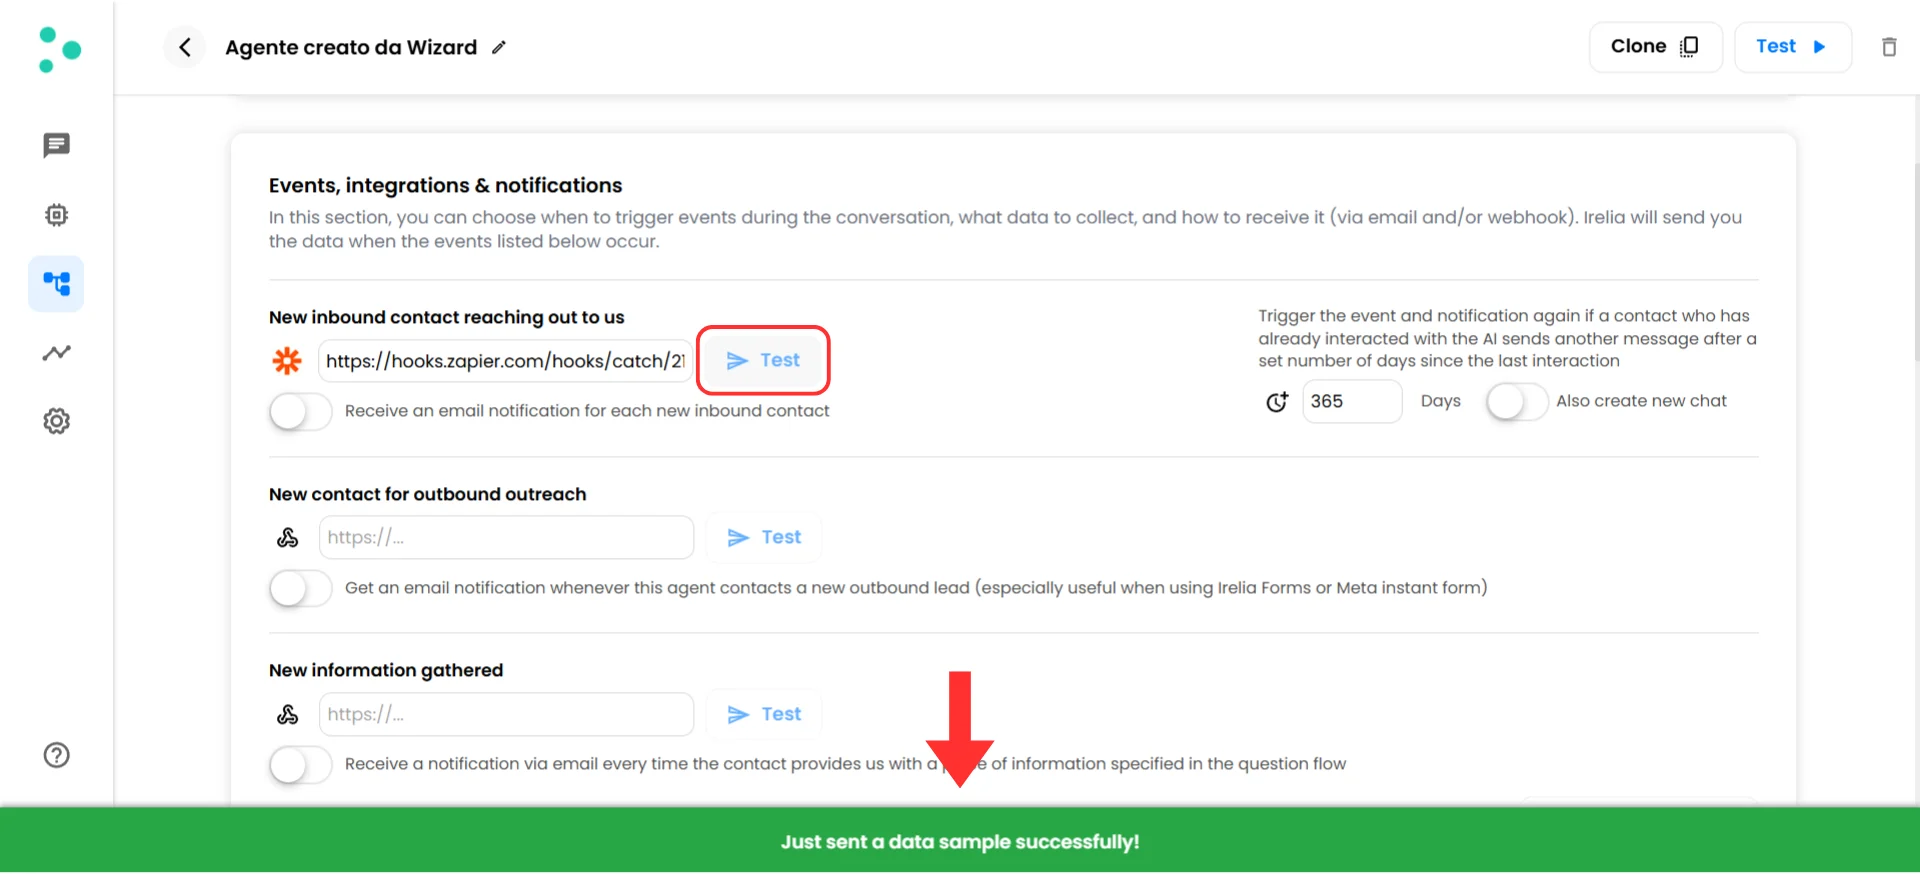 **What just happened:** Irelia sent sample data to Zapier. This sample data shows you exactly what kind of information Irelia will send when this event actually happens in a real conversation.
#### Verify Zapier received the data
4. Go back to your Zapier tab (the one you kept open)
5. Click the **"Test trigger"** button to receive the data sample
**What just happened:** Irelia sent sample data to Zapier. This sample data shows you exactly what kind of information Irelia will send when this event actually happens in a real conversation.
#### Verify Zapier received the data
4. Go back to your Zapier tab (the one you kept open)
5. Click the **"Test trigger"** button to receive the data sample
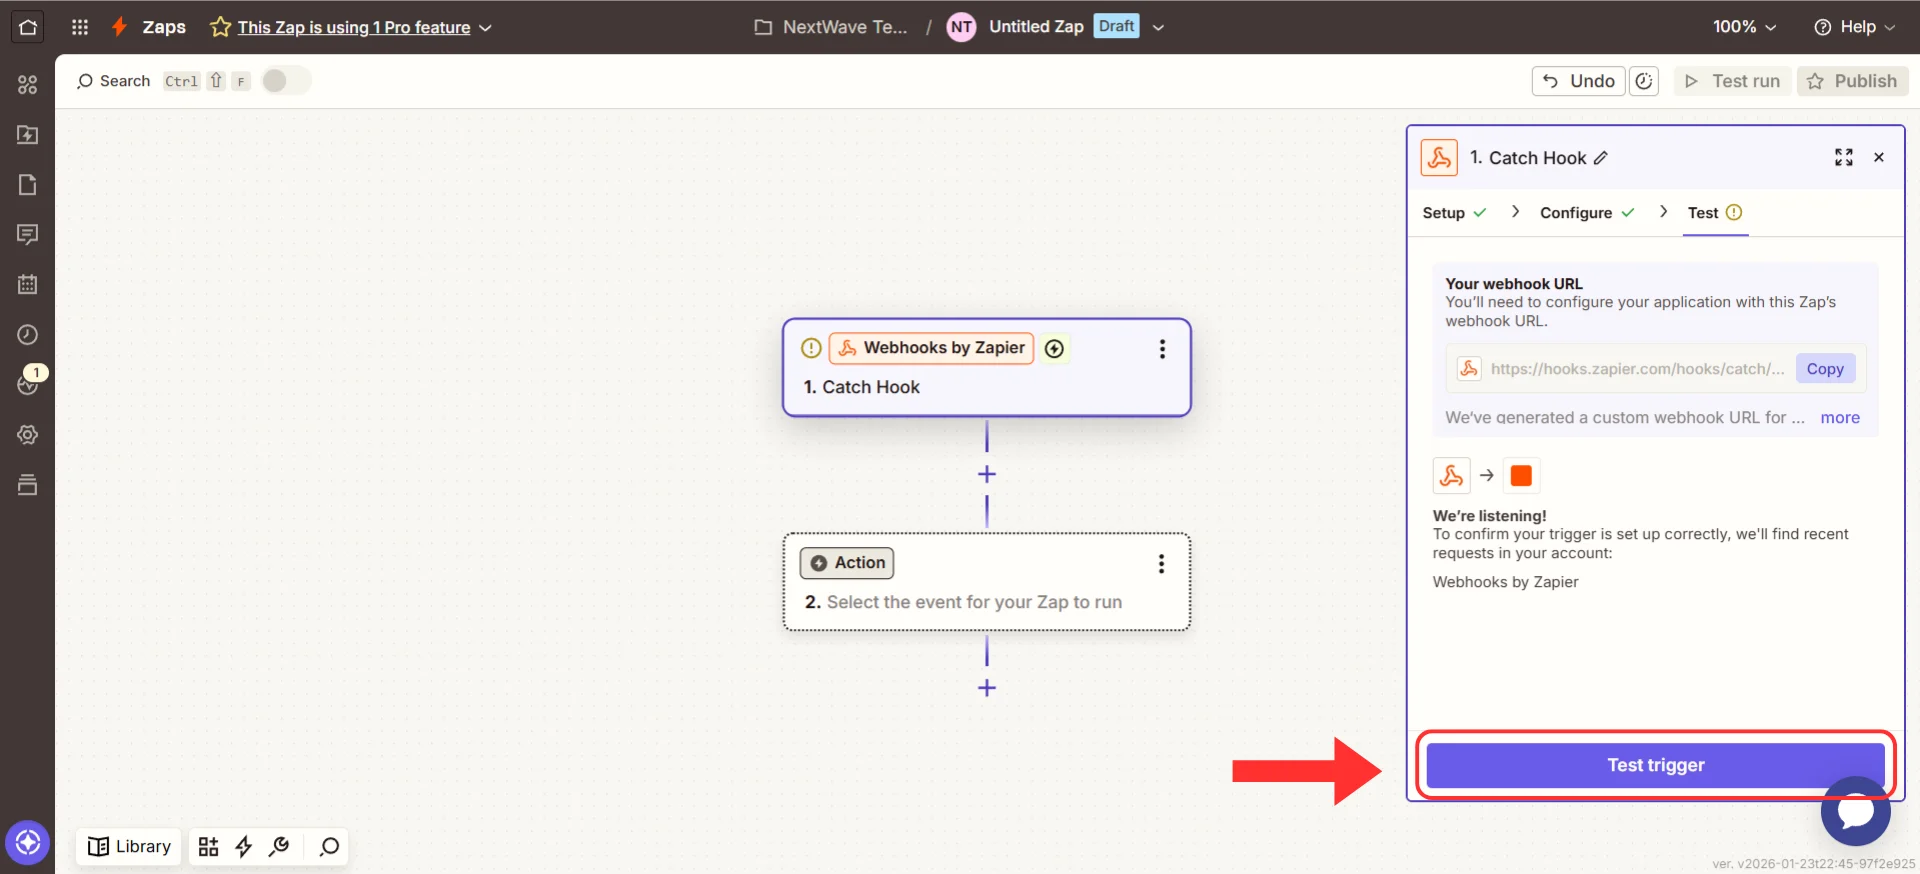 6. A list of data samples will appear — select one
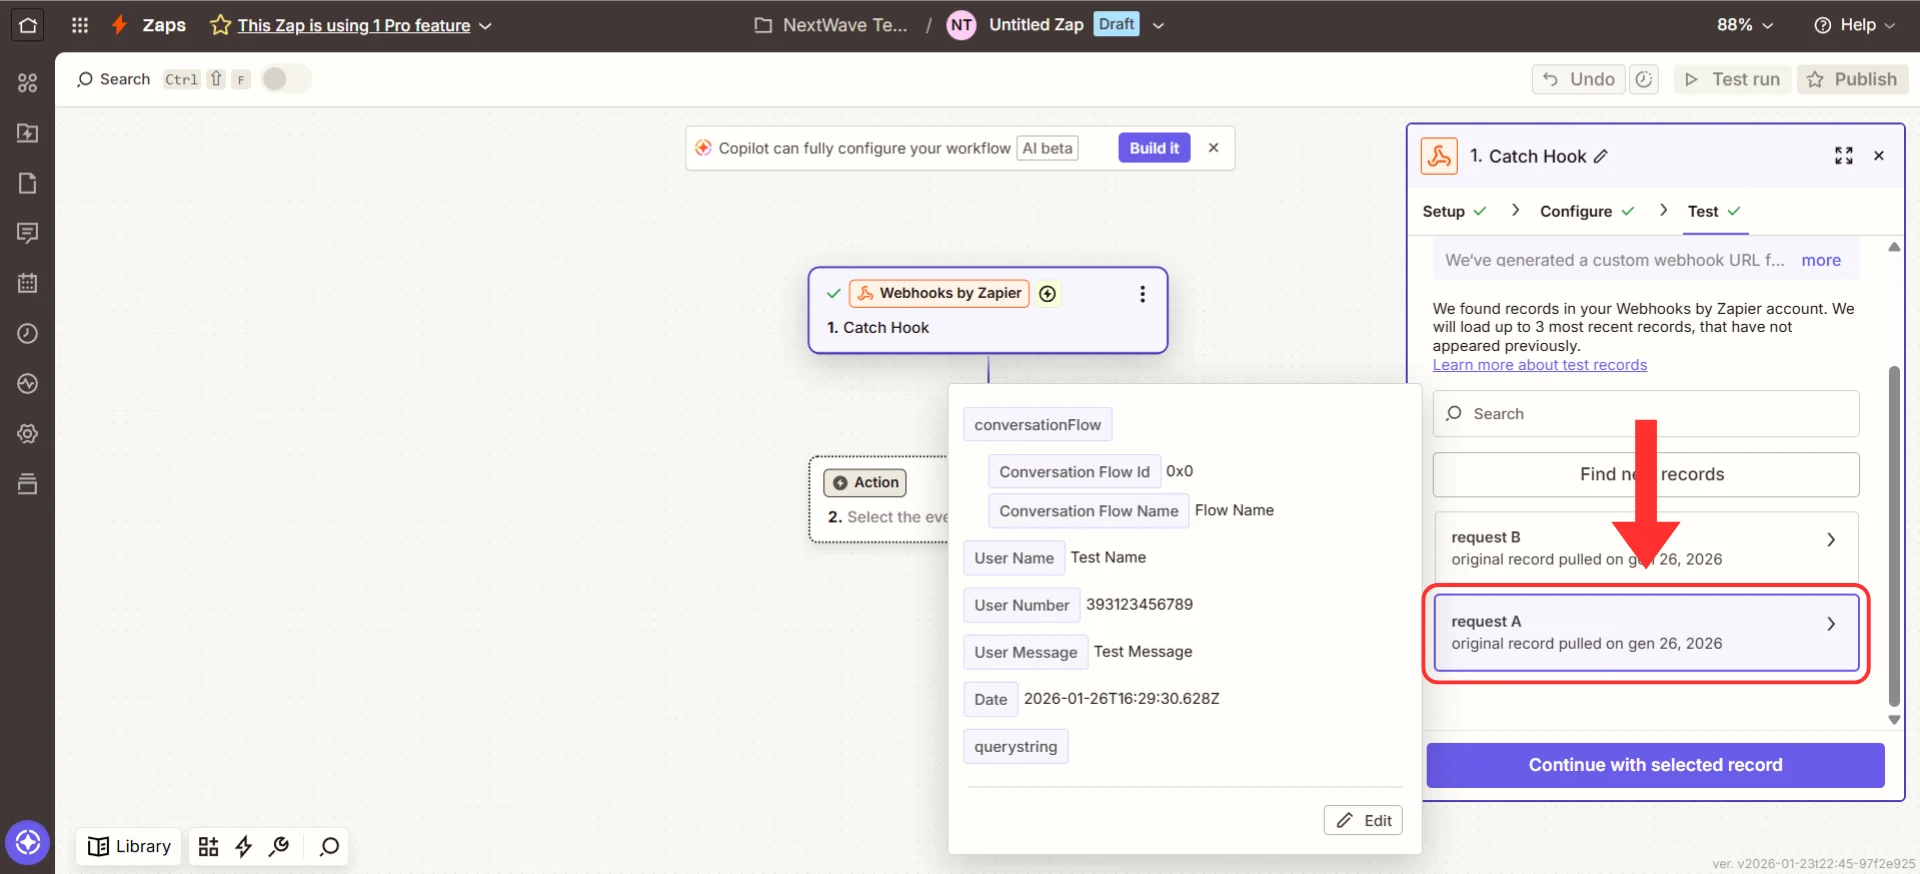 7. Click the **"Continue with selected record"** button
**Success!** Irelia and Zapier are connected and talking to each other.
### Understanding What Irelia Sends You
Before setting up your action, take 60 seconds to understand what Irelia just sent to Zapier.
7. Click the **"Continue with selected record"** button
**Success!** Irelia and Zapier are connected and talking to each other.
### Understanding What Irelia Sends You
Before setting up your action, take 60 seconds to understand what Irelia just sent to Zapier.
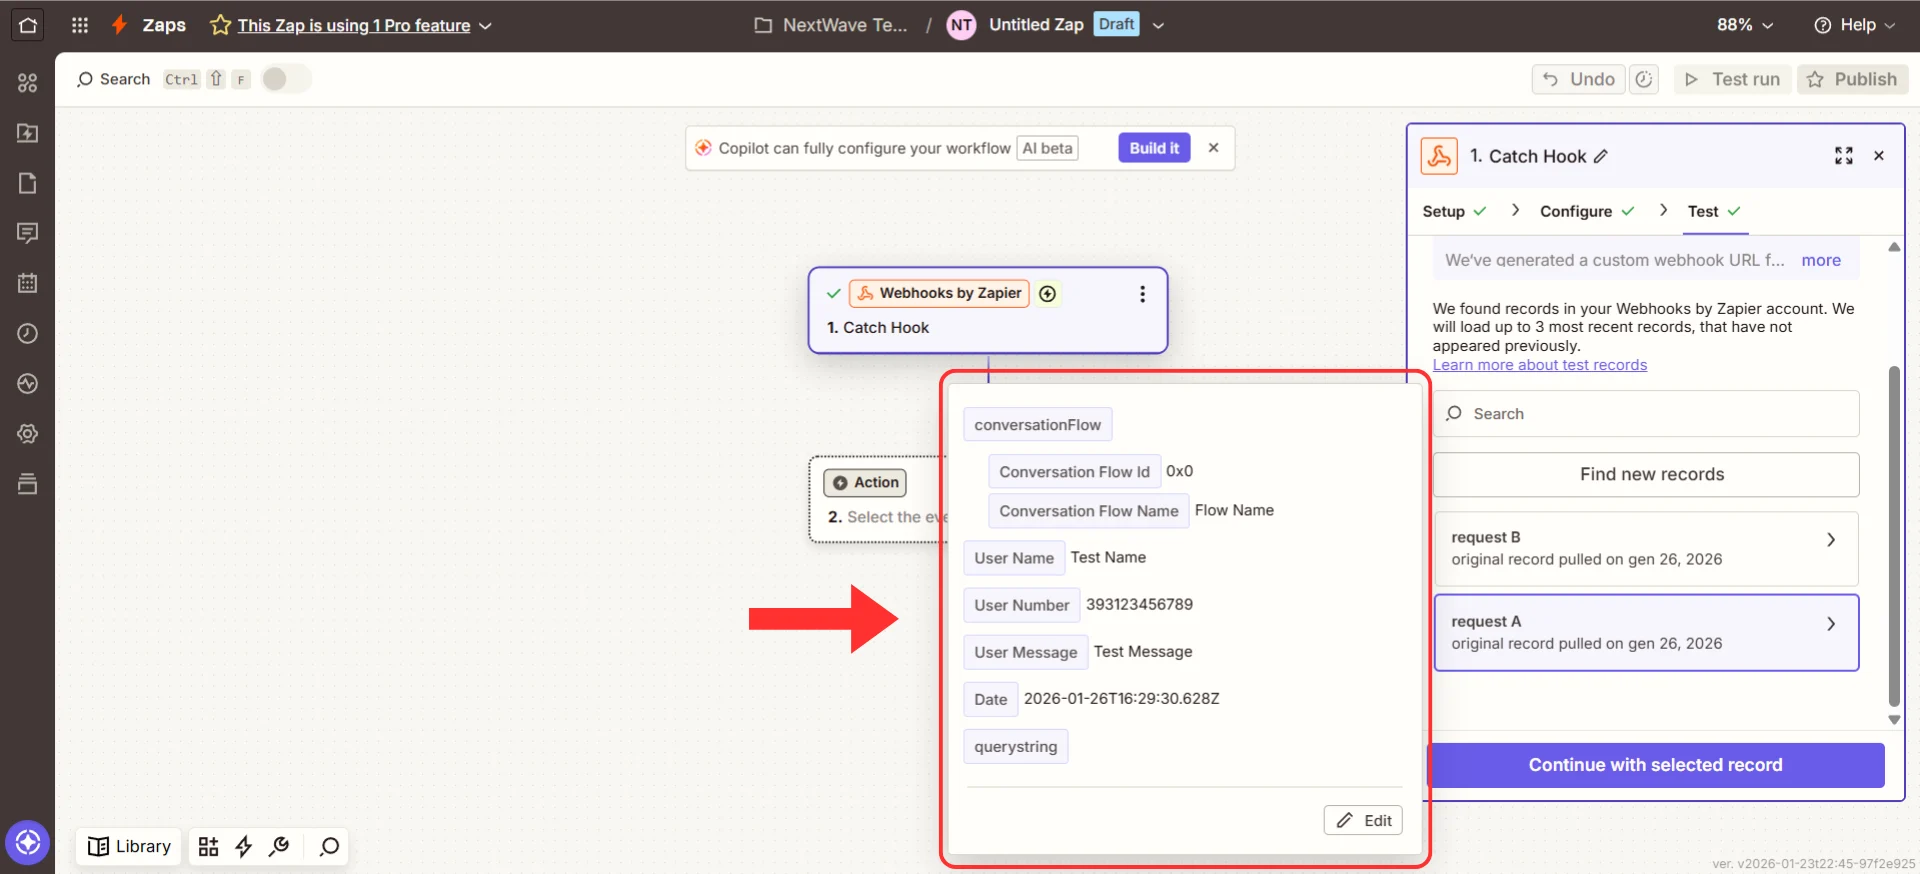 You can conceptually split this data into three buckets.
**1. 👤 Who They Are (Contact Info)**
* `userName` — The prospect's name
* `userNumber` — Their phone number
* `inboundLead` — Did they message first (`true`) or did you (`false`)?
**2. 💬 What Happened (Conversation Details)**
Per agent — the specific chat the user had with a specific agent (under the `conversationFlow` section):
* `id` — Unique agent identifier
* `name` — Name of the conversation agent
* `chatHistory` — Complete conversation transcript with this agent
* `leadQualification` — Are they qualified by this agent? (`"fit"`, `"not a fit"`, or `"TBD"`)
* `interestScore` — How interested are they? (0.0 to 1.0, like 0% to 100%)
* `reasonNotQualified` — Why they didn't qualify (if applicable)
* `goalAchieved` — Number of goals completed with this agent
* `numberOfMessageSent` — Messages sent by this agent
* `numberOfMessageReceived` — Messages received from prospect
* `numberOfQuestionLackingData` — Questions the AI couldn't answer from the [Knowledge Base](/en/How-to-Train-Your-AI-Agent-with-the-Knowledge-Base-in-Irelia.ai)
* `creditConsumedForThisChat` — Credits used for this conversation
Overall (across all agents):
* `chatHistory` — Complete chat history across all agents
* `optStatus` — Opt-in status (e.g., `"in"`, `"out"`)
* `creditConsumedForThisLead` — Total credits consumed
* `numberOfMessageSent` — Total messages sent
* `numberOfMessageReceived` — Total messages received
* `numberOfQuestionLackingData` — Total questions lacking answers
* `numberOfGoalAchieved` — Total goals achieved
**3. 📝 What You Learned (Custom Data)**
* `customVariables` — Specific information your agent collected (budget, company size, timeline, etc.)
Each custom variable has:
* `name` — What you asked about (e.g., "Budget")
* `value` — Categorized answer (e.g., "\$10k-50k")
* `valueRaw` — Exact words they used (e.g., "We have around 30k to spend")
You can conceptually split this data into three buckets.
**1. 👤 Who They Are (Contact Info)**
* `userName` — The prospect's name
* `userNumber` — Their phone number
* `inboundLead` — Did they message first (`true`) or did you (`false`)?
**2. 💬 What Happened (Conversation Details)**
Per agent — the specific chat the user had with a specific agent (under the `conversationFlow` section):
* `id` — Unique agent identifier
* `name` — Name of the conversation agent
* `chatHistory` — Complete conversation transcript with this agent
* `leadQualification` — Are they qualified by this agent? (`"fit"`, `"not a fit"`, or `"TBD"`)
* `interestScore` — How interested are they? (0.0 to 1.0, like 0% to 100%)
* `reasonNotQualified` — Why they didn't qualify (if applicable)
* `goalAchieved` — Number of goals completed with this agent
* `numberOfMessageSent` — Messages sent by this agent
* `numberOfMessageReceived` — Messages received from prospect
* `numberOfQuestionLackingData` — Questions the AI couldn't answer from the [Knowledge Base](/en/How-to-Train-Your-AI-Agent-with-the-Knowledge-Base-in-Irelia.ai)
* `creditConsumedForThisChat` — Credits used for this conversation
Overall (across all agents):
* `chatHistory` — Complete chat history across all agents
* `optStatus` — Opt-in status (e.g., `"in"`, `"out"`)
* `creditConsumedForThisLead` — Total credits consumed
* `numberOfMessageSent` — Total messages sent
* `numberOfMessageReceived` — Total messages received
* `numberOfQuestionLackingData` — Total questions lacking answers
* `numberOfGoalAchieved` — Total goals achieved
**3. 📝 What You Learned (Custom Data)**
* `customVariables` — Specific information your agent collected (budget, company size, timeline, etc.)
Each custom variable has:
* `name` — What you asked about (e.g., "Budget")
* `value` — Categorized answer (e.g., "\$10k-50k")
* `valueRaw` — Exact words they used (e.g., "We have around 30k to spend")
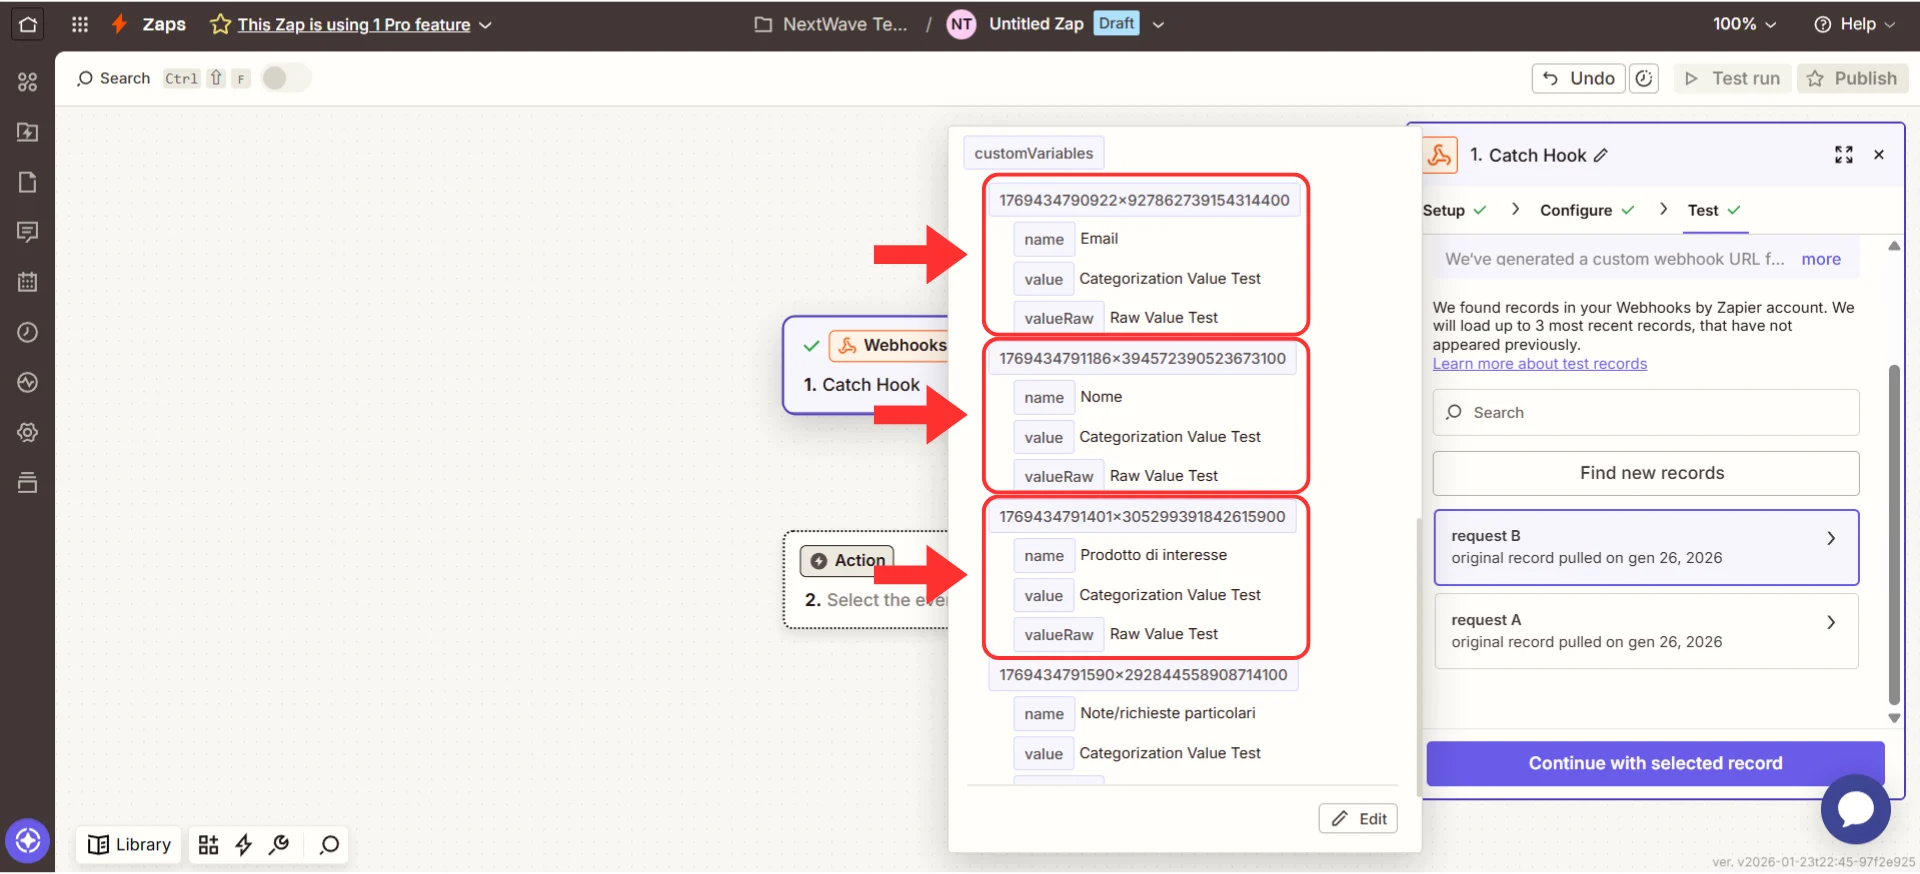 **Use these to:** Fill CRM fields, personalize emails, segment leads, give sales reps context, route leads to different teams, and prioritize follow-ups.
**Not all events send all data.** The test you just ran shows the data for **"New inbound contact"** events. Different events send different data. Don't worry if you don't see every field mentioned above — you're seeing exactly what's relevant for your event.
### Step 4: Set Up Your Action
\~5 minutes
Now comes the fun part: deciding what should automatically happen when Irelia sends data to Zapier.
#### Choose your first action
Ask yourself: *"When someone first contacts my agent, what's the ONE most valuable thing that should happen automatically?"*
Common answers:
* ✅ **Log it immediately** → Google Sheets (simplest, great for testing)
* ✅ **Alert my team** → Slack (immediate visibility)
* ✅ **Add to my CRM** → HubSpot, Salesforce, Pipedrive (most business value)
* ✅ **Start a sequence** → Email marketing tool (begins nurture process)
**Our recommendation for your first automation:** Choose **Google Sheets** or **Slack**. They're simple to set up, and you'll immediately see when your automation works. Once you've tested the connection, you can always change the action to something more complex.
Below you'll find guided instructions for these two examples.
**Want something different?** If you want to create more complex automations or connect different business tools, we suggest searching on YouTube for the exact outcome you want to achieve (e.g., *"How to update contact information on HubSpot using Zapier"*).
#### Example A: Log new contacts in Google Sheets
*Recommended for first-timers*
1. In the **"Action"** section, click the search box
2. Search for and select **"Google Sheets"**
**Use these to:** Fill CRM fields, personalize emails, segment leads, give sales reps context, route leads to different teams, and prioritize follow-ups.
**Not all events send all data.** The test you just ran shows the data for **"New inbound contact"** events. Different events send different data. Don't worry if you don't see every field mentioned above — you're seeing exactly what's relevant for your event.
### Step 4: Set Up Your Action
\~5 minutes
Now comes the fun part: deciding what should automatically happen when Irelia sends data to Zapier.
#### Choose your first action
Ask yourself: *"When someone first contacts my agent, what's the ONE most valuable thing that should happen automatically?"*
Common answers:
* ✅ **Log it immediately** → Google Sheets (simplest, great for testing)
* ✅ **Alert my team** → Slack (immediate visibility)
* ✅ **Add to my CRM** → HubSpot, Salesforce, Pipedrive (most business value)
* ✅ **Start a sequence** → Email marketing tool (begins nurture process)
**Our recommendation for your first automation:** Choose **Google Sheets** or **Slack**. They're simple to set up, and you'll immediately see when your automation works. Once you've tested the connection, you can always change the action to something more complex.
Below you'll find guided instructions for these two examples.
**Want something different?** If you want to create more complex automations or connect different business tools, we suggest searching on YouTube for the exact outcome you want to achieve (e.g., *"How to update contact information on HubSpot using Zapier"*).
#### Example A: Log new contacts in Google Sheets
*Recommended for first-timers*
1. In the **"Action"** section, click the search box
2. Search for and select **"Google Sheets"**
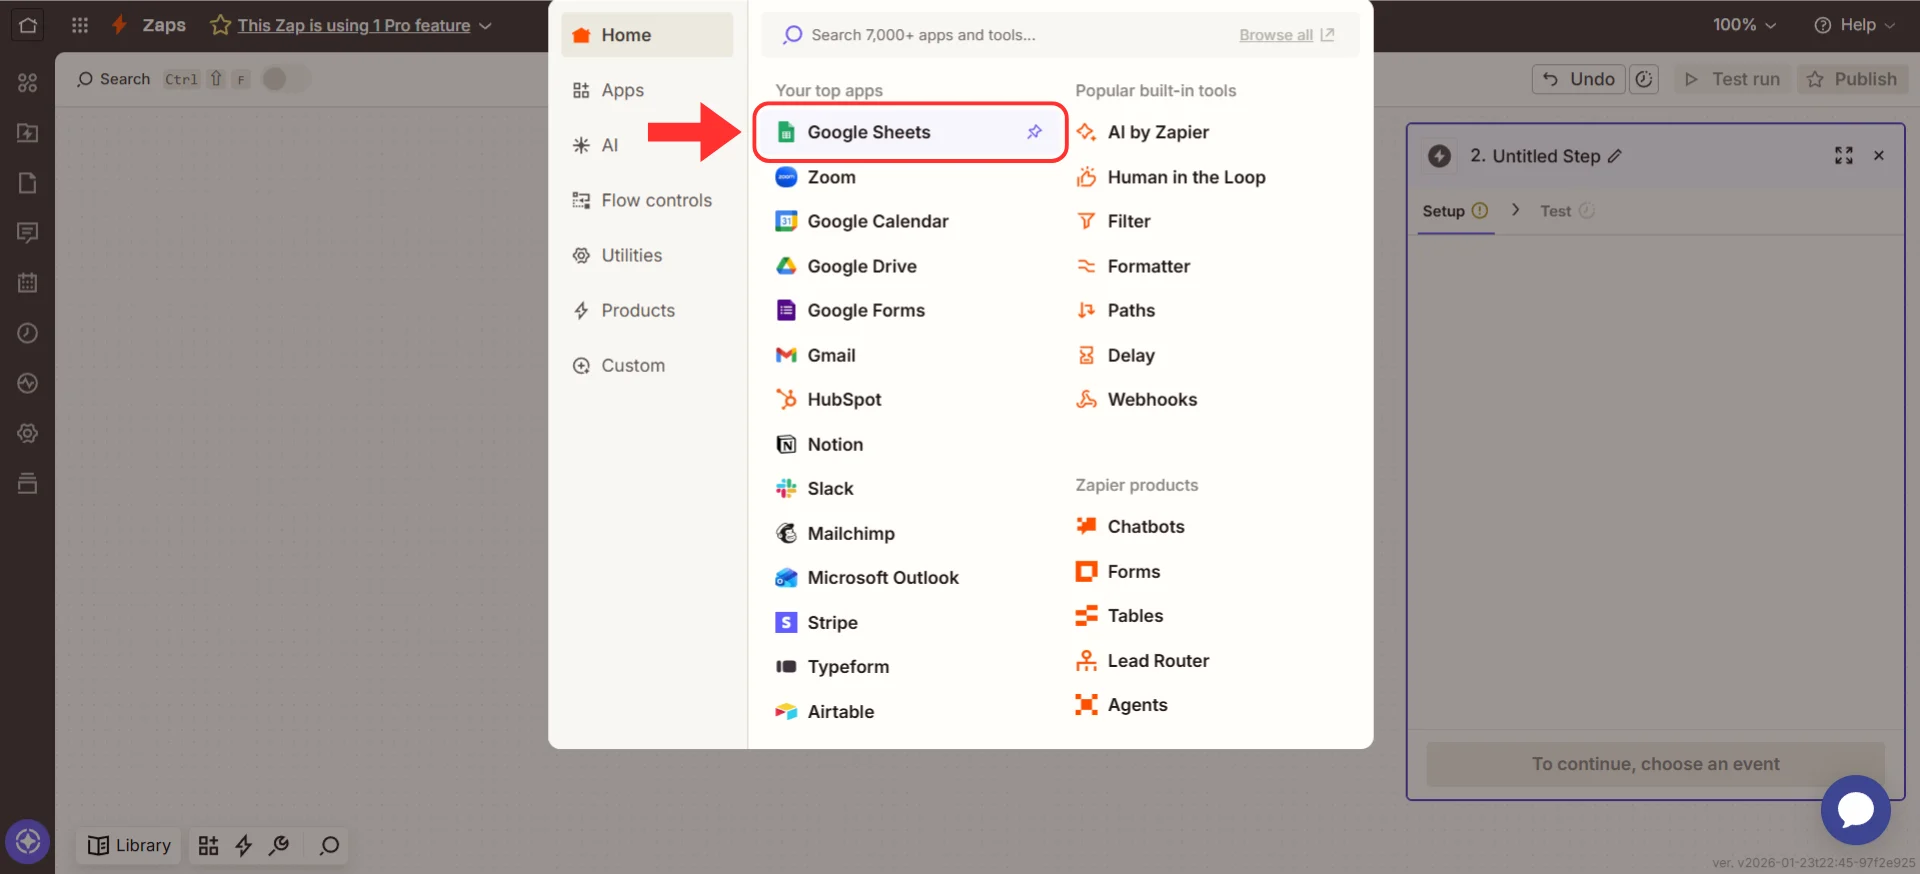 3. Choose **"Create Spreadsheet Row"** as the event
4. Click the **"Continue"** button
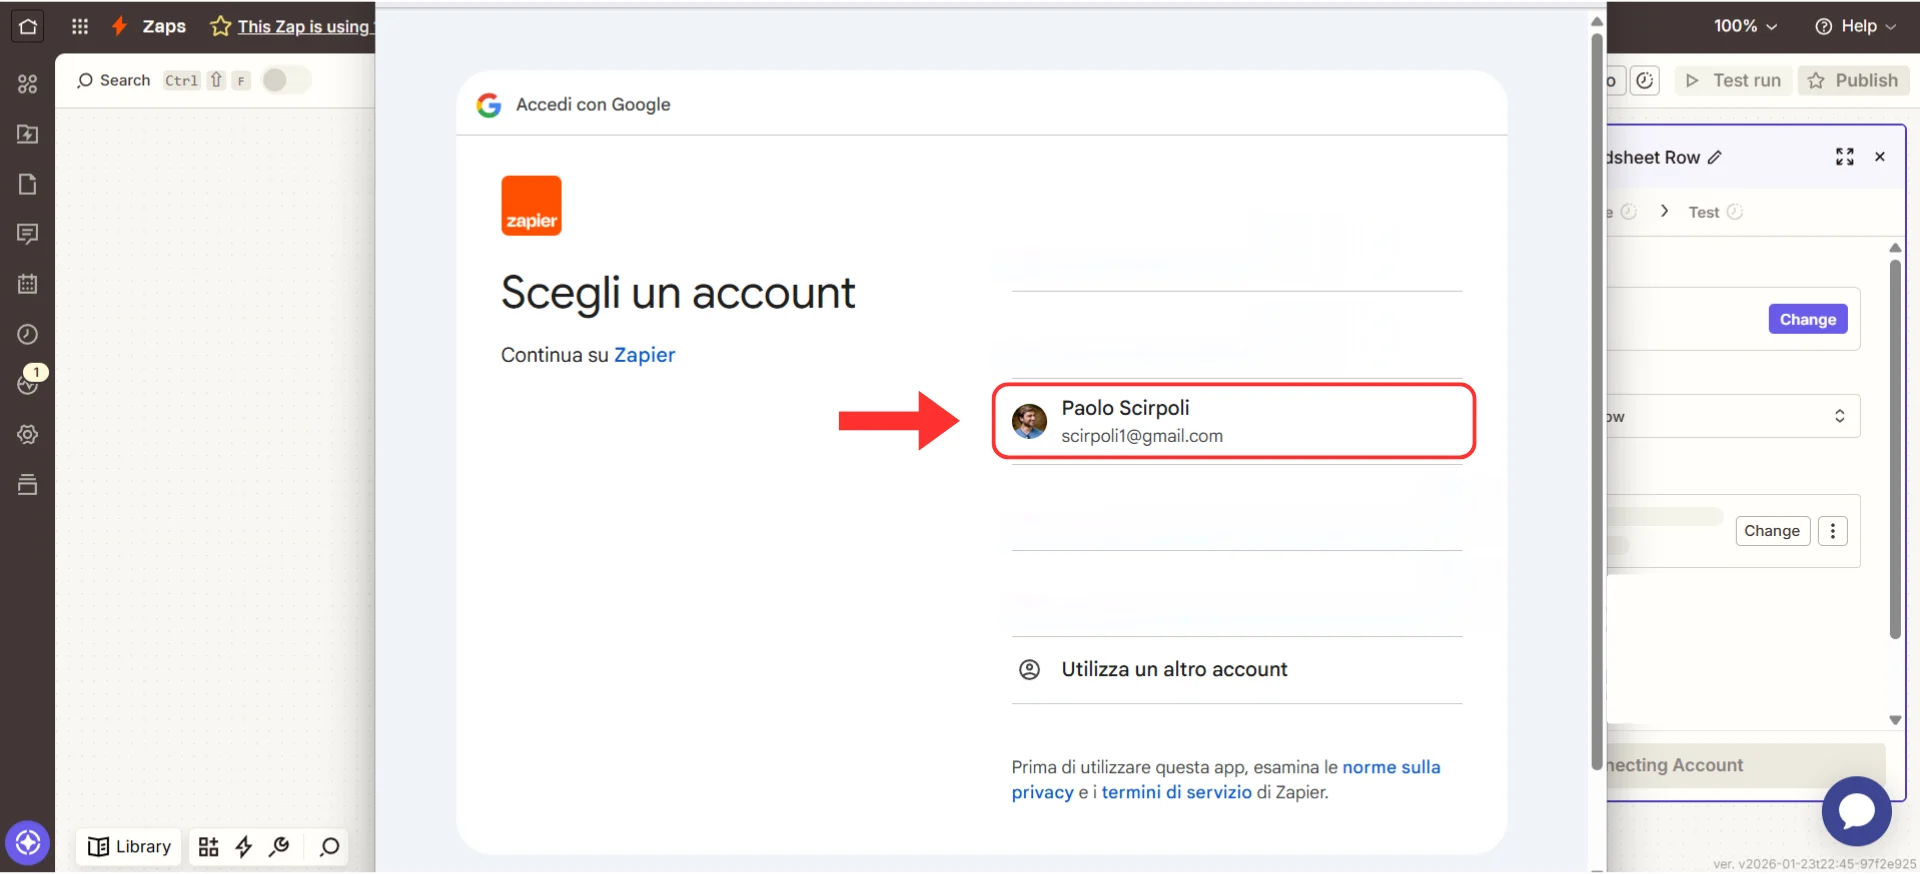
5. Connect your Google account (click **"Sign in"** and follow the prompts)
3. Choose **"Create Spreadsheet Row"** as the event
4. Click the **"Continue"** button
5. Connect your Google account (click **"Sign in"** and follow the prompts)
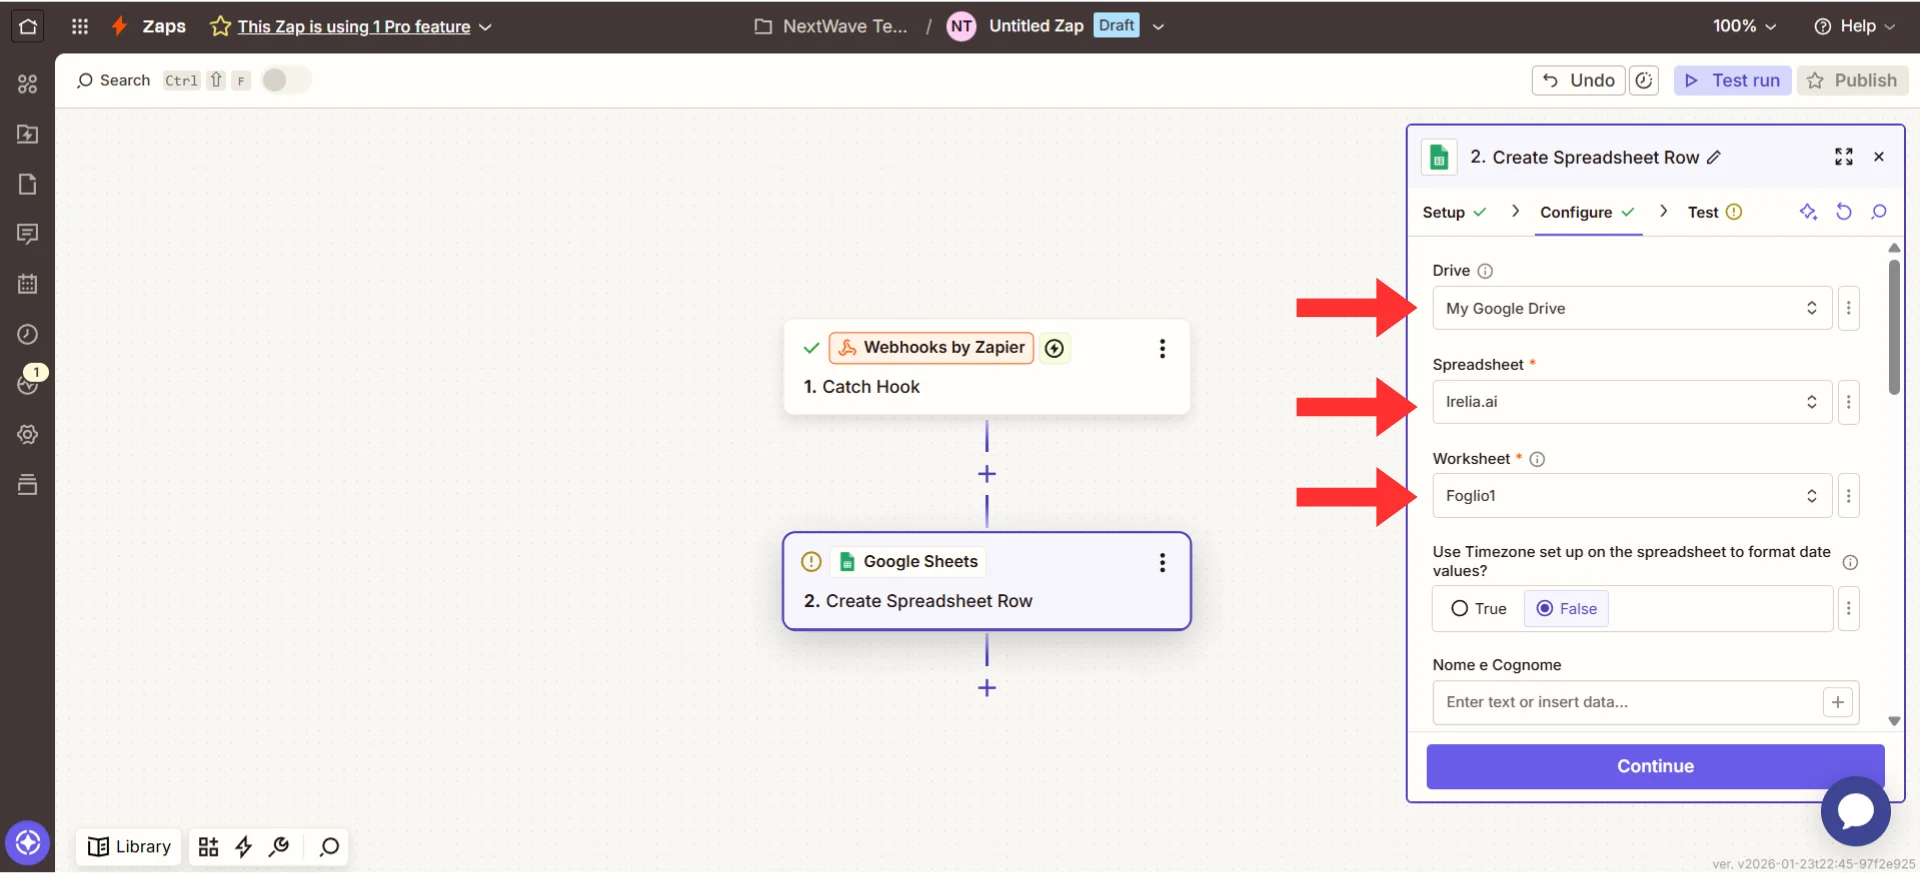
 6. Select your **"Spreadsheet"** (or create a new one first)
7. Select your **"Worksheet"** (usually "Sheet1")
6. Select your **"Spreadsheet"** (or create a new one first)
7. Select your **"Worksheet"** (usually "Sheet1")
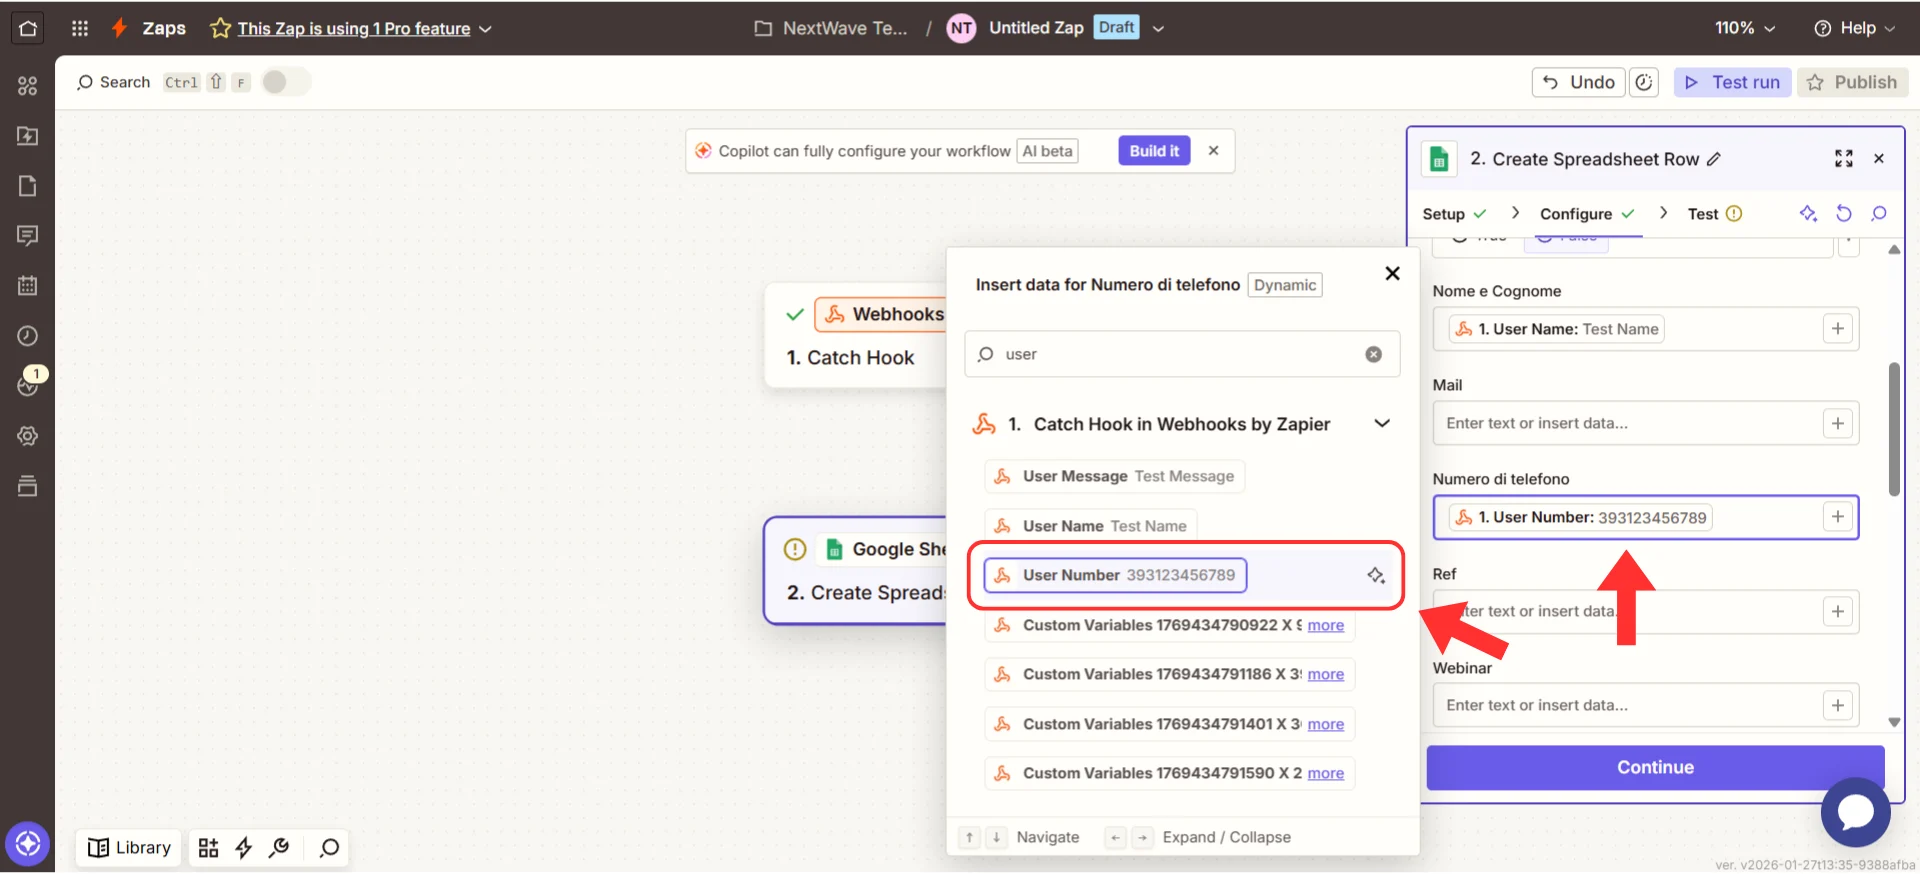
 8. **Map your fields** — this is where you tell Zapier which Irelia data goes into which spreadsheet column. Click into each field, and Zapier will show you all available data from Irelia. Select the one you want.
 9. Click the **"Continue"** button
**Skip to [Step 5](#step-5-test-your-complete-automation) →**
#### Example B: Send Slack notifications
*Great for team visibility*
1. In the **"Action"** section, search for **"Slack"**
2. Choose **"Send Channel Message"**
3. Connect your Slack workspace
4. Select your **"Channel"** (e.g., #leads, #sales, #notifications)
9. Click the **"Continue"** button
**Skip to [Step 5](#step-5-test-your-complete-automation) →**
#### Example B: Send Slack notifications
*Great for team visibility*
1. In the **"Action"** section, search for **"Slack"**
2. Choose **"Send Channel Message"**
3. Connect your Slack workspace
4. Select your **"Channel"** (e.g., #leads, #sales, #notifications)
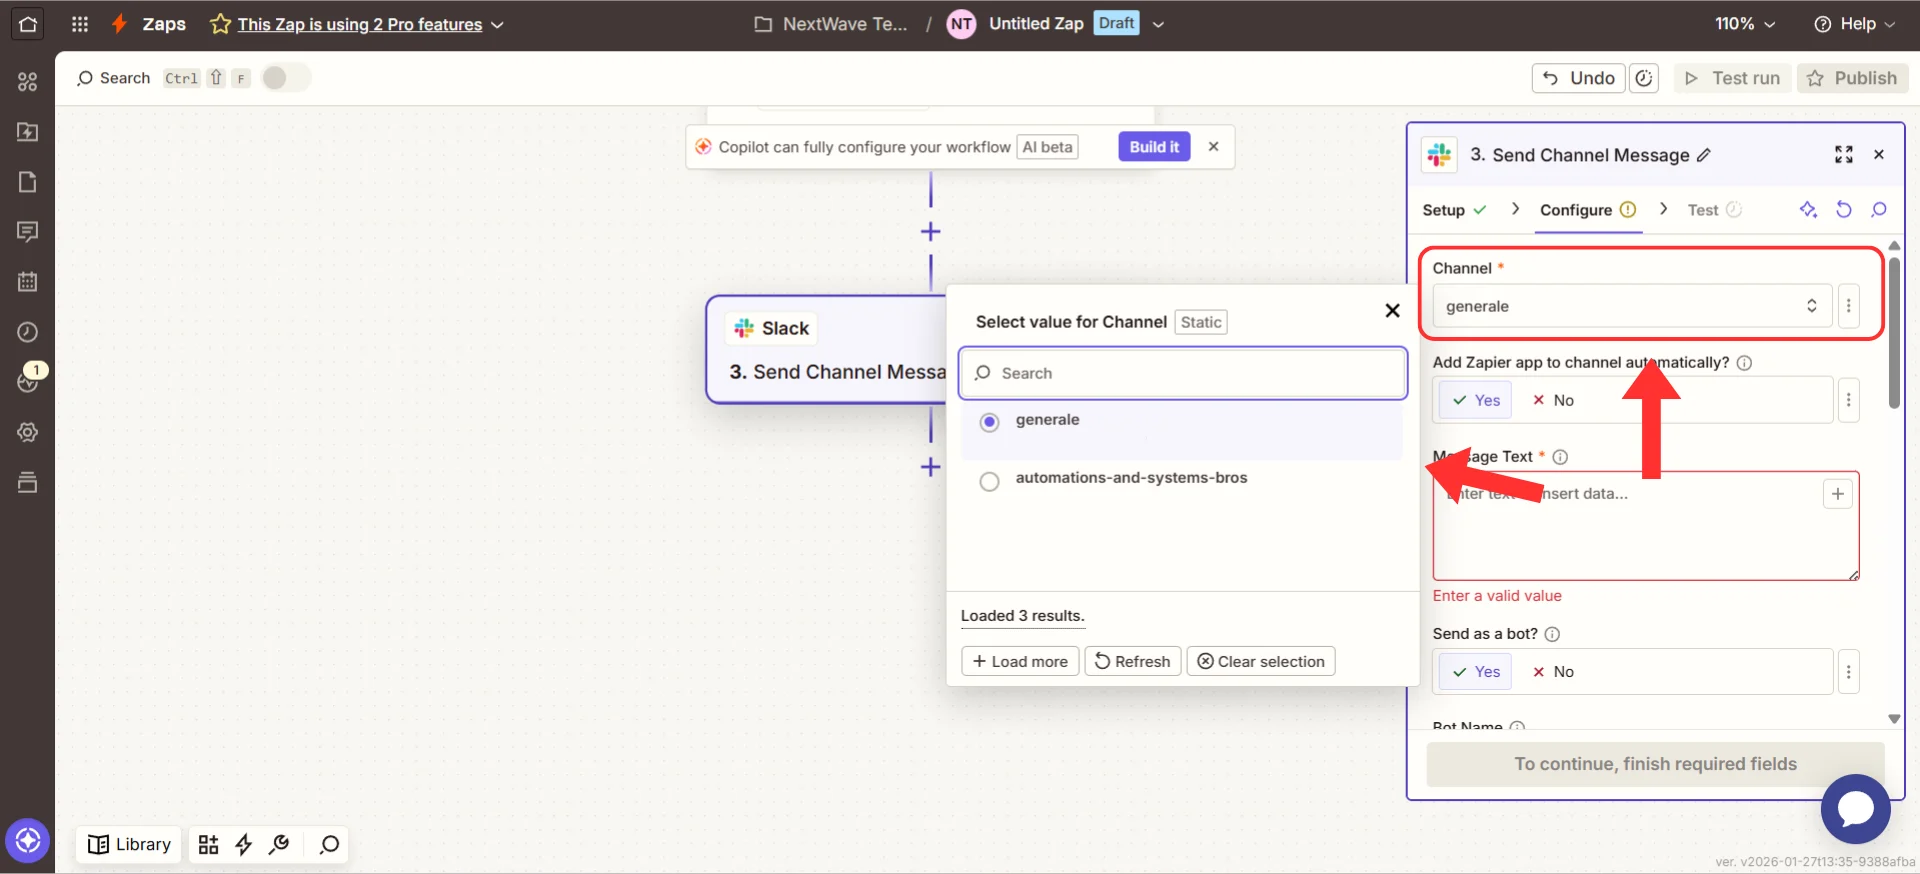 5. **Compose your message text** using Irelia data fields
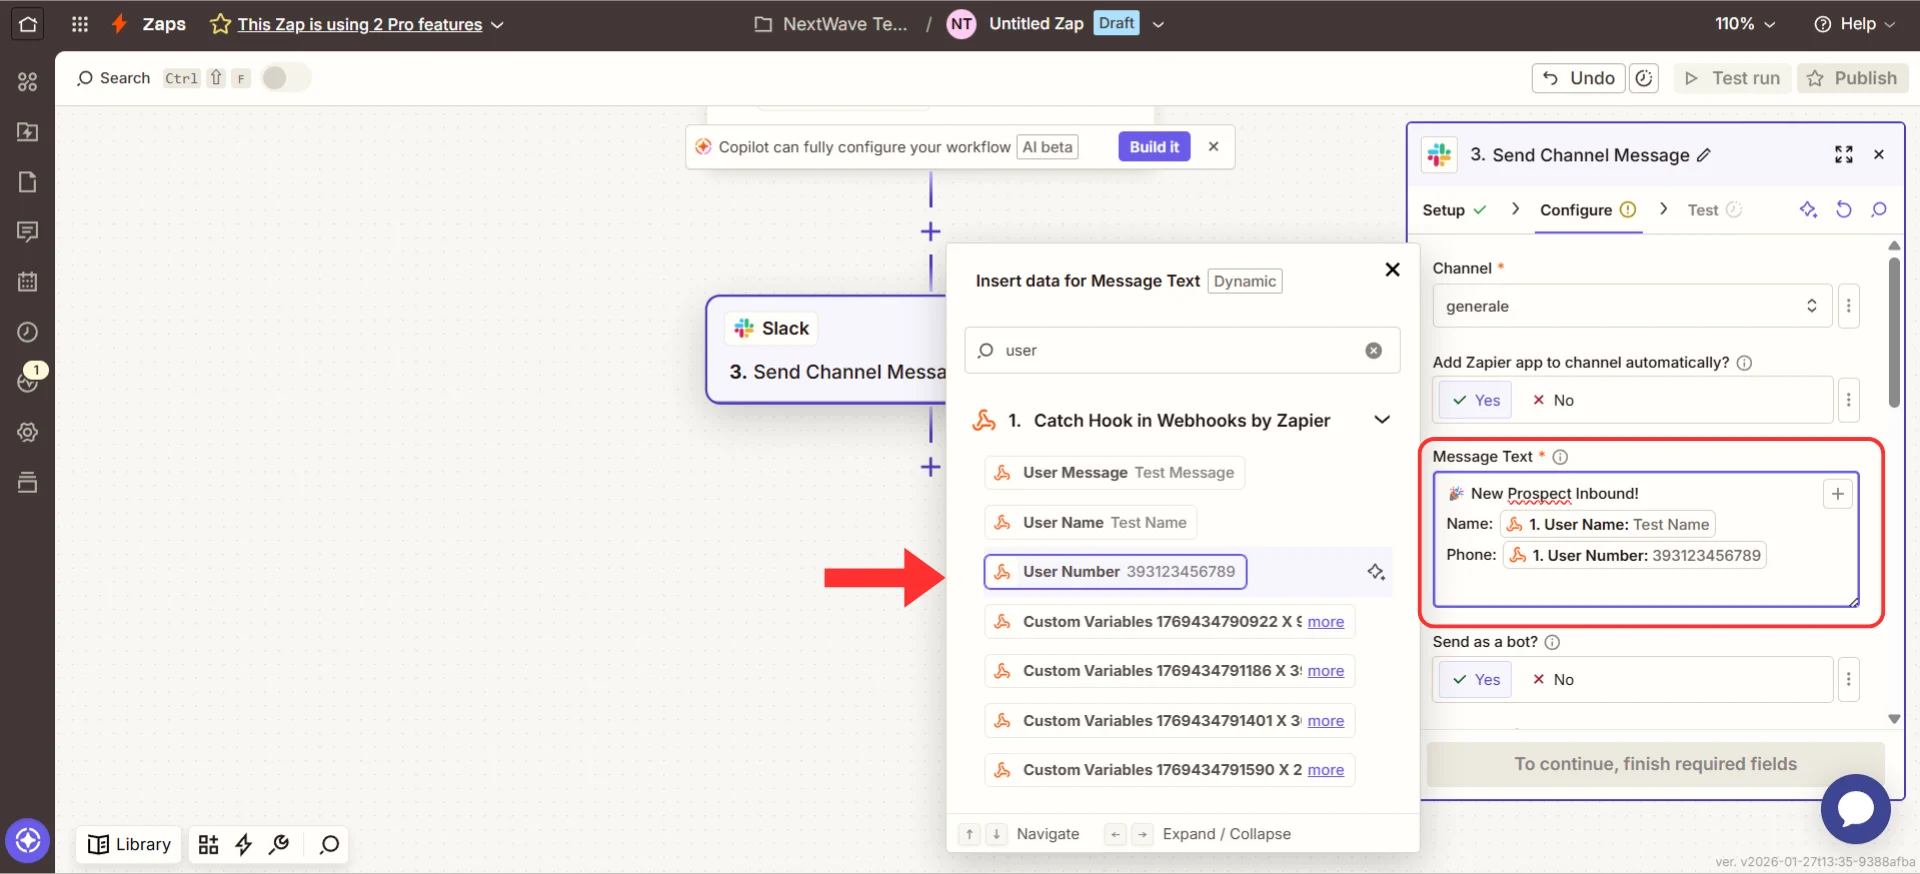 6. Click the **"Continue"** button
**Skip to [Step 5](#step-5-test-your-complete-automation) →**
#### Example C: Create a CRM contact
*Maximum business impact*
1. In the **"Action"** section, search for your CRM (HubSpot, Salesforce, Pipedrive, etc.)
2. Choose **"Create Contact"** (exact wording varies by CRM)
3. Connect your CRM account
4. Map Irelia fields to CRM fields
5. Click the **"Continue"** button
### Step 5: Test Your Complete Automation
\~3 minutes
Let's test the entire workflow end-to-end to make sure everything works together.
#### Run your test
1. At the bottom of your action setup, click the **"Test action"** button (or **"Test & Continue"**)
6. Click the **"Continue"** button
**Skip to [Step 5](#step-5-test-your-complete-automation) →**
#### Example C: Create a CRM contact
*Maximum business impact*
1. In the **"Action"** section, search for your CRM (HubSpot, Salesforce, Pipedrive, etc.)
2. Choose **"Create Contact"** (exact wording varies by CRM)
3. Connect your CRM account
4. Map Irelia fields to CRM fields
5. Click the **"Continue"** button
### Step 5: Test Your Complete Automation
\~3 minutes
Let's test the entire workflow end-to-end to make sure everything works together.
#### Run your test
1. At the bottom of your action setup, click the **"Test action"** button (or **"Test & Continue"**)
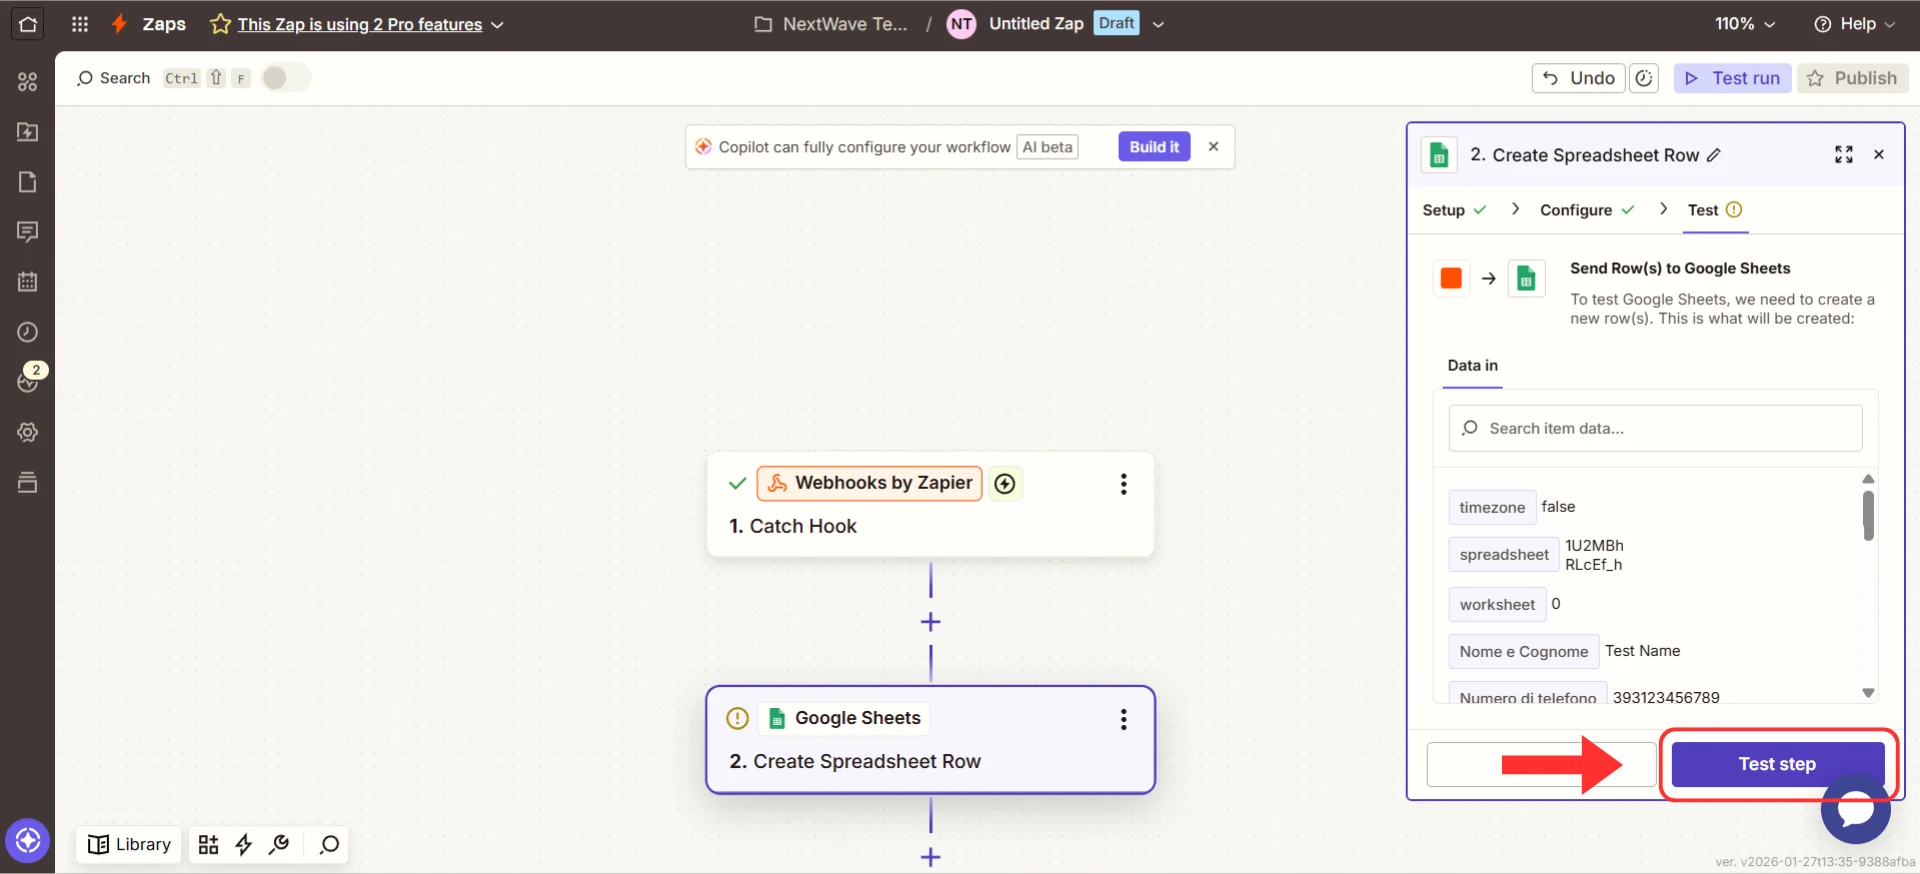 2. Zapier will send your test data to the app you selected
3. You'll see a success message: **"Test successful!"**
2. Zapier will send your test data to the app you selected
3. You'll see a success message: **"Test successful!"**
 #### Verify it worked
Now check your destination to confirm:
**If you chose Google Sheets:**
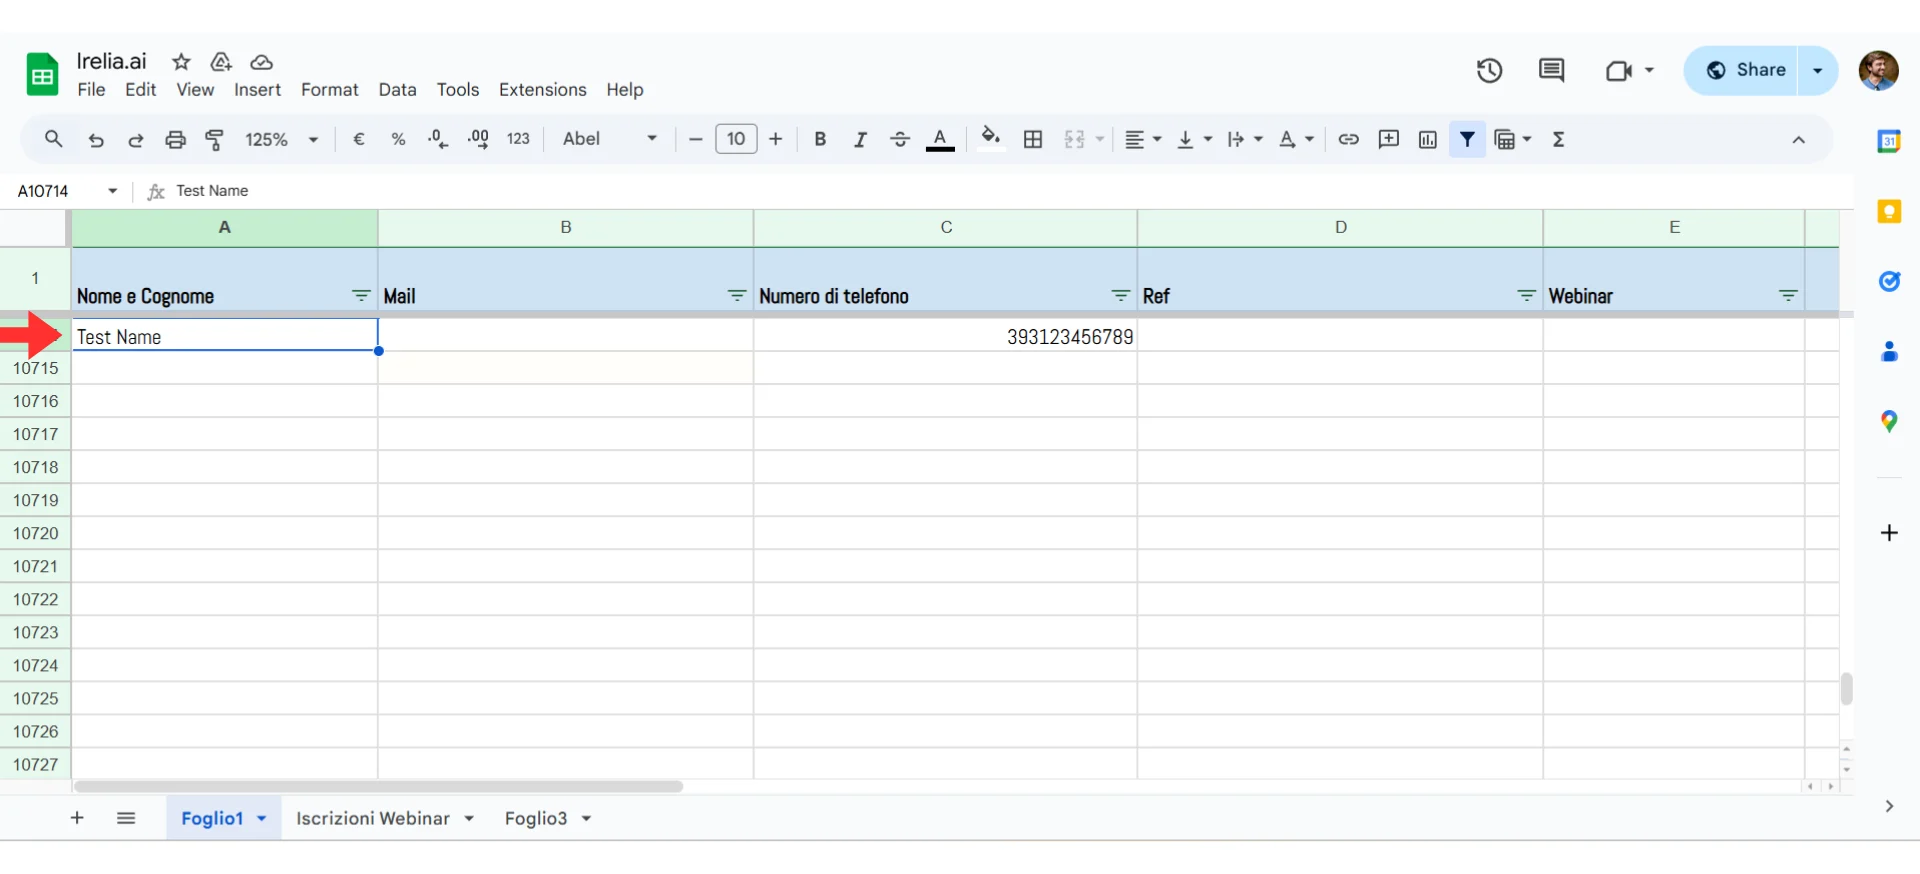
* Open your spreadsheet
* Look for a new row at the bottom with the test data
* You should see the prospect's name, phone number, status, etc.
#### Verify it worked
Now check your destination to confirm:
**If you chose Google Sheets:**
* Open your spreadsheet
* Look for a new row at the bottom with the test data
* You should see the prospect's name, phone number, status, etc.
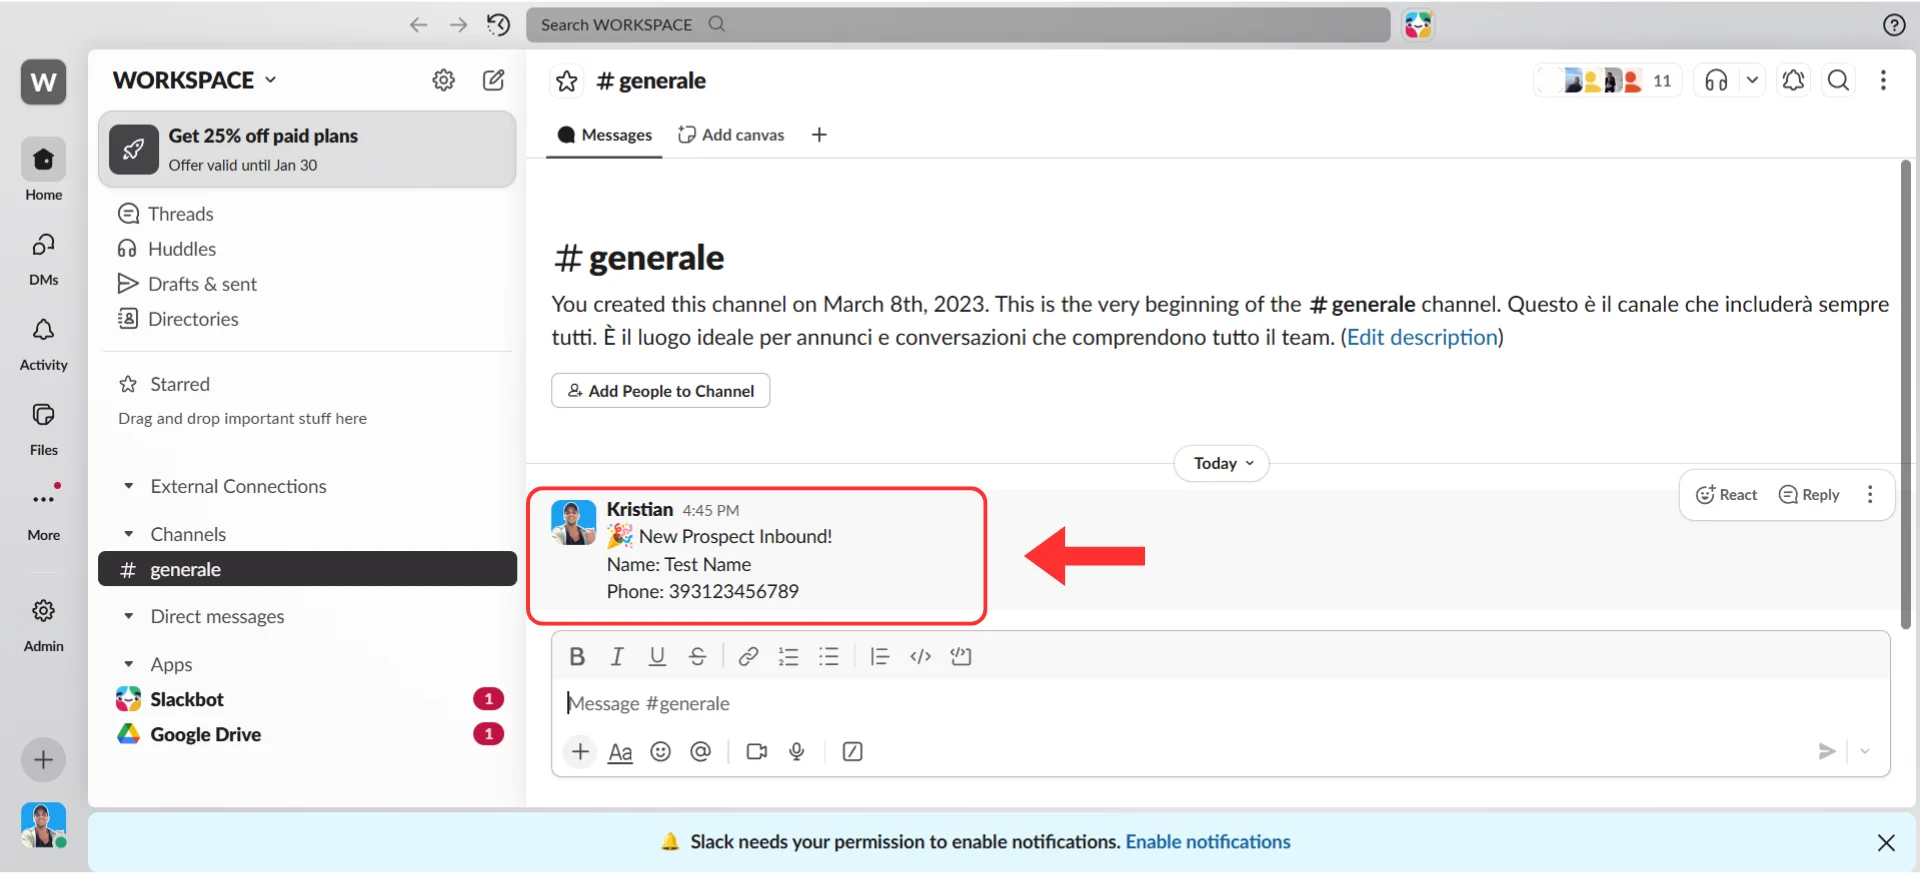
 **If you chose Slack:**
* Open Slack and go to your selected channel
* You should see your formatted message with the test data
**If you chose Slack:**
* Open Slack and go to your selected channel
* You should see your formatted message with the test data
 **If you chose a CRM:**
* Open your CRM and search for the test contact
* Verify the fields are populated correctly
**Success!** Your data appeared in the right place — your automation works!
### Step 6: Activate and Name Your Zap
\~1 minute
#### Activate your Zap
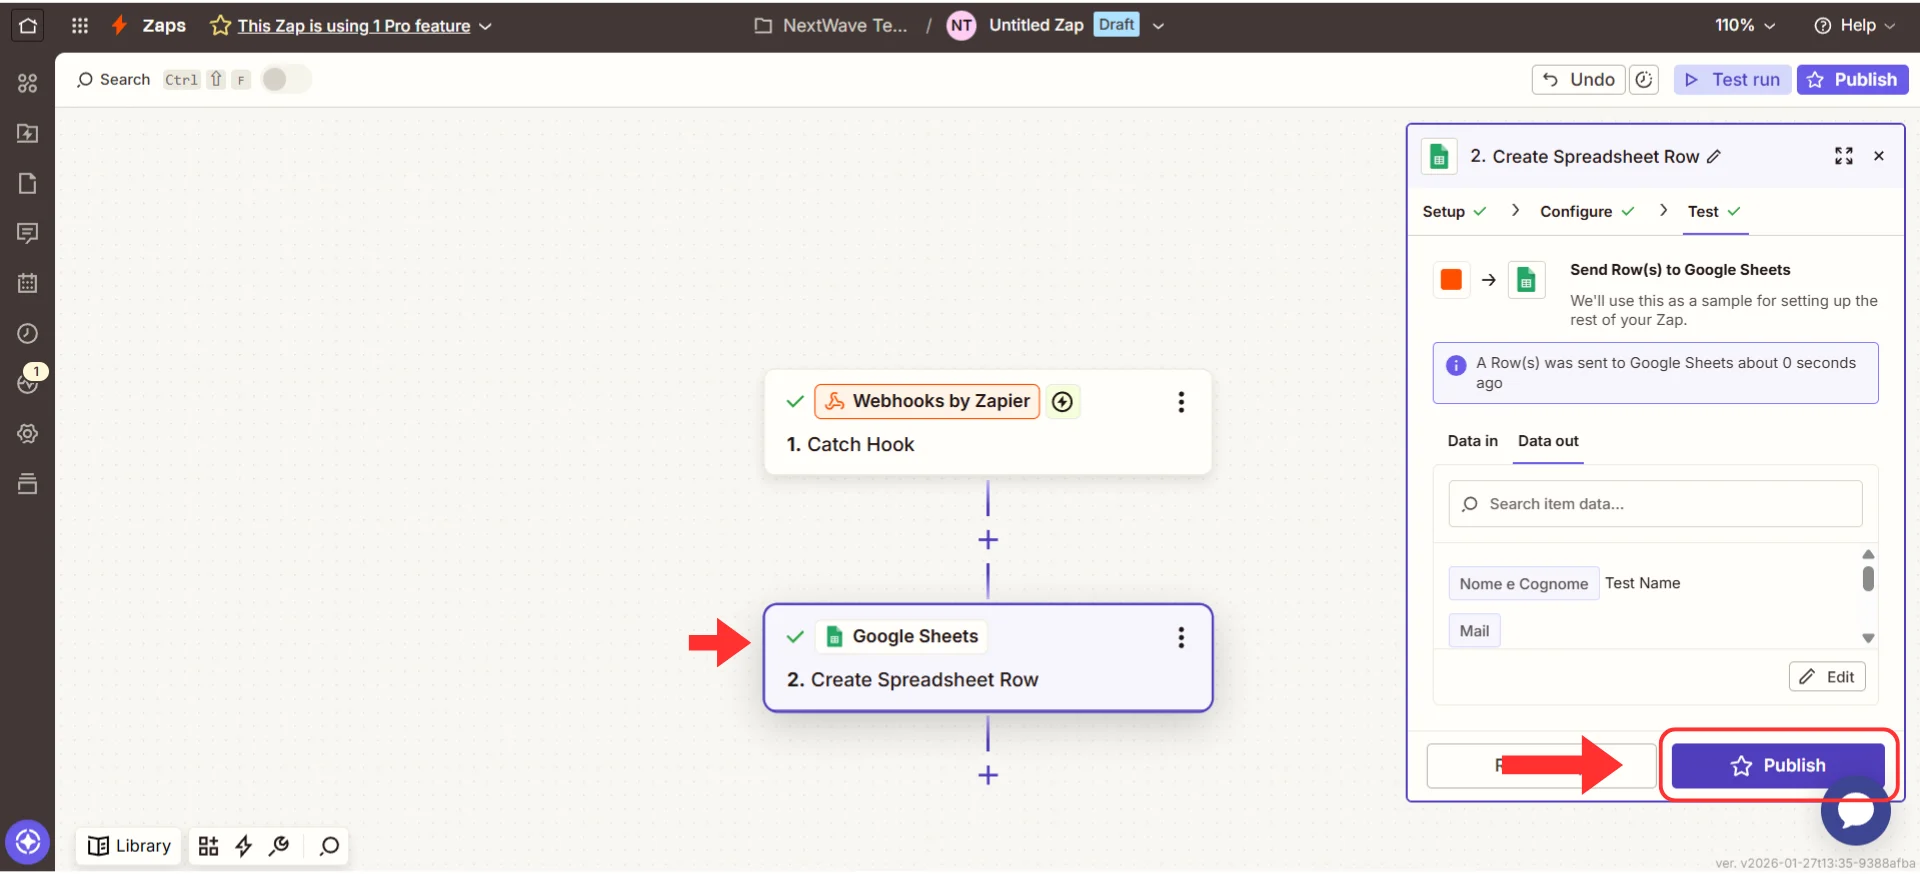
1. At the top of your Zap editor, click the toggle or **"Publish"** button to turn your Zap **ON**
2. You'll see a confirmation: **"Your Zap is ON"**
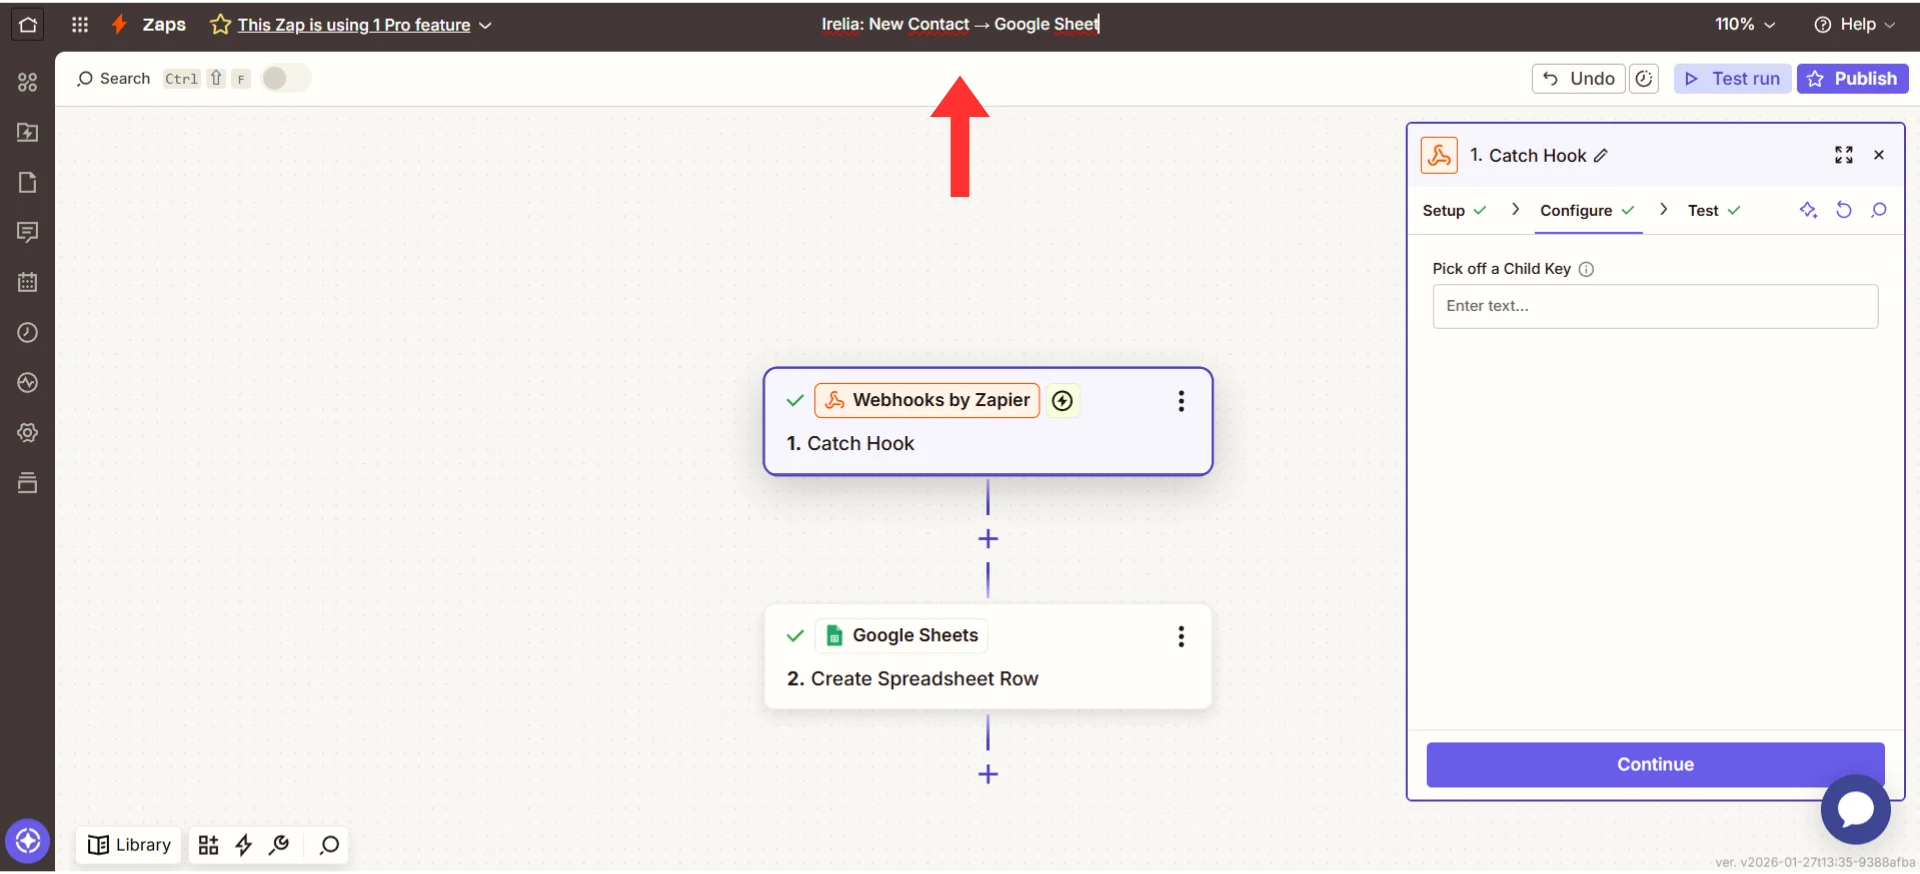
#### Give your Zap a name
3. Click on the Zap name at the top (it probably says something like "Webhooks by Zapier + Google Sheets")
4. Rename it to something descriptive like: `Irelia: New Contact → Google Sheet`
**If you chose a CRM:**
* Open your CRM and search for the test contact
* Verify the fields are populated correctly
**Success!** Your data appeared in the right place — your automation works!
### Step 6: Activate and Name Your Zap
\~1 minute
#### Activate your Zap
1. At the top of your Zap editor, click the toggle or **"Publish"** button to turn your Zap **ON**
2. You'll see a confirmation: **"Your Zap is ON"**
#### Give your Zap a name
3. Click on the Zap name at the top (it probably says something like "Webhooks by Zapier + Google Sheets")
4. Rename it to something descriptive like: `Irelia: New Contact → Google Sheet`
 **Success!** Your automation is now live!
### 🎉 Congratulations! You Did It!
Take a moment to appreciate what you just built:
✅ Your AI agent now talks to your other tools automatically
**Success!** Your automation is now live!
### 🎉 Congratulations! You Did It!
Take a moment to appreciate what you just built:
✅ Your AI agent now talks to your other tools automatically
✅ Important moments trigger instant actions
✅ No more manual data entry or checking dashboards — your systems are always up-to-date
✅ Your leads get faster, better follow-up
**What happens now:**
Every time someone reaches out to your Irelia agent for the first time → Irelia automatically sends their information to Zapier → Zapier immediately performs your action → All without you lifting a finger.
**Quick tips for success:**
* 🎯 **Start simple** — One event, one action. Master that before expanding.
* 🧪 **Test thoroughly** — Always verify with real data before relying on automation.
* 📊 **Monitor regularly** — Check Zap History weekly, especially at first.
* 🔄 **Iterate** — Your first automation doesn't have to be perfect. Refine over time.
* 🤝 **Ask for help** — Both Irelia and Zapier have great support teams.
Remember: every automation expert started with one simple Zap. You just built yours. The possibilities from here are endless. **Happy automating! 🚀**
### Monitoring Your Automation
**First few days:** Check daily to ensure your Zaps run successfully and your data looks correct.
**Ongoing:** Zapier sends you email notifications when Zaps error out, so you don't need to check constantly. Just verify things are working during the first few days.
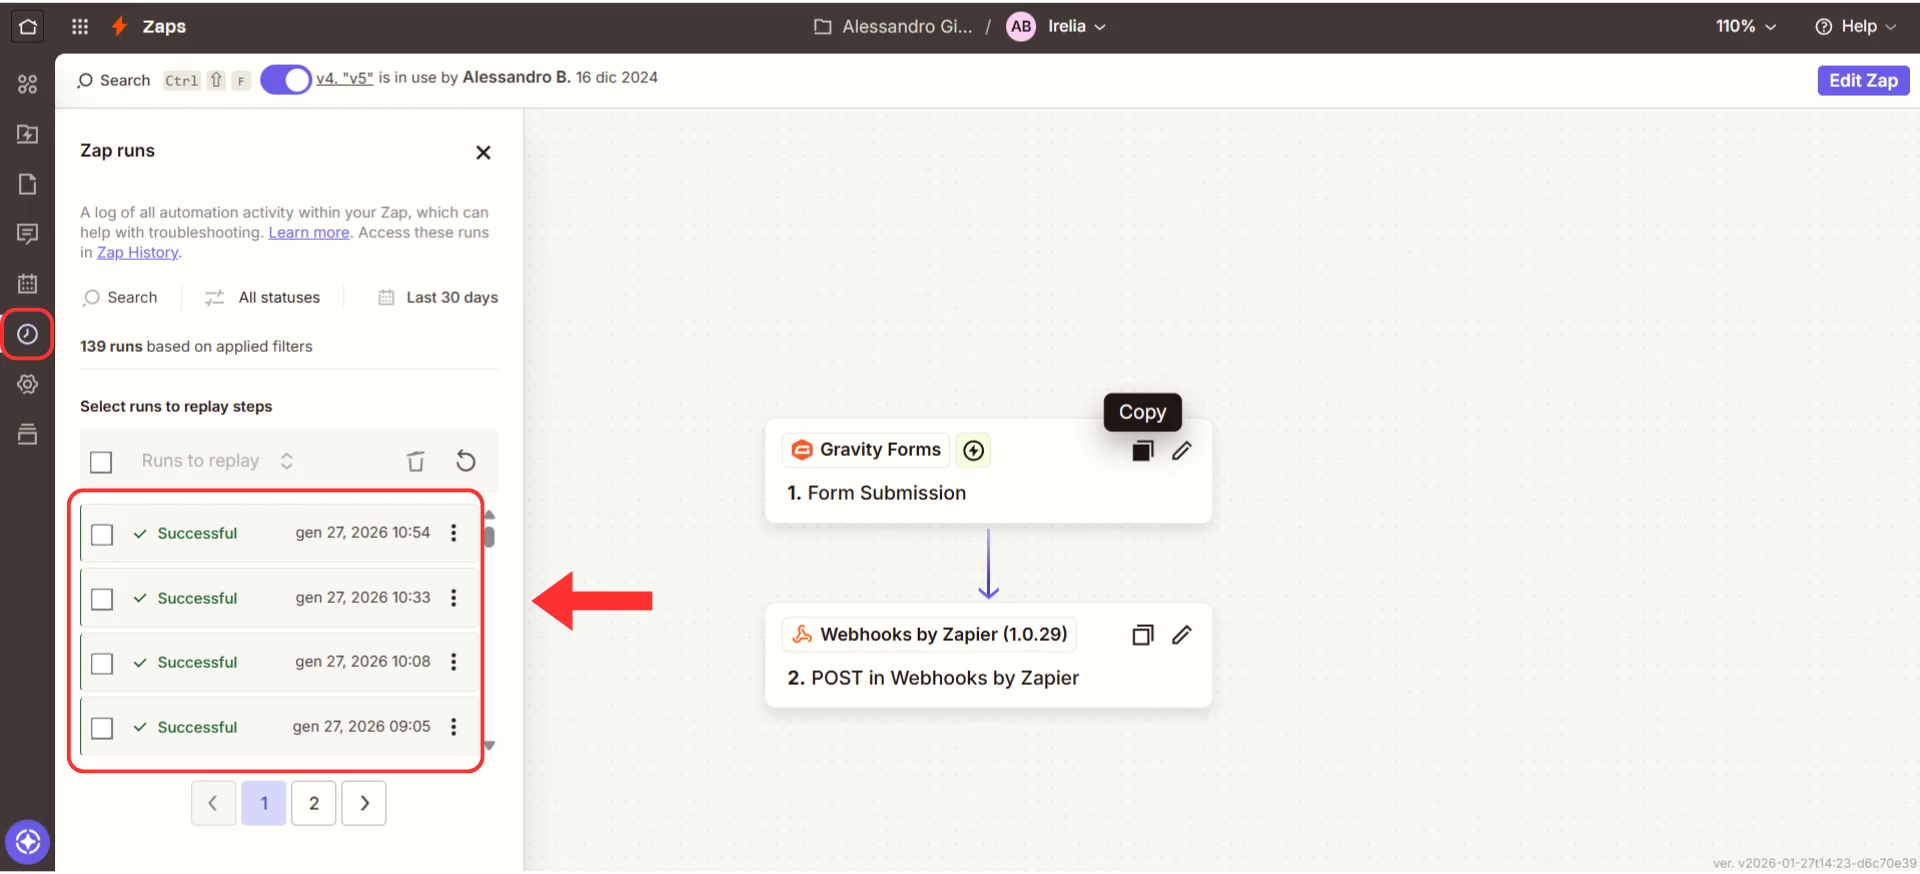
#### Check your Zap History
1. Go to **"Zap History"** (found in the left sidebar of your Zapier dashboard)
2. Here you can see every time your Zap runs:
* ✅ Success (green checkmark)
* ❌ Error (red X with details)
 **Pro tip:** Go to **"Account Settings"** → **"Notifications"** to enable email alerts for Zap errors.
### What's Next?
Now that you have one working automation, the possibilities are endless.
If you want to connect to more events like "Data Gathered," "Lead Qualified," or "Goal Achieved," simply repeat the steps above and customize the action (Step 4) to achieve your desired result.
**Your options from here:**
1. 🎯 **Want to track another event?** Create a new Zap and repeat this guide — just select a different event in Step 2
2. ➕ **Want this Zap to do more things?** Edit your Zap and click the **+** button below your action to add more actions
3. 🤖 **Have another agent to connect?** Repeat this guide for your other agents — each can have its own automations
4. ⚡ **Ready for advanced workflows?** Check out the [Advanced Automations](#-advanced-automations) section below
## 🚀 Advanced Automations
Ready to do more? These sections show you how to build sophisticated workflows.
### Search and Update Existing Records
Sometimes you don't want to create a new record — you want to update an existing one. For example, when a lead you already added gets qualified, or when new data is gathered for someone already in your system.
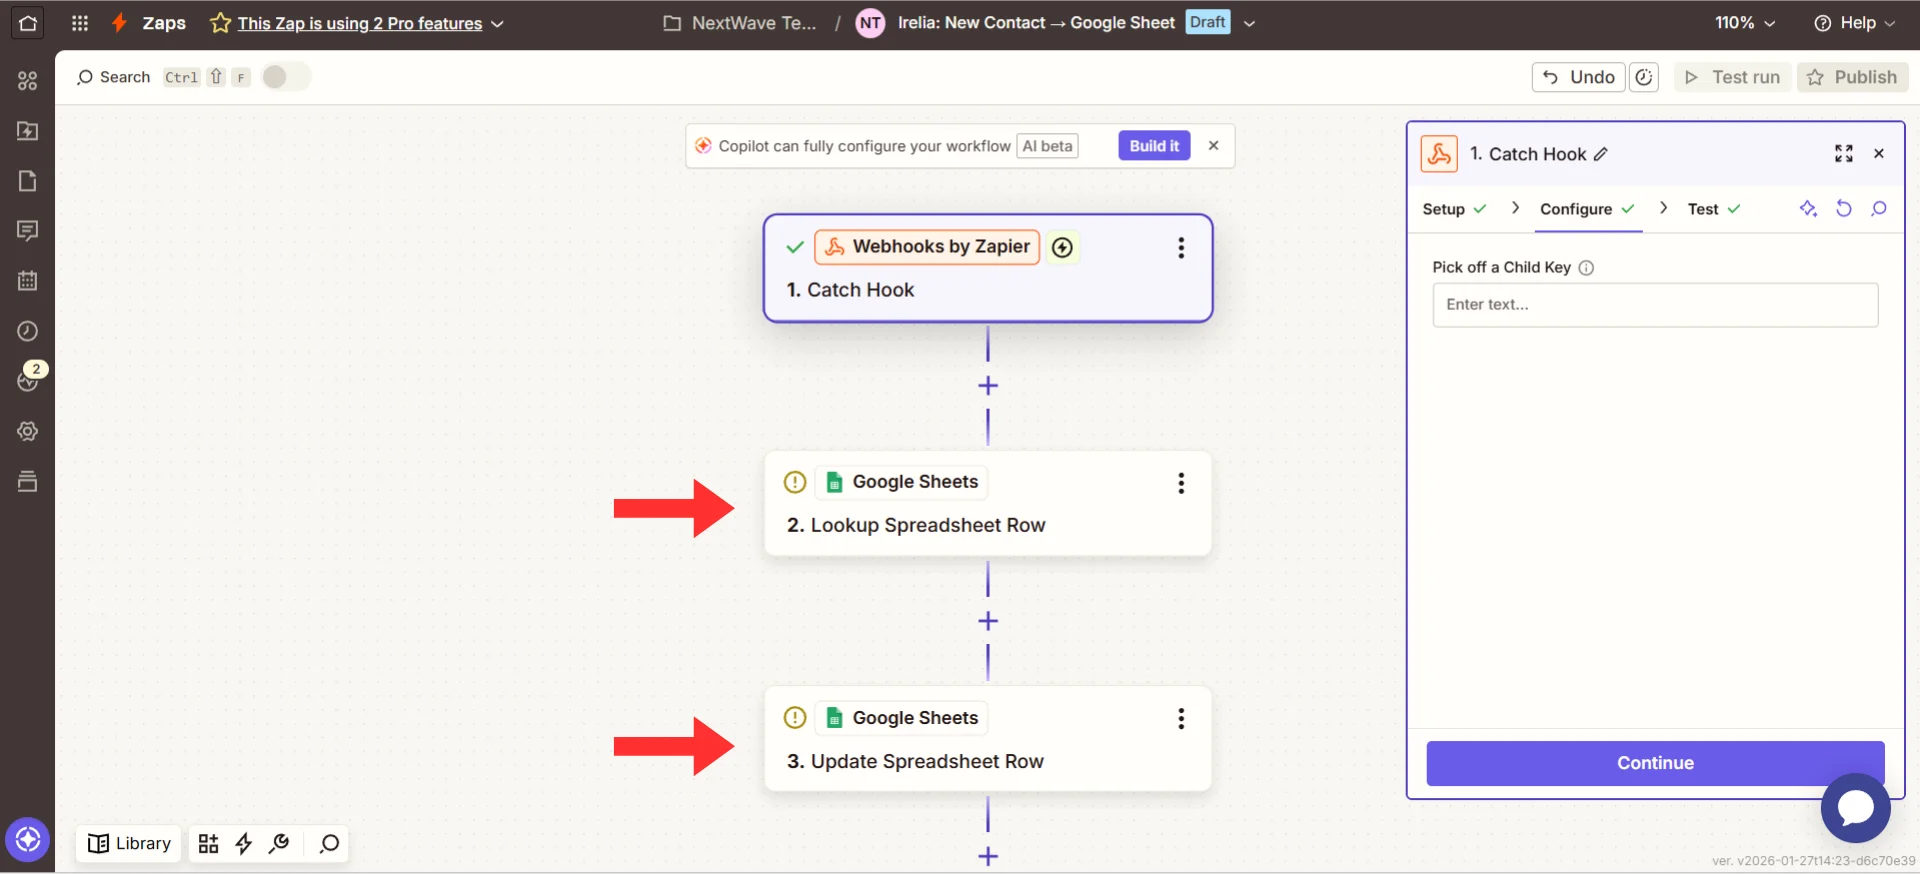
This requires a two-step approach: **search first, then update.**
**Example:** Update an existing lead's row when they get qualified.
**Trigger:** Lead Qualified
**Actions:**
1. **Search for the existing row**
* Add action: **"Google Sheets"** → **"Lookup Spreadsheet Row"**
* Set **"Lookup Column"** to "Phone"
* Set **"Lookup Value"** to `userNumber` from Irelia
* This finds the row matching the prospect's phone number
2. **Update that row with new data**
* Add action: **"Google Sheets"** → **"Update Spreadsheet Row"**
* Set **"Row"** to the row number returned from the search action
* Map the fields you want to update (lead status, interest score, etc.)
**Pro tip:** Go to **"Account Settings"** → **"Notifications"** to enable email alerts for Zap errors.
### What's Next?
Now that you have one working automation, the possibilities are endless.
If you want to connect to more events like "Data Gathered," "Lead Qualified," or "Goal Achieved," simply repeat the steps above and customize the action (Step 4) to achieve your desired result.
**Your options from here:**
1. 🎯 **Want to track another event?** Create a new Zap and repeat this guide — just select a different event in Step 2
2. ➕ **Want this Zap to do more things?** Edit your Zap and click the **+** button below your action to add more actions
3. 🤖 **Have another agent to connect?** Repeat this guide for your other agents — each can have its own automations
4. ⚡ **Ready for advanced workflows?** Check out the [Advanced Automations](#-advanced-automations) section below
## 🚀 Advanced Automations
Ready to do more? These sections show you how to build sophisticated workflows.
### Search and Update Existing Records
Sometimes you don't want to create a new record — you want to update an existing one. For example, when a lead you already added gets qualified, or when new data is gathered for someone already in your system.
This requires a two-step approach: **search first, then update.**
**Example:** Update an existing lead's row when they get qualified.
**Trigger:** Lead Qualified
**Actions:**
1. **Search for the existing row**
* Add action: **"Google Sheets"** → **"Lookup Spreadsheet Row"**
* Set **"Lookup Column"** to "Phone"
* Set **"Lookup Value"** to `userNumber` from Irelia
* This finds the row matching the prospect's phone number
2. **Update that row with new data**
* Add action: **"Google Sheets"** → **"Update Spreadsheet Row"**
* Set **"Row"** to the row number returned from the search action
* Map the fields you want to update (lead status, interest score, etc.)
 **Result:** Instead of creating duplicate rows, your existing lead's information gets updated in place.
**Phone number format must match.** For the search to work, the phone number format in your existing records must match the format Irelia sends. Irelia sends phone numbers **with the international prefix** (e.g., `393401234567`). If your existing records store phone numbers **without** the prefix (e.g., `3401234567`), the search won't find a match — because `3401234567` and `393401234567` are technically different values. Store phone numbers with the international prefix in your spreadsheets and CRMs to ensure Irelia's data always matches your existing records.
**Same logic applies to CRMs.** Most CRMs (HubSpot, Salesforce, Pipedrive) have similar "Find Contact" and "Update Contact" actions. Search by phone number, then update with the new data. Some CRMs even offer "Create or Update" actions that handle both scenarios automatically.
### Using Filters to Control When Actions Run
Filters let you add conditions so your action doesn't run for every event.
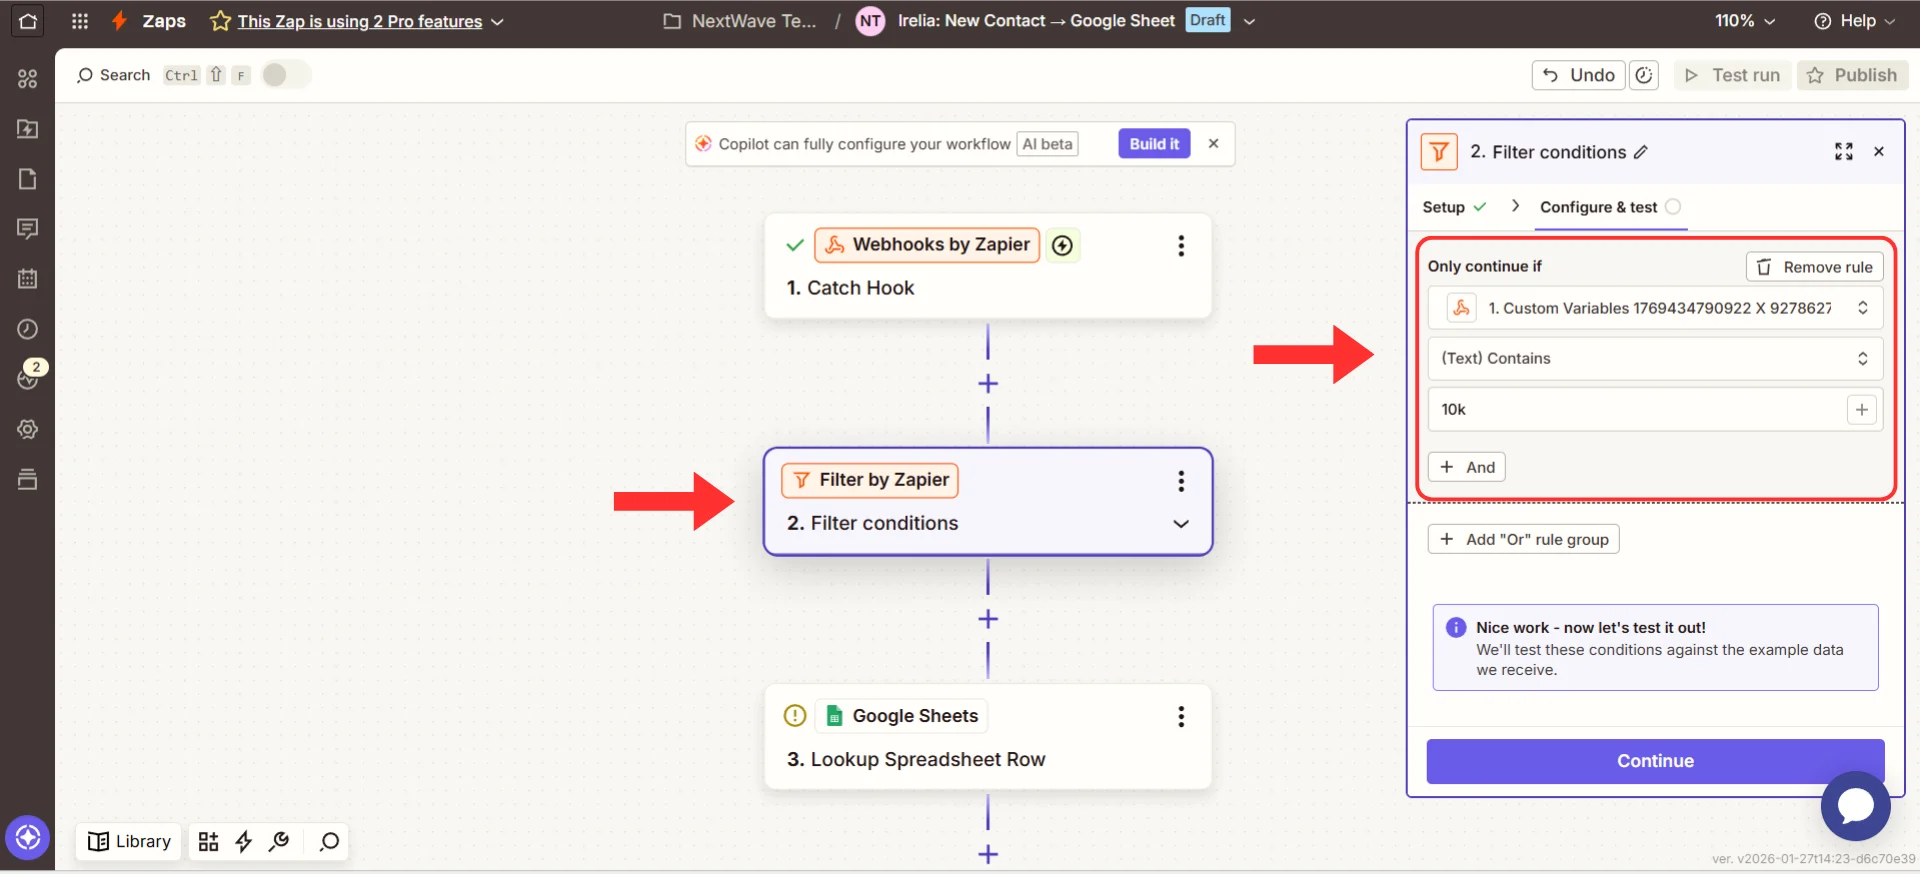
**Example:** Only add to CRM if the prospect's budget is "\$10k-50k" or higher.
1. In your Zap, click the **+** button between the trigger and action
2. Select **"Filter"**
3. Set your condition: `customVariables Value` **(text) contains** `$10k`
4. Only leads meeting this criteria will continue to your action
**Result:** Instead of creating duplicate rows, your existing lead's information gets updated in place.
**Phone number format must match.** For the search to work, the phone number format in your existing records must match the format Irelia sends. Irelia sends phone numbers **with the international prefix** (e.g., `393401234567`). If your existing records store phone numbers **without** the prefix (e.g., `3401234567`), the search won't find a match — because `3401234567` and `393401234567` are technically different values. Store phone numbers with the international prefix in your spreadsheets and CRMs to ensure Irelia's data always matches your existing records.
**Same logic applies to CRMs.** Most CRMs (HubSpot, Salesforce, Pipedrive) have similar "Find Contact" and "Update Contact" actions. Search by phone number, then update with the new data. Some CRMs even offer "Create or Update" actions that handle both scenarios automatically.
### Using Filters to Control When Actions Run
Filters let you add conditions so your action doesn't run for every event.
**Example:** Only add to CRM if the prospect's budget is "\$10k-50k" or higher.
1. In your Zap, click the **+** button between the trigger and action
2. Select **"Filter"**
3. Set your condition: `customVariables Value` **(text) contains** `$10k`
4. Only leads meeting this criteria will continue to your action
 **Common filter use cases:**
* Only add to CRM if budget matches your target → `customVariables Value` **equals** `$10k-50k`
* Only notify team if company size is "Enterprise" → `customVariables Value` **contains** `Enterprise`
* Only send to sales if lead is qualified → `leadQualification` **equals** `"fit"`
**Tip:** Use the `value` field (the categorized answer) for filters rather than `valueRaw` (exact words). The categorized value is more consistent and reliable for matching conditions.
### Multi-Step Zaps
Why do one thing when you can do several?
**Example:** When a lead is qualified:
1. Add to HubSpot CRM
2. Send Slack notification to sales team
3. Add to "Hot Leads" Google Sheet
4. Send welcome email
**How to set this up:**
1. After your first action, click the **+** button below it
2. Select **"Action"**
3. Add your second app and configure it
4. Repeat for additional actions
**Common filter use cases:**
* Only add to CRM if budget matches your target → `customVariables Value` **equals** `$10k-50k`
* Only notify team if company size is "Enterprise" → `customVariables Value` **contains** `Enterprise`
* Only send to sales if lead is qualified → `leadQualification` **equals** `"fit"`
**Tip:** Use the `value` field (the categorized answer) for filters rather than `valueRaw` (exact words). The categorized value is more consistent and reliable for matching conditions.
### Multi-Step Zaps
Why do one thing when you can do several?
**Example:** When a lead is qualified:
1. Add to HubSpot CRM
2. Send Slack notification to sales team
3. Add to "Hot Leads" Google Sheet
4. Send welcome email
**How to set this up:**
1. After your first action, click the **+** button below it
2. Select **"Action"**
3. Add your second app and configure it
4. Repeat for additional actions
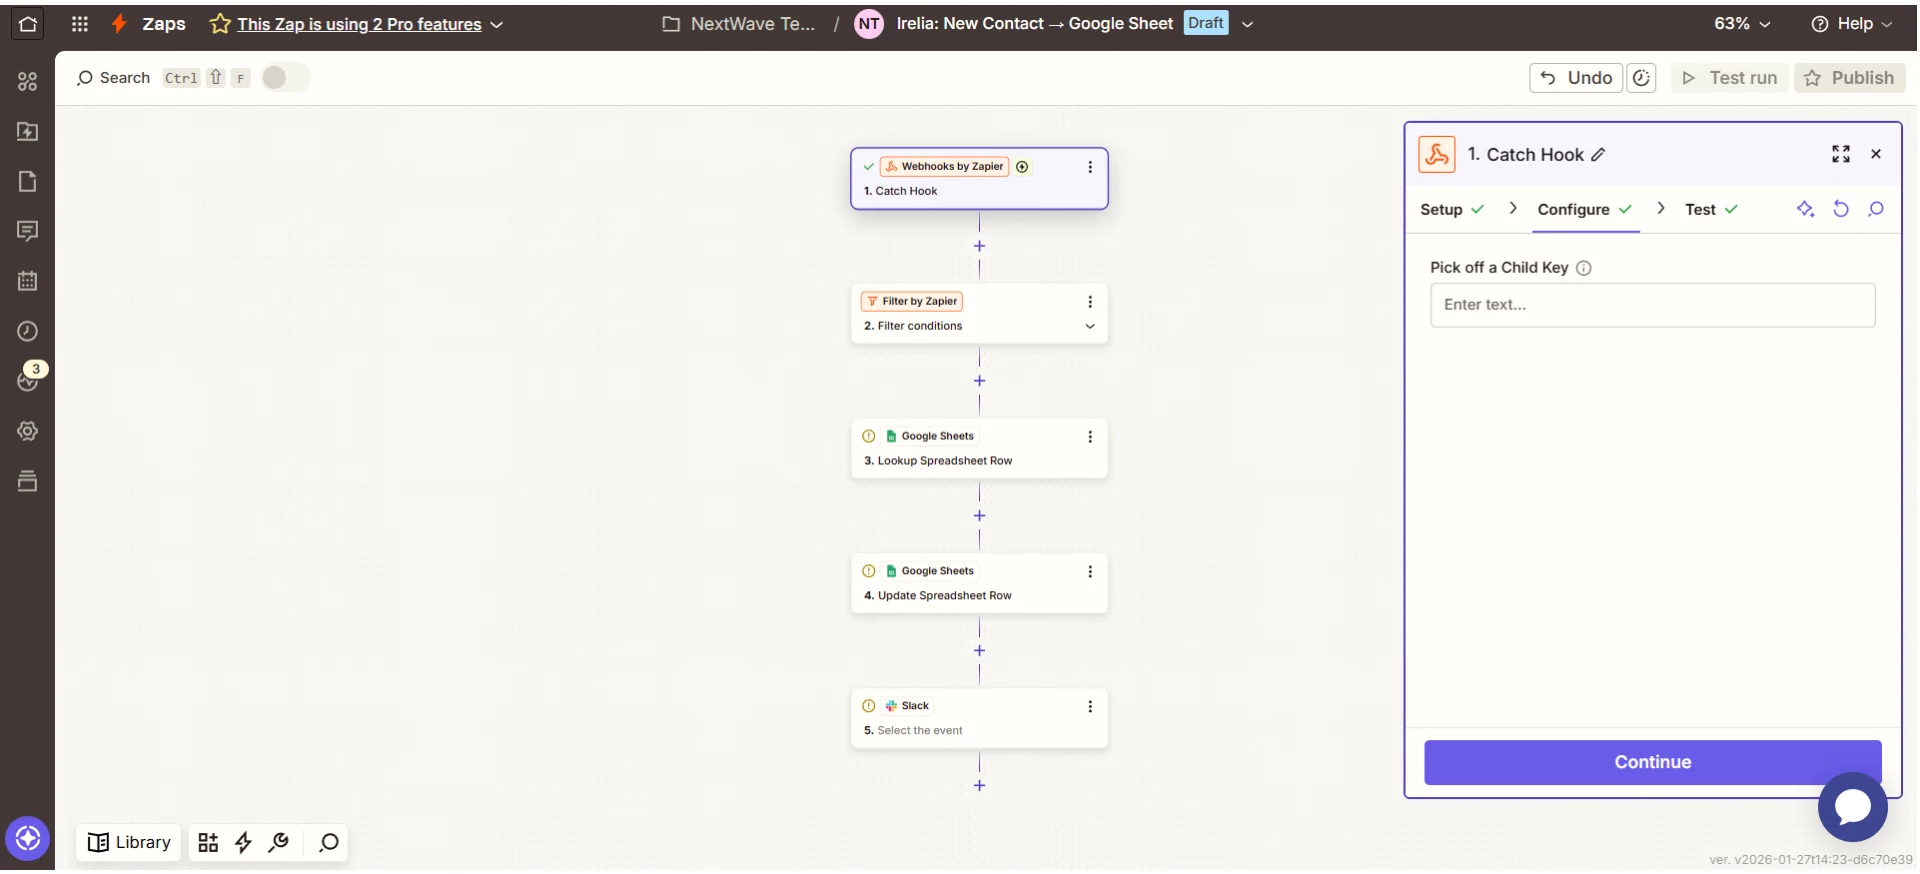 **Tip:** Actions run top-to-bottom. If an earlier action fails, later ones won't run. Place your most critical action first.
### Using Paths for If/Then Logic
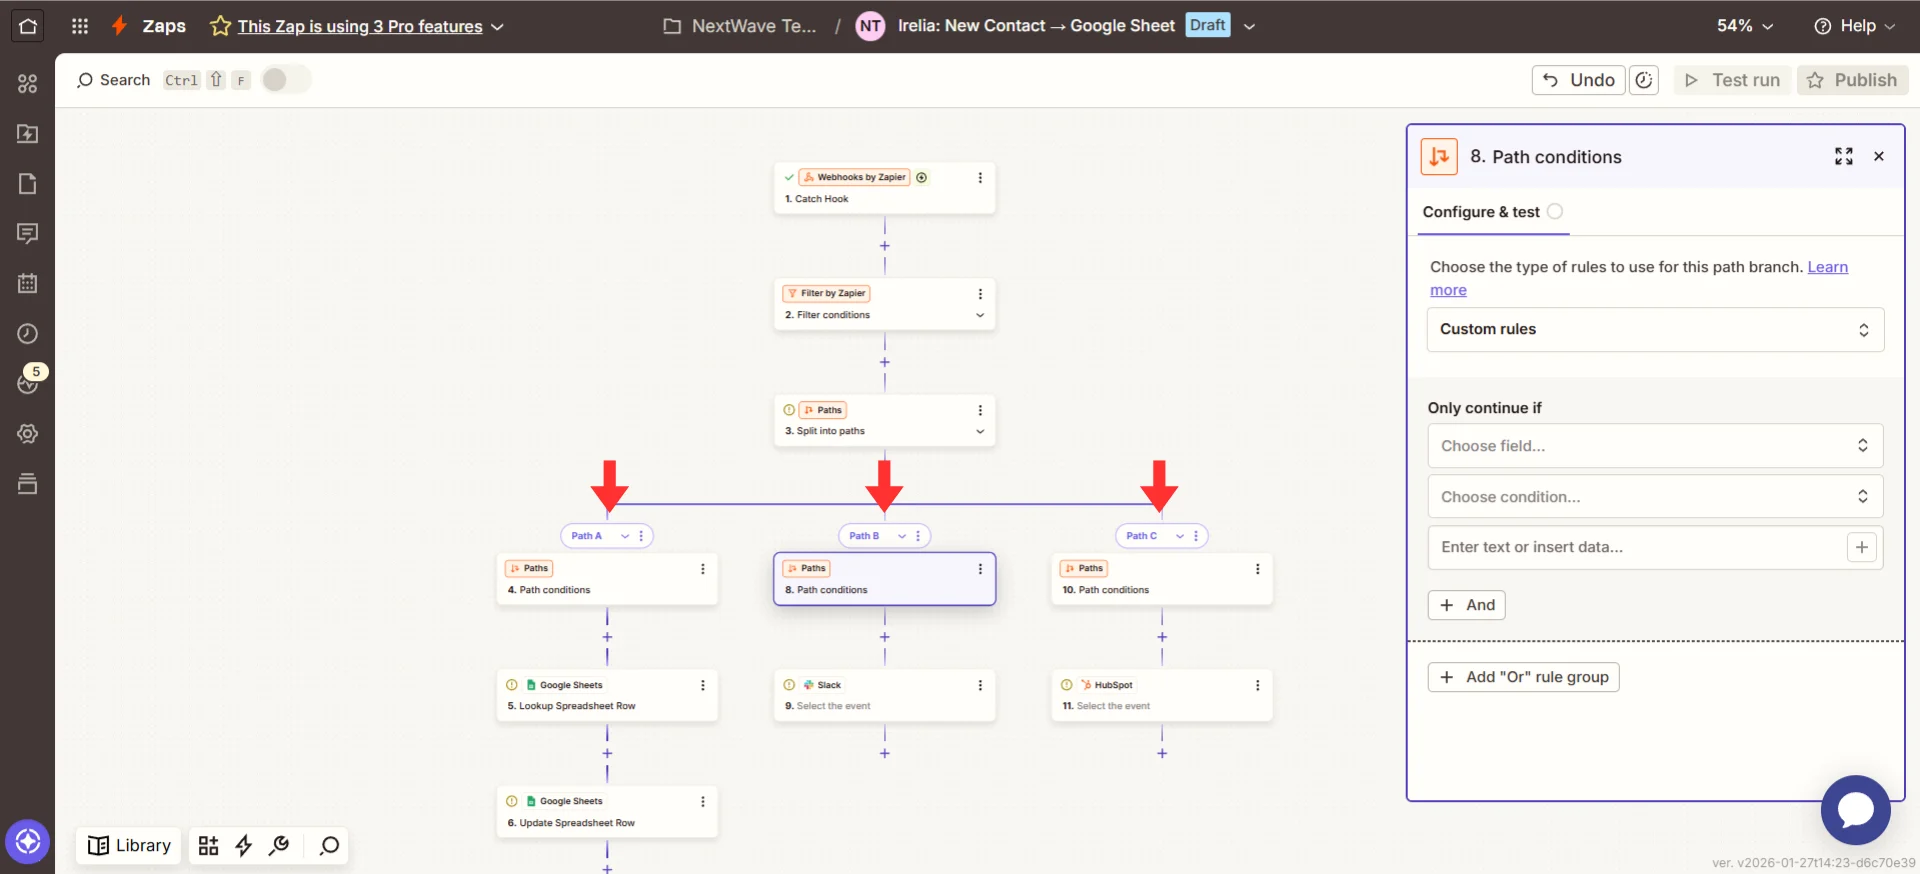
Paths let you create branching logic based on data.
**Example:** Route leads based on qualification status:
* **If** `leadQualification` equals `"fit"` → **Path A:** Add to HubSpot + Notify sales
* **Else If** `leadQualification` equals `"not a fit"` → **Path B:** Add to nurture campaign
* **Else** (`"TBD"`) → **Path C:** Add to "Needs Review" spreadsheet
**Tip:** Actions run top-to-bottom. If an earlier action fails, later ones won't run. Place your most critical action first.
### Using Paths for If/Then Logic
Paths let you create branching logic based on data.
**Example:** Route leads based on qualification status:
* **If** `leadQualification` equals `"fit"` → **Path A:** Add to HubSpot + Notify sales
* **Else If** `leadQualification` equals `"not a fit"` → **Path B:** Add to nurture campaign
* **Else** (`"TBD"`) → **Path C:** Add to "Needs Review" spreadsheet
 ### Using Formatter for Data Transformation
Zapier's Formatter tool lets you transform data before sending it:
* Format phone numbers consistently (add country code)
* Split `userName` into first name and last name
* Convert `interestScore` from decimal (0.85) to percentage (85%)
* Change date formats to match your CRM
### Real-World Use Case Examples
#### Use case 1: Qualified lead fast track
**Trigger:** Lead Qualified
**Actions:**
1. Create contact in HubSpot with "Hot Lead" status
2. Send Slack notification to sales team
3. Add to "Qualified Leads" Google Sheet
4. Send welcome email via Gmail
**Impact:** Sales team engages qualified leads within minutes instead of hours.
#### Use case 2: Disqualified lead nurture
**Trigger:** Lead Disqualified
**Actions:**
1. Add to Mailchimp nurture campaign
2. Log in "Nurture Pipeline" spreadsheet
3. Create task in Asana to follow up in 3 months
**Impact:** No lead is wasted; everyone gets appropriate follow-up.
#### Use case 3: Knowledge gap tracking
**Trigger:** Question Lacking Answer
**Actions:**
1. Send Slack notification to content team so they can reply manually through the [Irelia dashboard](/en/the-Chat-Panel)
2. Log in "Knowledge Base Gaps" spreadsheet
**Impact:** Continuously improve your AI agent's knowledge.
#### Use case 4: Goal achievement flow
**Trigger:** Goal Achieved
**Actions:**
1. Send confirmation email with next steps
2. Update CRM with goal completion
3. Notify account manager in Slack
**Impact:** Instant positive reinforcement and seamless customer journey.
#### Use case 5: Rich data capture
**Trigger:** Data Gathered
**Actions:**
1. Update CRM with custom variables (budget, timeline, company size)
2. Add to segment-specific sheet (Enterprise vs SMB)
3. Trigger personalized email based on answers
**Impact:** Rich prospect data flows automatically; no manual entry.
## ✅ Quick Checklist
Use this to verify your setup is complete:
* Webhook URL copied from Zapier
* URL pasted into Irelia for your chosen event
* Test data sent from Irelia
* Test data received in Zapier
* Action configured (Google Sheets, Slack, or CRM)
* Action tested successfully
* Zap turned ON
* Zap given a descriptive name
* Triggered a real event (or used the **"Test"** button)
* Confirmed data appeared in destination app
* Checked Zap History shows successful run
✅ **All checked? You're good to go!**
## 🛠️ Troubleshooting & FAQs
Don't panic! Here are the most common issues and exactly how to fix them.
**How to fix it:**
**Step 1: Verify the webhook URL in Irelia**
* Go to Irelia → **"Events and Notifications"**
* Check that the webhook URL is filled in for your event
* Make sure it matches the URL from Zapier exactly (no extra spaces)
**Step 2: Send test data again**
* Click the blue **"Test"** button in Irelia next to your webhook URL
* Wait 5–10 seconds
* Go back to Zapier and click the **"Test trigger"** button again
**Step 3: Try a fresh webhook URL**
* If still not working, edit your Zap trigger and copy a new webhook URL
* Delete the old URL in Irelia and paste the new one
* Click **"Test"** again in Irelia
**How to fix it:**
**Step 1: Read the error message**
* Zapier shows detailed error messages in red
* Look for phrases like "Required field missing" or "Authentication failed"
**Step 2: Check required fields**
* Look for fields marked with a red asterisk (\*)
* Make sure each required field has data mapped
**Step 3: Reconnect your account**
* In your action setup, click **"Reconnect"** or the account name
* Sign in again and grant permissions
* Test the action again
**Step 4: Verify your destination exists**
* **Google Sheets:** Confirm the spreadsheet wasn't deleted
* **Slack:** Check the channel wasn't archived
* **CRM:** Verify pipeline/status values still exist
**How to fix it:**
**Step 1: Check Zap History for details**
* Go to Zapier → **"Zap History"**
* Click on your recent run to expand details
* Look at **"Data Out"** to see exactly what was sent
### Using Formatter for Data Transformation
Zapier's Formatter tool lets you transform data before sending it:
* Format phone numbers consistently (add country code)
* Split `userName` into first name and last name
* Convert `interestScore` from decimal (0.85) to percentage (85%)
* Change date formats to match your CRM
### Real-World Use Case Examples
#### Use case 1: Qualified lead fast track
**Trigger:** Lead Qualified
**Actions:**
1. Create contact in HubSpot with "Hot Lead" status
2. Send Slack notification to sales team
3. Add to "Qualified Leads" Google Sheet
4. Send welcome email via Gmail
**Impact:** Sales team engages qualified leads within minutes instead of hours.
#### Use case 2: Disqualified lead nurture
**Trigger:** Lead Disqualified
**Actions:**
1. Add to Mailchimp nurture campaign
2. Log in "Nurture Pipeline" spreadsheet
3. Create task in Asana to follow up in 3 months
**Impact:** No lead is wasted; everyone gets appropriate follow-up.
#### Use case 3: Knowledge gap tracking
**Trigger:** Question Lacking Answer
**Actions:**
1. Send Slack notification to content team so they can reply manually through the [Irelia dashboard](/en/the-Chat-Panel)
2. Log in "Knowledge Base Gaps" spreadsheet
**Impact:** Continuously improve your AI agent's knowledge.
#### Use case 4: Goal achievement flow
**Trigger:** Goal Achieved
**Actions:**
1. Send confirmation email with next steps
2. Update CRM with goal completion
3. Notify account manager in Slack
**Impact:** Instant positive reinforcement and seamless customer journey.
#### Use case 5: Rich data capture
**Trigger:** Data Gathered
**Actions:**
1. Update CRM with custom variables (budget, timeline, company size)
2. Add to segment-specific sheet (Enterprise vs SMB)
3. Trigger personalized email based on answers
**Impact:** Rich prospect data flows automatically; no manual entry.
## ✅ Quick Checklist
Use this to verify your setup is complete:
* Webhook URL copied from Zapier
* URL pasted into Irelia for your chosen event
* Test data sent from Irelia
* Test data received in Zapier
* Action configured (Google Sheets, Slack, or CRM)
* Action tested successfully
* Zap turned ON
* Zap given a descriptive name
* Triggered a real event (or used the **"Test"** button)
* Confirmed data appeared in destination app
* Checked Zap History shows successful run
✅ **All checked? You're good to go!**
## 🛠️ Troubleshooting & FAQs
Don't panic! Here are the most common issues and exactly how to fix them.
**How to fix it:**
**Step 1: Verify the webhook URL in Irelia**
* Go to Irelia → **"Events and Notifications"**
* Check that the webhook URL is filled in for your event
* Make sure it matches the URL from Zapier exactly (no extra spaces)
**Step 2: Send test data again**
* Click the blue **"Test"** button in Irelia next to your webhook URL
* Wait 5–10 seconds
* Go back to Zapier and click the **"Test trigger"** button again
**Step 3: Try a fresh webhook URL**
* If still not working, edit your Zap trigger and copy a new webhook URL
* Delete the old URL in Irelia and paste the new one
* Click **"Test"** again in Irelia
**How to fix it:**
**Step 1: Read the error message**
* Zapier shows detailed error messages in red
* Look for phrases like "Required field missing" or "Authentication failed"
**Step 2: Check required fields**
* Look for fields marked with a red asterisk (\*)
* Make sure each required field has data mapped
**Step 3: Reconnect your account**
* In your action setup, click **"Reconnect"** or the account name
* Sign in again and grant permissions
* Test the action again
**Step 4: Verify your destination exists**
* **Google Sheets:** Confirm the spreadsheet wasn't deleted
* **Slack:** Check the channel wasn't archived
* **CRM:** Verify pipeline/status values still exist
**How to fix it:**
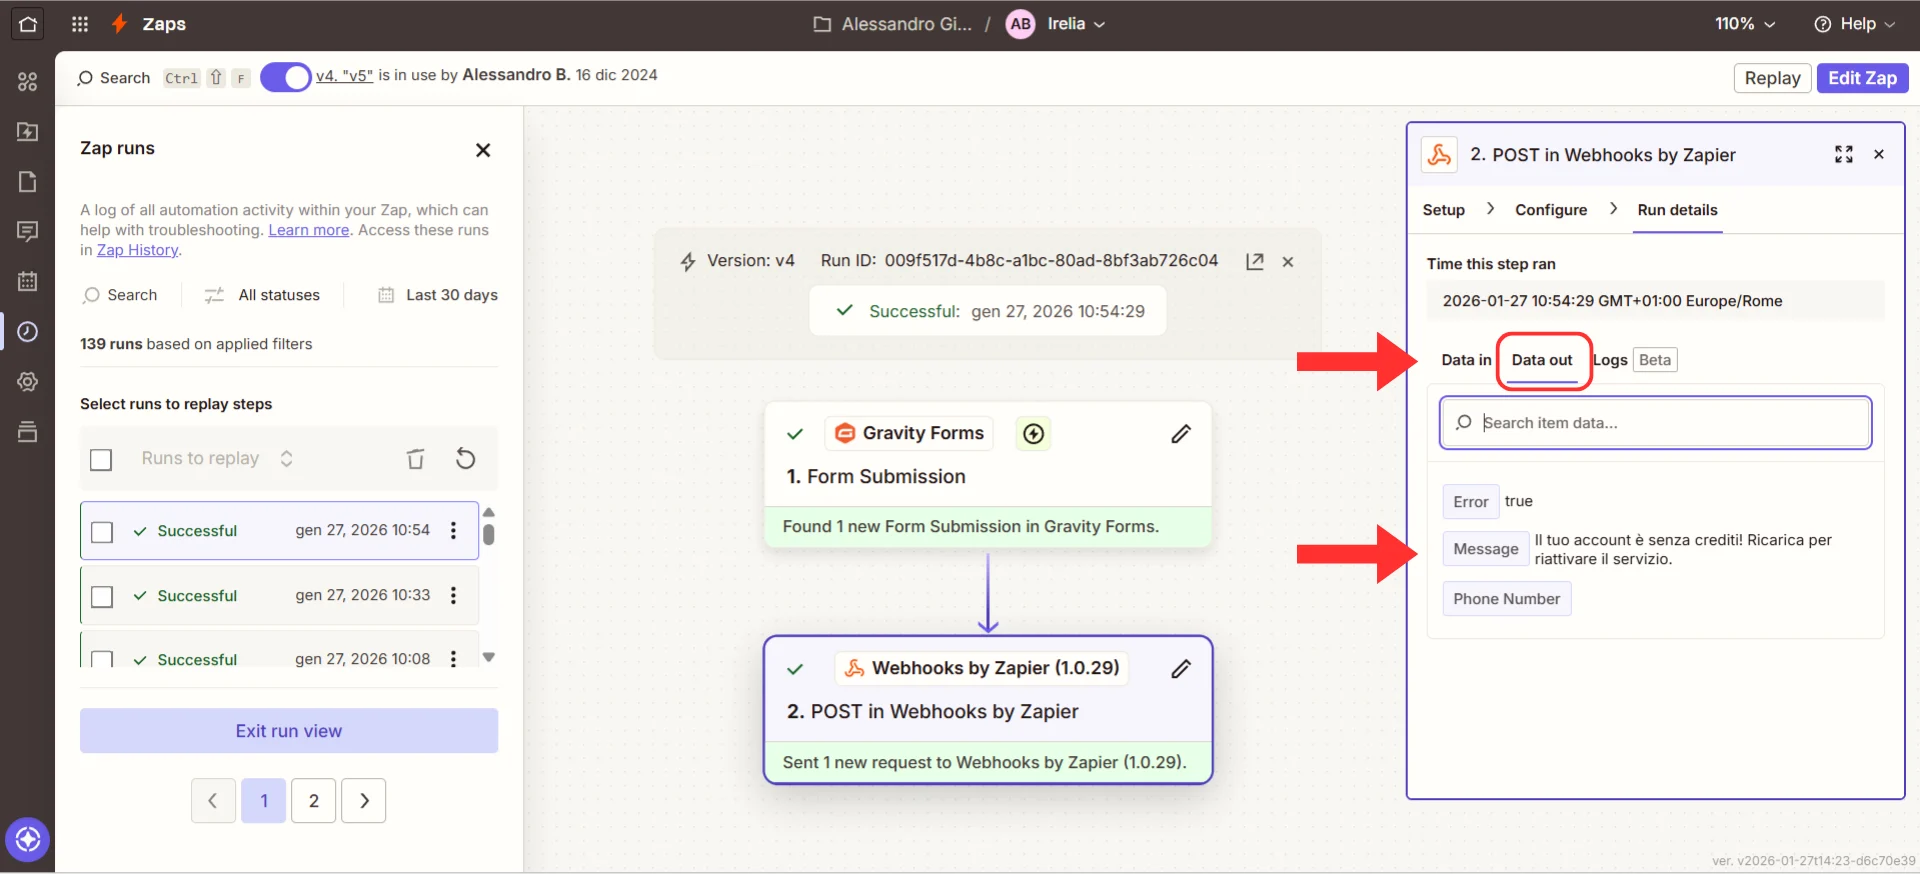
**Step 1: Check Zap History for details**
* Go to Zapier → **"Zap History"**
* Click on your recent run to expand details
* Look at **"Data Out"** to see exactly what was sent
 **Step 2: Look in the right place**
* **Google Sheets:** Scroll to the bottom (new rows are added at the end). Try Ctrl+F to search.
* **Slack:** Check you're in the right channel. Search for messages from "Zapier."
* **CRM:** Search by phone number instead of name. Check if you're in a filtered view.
**Step 3: Check for filters**
* Go back to your Zap editor
* Look for any Filter steps between trigger and action
* Verify your data passes the filter conditions
**How to fix it:**
**Step 1: Check if your Zap is ON**
* Go to your Zapier dashboard
* Verify your Zap shows **"ON"** in green
* If it says **"OFF"** or **"Paused"**, turn it back on
**Step 2: Check authentication**
* Edit your Zap and look for yellow warning icons
* Reconnect any apps that show warnings
* This is especially common with Google accounts
**Step 3: Verify Irelia configuration**
* Go to Irelia → **"Events and Notifications"**
* Confirm the webhook URL is still there
**Step 4: Check Zapier task usage**
* Go to **"Account"** → **"Usage"**
* Free plans have 100 tasks per month
* If you've hit the limit, upgrade or wait for the reset
**How to fix it:**
**Step 1: Audit your Zaps**
* Check all your active Zaps
* Look for duplicates with the same trigger
* Turn off or delete duplicate Zaps
**Step 2: Check Irelia configuration**
* Verify each event has a unique webhook URL
* If you pasted the same URL in multiple events, that's the problem
**How to fix it:**
**Step 1: Use the right event**
* "New Inbound Contact" fires **before** data collection
* Use "Data Gathered," "Goal Achieved," or "Lead Qualified" events instead if you need collected data
**Step 2: Check variable indices**
* Custom variables are numbered in the Zapier interface
* Make sure you're mapping the correct index for each variable
**Step 3: Test with a complete conversation**
* Instead of using the **"Test"** button, have a full conversation that reaches data collection
* Then check if data flows through
**Irelia.ai Support:**
* Contact support in the WhatsApp priority support group or send an email to [info@irelia.ai](mailto:info@irelia.ai)
* Include: screenshots of your configuration, the error message, and what you expected vs. what happened
**Zapier Support:**
* Visit: help.zapier.com
* Check: status.zapier.com for outages
**Step 2: Look in the right place**
* **Google Sheets:** Scroll to the bottom (new rows are added at the end). Try Ctrl+F to search.
* **Slack:** Check you're in the right channel. Search for messages from "Zapier."
* **CRM:** Search by phone number instead of name. Check if you're in a filtered view.
**Step 3: Check for filters**
* Go back to your Zap editor
* Look for any Filter steps between trigger and action
* Verify your data passes the filter conditions
**How to fix it:**
**Step 1: Check if your Zap is ON**
* Go to your Zapier dashboard
* Verify your Zap shows **"ON"** in green
* If it says **"OFF"** or **"Paused"**, turn it back on
**Step 2: Check authentication**
* Edit your Zap and look for yellow warning icons
* Reconnect any apps that show warnings
* This is especially common with Google accounts
**Step 3: Verify Irelia configuration**
* Go to Irelia → **"Events and Notifications"**
* Confirm the webhook URL is still there
**Step 4: Check Zapier task usage**
* Go to **"Account"** → **"Usage"**
* Free plans have 100 tasks per month
* If you've hit the limit, upgrade or wait for the reset
**How to fix it:**
**Step 1: Audit your Zaps**
* Check all your active Zaps
* Look for duplicates with the same trigger
* Turn off or delete duplicate Zaps
**Step 2: Check Irelia configuration**
* Verify each event has a unique webhook URL
* If you pasted the same URL in multiple events, that's the problem
**How to fix it:**
**Step 1: Use the right event**
* "New Inbound Contact" fires **before** data collection
* Use "Data Gathered," "Goal Achieved," or "Lead Qualified" events instead if you need collected data
**Step 2: Check variable indices**
* Custom variables are numbered in the Zapier interface
* Make sure you're mapping the correct index for each variable
**Step 3: Test with a complete conversation**
* Instead of using the **"Test"** button, have a full conversation that reaches data collection
* Then check if data flows through
**Irelia.ai Support:**
* Contact support in the WhatsApp priority support group or send an email to [info@irelia.ai](mailto:info@irelia.ai)
* Include: screenshots of your configuration, the error message, and what you expected vs. what happened
**Zapier Support:**
* Visit: help.zapier.com
* Check: status.zapier.com for outages