

What You'll Need
Choosing Your Phone Number
Quick Path
Step-by-Step Guide
Display Name Guidelines & Changes
Business Verification
Dealing with a Flagged Account
Quick Checklist
Troubleshooting & FAQs
Introduction
WhatsApp is where your customers already are — but handling every conversation manually doesn’t scale. You need your AI agent responding instantly, qualifying leads, and capturing data around the clock, right inside WhatsApp. This guide walks you through connecting your WhatsApp Business number to Irelia.ai using Meta’s Embedded Signup. You’ll link your number directly to your Irelia AI agent in minutes — no coding, no API configuration, just a guided signup flow. By the end of this guide, you’ll have: ✅ A working WhatsApp Business connection to Irelia.ai✅ Your AI agent ready to handle WhatsApp conversations 24/7
✅ Your Display Name set to show your brand to customers
✅ Business Verification started to protect your account and unlock higher messaging limits
🗺️ What You’ll Do
Here’s a quick overview of the process:- Access Irelia settings and start the WhatsApp connection (~1 minute)
- Log in and authorize with Meta — grant the necessary permissions (~1 minute)
- Configure your WhatsApp Business Account — select your , create a , and enter your details (~2 minutes)
- Add your phone number, set your Display Name, and verify — or select a free Meta-provided number (~2 minutes)
- Confirm the connection in Irelia — select your number and see the success screen (~1 minute)
- Start Business Verification — submit documents to protect your account and unlock higher limits (~5 minutes)
📋 What You’ll Need
Required Information
- Legal business name — Your company’s official registered name
- Business address — Your company’s official address
- Business website — A working website that matches your business
- Display Name — The customer-facing name for your WhatsApp profile. You’ll set this during the signup flow. → Review the guidelines so you have a compliant name ready
Account Requirements
- Facebook account — A personal Facebook account (not a Page)
- Admin access to an existing Business Manager, OR willingness to create one during setup
Highly Recommended
- Start Business Verification early — If the option is available in your Business Manager’s Security Center, begin the process before or right after setup. It protects your account from restrictions and unlocks higher messaging limits. → Learn more
📞 Choosing Your Phone Number
You have two options when connecting WhatsApp to Irelia:📱 Option A: Use Your Own Number
Best for: Businesses wanting a local or branded number that customers recognize. Requirements:- Landline number, SIM card, or eSIM (an active subscription is NOT required — the number just needs to receive one code)
- Number must NOT be registered on WhatsApp or WhatsApp Business app
- Able to receive SMS or voice call for one-time verification
🆓 Option B: Use a Meta-Provided US Number
Best for: Businesses without a spare number, or those serving international or US markets. Requirements: None! Meta provides a free US (+1) number automatically. How to get it: During phone setup, select “I don’t have a phone number” or “Use Display Name” — Meta assigns one instantly.⚡ Quick Path (Experienced Users)
Already familiar with Meta Business tools? Here’s the condensed version:- Irelia: Go to “Settings” → “Channels Configuration” → Click “Connect WhatsApp”
- New tab: Review requirements → Click “Continue with Facebook”
- Meta popup: Log in → Click “Begin” (or “Get Started”)
- Select Business Portfolio and create a new WhatsApp Business Account
- Enter: Account name, country, category, website
- Phone & Display Name: Add your number, set your Display Name (guidelines), and verify via SMS or voice call — OR select “Use only display name” for a free Meta-provided US number
- Irelia: Select your phone number → Click “Confirm”
- Done: See the congratulations screen ✅
- Business Verification: Start the process in Security Center as soon as possible, especially for new Business Managers — why it matters
🔌 Step-by-Step Connection Guide
Access Your Channel Settings
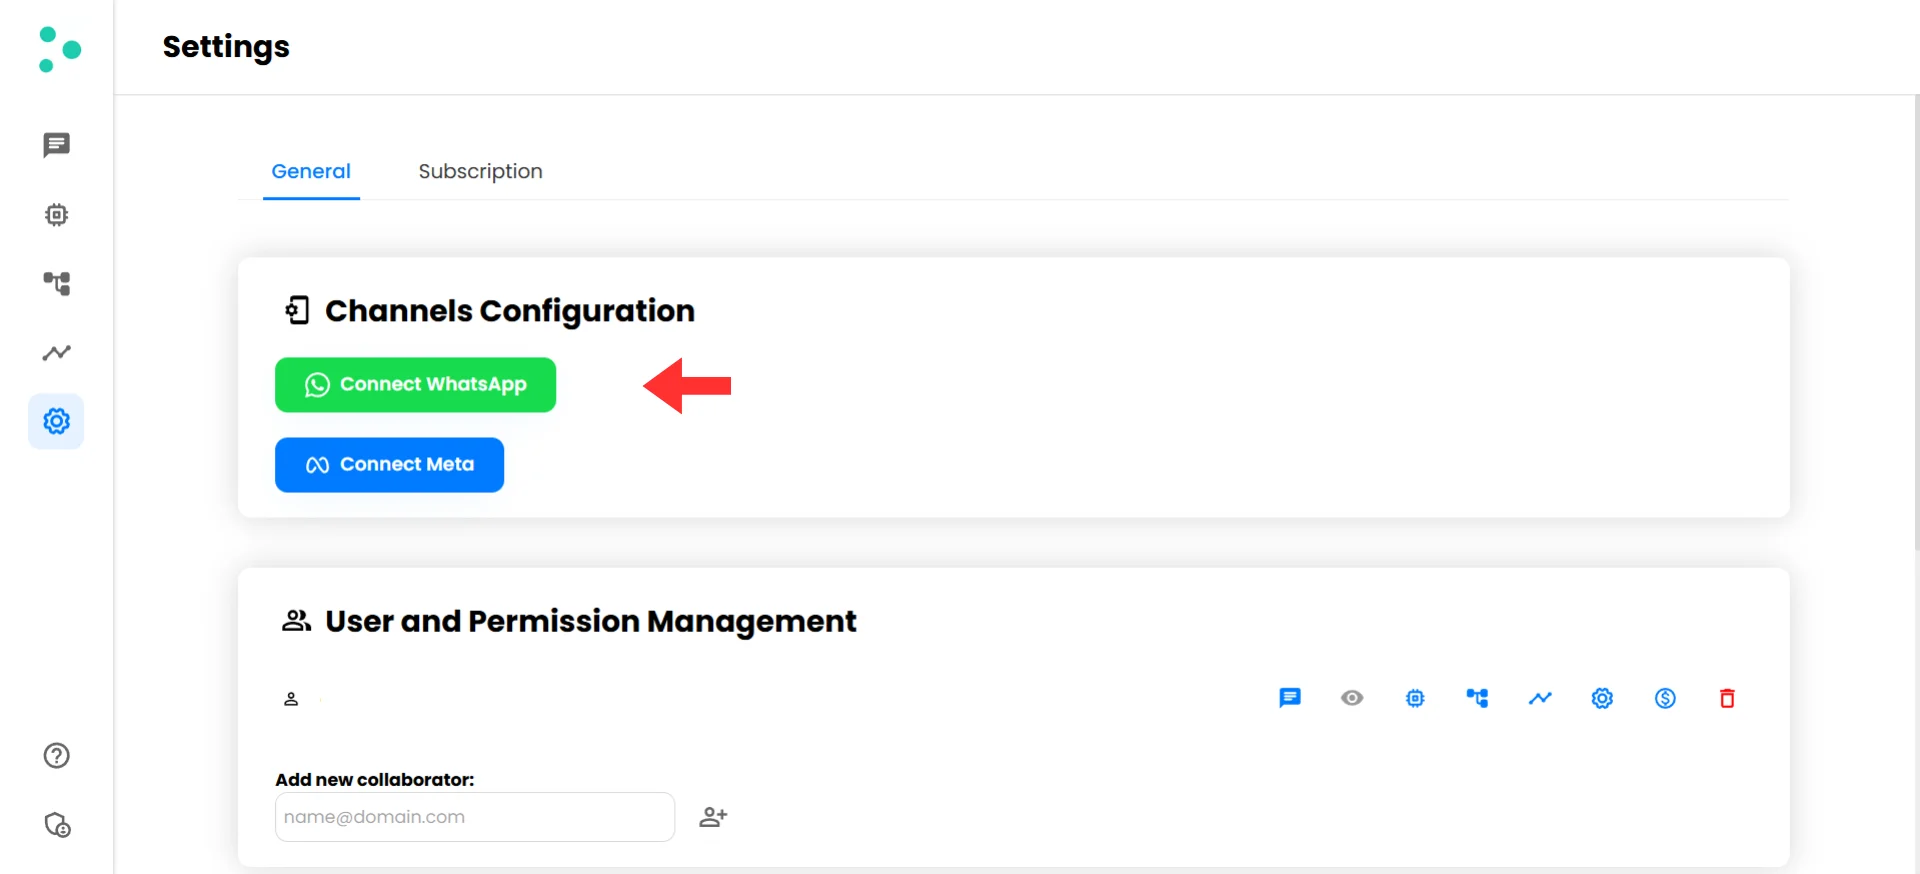
The 'Connect WhatsApp' button in Irelia Channels Configuration
Start the WhatsApp Connection
Review Requirements and Begin the Connection
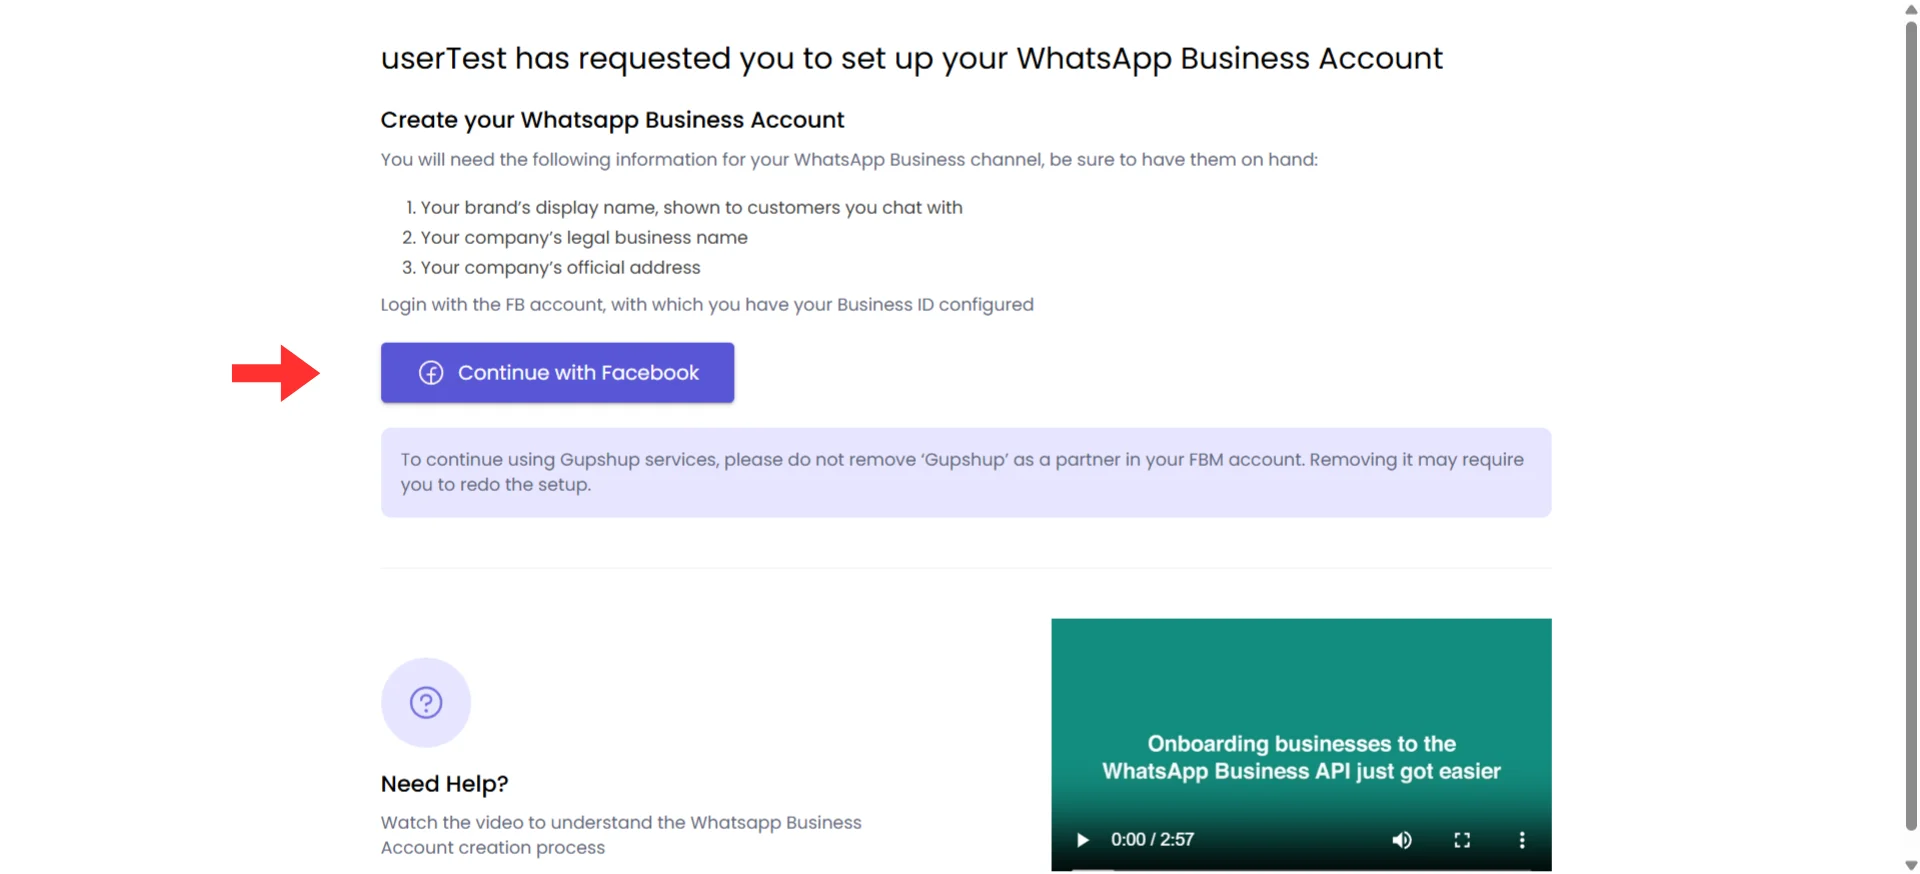
Review requirements, then click 'Continue with Facebook'
- Click the “Continue with Facebook” button
- A Meta popup window will appear
Log In with Facebook
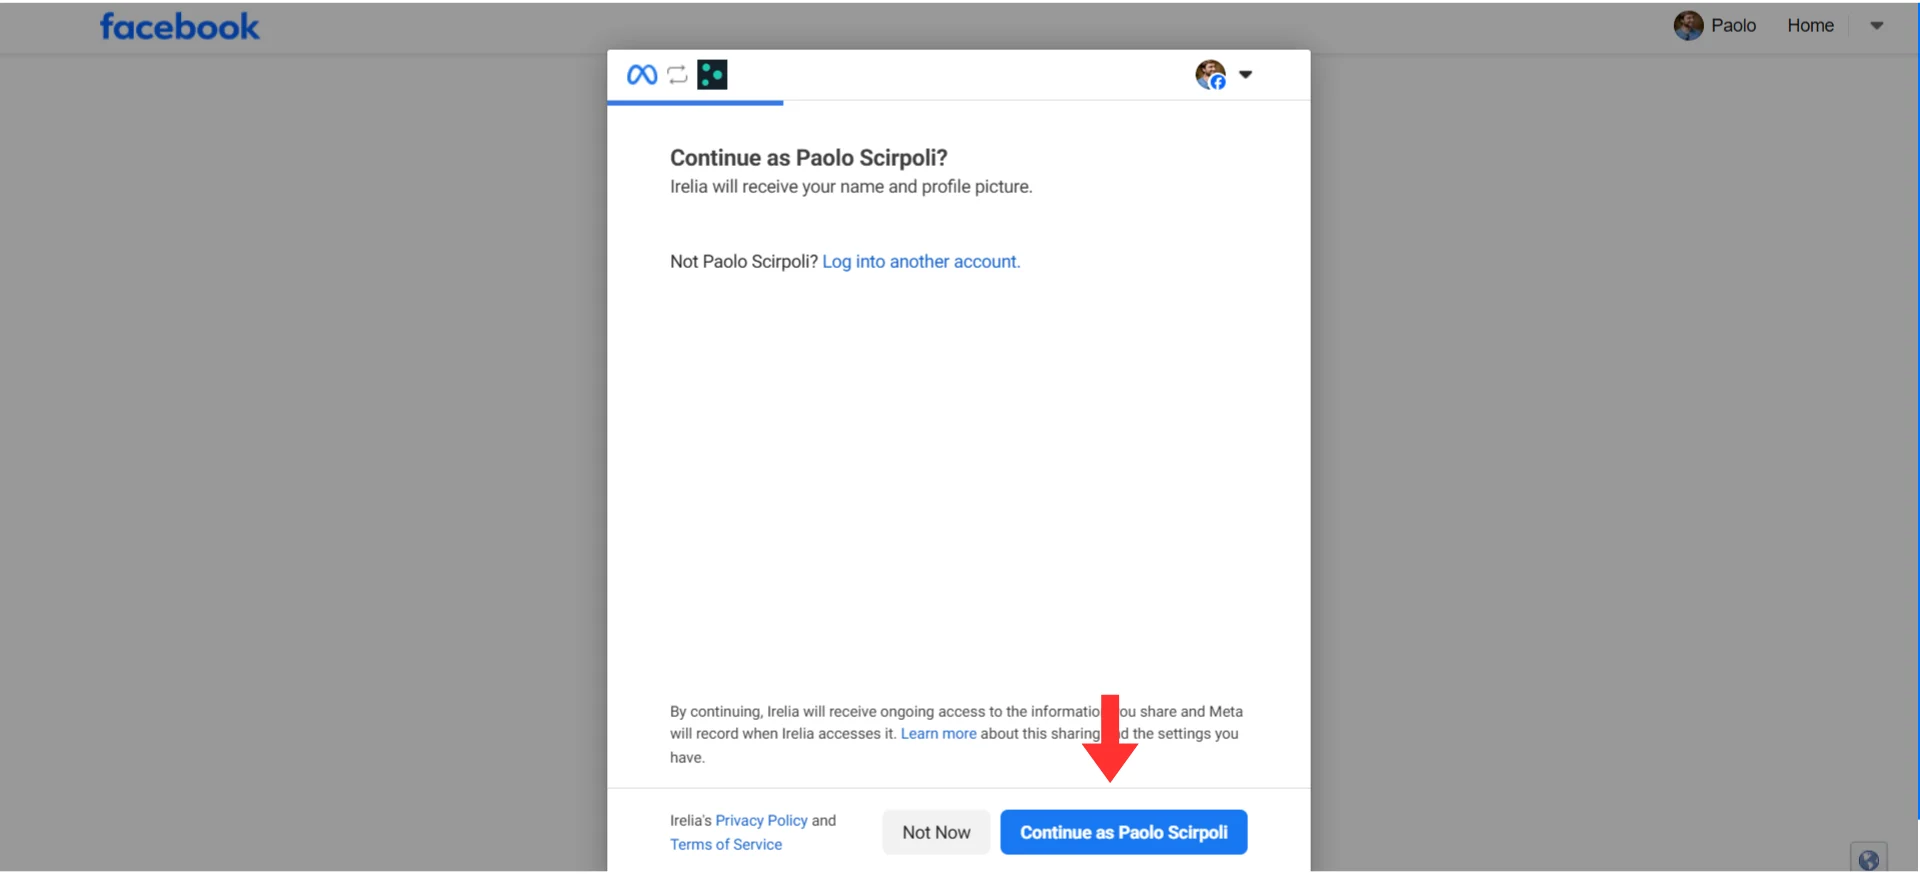
Facebook login popup — click Continue as Your Name
Authorize the Connection
- WhatsApp Business Account Access — Allows managing phone numbers, message templates, sending and receiving messages
- Billing Management — Associates billing for WhatsApp API usage
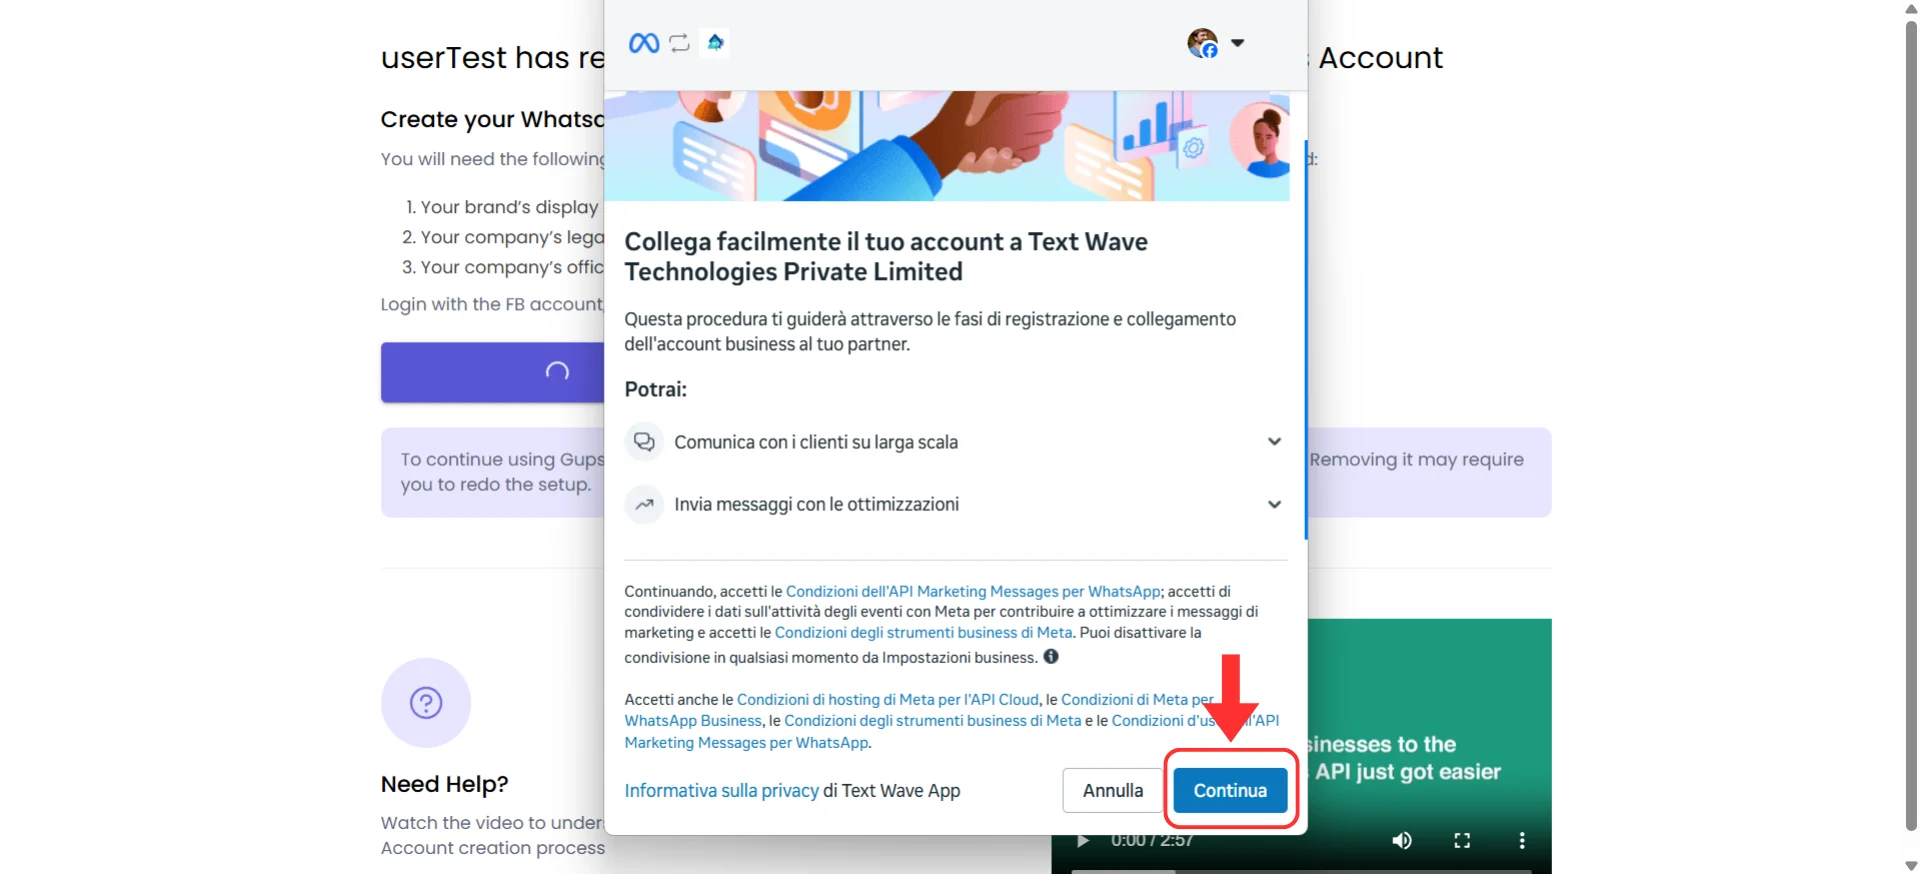
Permissions screen — click Begin to authorize
Select Your Business Portfolio and Create a WhatsApp Business Account
- Business Portfolio — Select your existing Business Manager (labeled “Business Portfolio” in this screen) from the dropdown, or create a new one
- WhatsApp Business Account — Select “Create a new WhatsApp Business Account” (don’t select already existing ones in the list)
- Click “Continue”
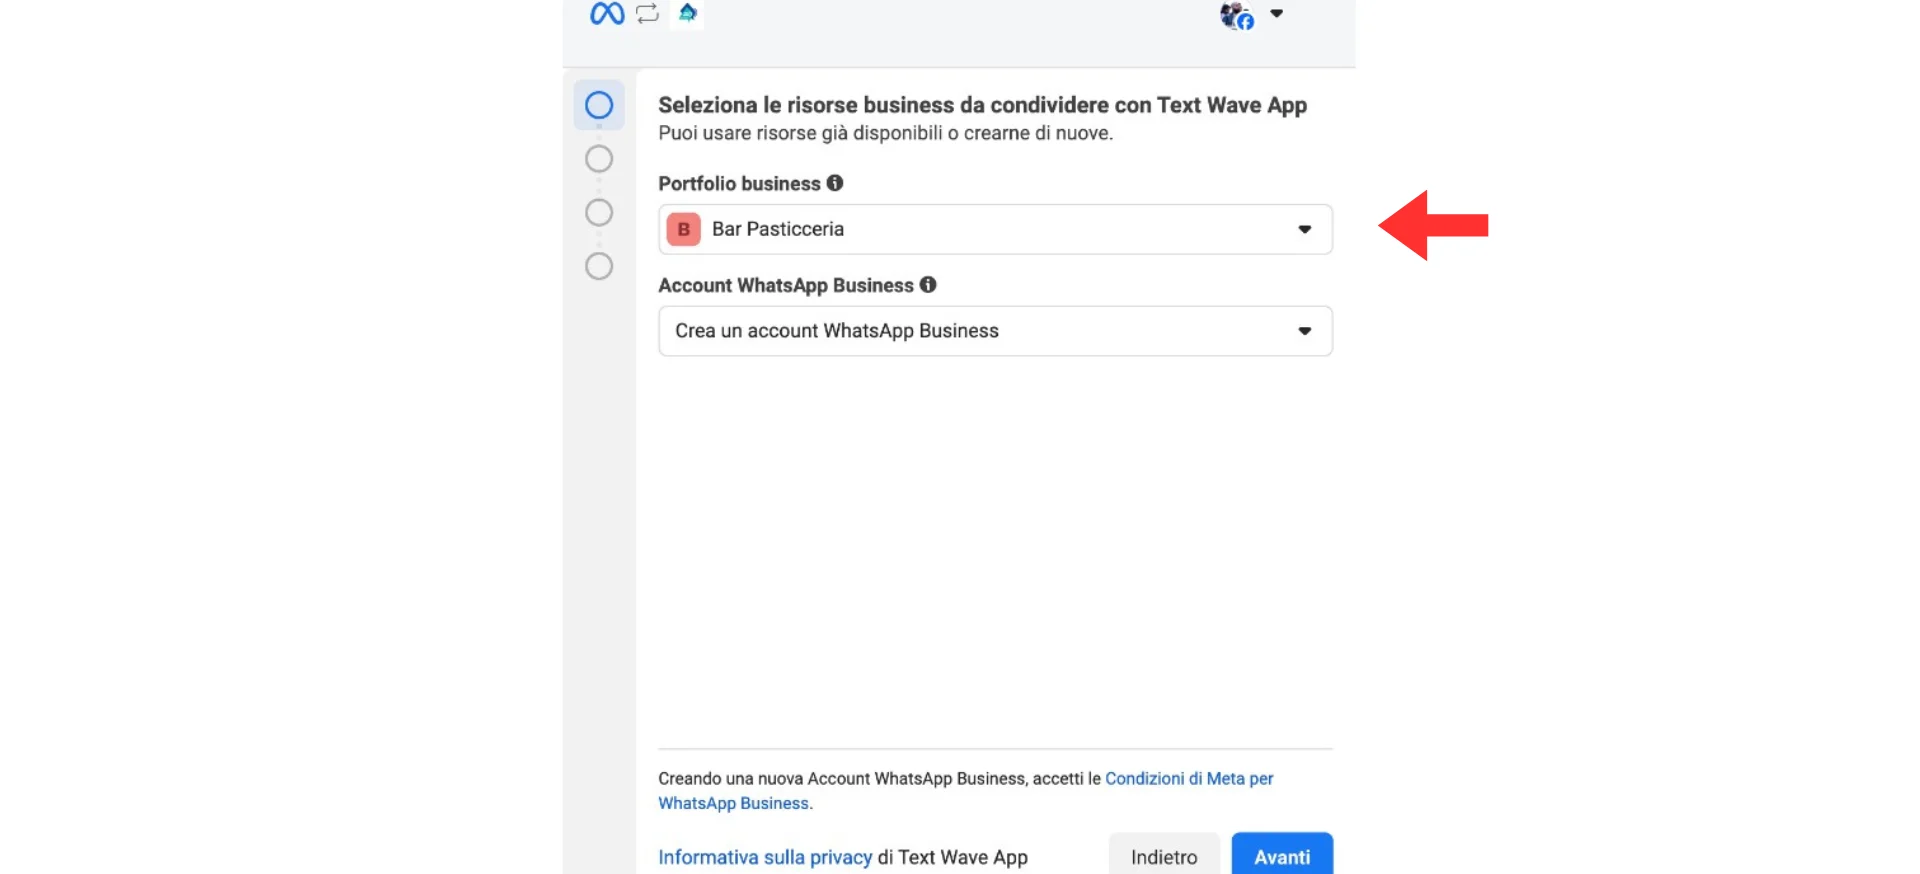
Select your Business Manager and create a new WhatsApp Business Account
Enter Your Account Details
- Fill in all four fields
- Click “Continue”
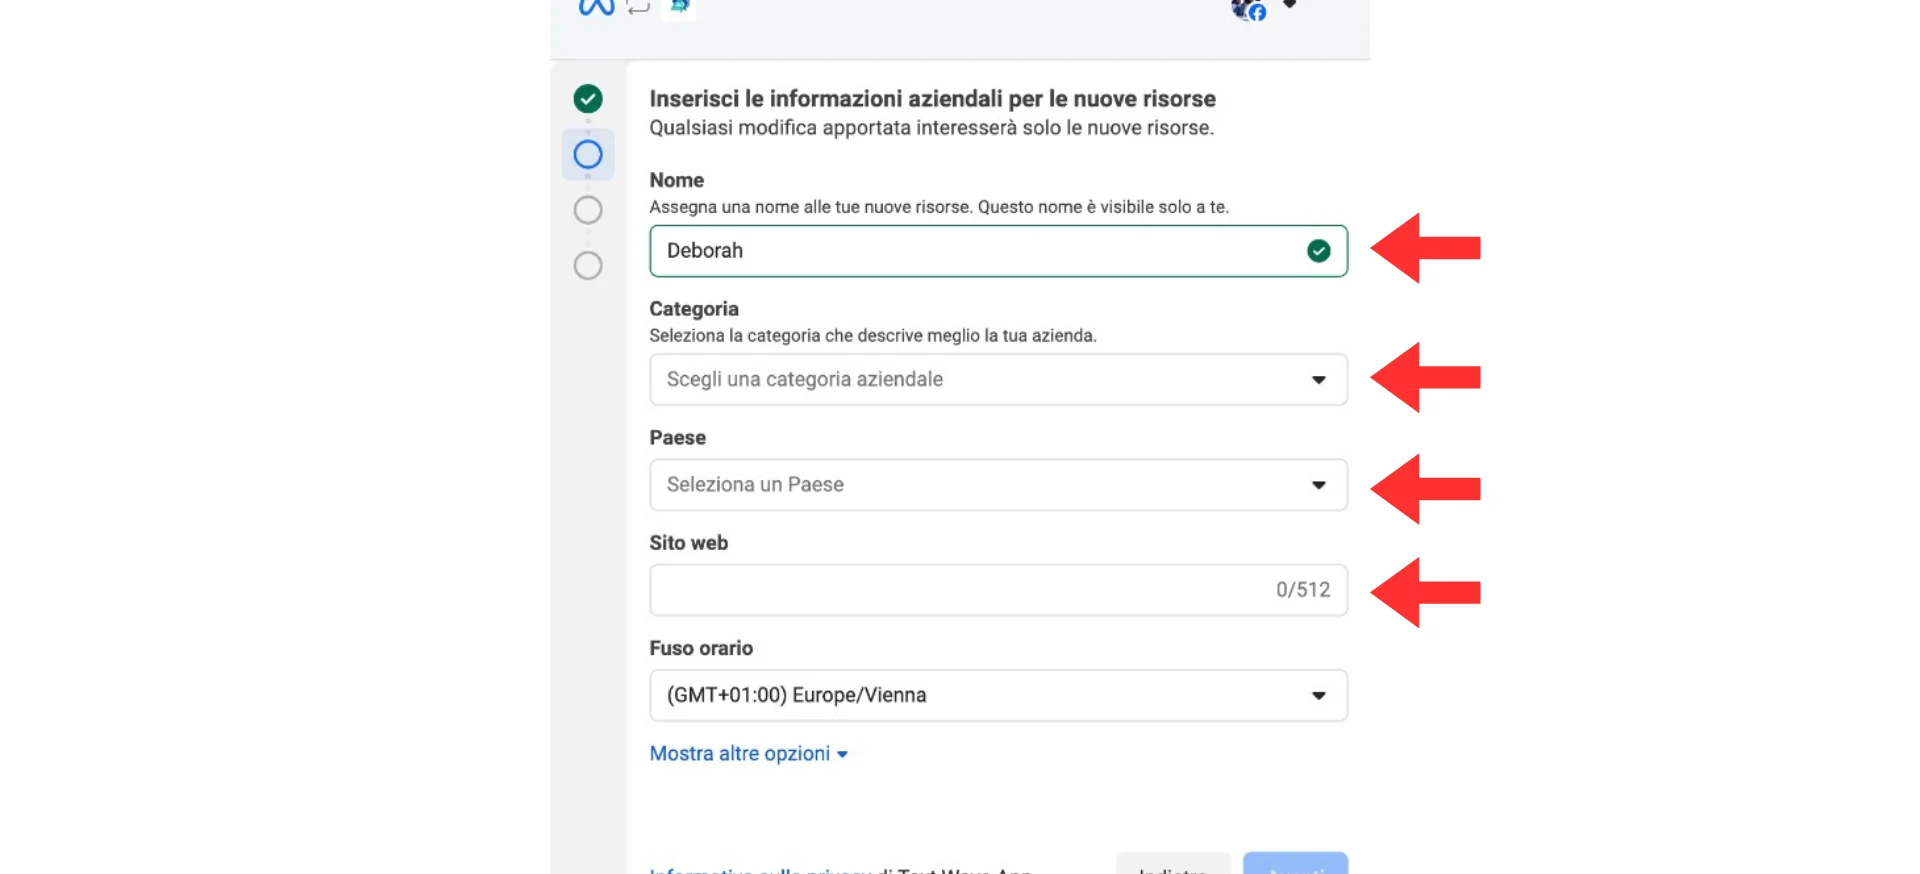
Account details form: name, country, category, and website
Add Your Phone Number, Set Your Display Name, and Verify
Option A: Add a new phone number
- Enter your phone number with country code (e.g., +1 555 123 4567)
- Set your Display Name — You’ll see an input field pre-filled with your Business Manager name. Replace it with the customer-facing name you want people to see when they receive your messages (e.g., “Acme Marketing” or “Mario’s Pizza Roma”).
-
Choose your verification method:
- 📱 SMS — Receive a text message with a code
- 📞 Voice Call — Receive an automated call with a code
- Enter the verification code when received
Option B: Use a Meta-provided US number
Select “Use only display name” — Meta will assign a free US (+1) number automatically. No phone verification needed.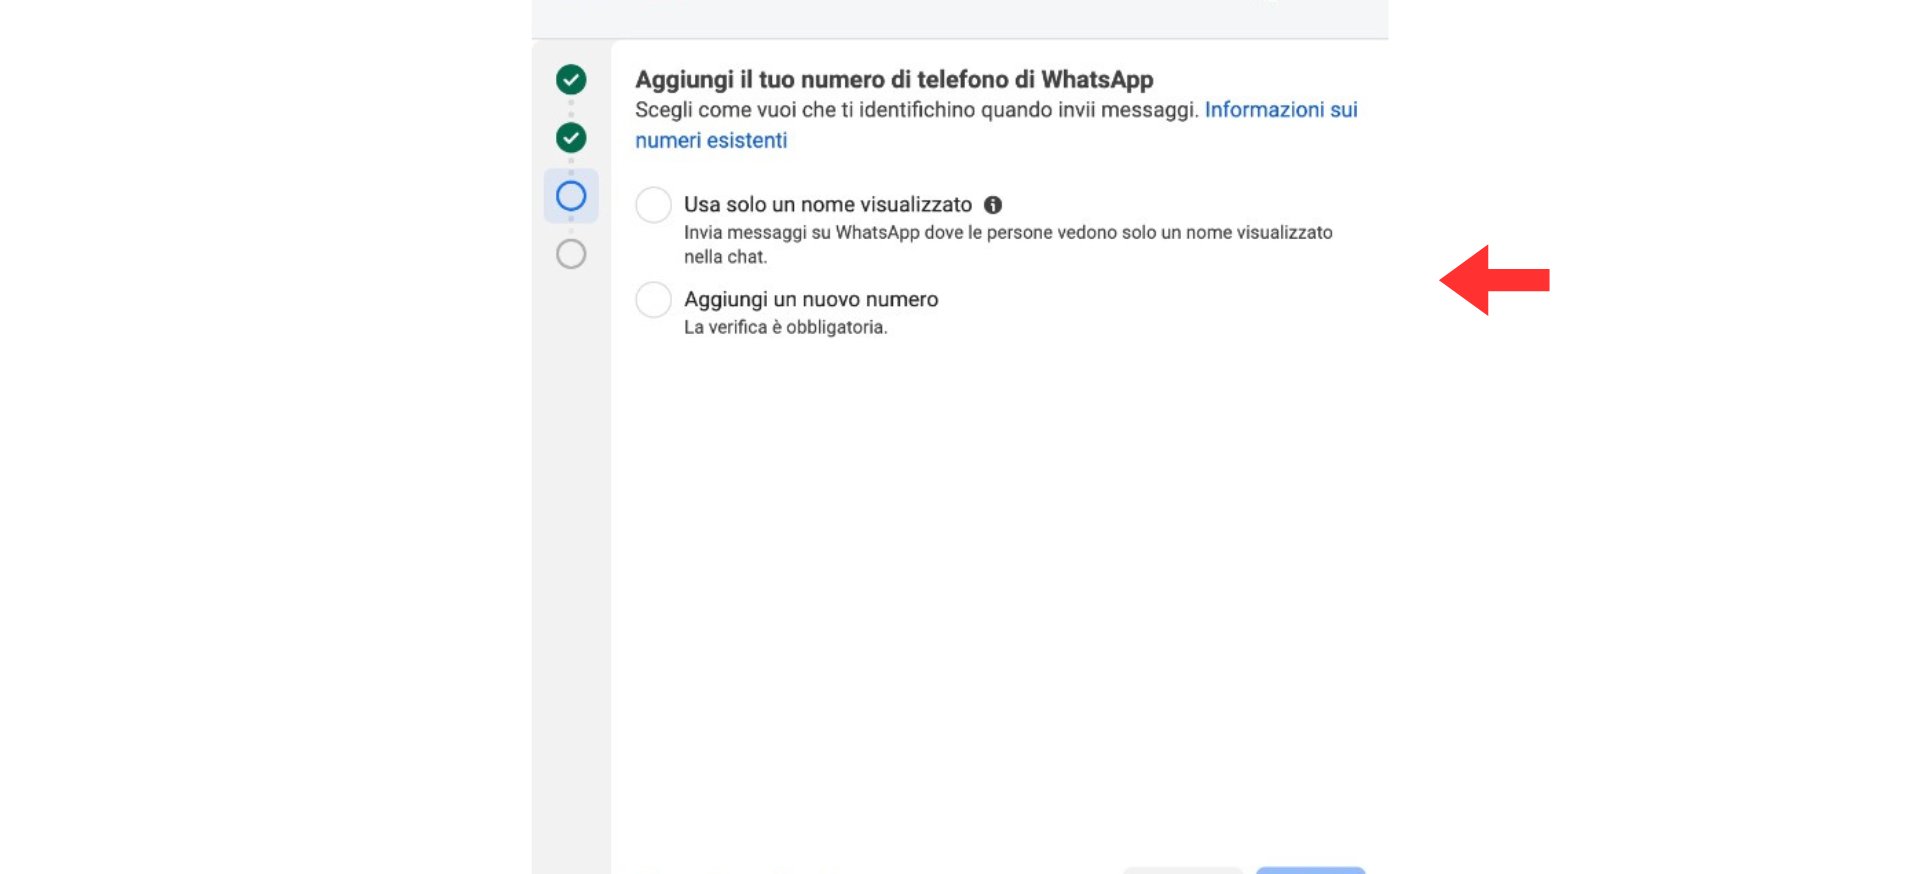
Phone number, Display Name, and verification method selection
Complete the Meta Signup
- Click “Continue”, then click “End”
- The Meta popup will close, and you’ll return to the setup page
- You’ll see a screen saying “We are almost done!” showing the phone number(s) available for activation
- Select your phone number from the list
- Click “Confirm”
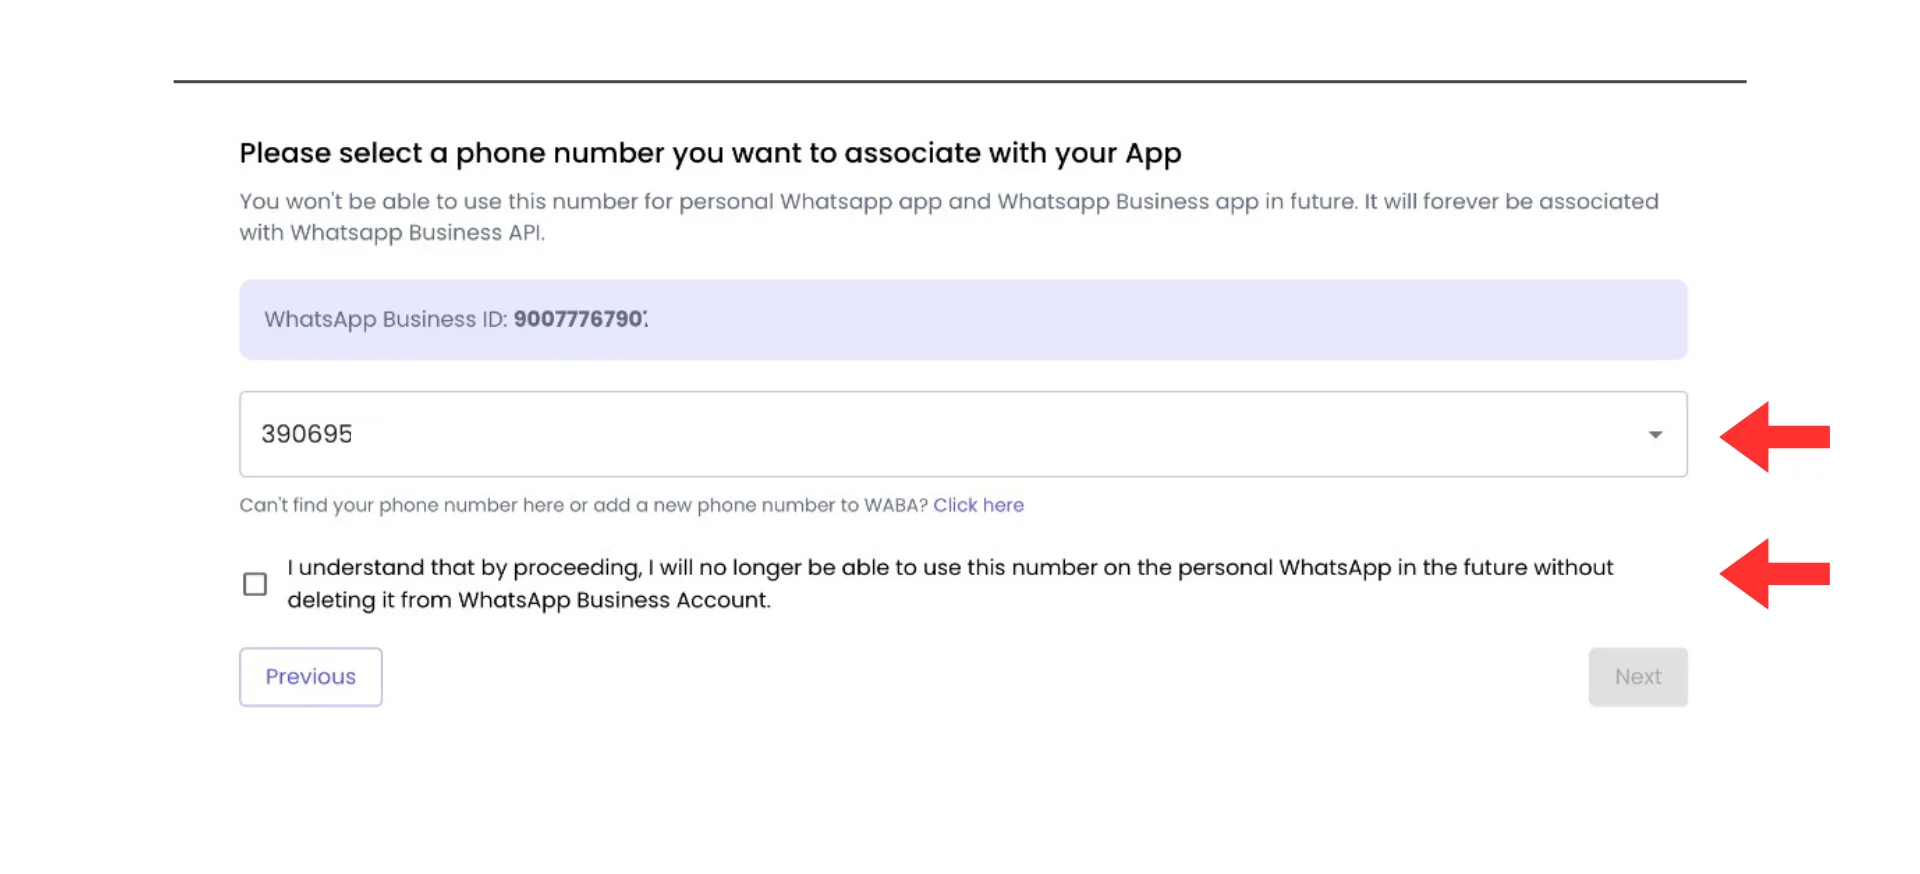
Select your phone number from the list of available numbers
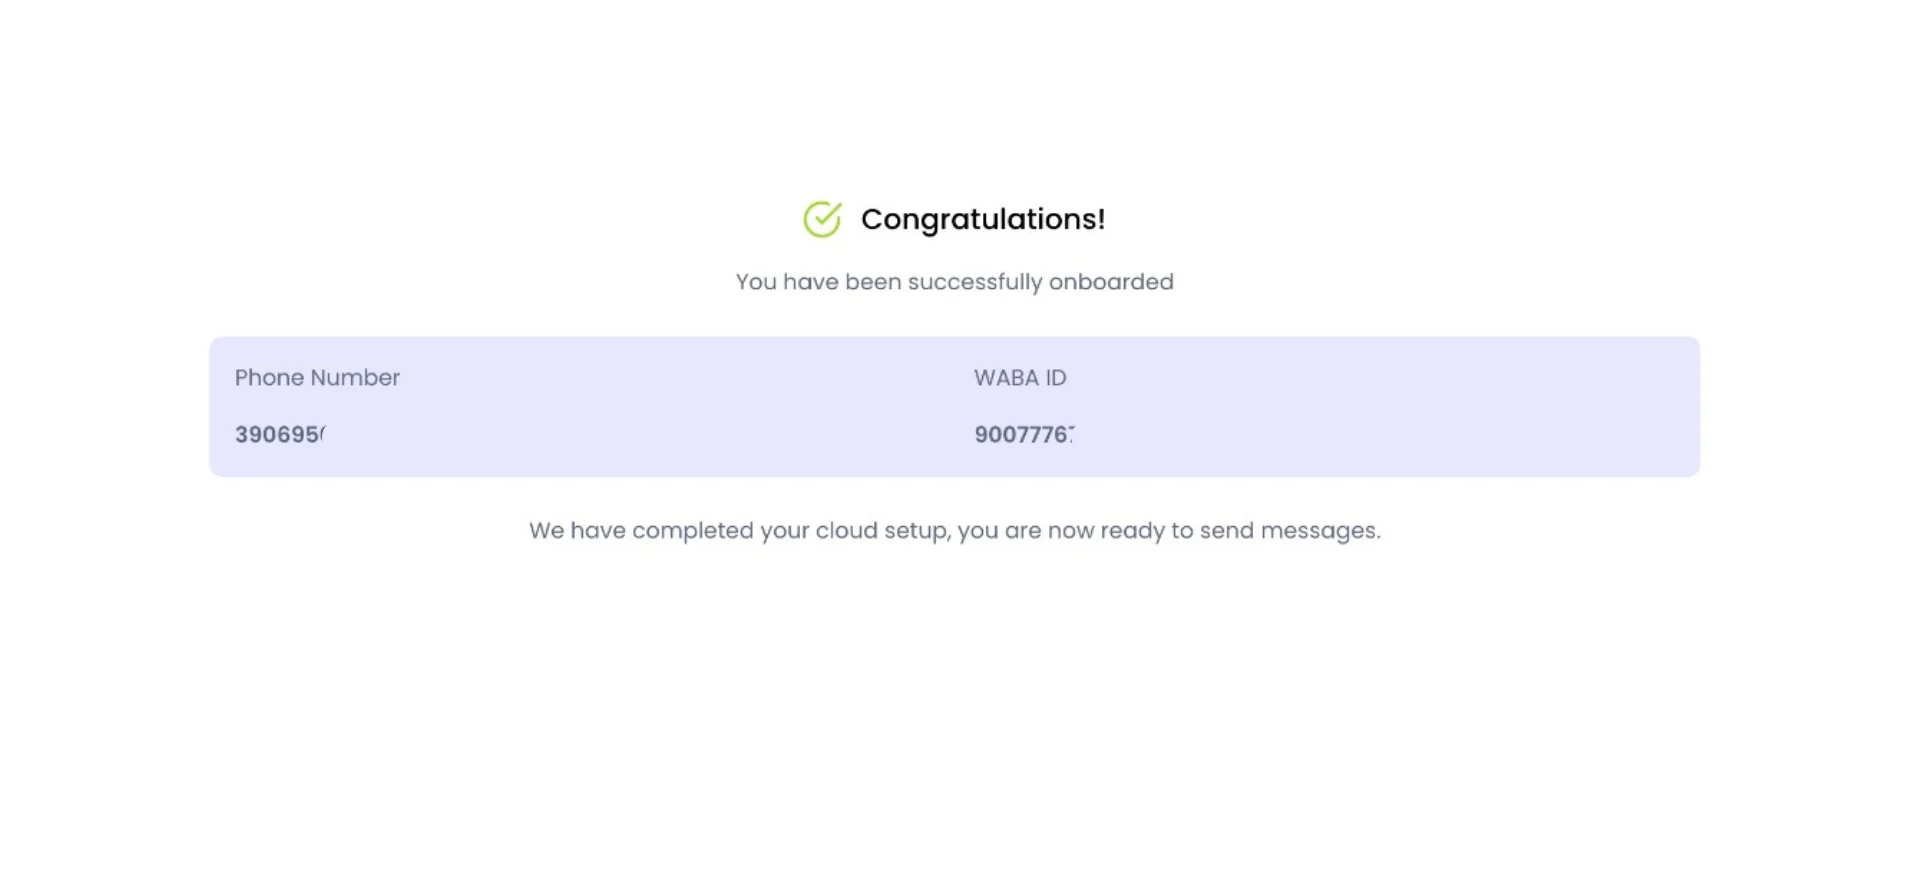
Connection complete — Phone Number and WABA ID confirmed
🎉 Congratulations! You Did It!
Take a moment to appreciate what you just built: ✅ Your WhatsApp Business number is connected to Irelia✅ Your AI agent can now handle WhatsApp conversations 24/7
✅ Every incoming message gets an instant, intelligent response
✅ Lead qualification, data capture, and follow-up happen automatically
What’s Next?
Now that your WhatsApp connection is live:- 🛡️ Start Business Verification — If you haven’t already, head to Security Center and begin the process now. This is especially important for new Business Managers to avoid potential restrictions. → Full guide
- 📝 Need to change your Display Name later? If you want to update the name you entered during setup, see How to Change Your Display Name.
📝 Display Name Guidelines & Changes
During the Embedded Signup, you set your WhatsApp Display Name — the name customers see when they chat with you. This section covers the guidelines your name must follow to be approved, plus how to change it later if needed.📏 Display Name Guidelines
How approval works
Meta’s approval system checks the alignment between your Business Manager profile information and your Display Name. Here’s how it works:- Your BM profile contains your official company name (e.g., “SalesX SPA”)
- Business Verification confirms this with official documents
- Display Name should align with this verified company identity
Approved examples
Rejected examples
Display Name rules
- Must be related to your business — Clearly represent your brand.
- Must match your documentation — Align with your BM profile and verification documents.
- No prohibited words — Avoid “WhatsApp”, “Meta”, “Facebook”, etc.
- No generic terms alone — “Customer Service” alone won’t work, but “Acme Customer Service” will.
- Proper grammar — No AlL cApS, excessive punctuation!!!, or $pecial ch@racters.
🔄 How to Change Your Display Name
If you need to update the Display Name you entered during setup, you can change it through WhatsApp Manager:- Go to Meta Business Suite → “Business Settings” (gear icon)
- Click “WhatsApp Accounts” in the left sidebar
- Select your WABA → scroll down → click “WhatsApp Manager”
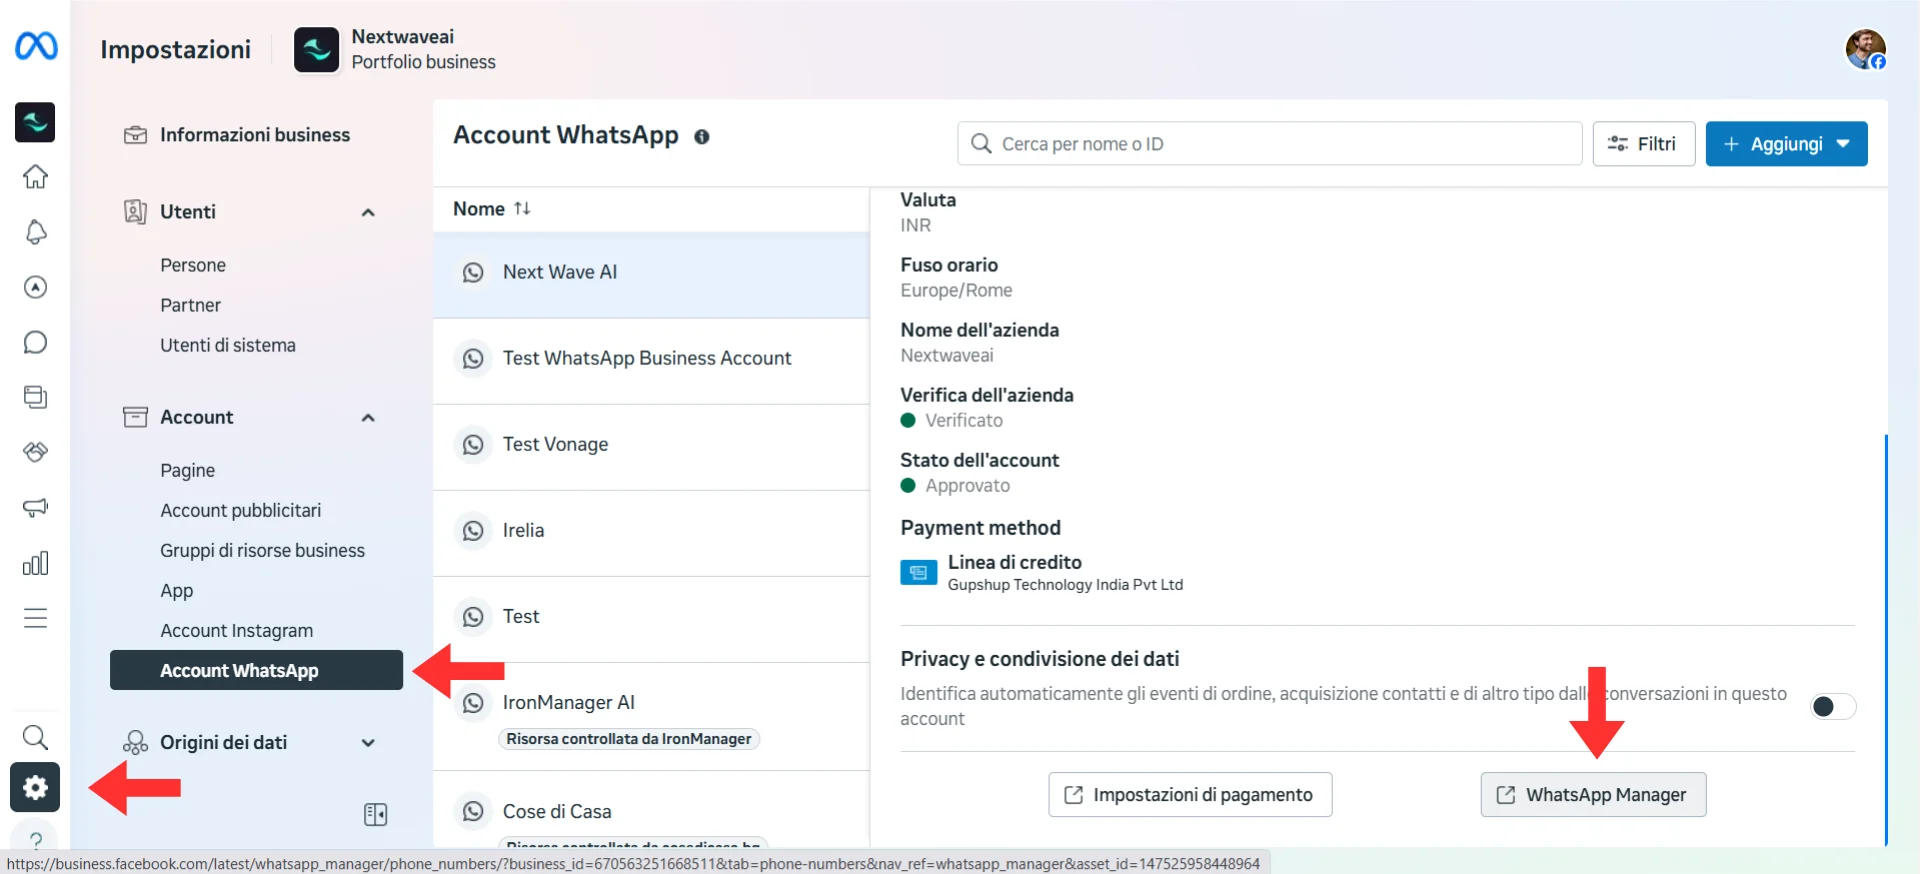
Click the gear icon to access Business Settings
- In WhatsApp Manager, click “Phone numbers” in the left menu
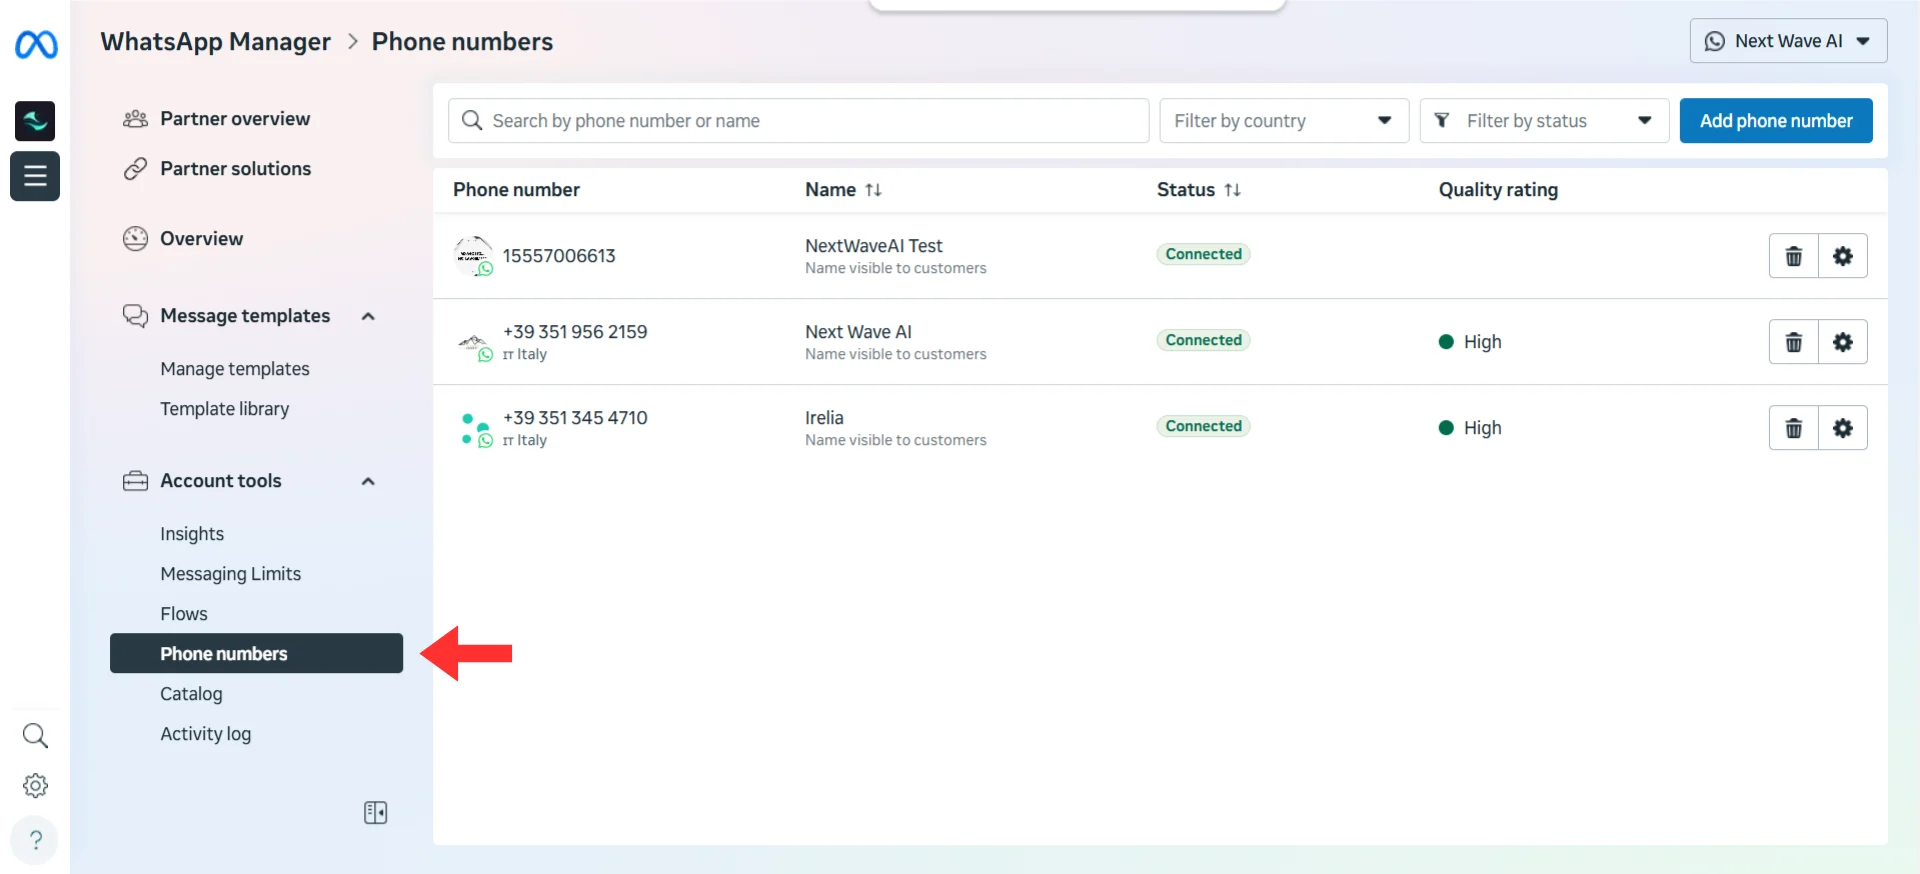
Click Phone numbers in the WhatsApp Manager sidebar
- Click on your phone number to open its settings
- Click the pencil/edit icon next to your current Display Name
- Enter your new Display Name and click “Submit” for review (approval takes 24–48 hours)
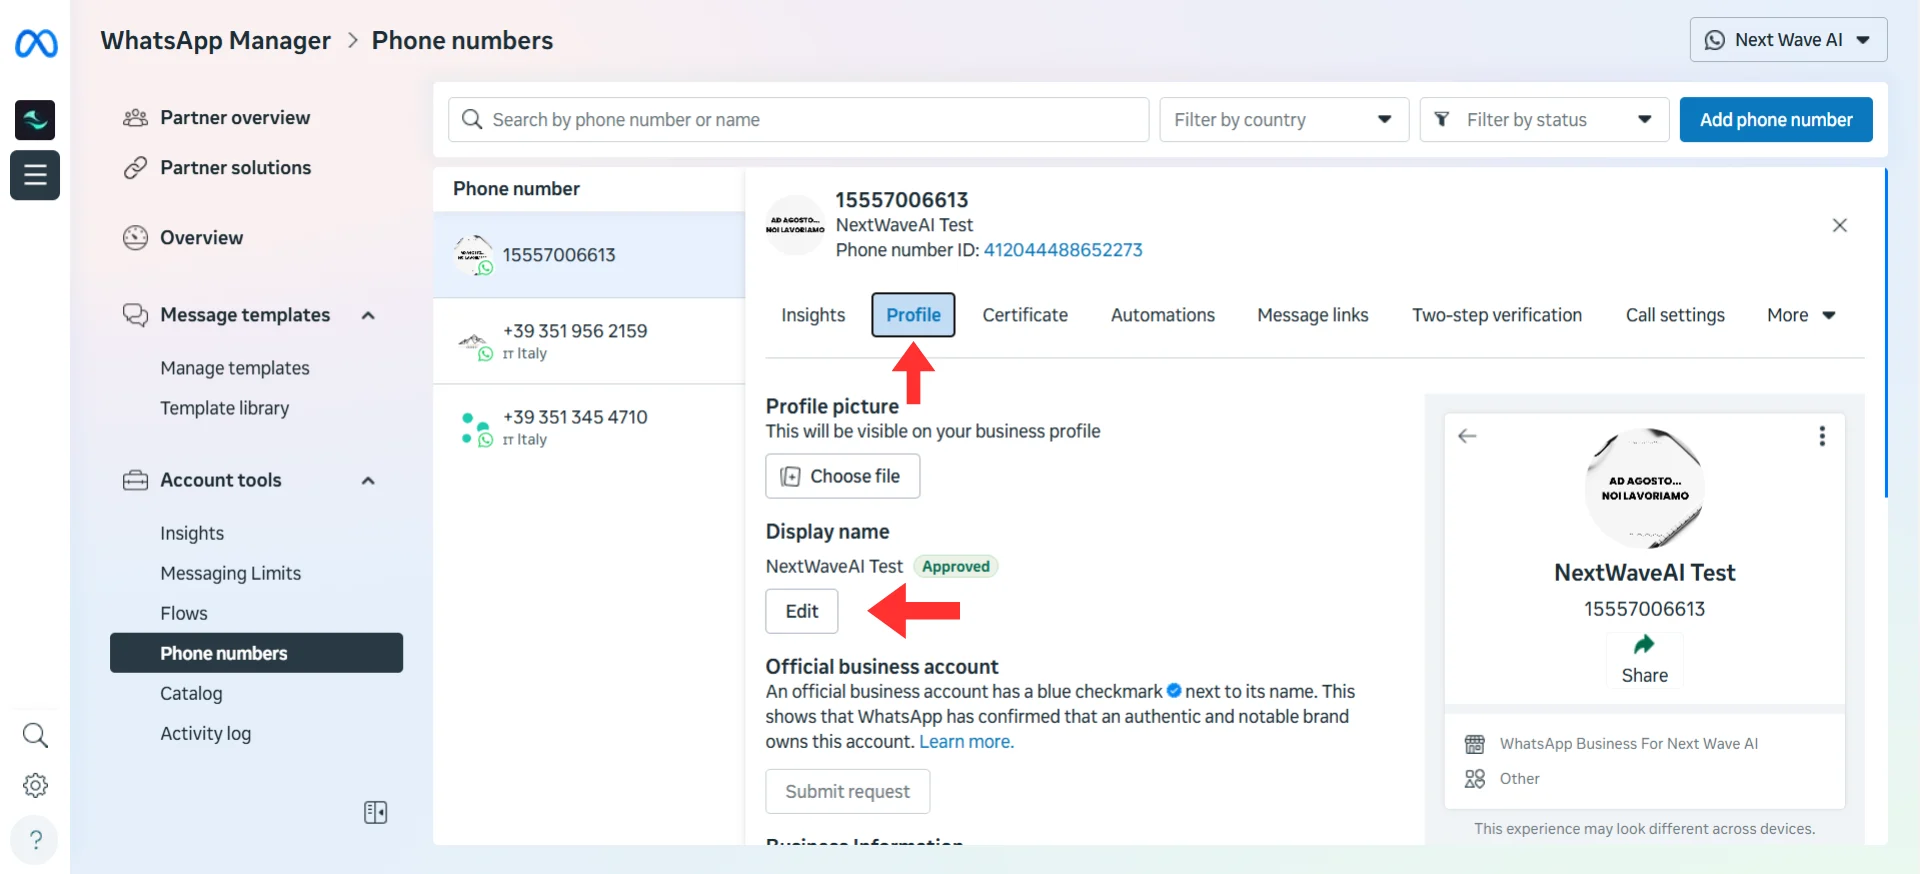
Click the pencil icon to edit your Display Name
🏢 Business Verification Explained
What Is Business Verification?
Business Verification is Meta’s process to confirm your business is legitimate. It involves submitting official documents to prove your business identity.🎯 Why Business Verification Matters
- 🛡️ Avoid future problems — New, unverified Business Managers are more likely to be flagged or restricted by Meta’s automated systems. Verifying early significantly reduces this risk.
- 📈 WhatsApp longevity — Verified accounts are more stable and less likely to face sudden restrictions down the road.
- 🔮 Future-proofing — Meta increasingly favors verified businesses with new features and higher limits.
- 📞 US number access — The free Meta-provided US phone number option may not appear if your Business Manager isn’t verified.
Can You Start Without Verification?
Yes — you can connect WhatsApp and start using it immediately without verification. You won’t be blocked from setting up. Without verification, you can still:- ✅ Respond to unlimited customer-initiated conversations
- ✅ Send business-initiated messages to 50 unique customers per 24-hour rolling period
- ✅ Use your AI agent for all incoming conversations
How to Start Verification
- Go to Meta Business Suite → “Business Settings” → “Security Center”
- Click “Start Verification”
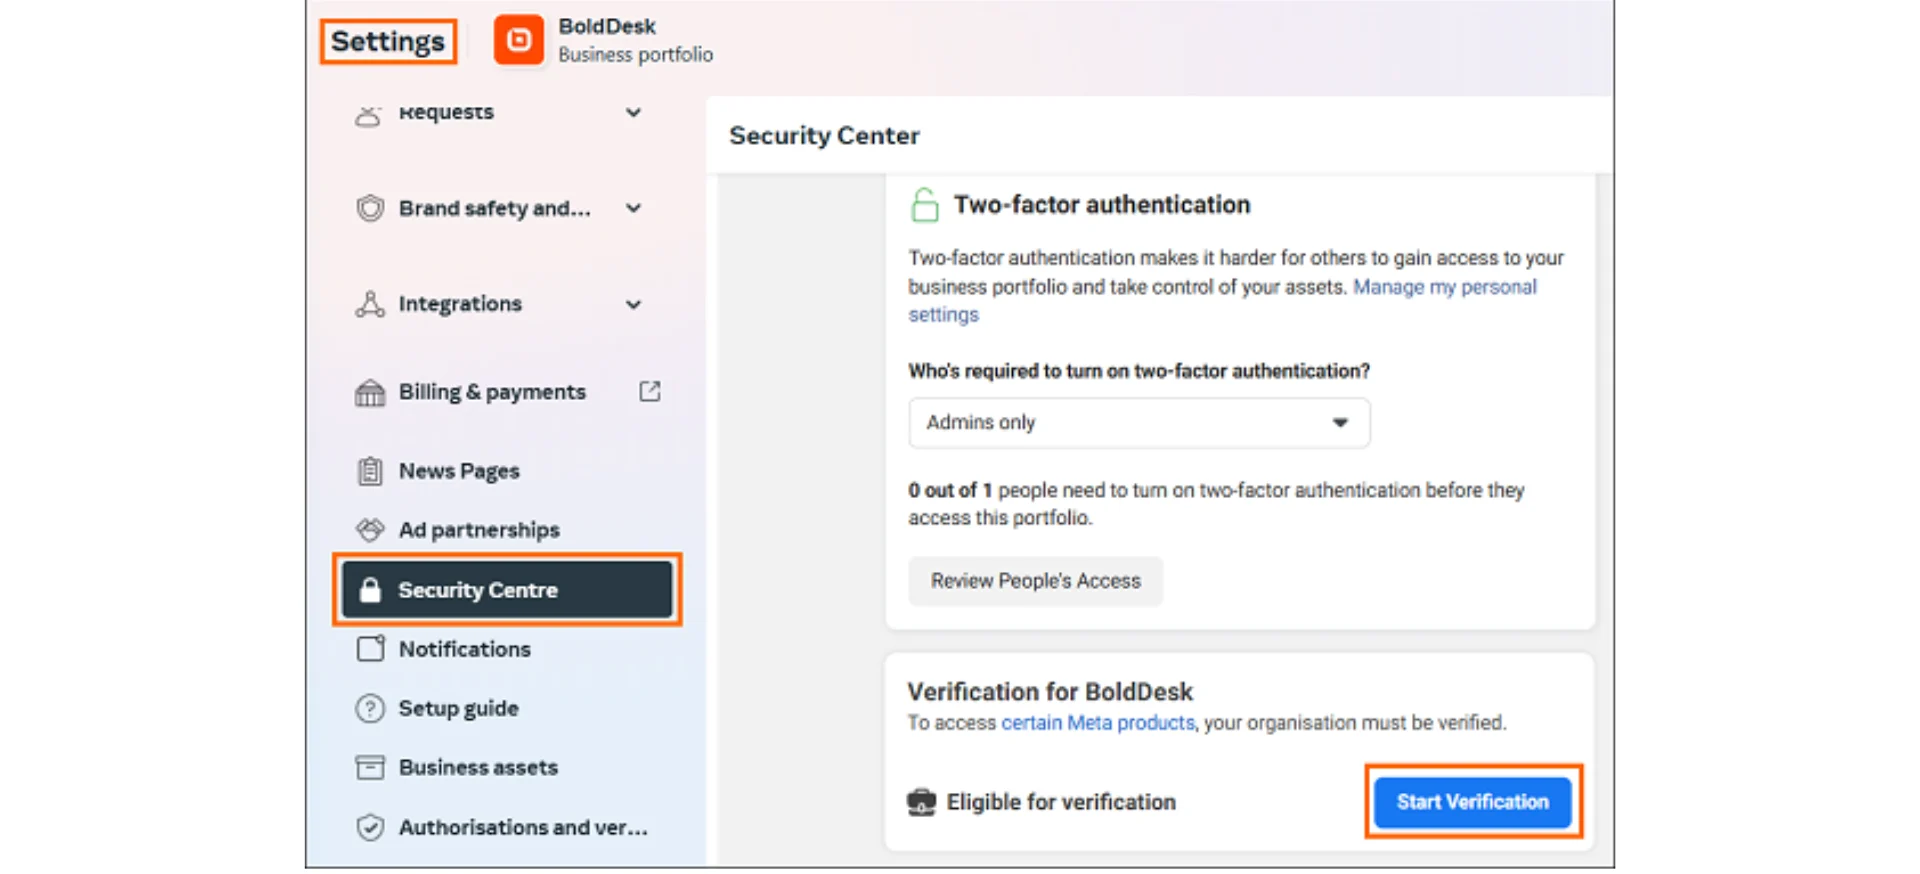
Click Start Verification in Security Center
- Submit one of the following documents:
- Business registration certificate or business license
- Tax registration certificate or articles of incorporation
- Utility bill or bank statement (showing business name and address)
- Government-issued ID of business admin
❓ What If Verification Isn’t Available?
If you don’t see the verification option, Meta doesn’t have enough information about your business yet. Complete your Business Manager profile:- Go to Meta Business Suite → “Business Settings” (gear icon) → “Business Info”
- Fill in all required fields:
- ✅ Complete business address
- ✅ Working website URL
- ✅ Business details (legal name, phone, email)
- Save your changes and wait 24–48 hours for the verification option to appear
🚩 Dealing with a Flagged Account
Sometimes your WABA setup completes successfully, but the account is immediately flagged or restricted by Meta. Don’t panic — it’s usually fixable!What Does Flagged Mean?
A flagged account means Meta’s automated systems detected something that seems to violate their policies — even if nothing is actually wrong.How to Check Status and Request a Review
Both tasks happen in the same place. Follow these steps:- Go to Meta Business Suite → “Business Settings” (gear icon)
- Click “WhatsApp Accounts” in the left sidebar
- Select your WABA → scroll down → click “WhatsApp Manager”
Open Business Settings via the gear icon
- Click “Overview” — you’ll see warning banners if your account has been flagged
- Click the blue link in the warning banner to review the specific restriction reason
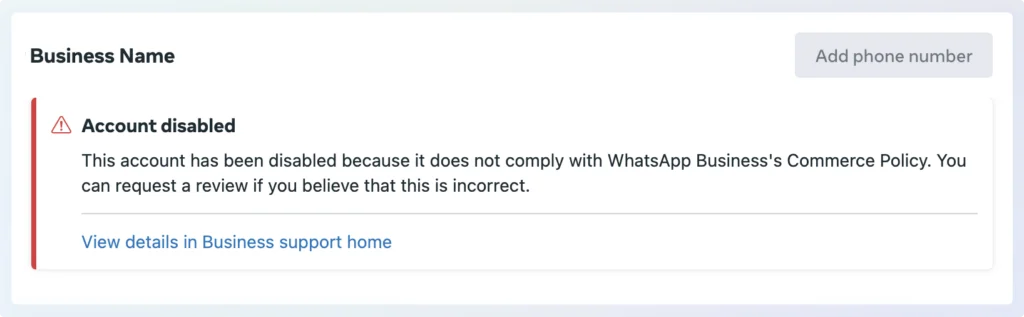
Warning banner in WhatsApp Manager Overview
- To request a review: Click the “Request Review” button and explain that you’ve fixed the root issue
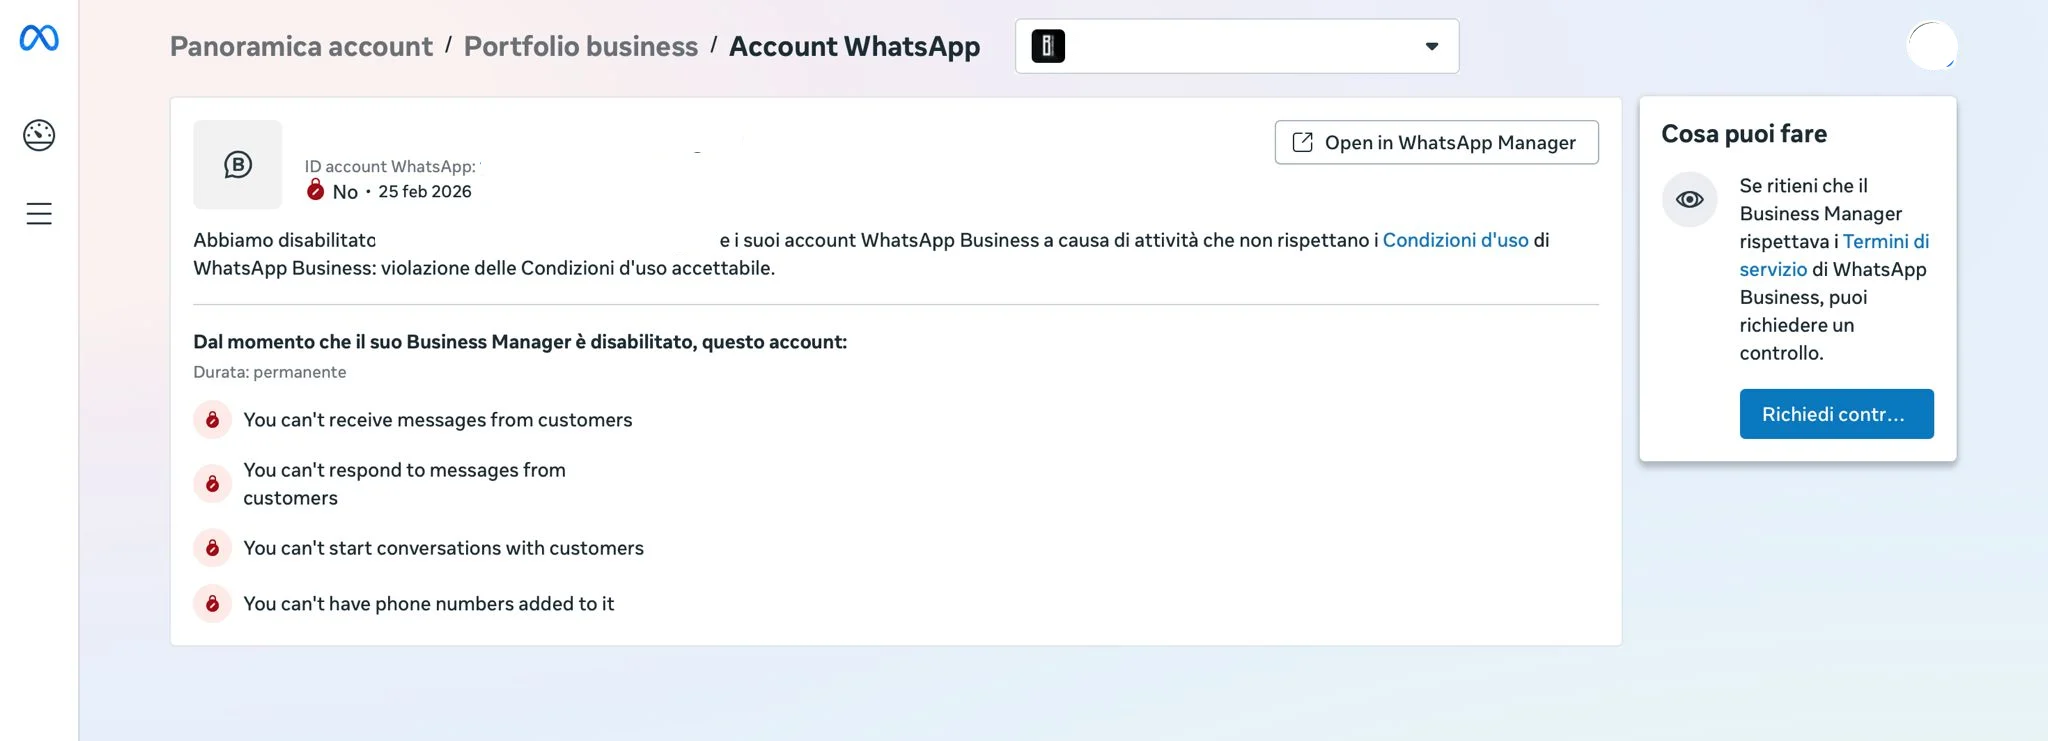
Restriction details page with the Request Review button
What to Expect
- ⏱️ Review time: 24–72 hours (up to 7 business days)
- ✅ If approved: Restrictions are lifted automatically
- ❌ If denied: Fix remaining issues and appeal again
✅ Quick Checklist
Use this checklist before, during, and after setup:Before You Start
Before You Start
- Facebook account ready with login credentials
- Business information prepared (name, address, website)
- Display Name ready — reviewed the guidelines and chosen a compliant name
- Phone number ready (not connected to the WhatsApp app) OR plan to use a Meta-provided number
- Phone nearby to receive verification code (if using your own number); if landline with auto-dialer, plan to disconnect it temporarily
During Setup
During Setup
- Clicked “Connect WhatsApp” in Irelia settings
- Logged into the correct Facebook account
- Created or selected Business Portfolio and WhatsApp Business Account
- Entered account details (name, country, category, website)
- Set Display Name to your preferred customer-facing name
- Added and verified phone number (used Voice Call if SMS didn’t arrive or if using a landline) OR selected Meta-provided number
- Waited 1–2 minutes for confirmation page to load (didn’t close the page!)
- Selected phone number in Irelia confirmation screen
- Saw the “Congratulations” success screen
After Setup
After Setup
- Started Business Verification process — Do this right away if available; critical for new Business Managers → guide
- Tested sending a message to the WhatsApp number
- Noted: Never remove Gupshup or Text Wave as a partner!
🛠️ Troubleshooting & FAQs
❌ Issue 1: "This number is registered to an existing WhatsApp account"
Your number is still active on another platform — only one platform at a time is allowed
❌ Issue 1: "This number is registered to an existing WhatsApp account"
Your number is still active on another platform — only one platform at a time is allowed
- “This number is registered to an existing WhatsApp account. To use this number, disconnect it from the existing account. Then, return to this page and re-enter the number.” — Number is active on the WhatsApp or WhatsApp Business app
- “This phone number is already connected to another WhatsApp Business Account” — Number is tied to an existing WABA in a different Business Manager
- “The phone number was already registered on our platform (i.e., WhatsApp Messenger, WhatsApp Business App or WhatsApp Business API)” — General variant covering any of the above
- Number active on the WhatsApp app (smartphone)? Delete the account from the app: go to “Settings” → “Account” → “Delete Account” in WhatsApp. Wait 5–10 minutes.
- Number tied to an existing WABA? Delete that WABA from your Business Manager — see the deletion instructions in Choosing Your Phone Number.
- Go back to Step 1 and begin again.
❌ Issue 2: "I'm not receiving the verification code"
The SMS or voice call with your verification code isn't reaching your phone
❌ Issue 2: "I'm not receiving the verification code"
The SMS or voice call with your verification code isn't reaching your phone
- Voice Call is more reliable than SMS and almost always works.
- Disconnect any auto-dialer or IVR system on the line — these intercept the automated verification call and prevent the code from reaching you. Temporarily disconnect, receive the code, then reconnect.
- Verify you entered the correct country code
- Check if your carrier blocks automated messages
- Make sure your phone number can receive calls or SMS
- Make sure the phone has signal and service
- Wait 60 seconds, then request a new code.
❌ Issue 3: "My website is blocking the process"
Issues with your website are blocking Meta's signup flow
❌ Issue 3: "My website is blocking the process"
Issues with your website are blocking Meta's signup flow
- Make sure your website is live and accessible — no downtime or server errors
- Remove any password protection, “coming soon” pages, or maintenance mode
- Check for a valid SSL certificate (
https://nothttp://)
- Ensure the website clearly displays your business name (matching what you entered)
- Make sure your site has real content (not just a single landing page with no info)
- Verify the site loads properly on mobile devices
- Make sure your site isn’t geo-blocked (accessible from different countries)
- Check that Meta’s crawler can access your site — no
robots.txtblocking
❌ Issue 4: "My display name was rejected"
Meta didn't approve your Display Name due to naming policies
❌ Issue 4: "My display name was rejected"
Meta didn't approve your Display Name due to naming policies
- Read the Display Name Guidelines section.
- Make sure your Display Name matches your verified business name in Business Manager.
- Choose a name that clearly represents your business.
- Avoid generic terms, special characters, or prohibited words.
- Submit a compliant name — see How to Change Your Display Name for step-by-step instructions.
❌ Issue 5: "I don't see my (or my client's) Business Manager in the dropdown"
Your Facebook account doesn't have the required permission level
❌ Issue 5: "I don't see my (or my client's) Business Manager in the dropdown"
Your Facebook account doesn't have the required permission level
- Logged into the wrong Facebook account? The dropdown only shows Business Managers where your Facebook account has admin access. Make sure you’re logged into the correct account.
- Don’t have a Business Manager yet? No problem. Select “Create a new Business Manager” directly in the dropdown during signup.
- You have a BM but it’s still not showing? You likely don’t have the right permission level. Read on.
Instructions for your client
- Go to Meta Business Suite and click the gear icon (⚙️) to open “Business Settings”
- In the left sidebar, click “People”, then click the “Invite People” button
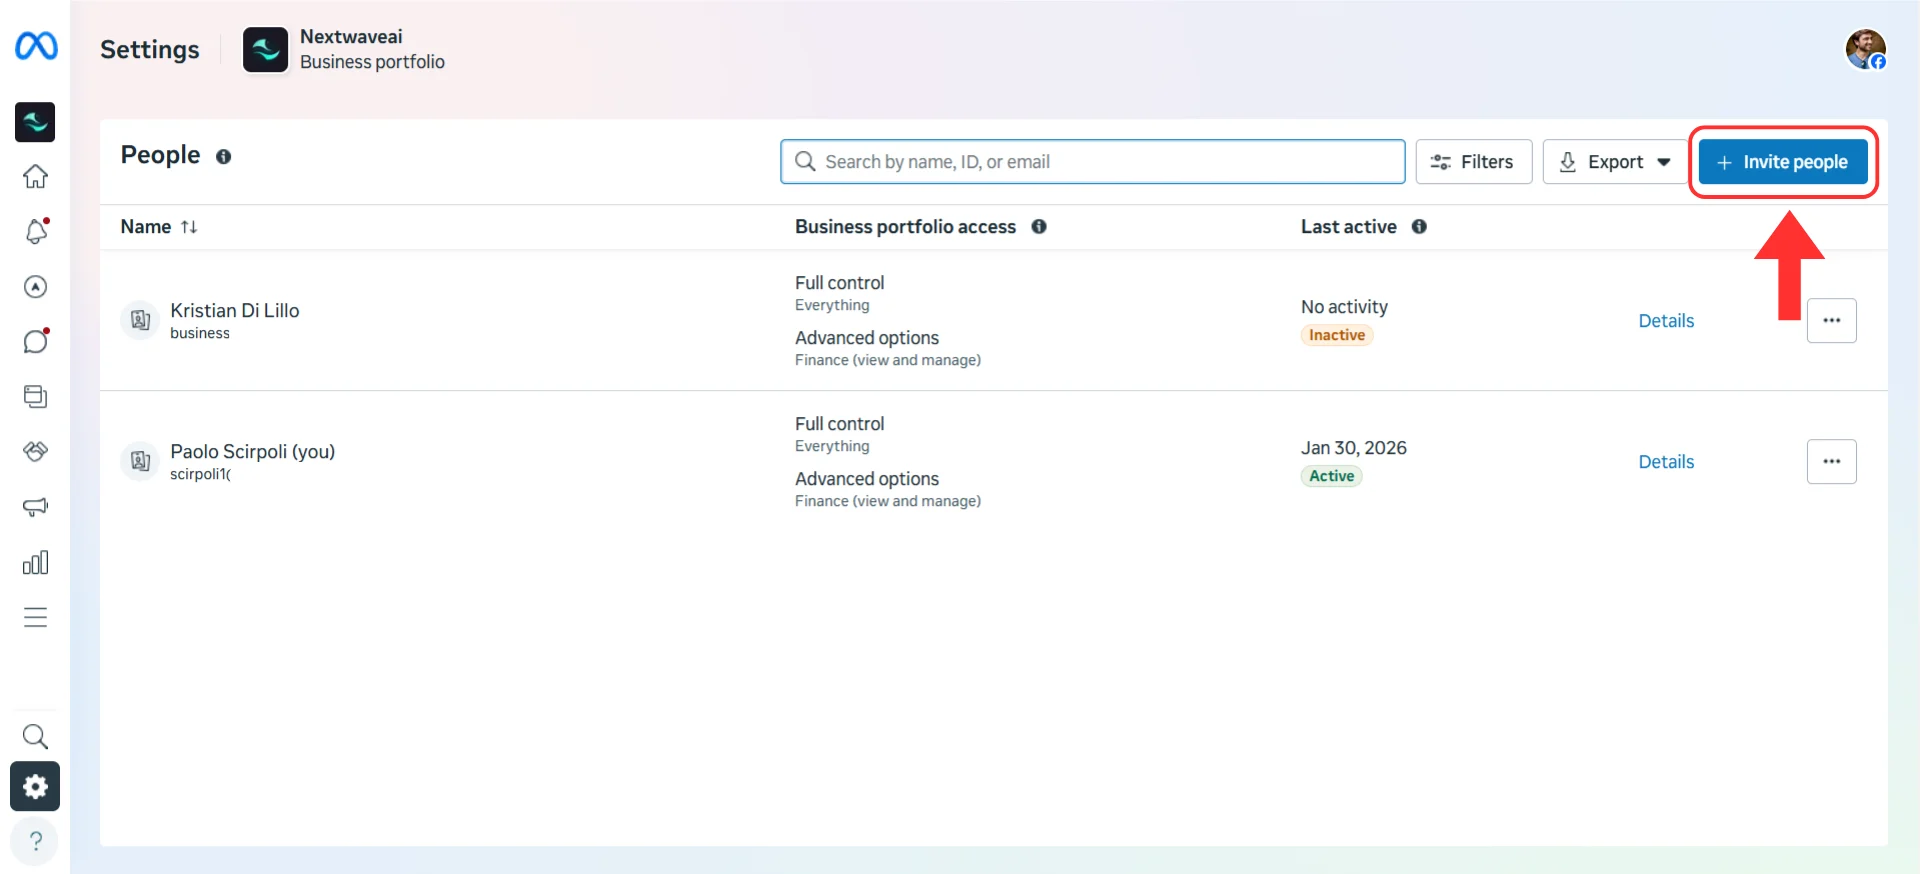
Click Invite People in Business Settings
- Enter the email address associated with the marketer or agency’s Facebook account
- Select “Full control” (Admin access) — this is critical, don’t select “Partial access”
- Make sure Finance permissions are enabled — toggle on both “Finance analyst” and “Finance editor” if shown as separate options. In some interfaces this appears as a “Finance access” toggle.
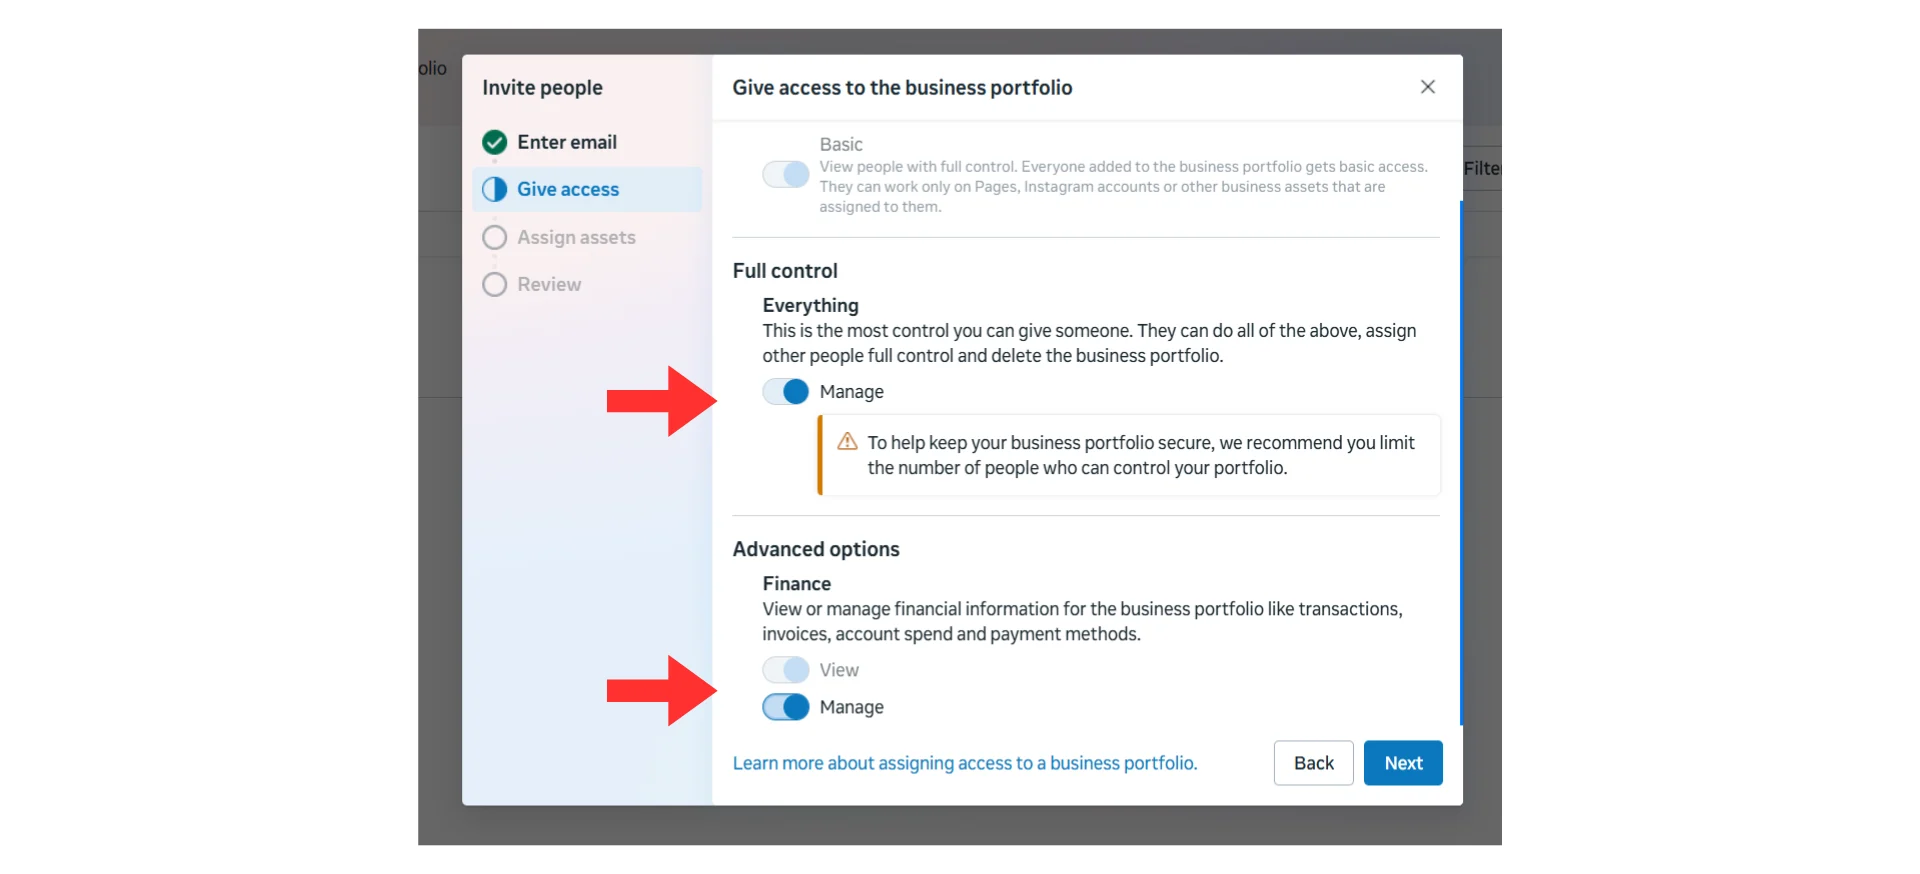
Select Full control and enable finance permissions
- Click “Send Invitation”
❌ Issue 6: "The connection process stopped or froze"
The Meta popup closed unexpectedly or got stuck during authorization
❌ Issue 6: "The connection process stopped or froze"
The Meta popup closed unexpectedly or got stuck during authorization
- Clear your browser cache and cookies
- Disable browser extensions (especially ad blockers)
- Disable any VPN you might be using
- Open Google Chrome in incognito mode
- Restart the process from Step 1
❌ Issue 7: "I can't find my phone number"
Your newly registered number isn't appearing in the activation list
❌ Issue 7: "I can't find my phone number"
Your newly registered number isn't appearing in the activation list
- Wait 30–60 seconds and refresh the page.
- Repeat the process from Step 1 and make sure the phone verification completed successfully.
- If the issue continues, contact Irelia support (see Need Help?).
❌ Issue 8: "My WhatsApp integration has stopped working"
Your WhatsApp connection was working but stopped
❌ Issue 8: "My WhatsApp integration has stopped working"
Your WhatsApp connection was working but stopped
- Gupshup or Text Wave removed as a partner — Someone may have accidentally removed Irelia’s technology provider from your Business Manager.
- WABA flagged or restricted — Meta may have restricted your account.
- Phone number registered on the WhatsApp app — Someone may have registered your business number on the WhatsApp or WhatsApp Business app, disconnecting it from the API.
- WABA or phone number deleted — Another admin may have accidentally deleted the WhatsApp Business Account or removed the phone number.
1️⃣ Gupshup or Text Wave was removed as a partner
Someone may have accidentally removed Gupshup or Text Wave (Irelia’s WhatsApp technology provider) from your Business Manager.How to check:- Go to Meta Business Suite → “Business Settings” → “Partners”
- Look for “Gupshup” or “Text Wave” in the list
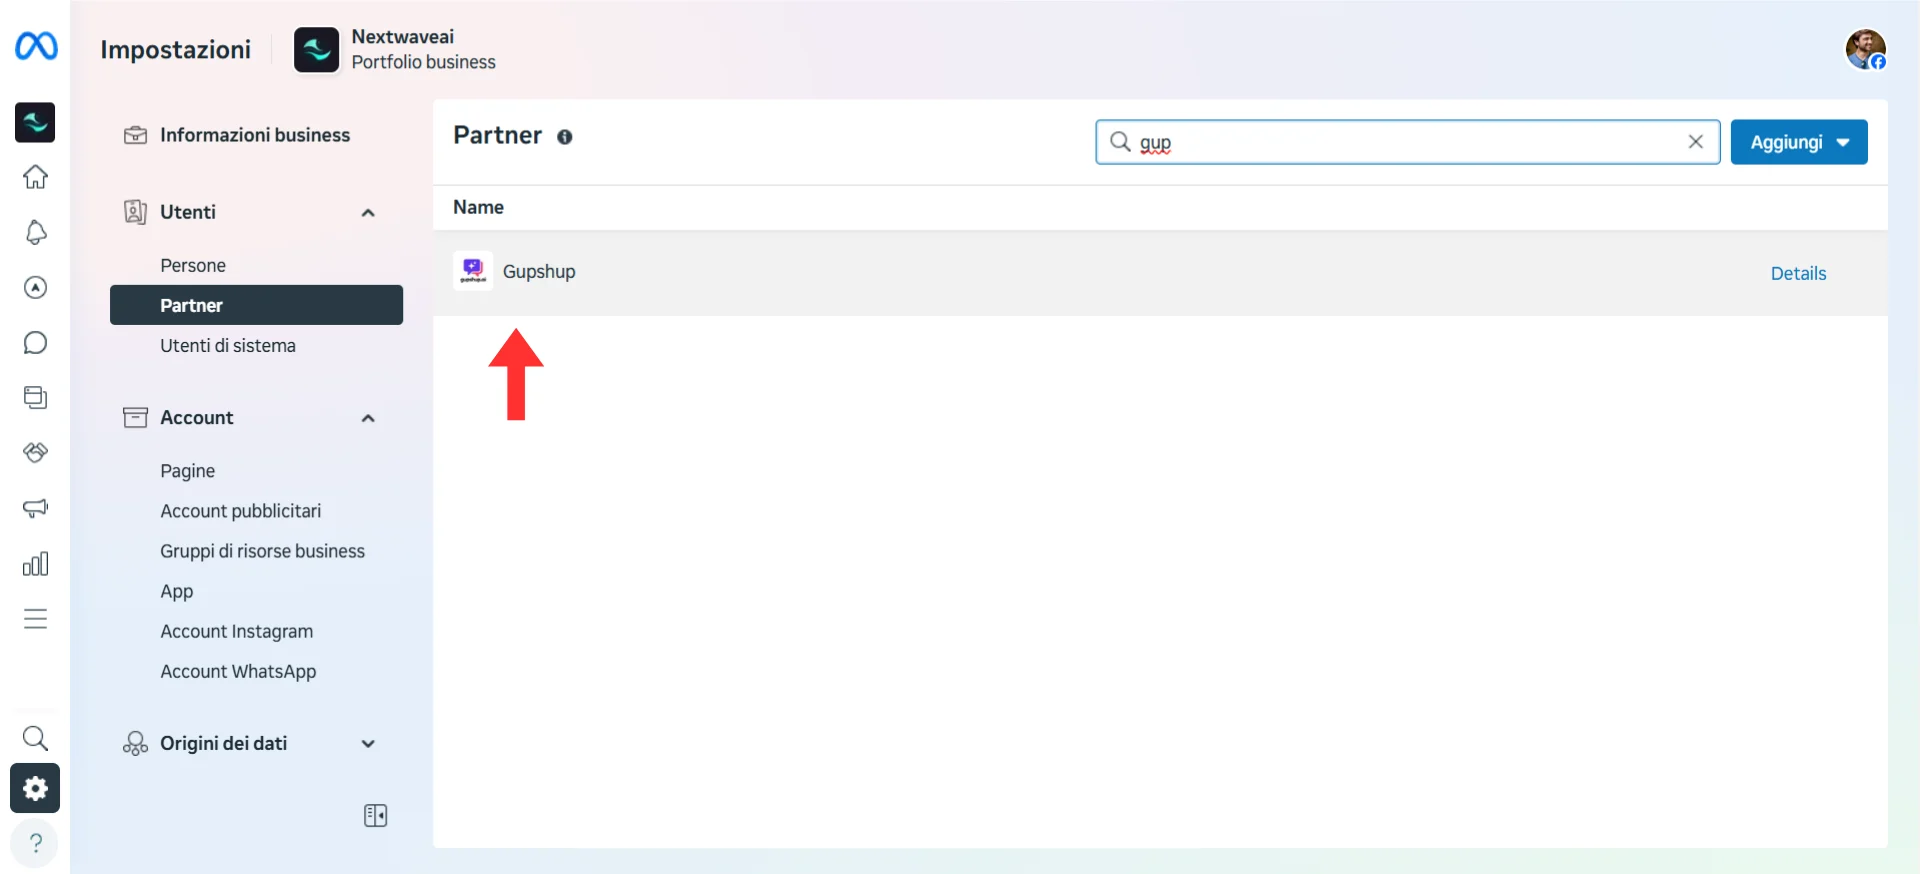
Check the Partners list for Gupshup or Text Wave
2️⃣ Your WABA was restricted or flagged by Meta
👉 See Dealing with a Flagged Account for detailed steps.3️⃣ The phone number was registered on the WhatsApp app
If someone registered your business number on the WhatsApp or WhatsApp Business app, it disconnects from the API.How to check: Open the WhatsApp app on your phone(s) and see if your business number is active there.How to fix:- Delete the account from the app: go to “Settings” → “Account” → “Delete Account”
- Wait 5–10 minutes
- Contact Irelia support to re-register the number
4️⃣ Your WABA or phone number was deleted
Another admin may have accidentally deleted the WhatsApp Business Account or removed the phone number.How to check:- Go to Meta Business Suite → “Business Settings” → “WhatsApp Accounts”
- Verify your WABA still exists
- Click into it and confirm your phone number is still listed
❌ Issue 9: "My account was flagged or restricted immediately after setup"
Meta's automated systems flagged your WABA right after setup
❌ Issue 9: "My account was flagged or restricted immediately after setup"
Meta's automated systems flagged your WABA right after setup
Why doesn't the Meta-provided US number option appear?
Why doesn't the Meta-provided US number option appear?
Why is my messaging limit only 50 customers?
Why is my messaging limit only 50 customers?
If my WhatsApp account gets banned, will it affect my Meta ads and the rest of my Business Manager?
If my WhatsApp account gets banned, will it affect my Meta ads and the rest of my Business Manager?
🆘 Need Help?
- Contact support in the WhatsApp priority support group or send an email to info@irelia.ai
- Include: screenshots of your configuration, the error message, and what you expected vs. what happened
- Visit: business.facebook.com/help
- Check: metastatus.com for outages