~20 minutes setup
What You'll Need
Common Use Cases
Quick Path
Step-by-Step Setup
Advanced Automations
Quick Checklist
Troubleshooting & FAQs
Introduction
You’ve built your conversational AI agent on Irelia.ai, and it’s actively chatting with prospects on WhatsApp, Facebook, and Instagram. But what happens when something important occurs — like when a lead gets qualified, when your agent collects key information, or when someone books a meeting? Right now, you might be manually checking your Irelia dashboard and copying information to other tools. There’s a better way. Irelia tracks these important milestones as events — the “moments that matter” in your conversations. This guide shows you how to automatically send event data from Irelia to your other business tools the instant it happens — no manual work, no delays, no checking dashboards. By the end of this guide, you’ll have: ✅ A working automation that triggers when specific events happen in your Irelia conversations✅ Data flowing automatically from Irelia to your CRM, spreadsheets, or team chat
✅ The knowledge to build unlimited additional automations
How This Works
Think of this connection like a smart doorbell system:What You’ll Do
- 🔗 Get a webhook URL from Make.com — 3 min
- 📋 Paste the URL into Irelia — 2 min
- 🧪 Send test data — 2 min
- ⚡ Set up your action (Google Sheets, Slack, etc.) — 5 min
- ✅ Test everything end-to-end — 3 min
- 🚀 Turn it on and name it — 1 min
📋 What You’ll Need
- An Irelia.ai account with at least one active agent Required
- A Make.com account (free tier works fine) — Sign up here if needed Required
- A destination for your data (Google Sheets, Slack, or your CRM) Required
🎯 Common Use Cases
80% of readers need one of these two setups. Find yours, note the guidance, then follow the Step-by-Step Setup below — you’ll just make different selections at Step 2 and Step 4.- Lead Qualified / Goal Achieved
- Data Gathered
Lead Qualified or Goal AchievedWhich steps do I follow?- Contact already exists in your CRM or spreadsheet → follow Steps 1–3, then use the Search and Update Existing Records pattern for Step 4.
- Contact is brand new (not yet in your system) → follow Steps 1–6 as written (Example A, B, or C in Step 4).
📡 Available Events Reference
Your AI agent tracks several types of events as it chats with prospects. Below are some examples of events Irelia can notify you about:⚡ Quick Path (Experienced Users)
Already comfortable with Make.com? Here’s the condensed version:- Make.com: Create Scenario → Add Module: “Webhooks” → Select “Custom webhook” → Create webhook → Copy URL
- Irelia: Settings → Select Agent → Events and Notifications → Paste URL into desired event field
- Test: Click “Test” button in Irelia → Return to Make.com → Verify data structure determined
- Action: Add your action Module → Map fields → Run once → Activate
🔧 Step-by-Step Setup
Step 1: Set Up Make.com to Receive Irelia Notifications
~3 minutes In this step, you’ll create a new and configure it to listen for events from Irelia. For this guide, we’ll use “New Inbound Contact” because it’s easy to trigger and perfect for learning. Once you understand how it works, you can easily set up other events.Create your Scenario
- Log into your Make.com account at make.com
- Click the “Create a new scenario” button (or the + icon in the top right)
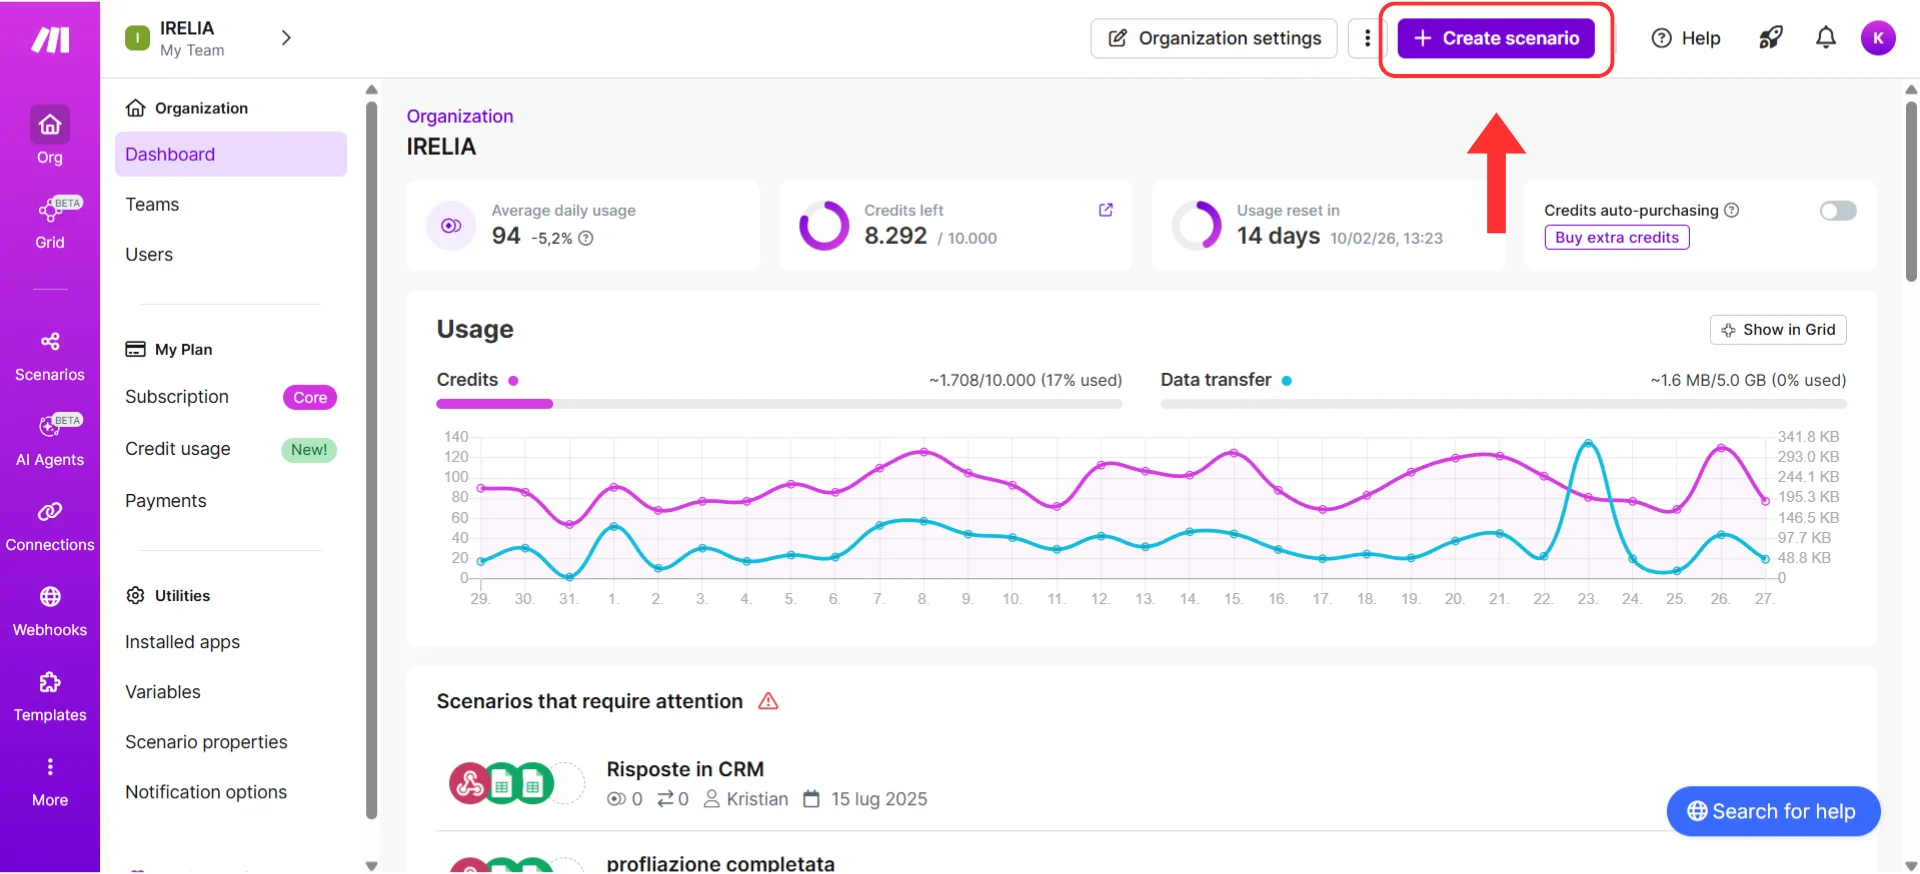
Click 'Create a new scenario' to start building your automation
- You’ll see the Scenario editor — a visual canvas where you’ll build your automation
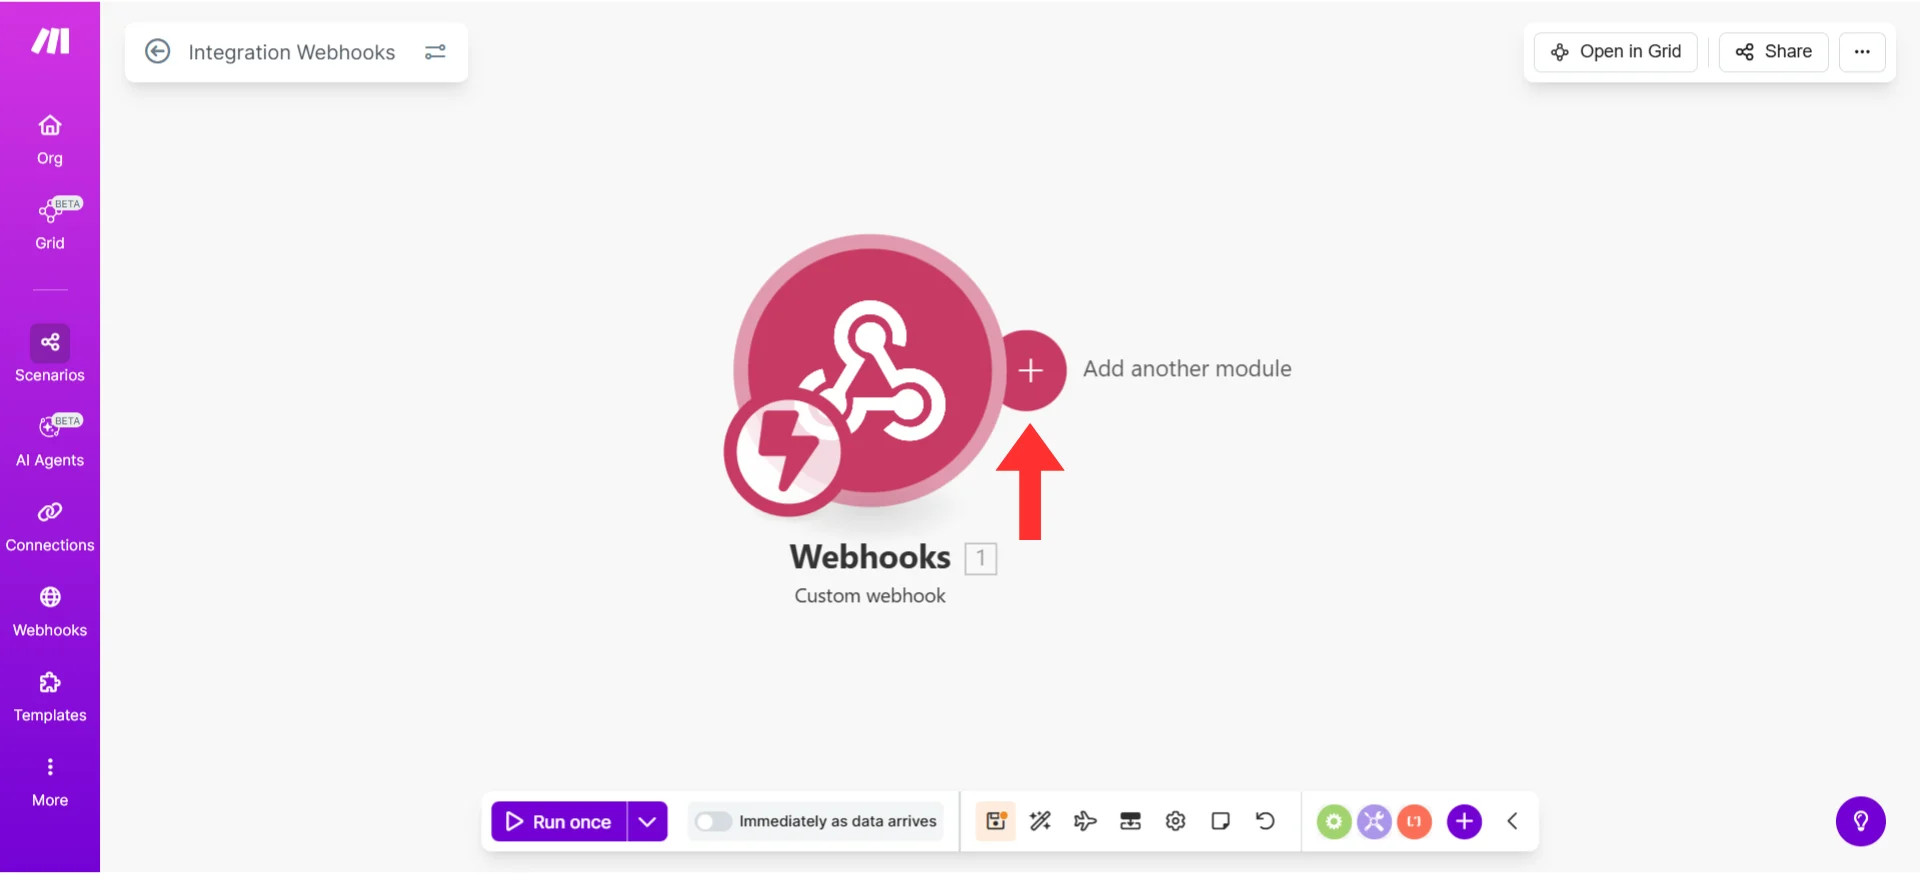
- You’ll start with an empty canvas showing a large + icon in the center
Add the webhook Module
- Click the + icon in the center of the canvas
- A search box will appear — type
webhooks - Select “Webhooks” from the results
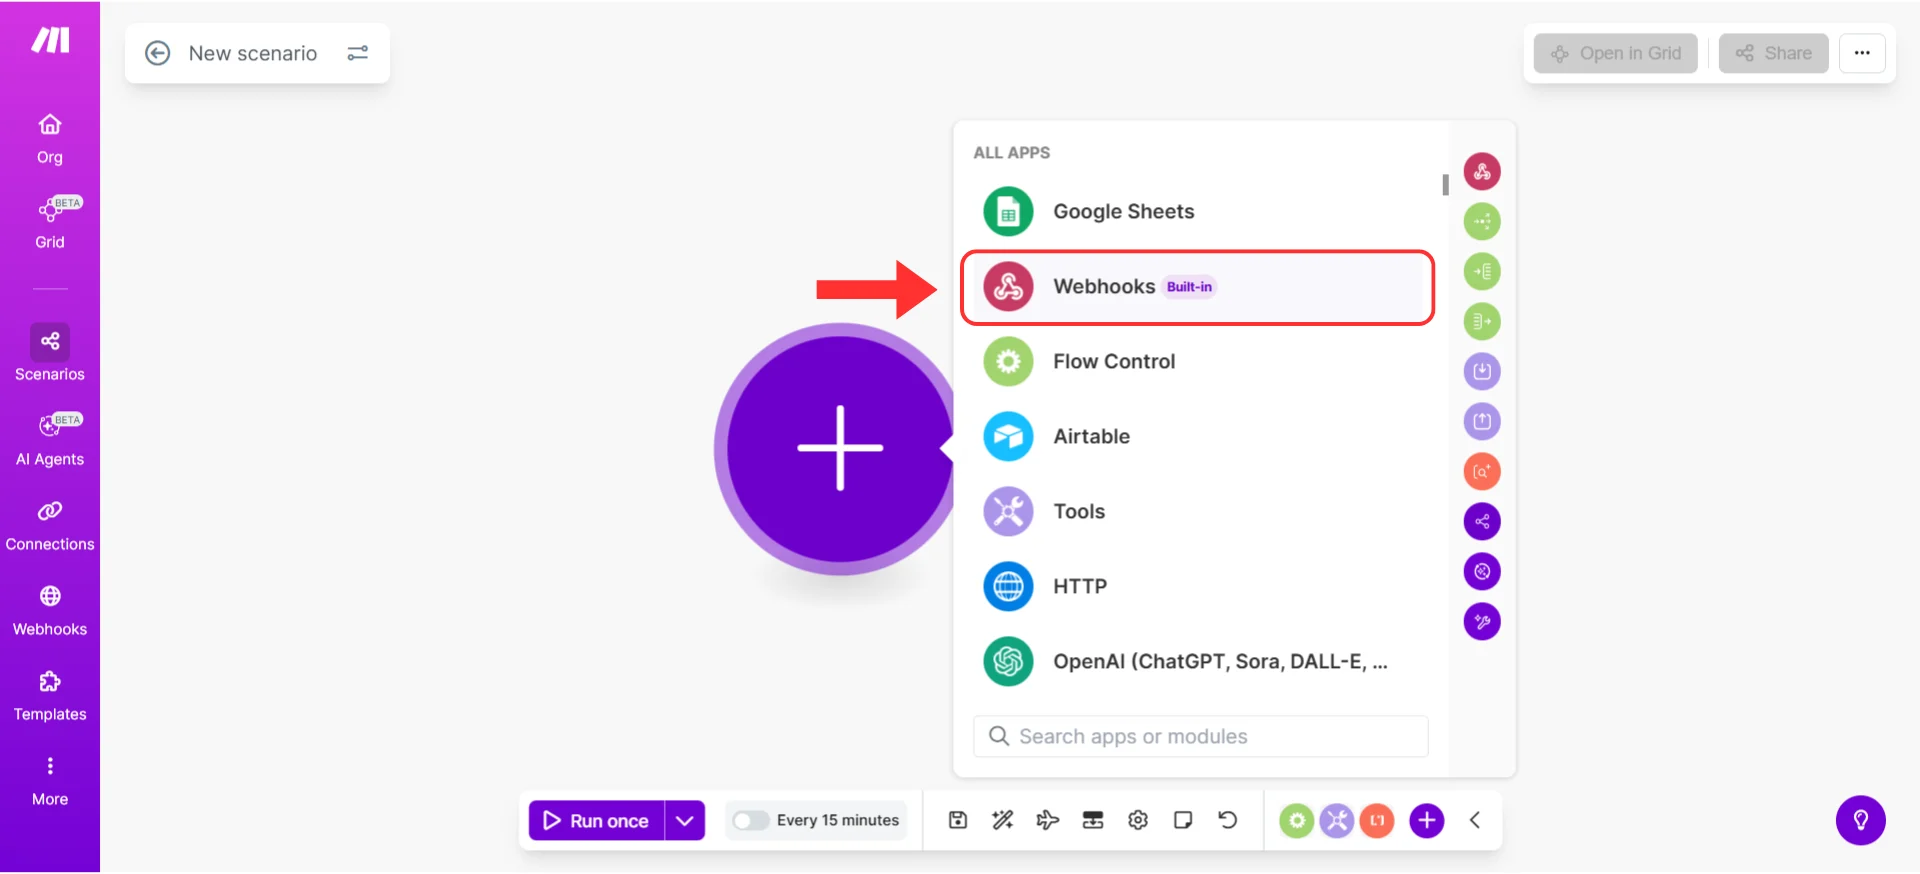
Search for 'webhooks' and select the Webhooks Module
- From the list of triggers, select “Custom webhook”
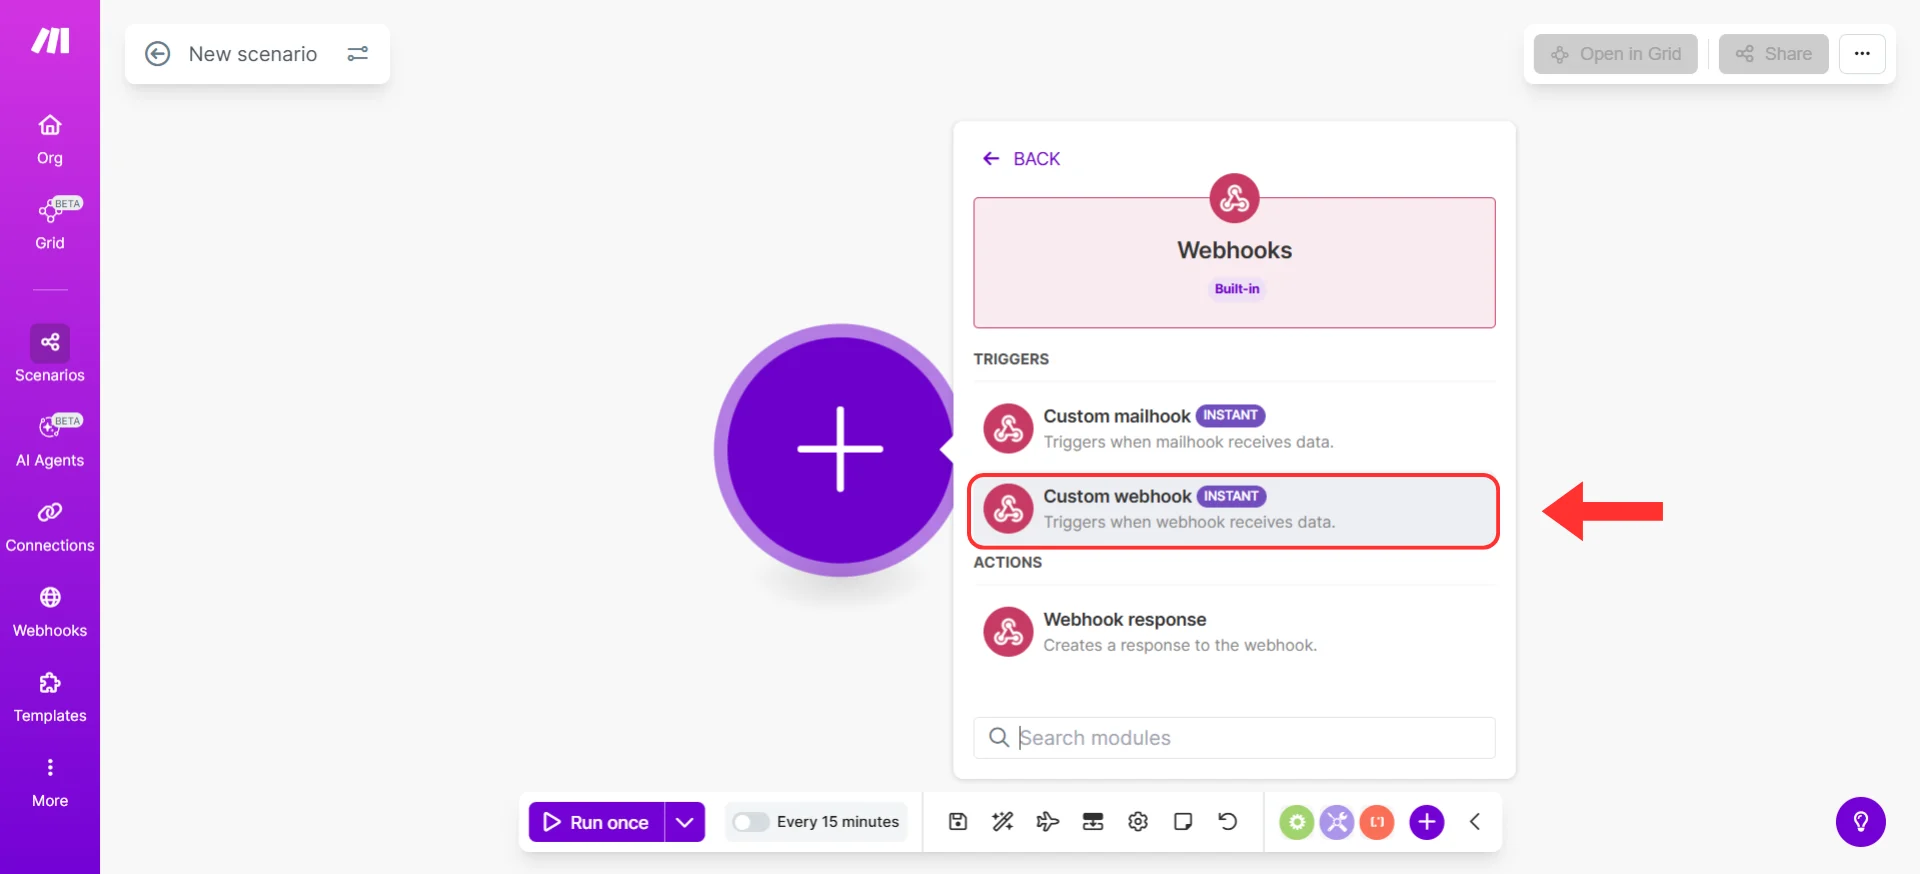
Select 'Custom webhook' as the trigger type
Create your webhook and get the URL
- A configuration panel will open. Click “Add” to create a new webhook
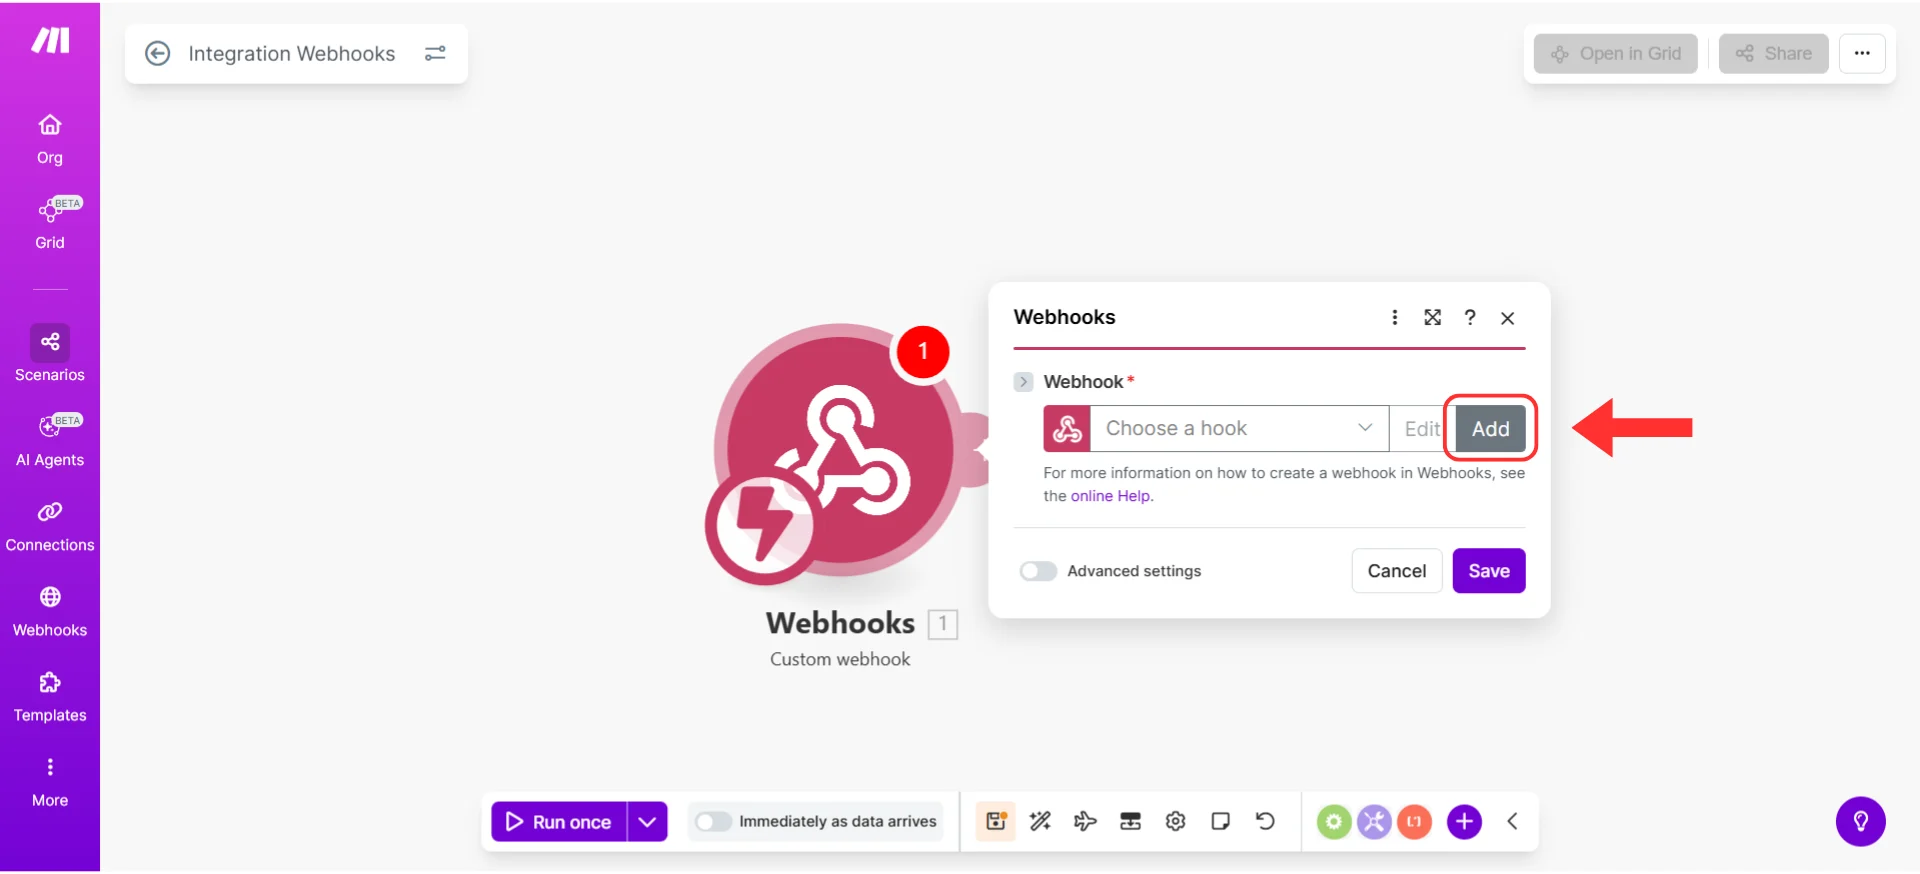
Click 'Add' to create a new webhook endpoint
- Give your webhook a descriptive name (e.g., “Irelia - New Inbound Contact”)
- Leave all other settings at their defaults
- Click “Save”
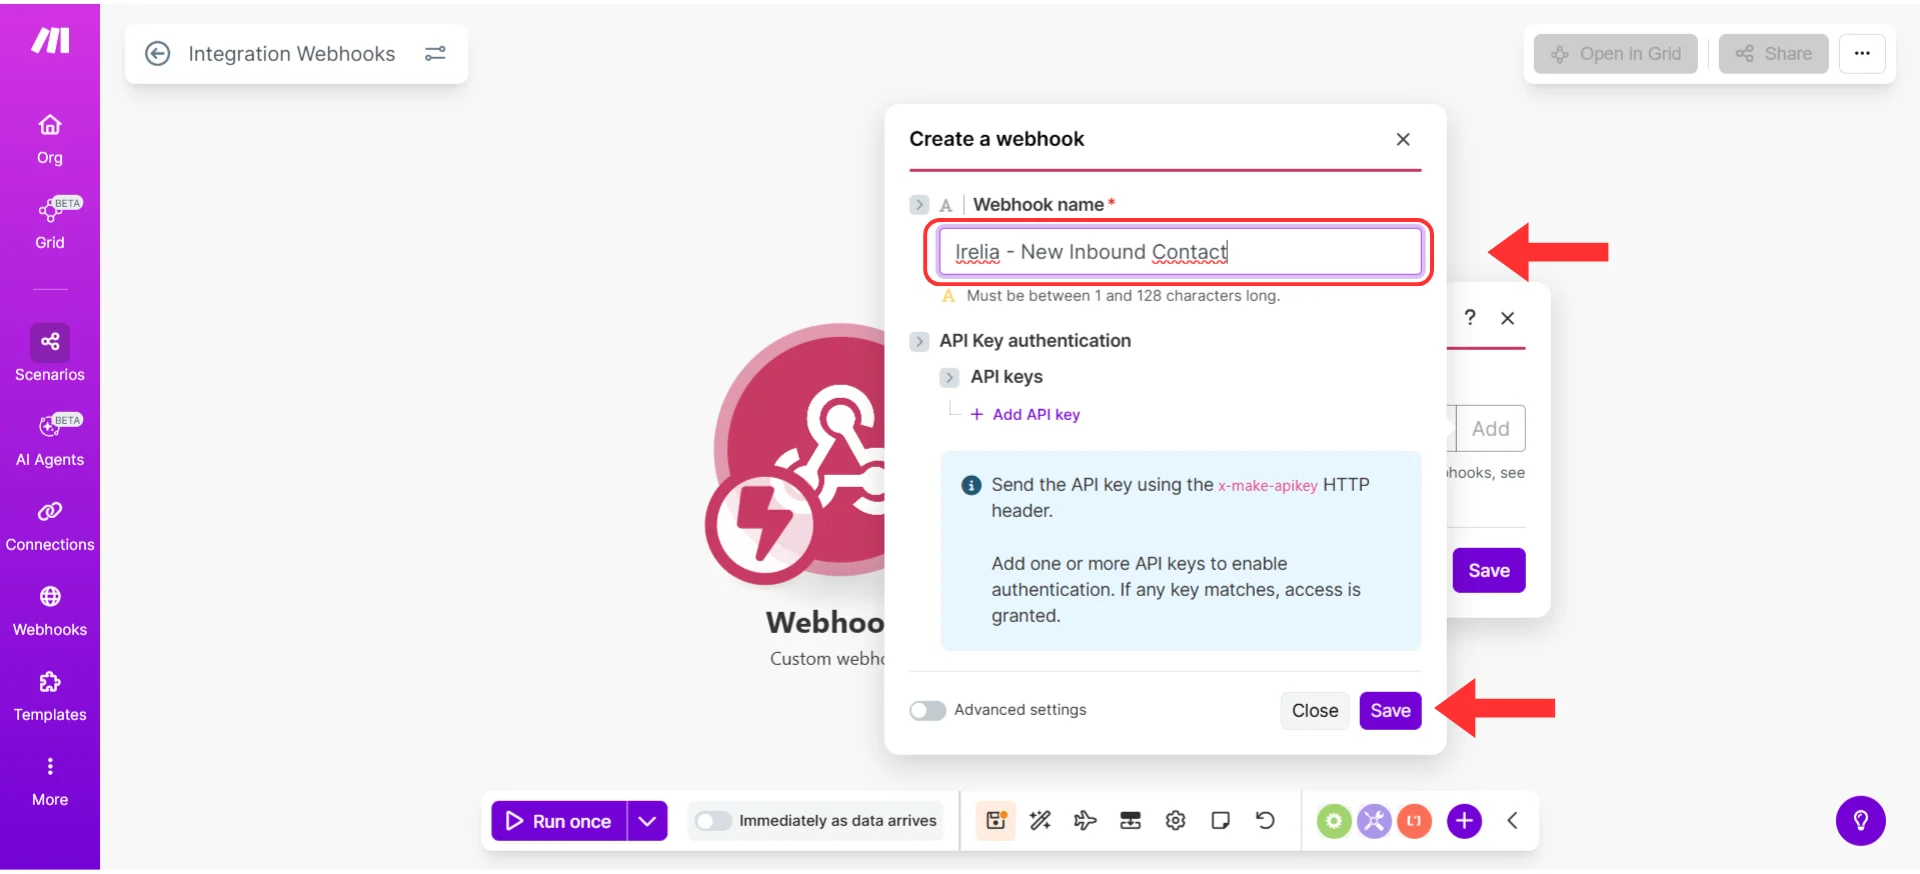
Name your webhook and click Save to generate the URL
- Make.com will generate a unique webhook URL
- It looks like:
https://hook.make.com/abc123xyz789...
- It looks like:
- Click the “Copy address to clipboard” button
Keep this tab open — you'll return here after configuring Irelia
Step 2: Tell Irelia Where to Send Notifications
~2 minutes Now you’ll log into Irelia and paste the webhook URL you just copied. In Irelia, each AI agent can have its own automations. For this guide, you’ll configure ONE event for ONE agent. Once you understand how it works, you can easily set up more.Access your agent settings
- Log into your Irelia.ai settings dashboard
- Select the agent you want to connect to Make.com
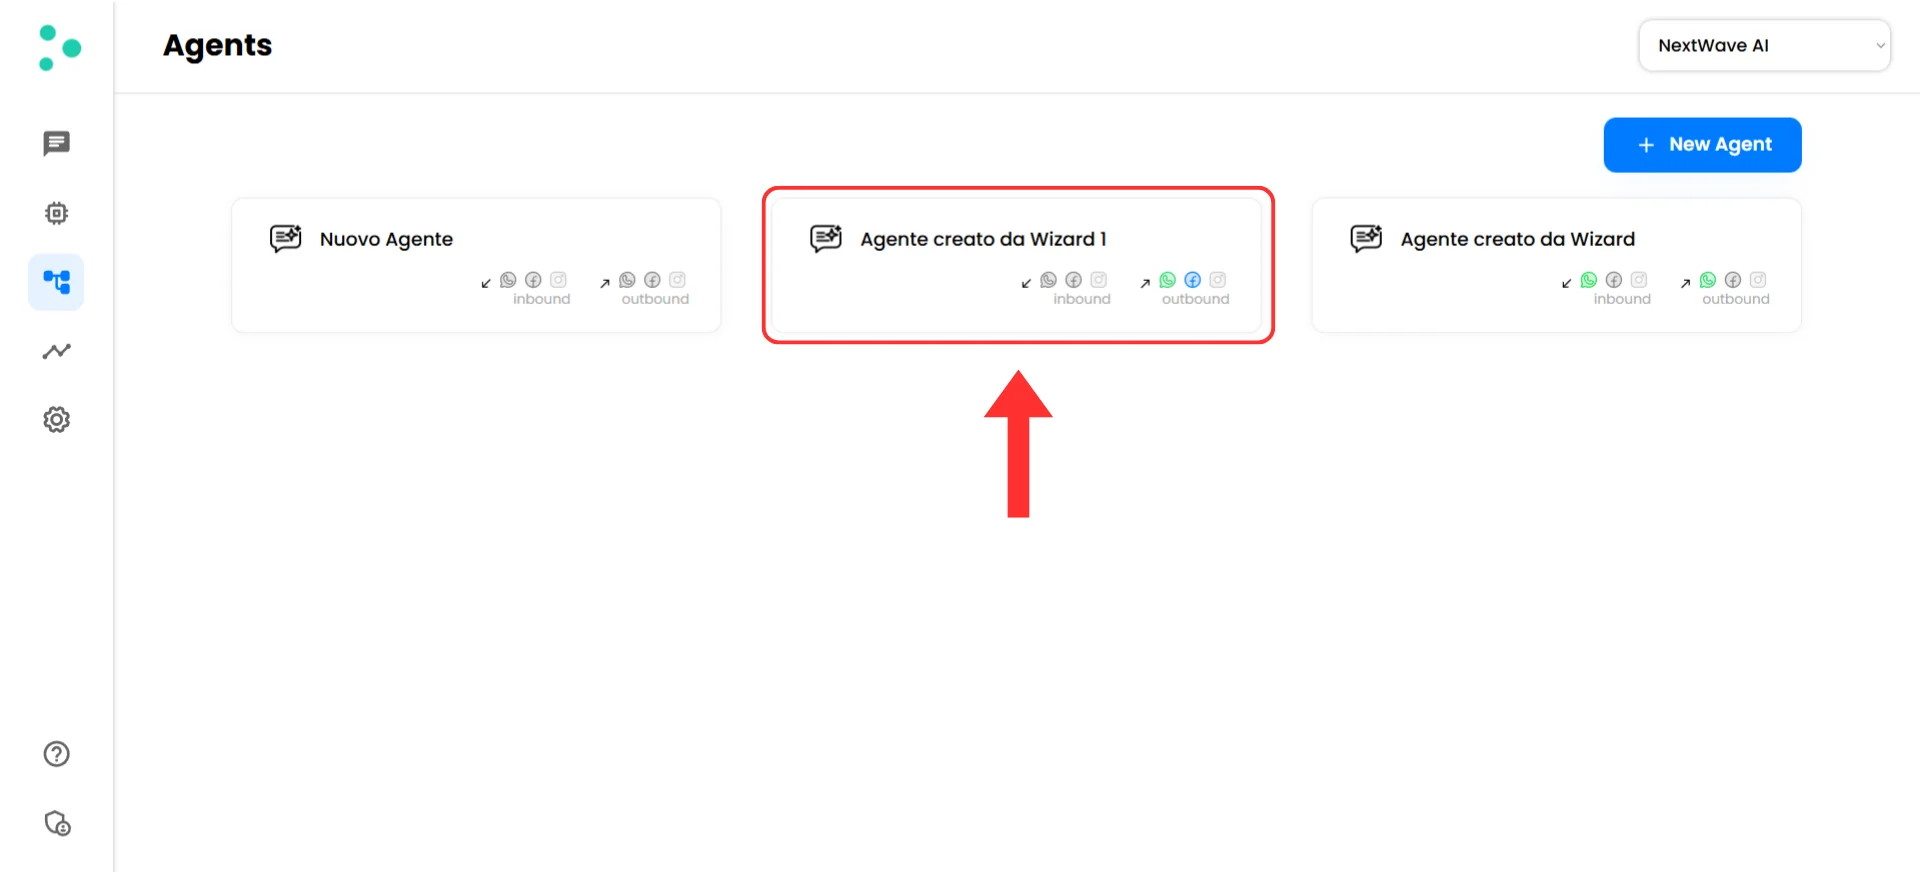
Select the agent you want to connect to Make.com
- Navigate to “Events and Notifications”

Open the Events and Notifications section
Configure your webhook
- You’ll see a list of available events

Available event types with URL fields for webhook configuration
- Find “New inbound contact reaching out to us” (or the event you wish to configure)
- Click in the “URL” field next to this event
- Paste the webhook URL you copied from Make.com (the URL will auto-save)
Paste the Make.com webhook URL into the event URL field
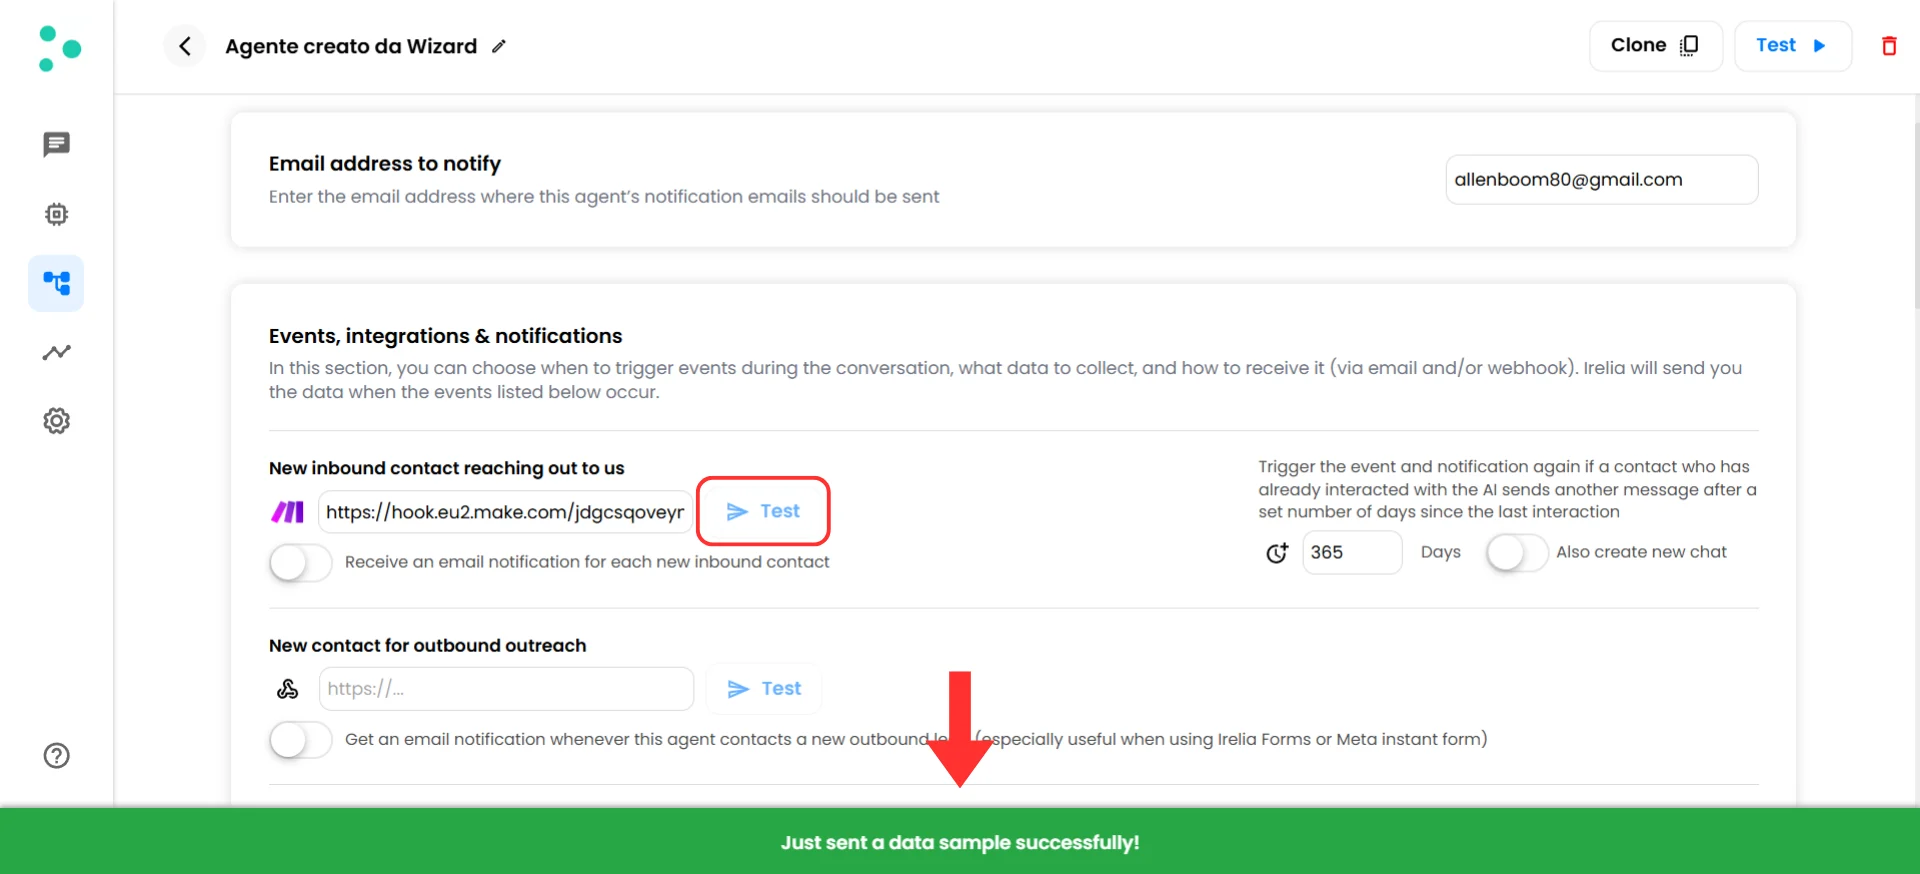
Step 3: Test the Connection
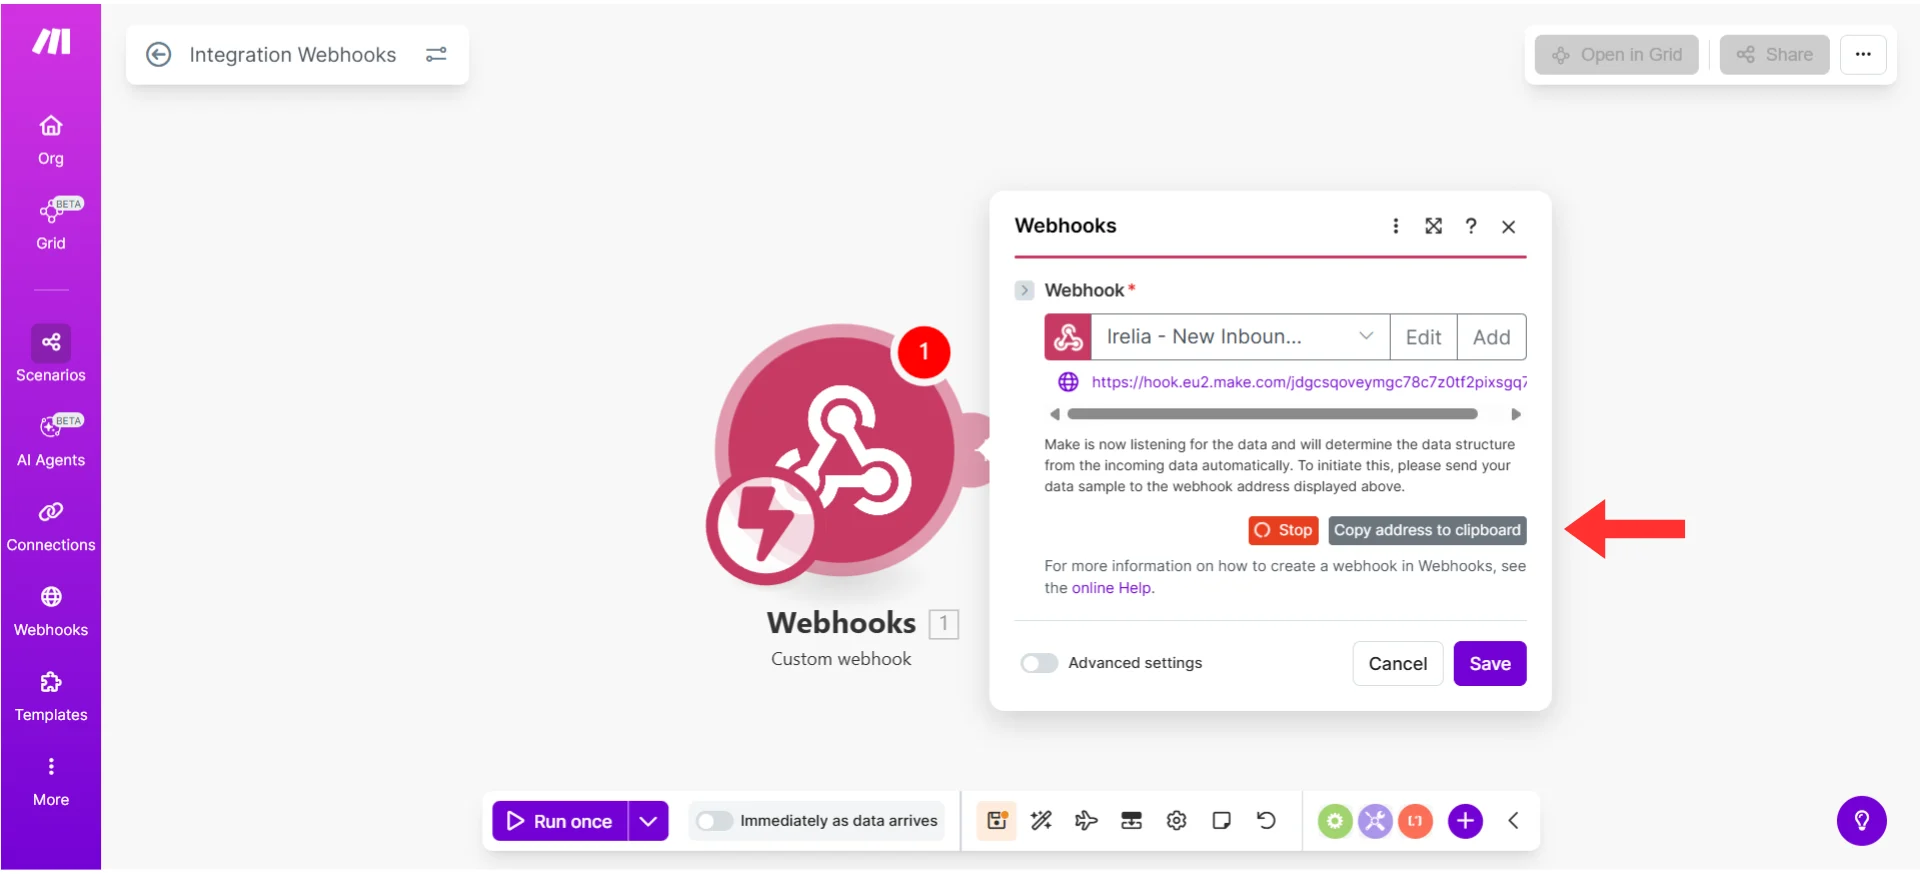
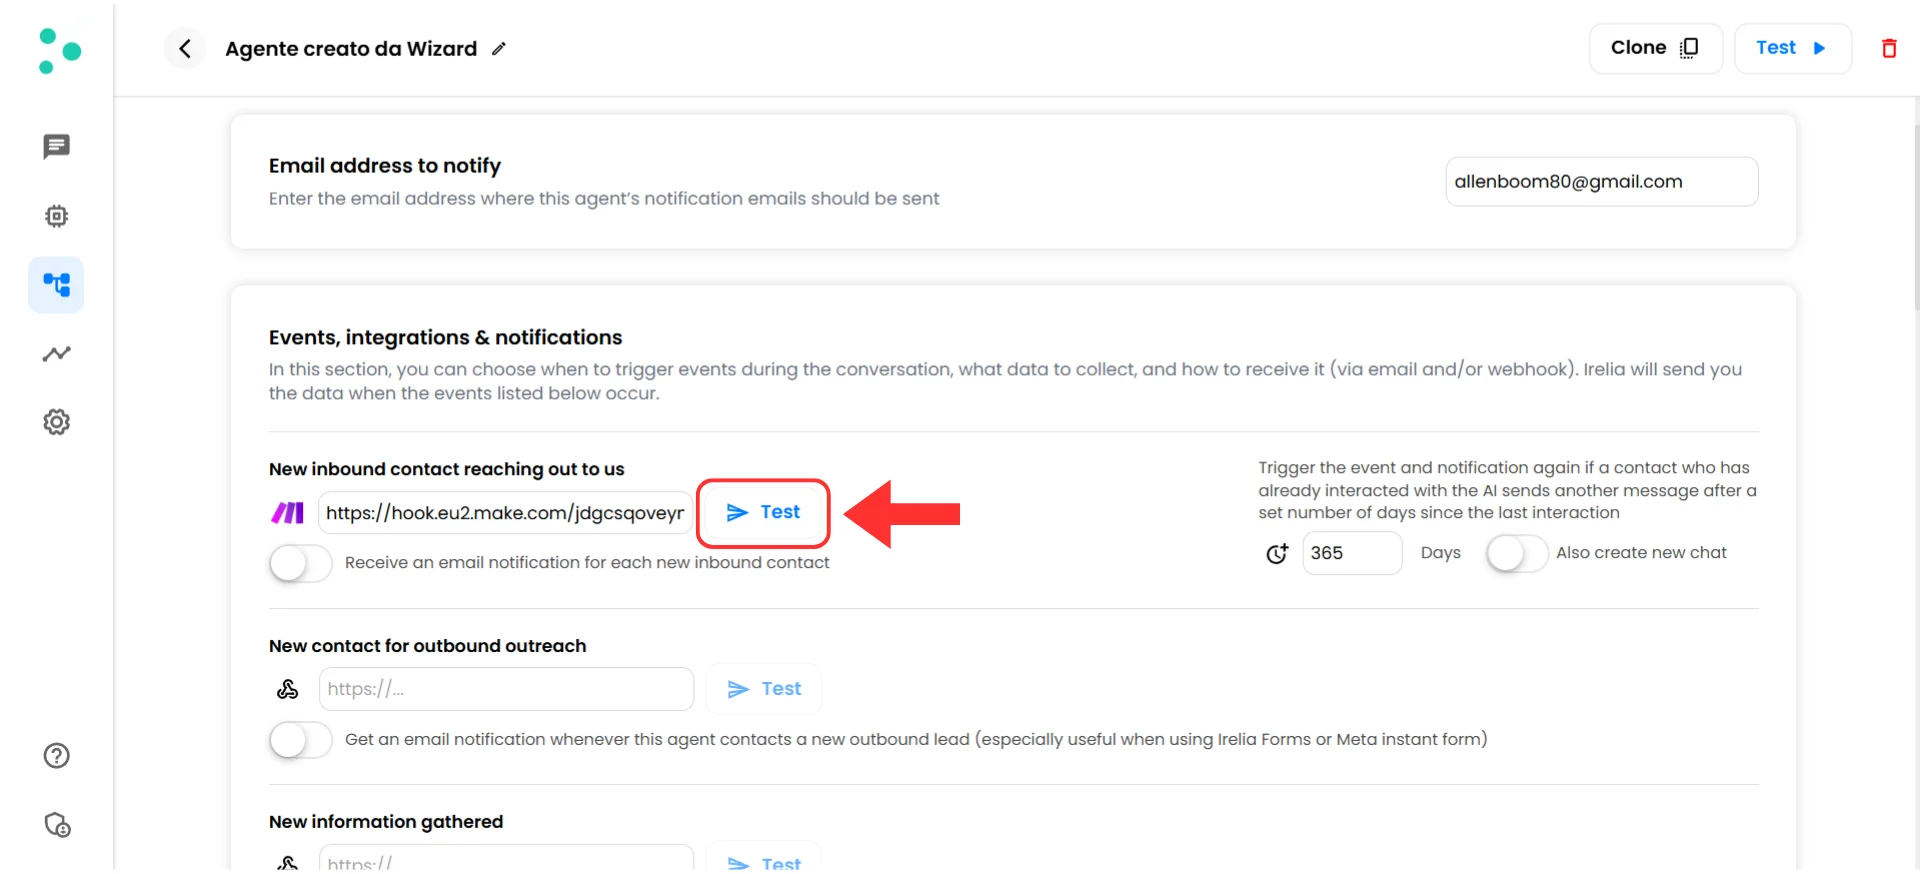
~2 minutes Now let’s verify that Irelia and Make.com can talk to each other.Send test data from Irelia
- In your Irelia webhook configuration (where you just pasted the URL), find the blue “Test” button next to the webhook URL field
- Click “Test”
- You should see a green success indicator in Irelia that says “Just sent a data sample successfully”
Green success confirmation after sending test data
Verify Make.com received the data
- Go back to your Make.com tab (the one you kept open)
- You should see a success message: “Successfully determined” with a green checkmark
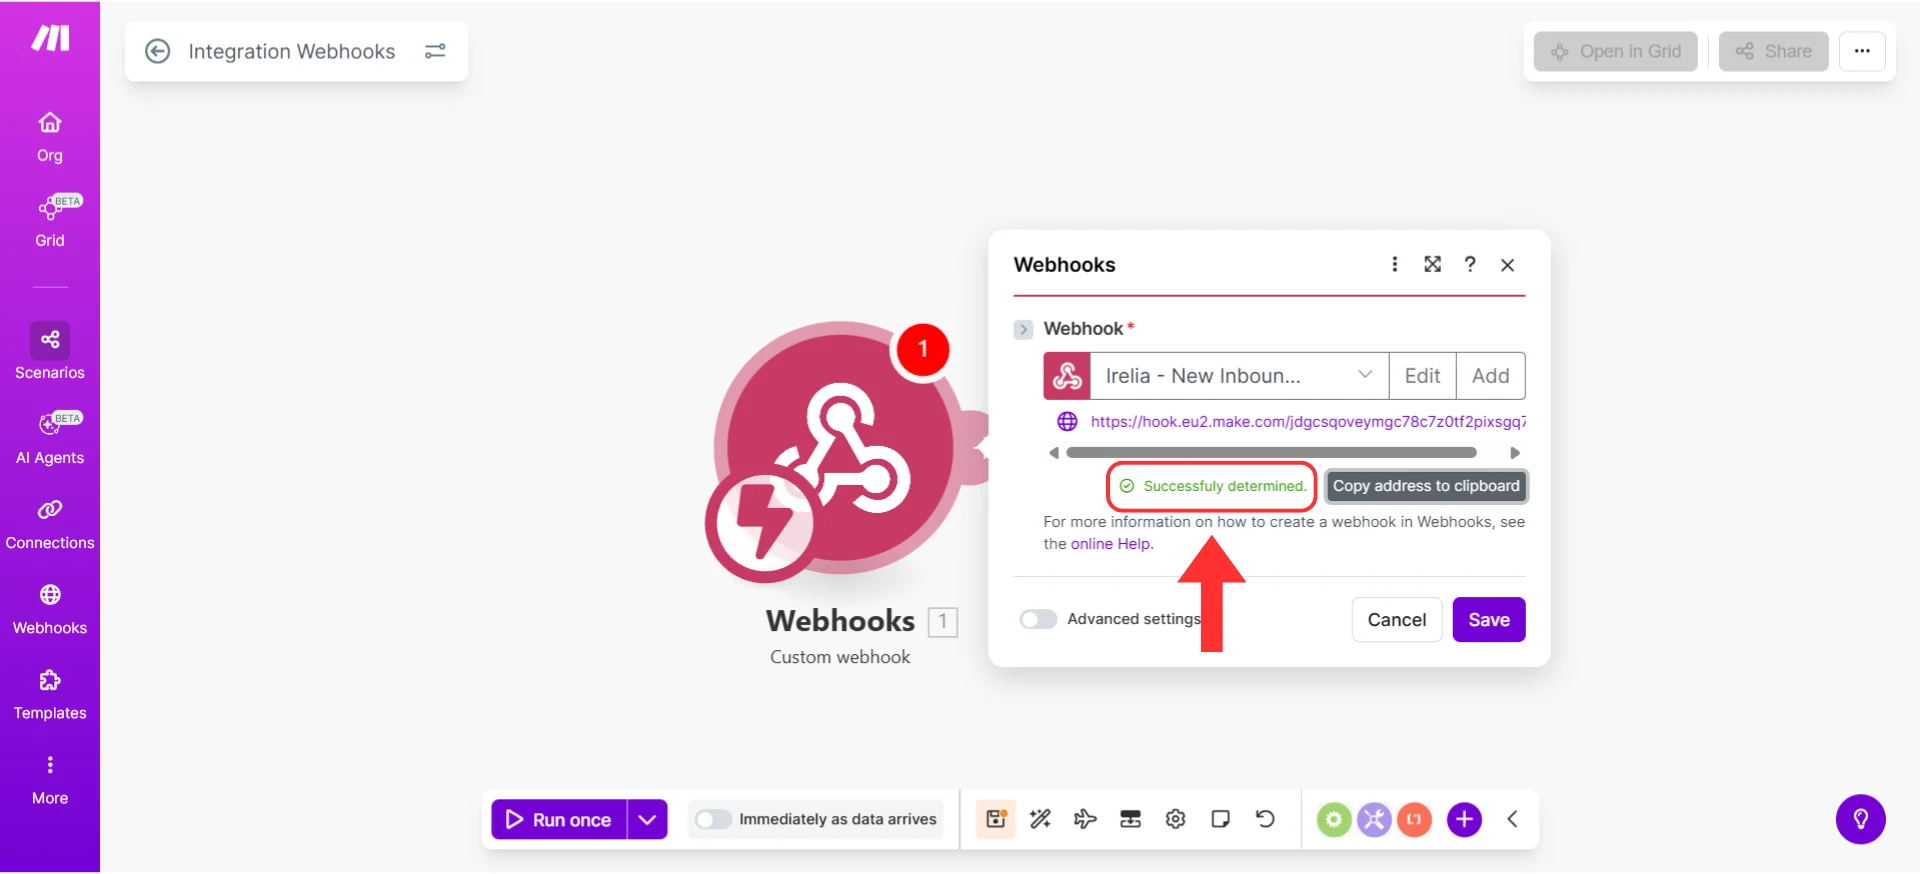
'Successfully determined' confirms Make.com received the data
- Click “OK” to close the configuration panel
Understanding the Data Irelia Sends
Before setting up actions, take 60 seconds to understand what Irelia just sent to Make.com.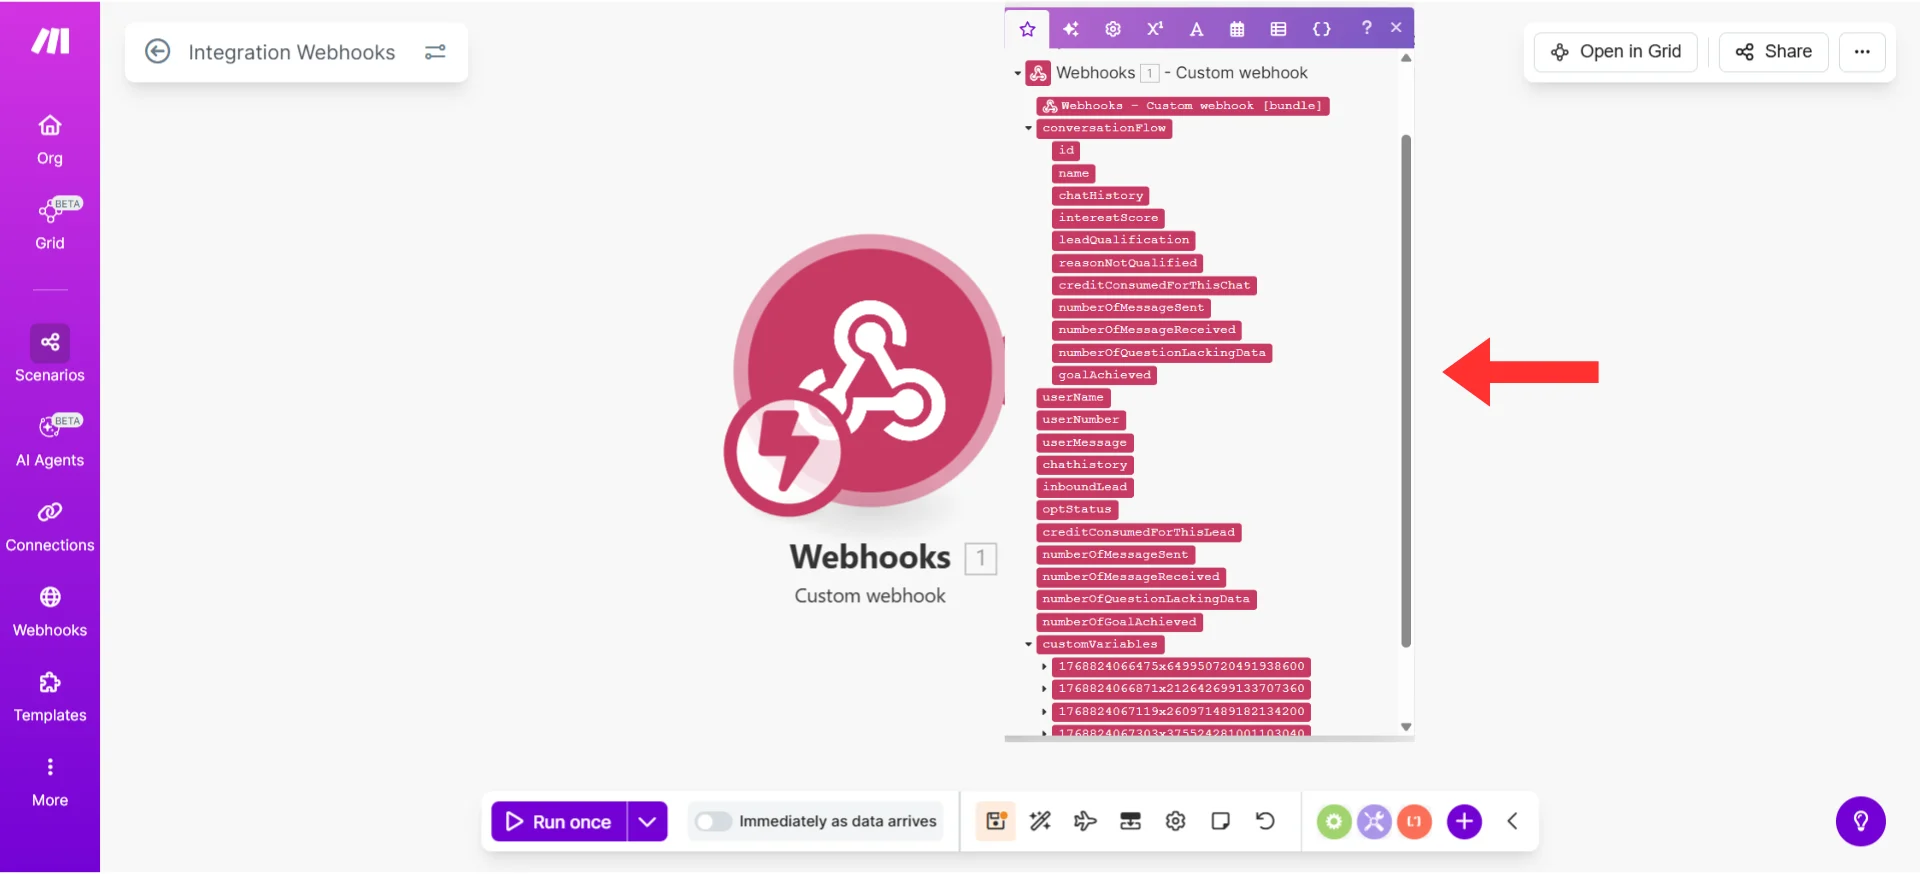
All available data fields from the Irelia webhook
userName— The prospect’s nameuserNumber— Their phone numberinboundLead— Did they message first (true) or did you (false)?
conversationFlow section):
id— Unique agent identifiername— Name of the conversation agentchatHistory— Complete conversation transcript with this agentleadQualification— Are they qualified by this agent? ("fit","not a fit", or"TBD")interestScore— How interested are they? (0.0 to 1.0, like 0% to 100%)reasonNotQualified— Why they didn’t qualify (if applicable)goalAchieved— Number of goals completed with this agentnumberOfMessageSent— Messages sent by this agentnumberOfMessageReceived— Messages received from prospectnumberOfQuestionLackingData— Questions the AI couldn’t answer from Knowledge BasecreditConsumedForThisChat— Credits used for this conversation
chatHistory— Complete chat history across all agentsoptStatus— Opt-in status (e.g.,"in","out")creditConsumedForThisLead— Total credits consumednumberOfMessageSent— Total messages sentnumberOfMessageReceived— Total messages receivednumberOfQuestionLackingData— Total questions lacking answersnumberOfGoalAchieved— Total goals achieved
customVariables— Specific information your agent collected (budget, company size, timeline, etc.)
name— What you asked about (“Budget”)value— Categorized answer (“$10k-50k”)valueRaw— Exact words they used (“We have around 30k to spend”)
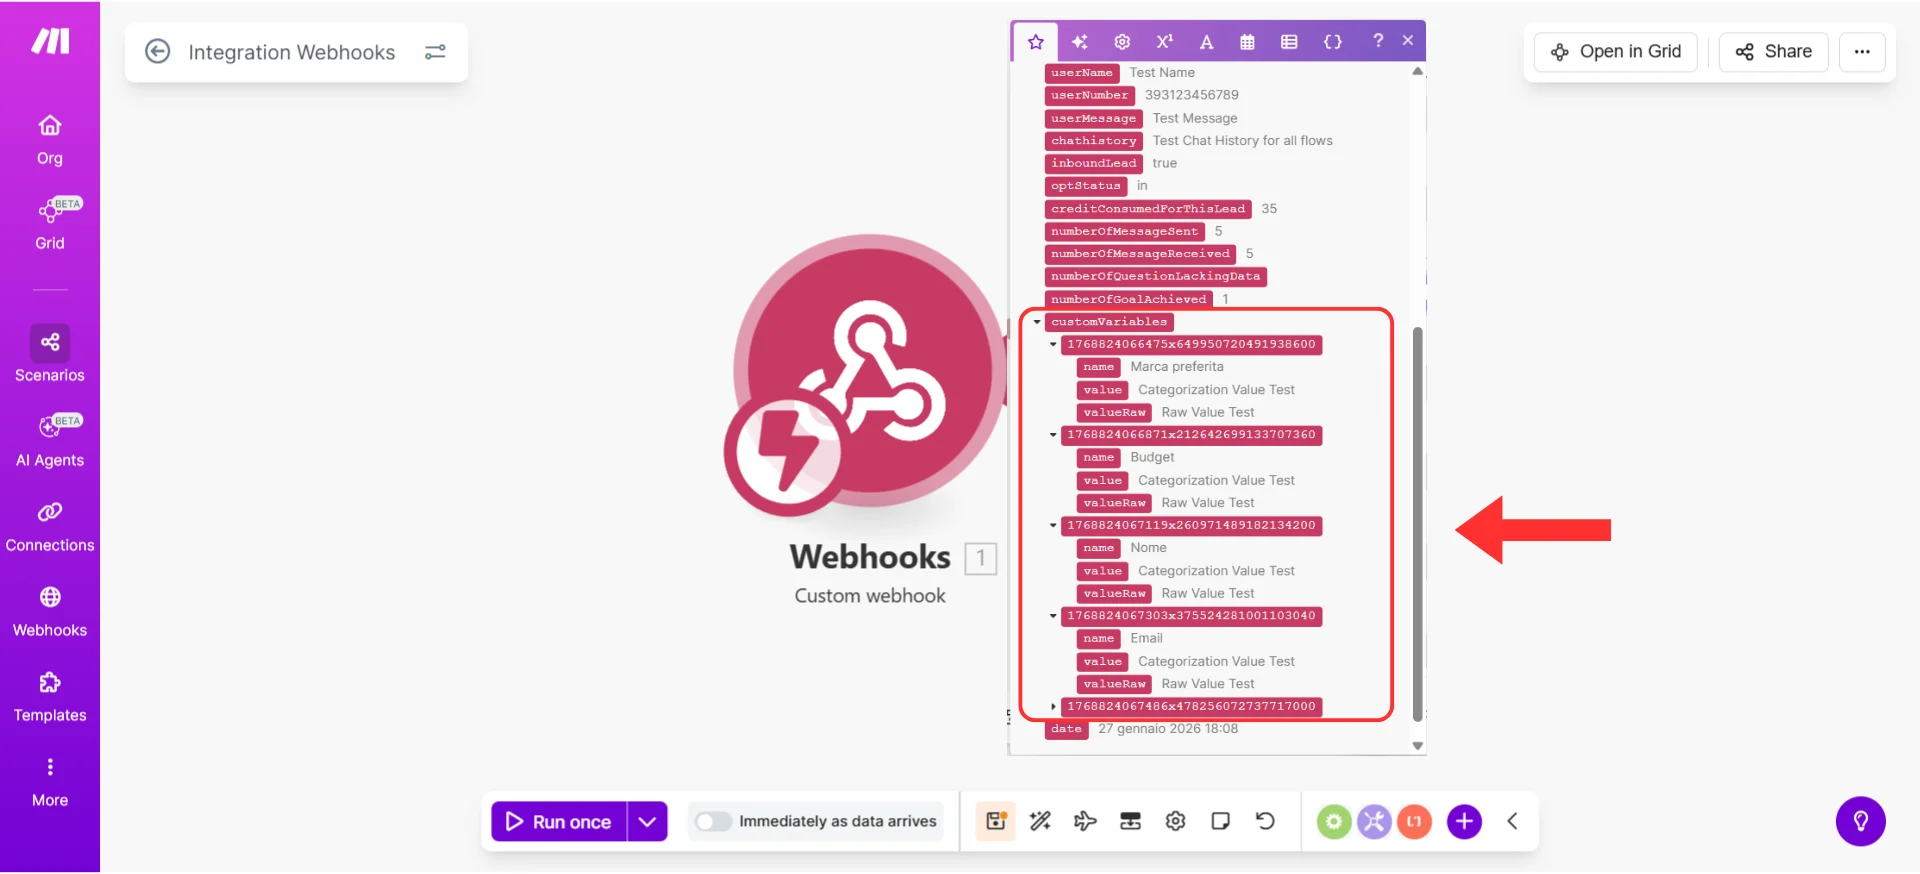
Expanded customVariables showing name, value, and valueRaw fields
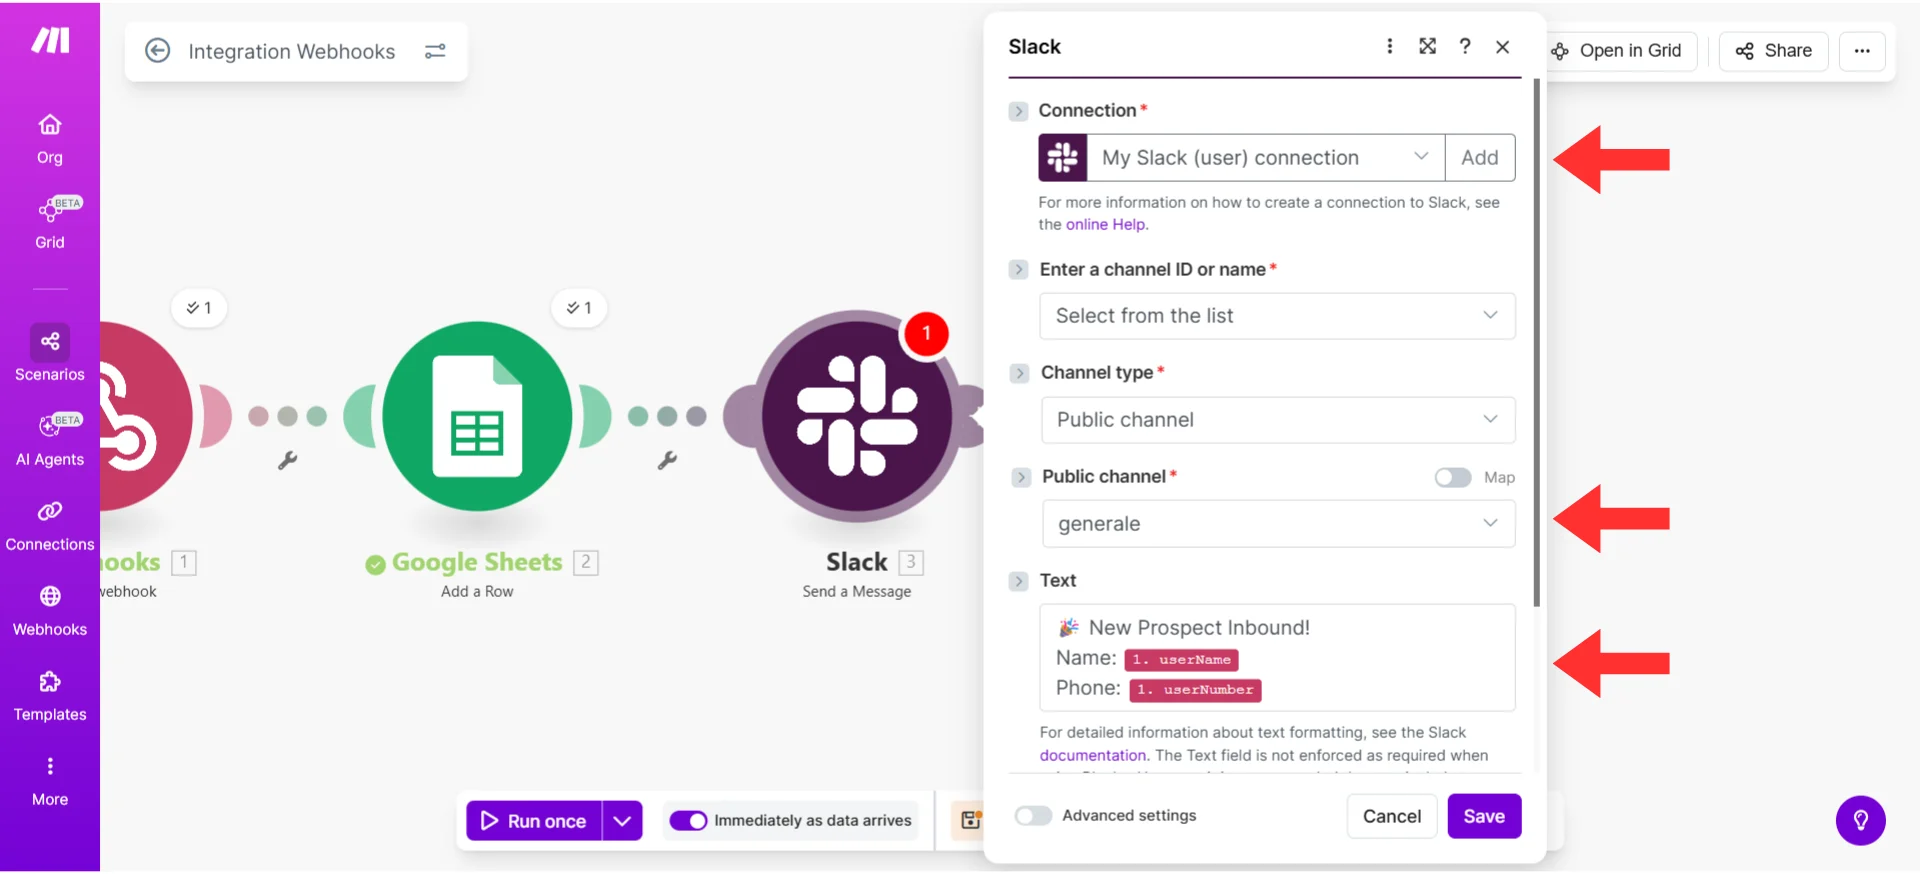
Step 4: Set Up Your Action
~5 minutes Now comes the fun part: deciding what should automatically happen when Irelia sends data to Make.com.Choose your first action
Ask yourself: “When someone first contacts my agent, what’s the ONE most valuable thing that should happen automatically?” Common answers:- ✅ Log it immediately → Google Sheets (simplest, great for testing)
- ✅ Alert my team → Slack (immediate visibility)
- ✅ Add to my CRM → HubSpot, Salesforce, Pipedrive (most business value)
- ✅ Start a sequence → Email marketing tool (begins nurture process)
- Google Sheets
- Slack
- CRM
- Hover over the right side of your webhook Module until you see a small + icon appear
- Click the + icon to add a new Module
Click the + icon on the right side of the webhook Module
- In the search box, type
Google Sheets - Select “Google Sheets” from the results
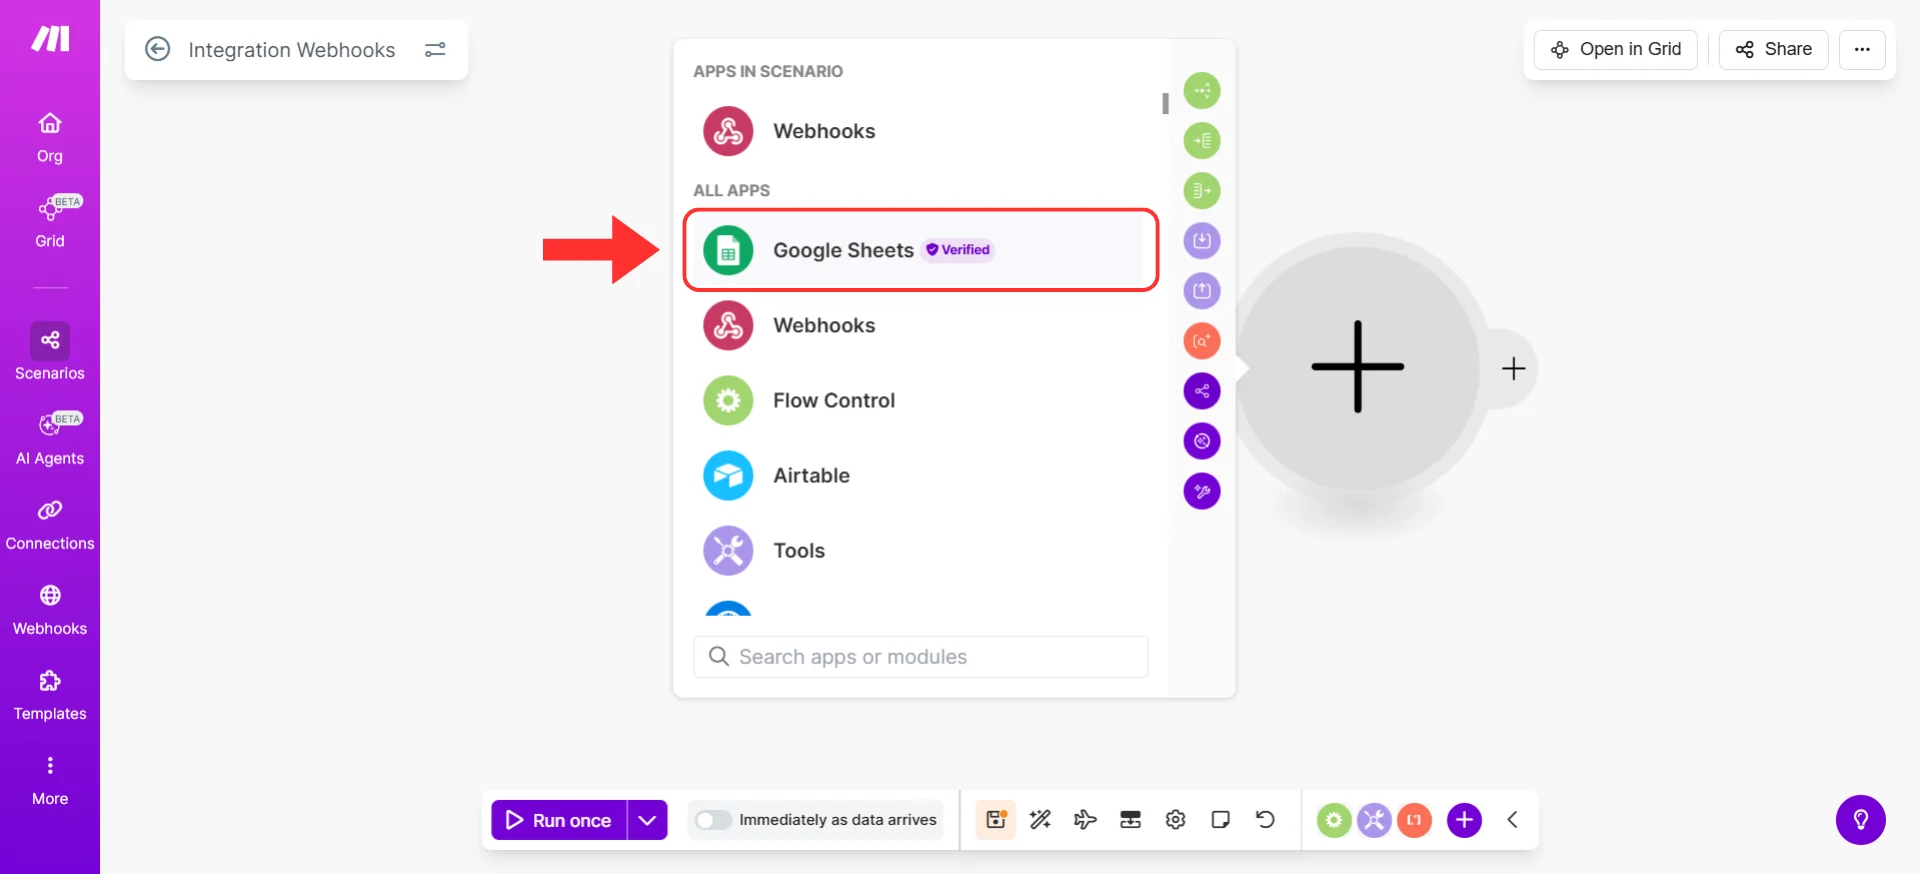
Select Google Sheets from the app list
- From the list of actions, select “Add a Row”

Select 'Add a Row' to log lead data in your spreadsheet
- Click “Add” to connect your Google account (or select an existing connection)
- Follow the prompts to sign in and grant Make.com access to your Google Sheets
- Select your “Spreadsheet” from the dropdown (or create a new one first in Google Sheets)
- Select your “Sheet” (usually “Sheet1”)

Select your target spreadsheet and sheet tab
- Map your fields — this is where you tell Make.com which Irelia data goes into which spreadsheet column
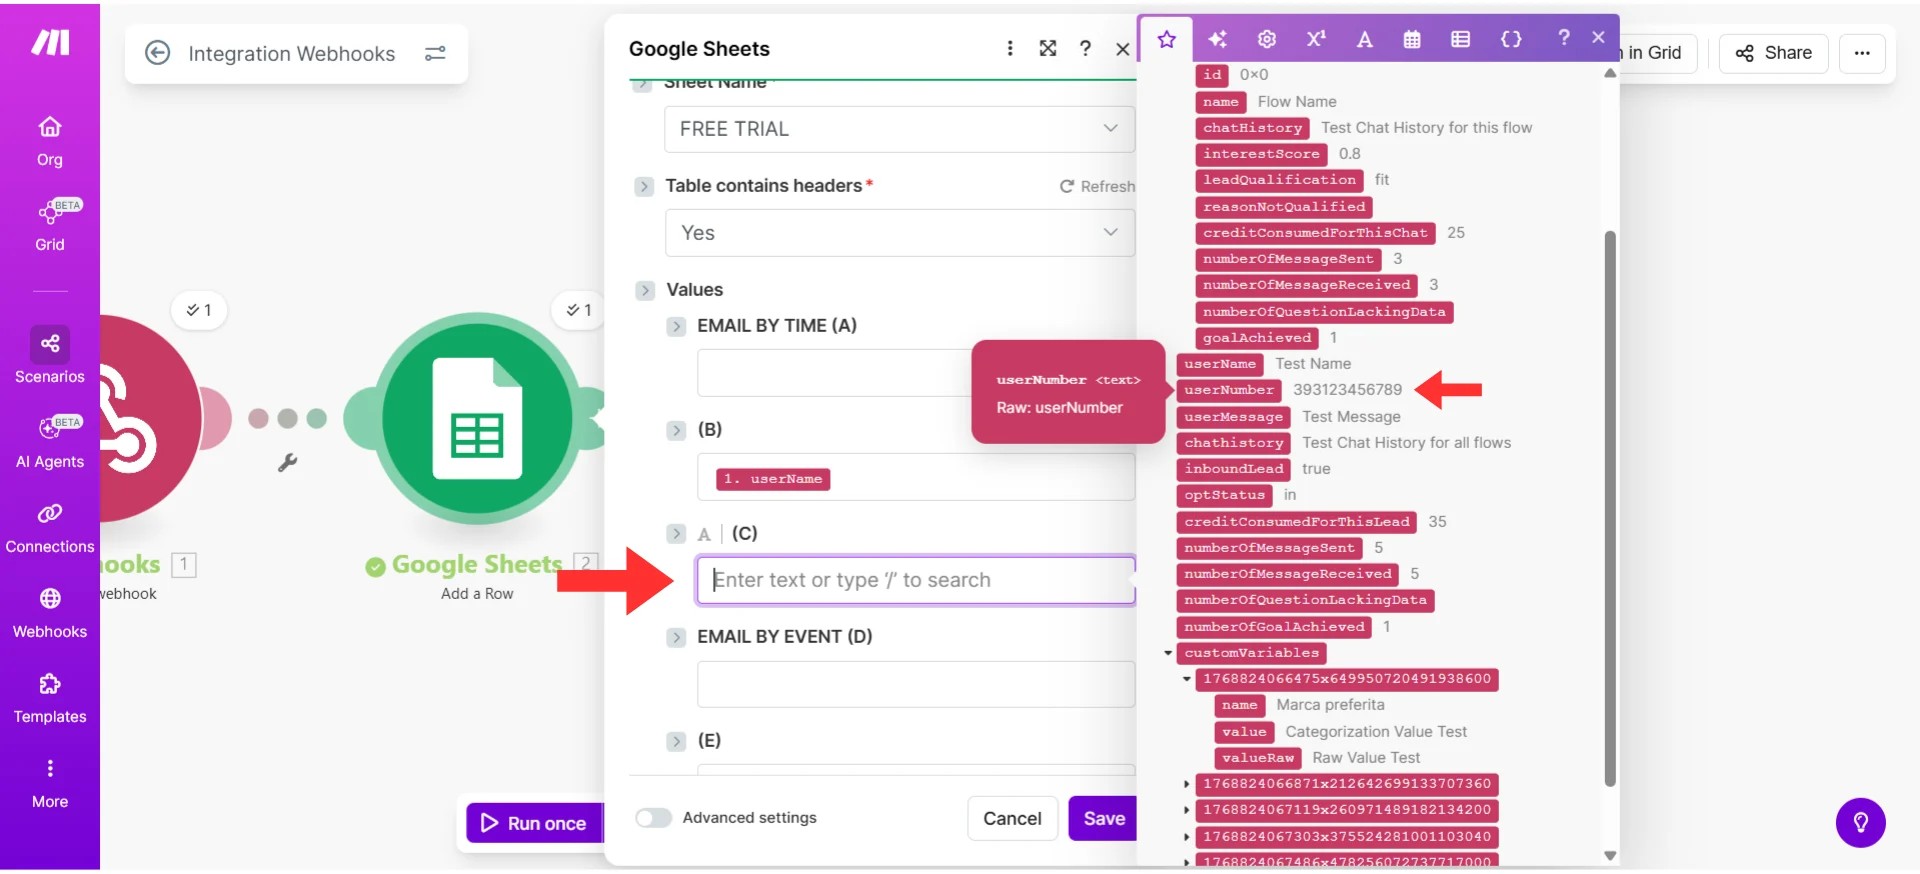
Map Irelia data fields to your spreadsheet columns
- Click “OK” to save the Module configuration
Step 5: Test Your Complete Automation
~3 minutes Let’s test the entire workflow end-to-end to make sure everything works together.Run your test
- At the bottom left of the canvas, click the “Run once” button
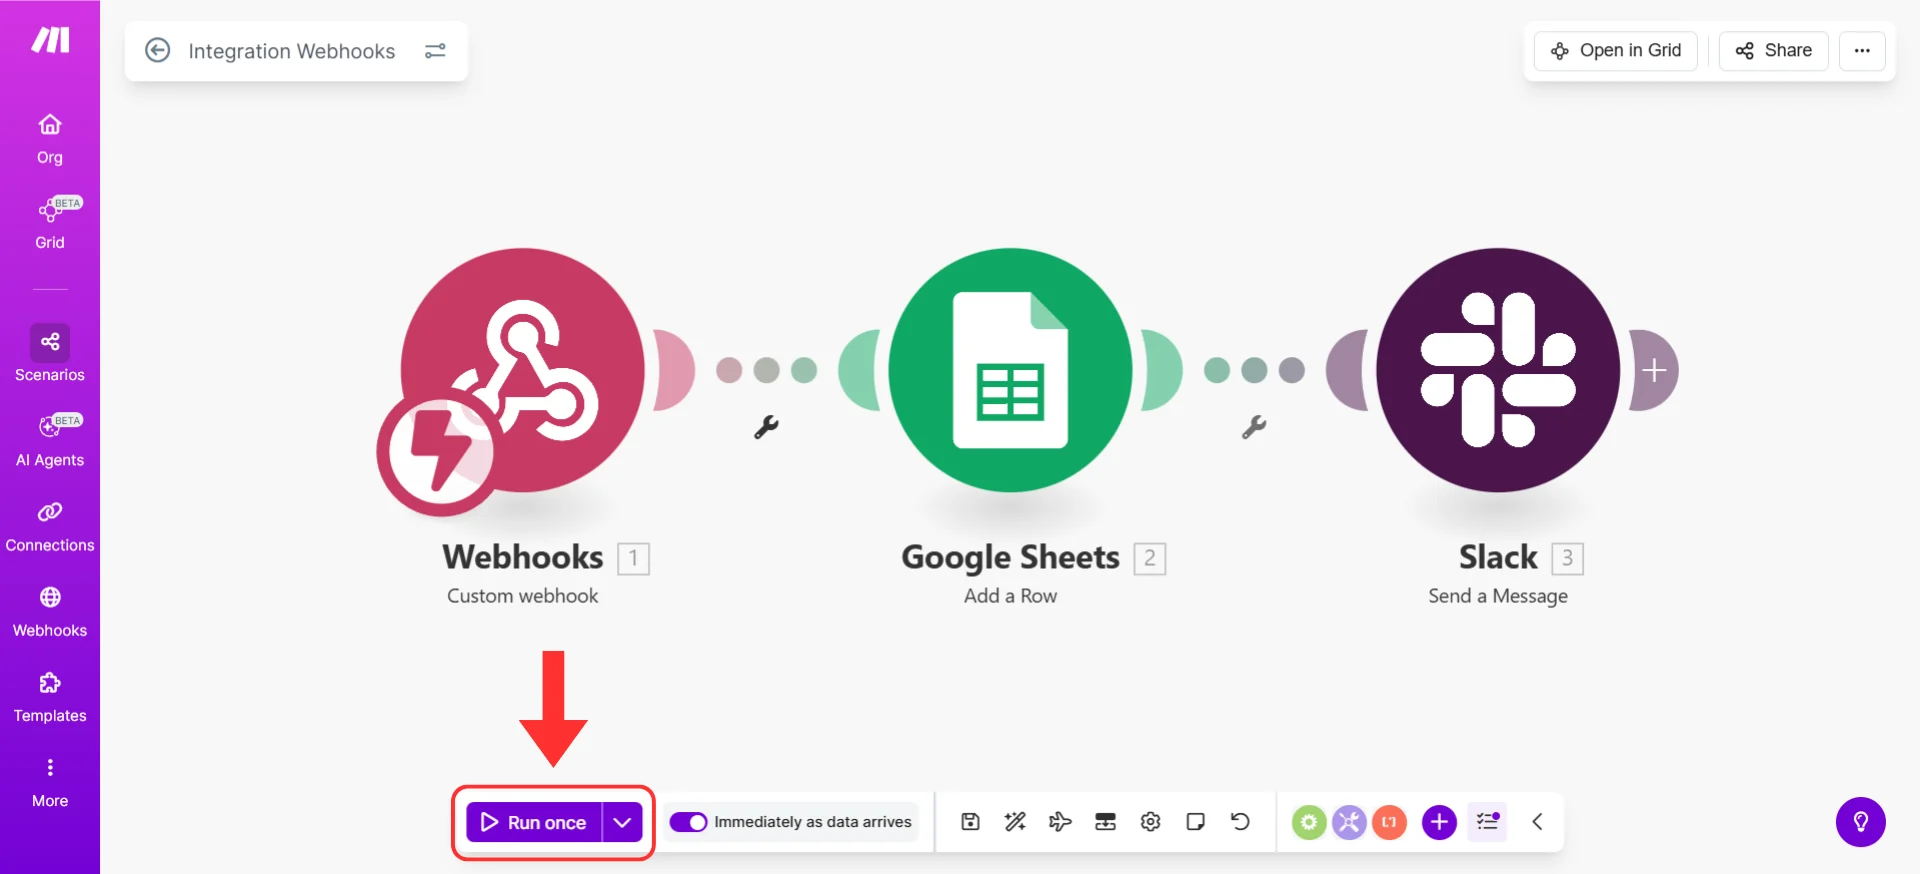
Click 'Run once' to execute the Scenario manually
- Make.com will start listening. You’ll see “Waiting for data…” on your webhook Module
- Go back to Irelia and click the “Test” button again to send fresh data
- Return to Make.com — you should see the data flow through both Modules
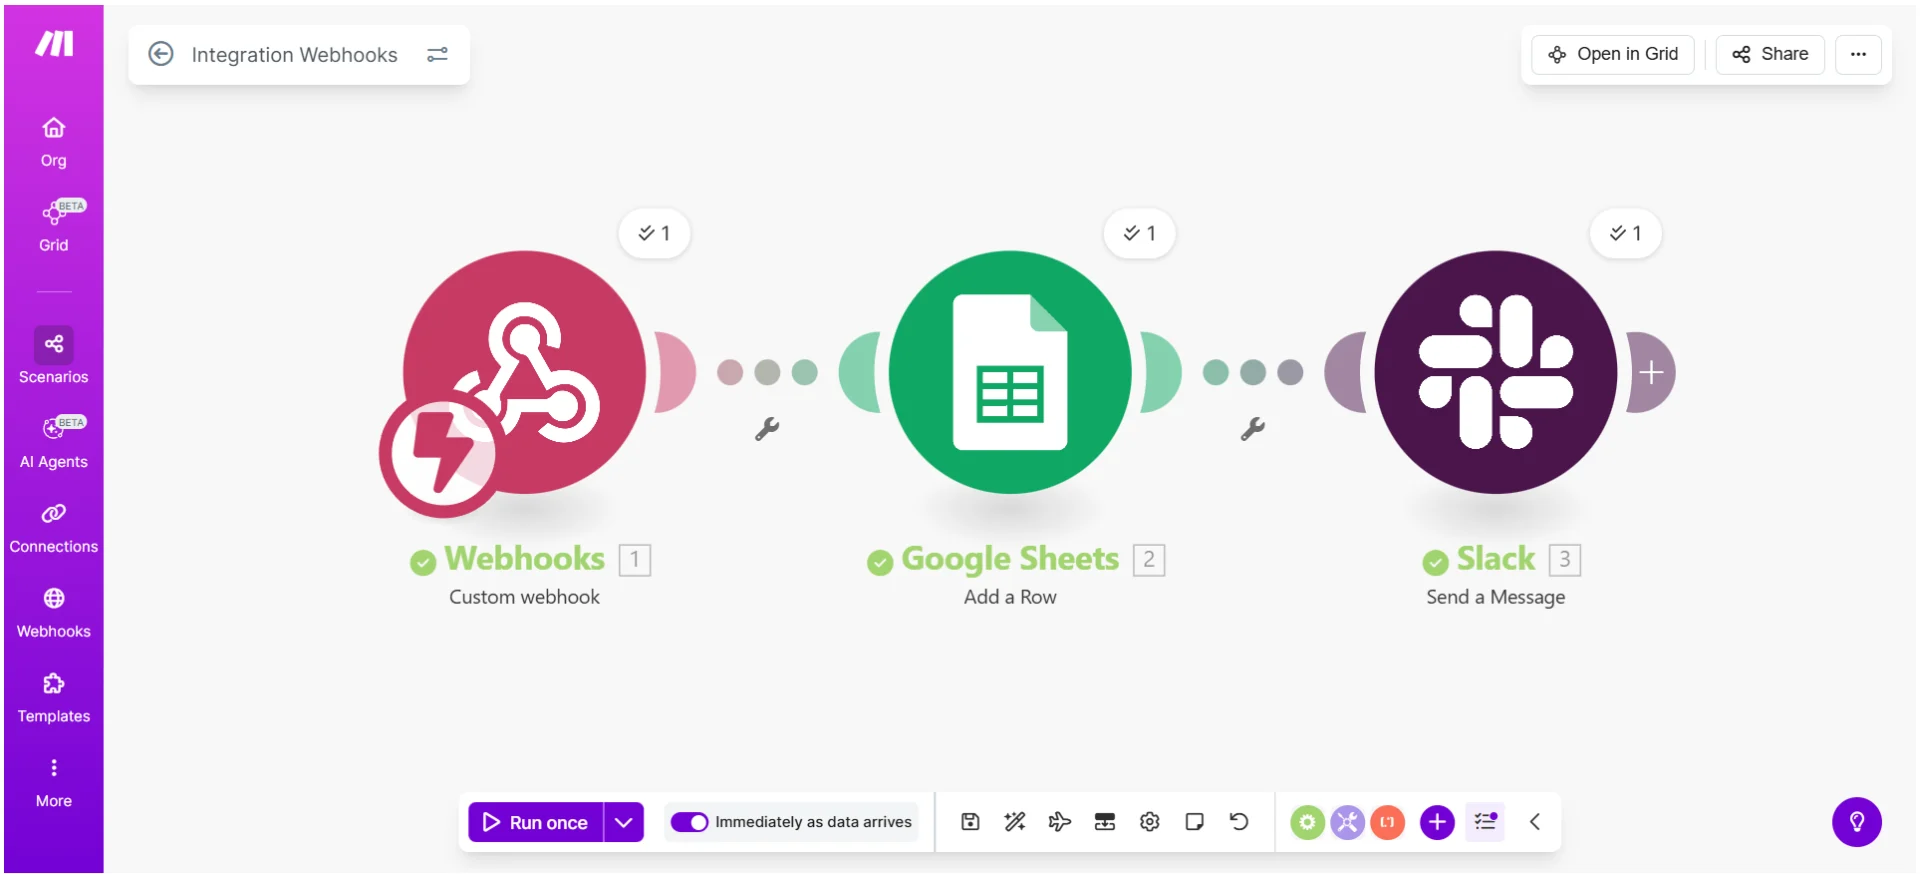
Green checkmarks on both Modules confirm successful processing
- Each Module will show a number (like “1”) indicating how many items were processed
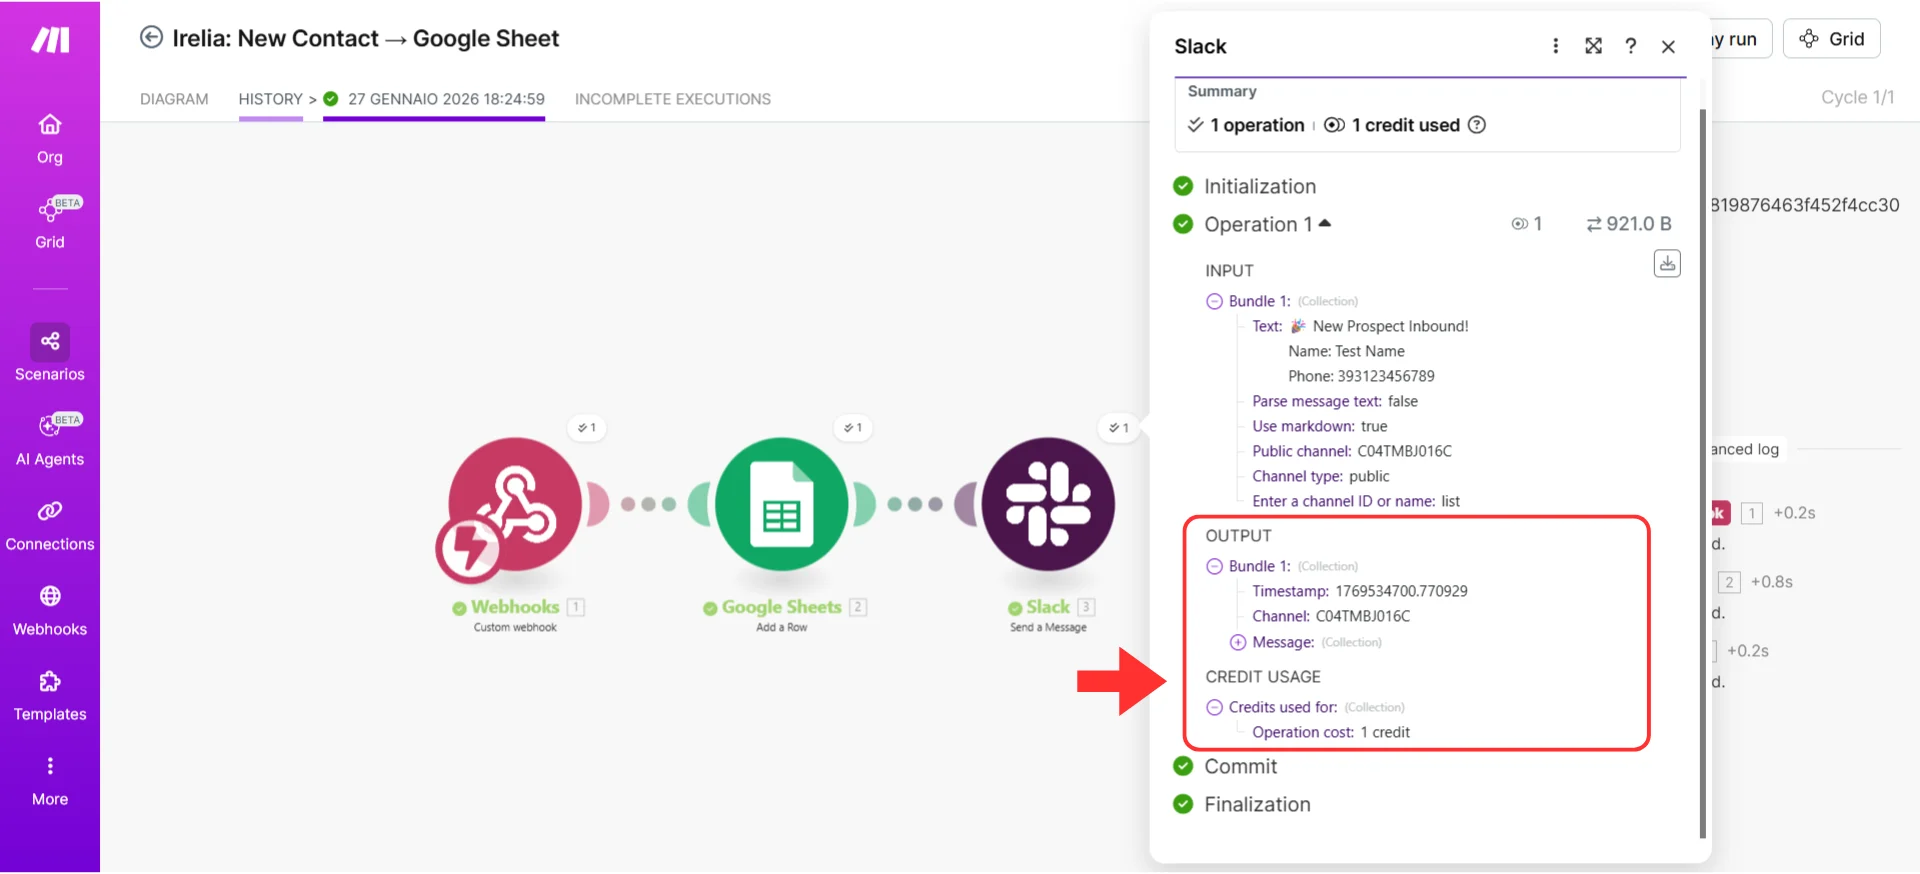
- Click on any Module to see the details of what was processed
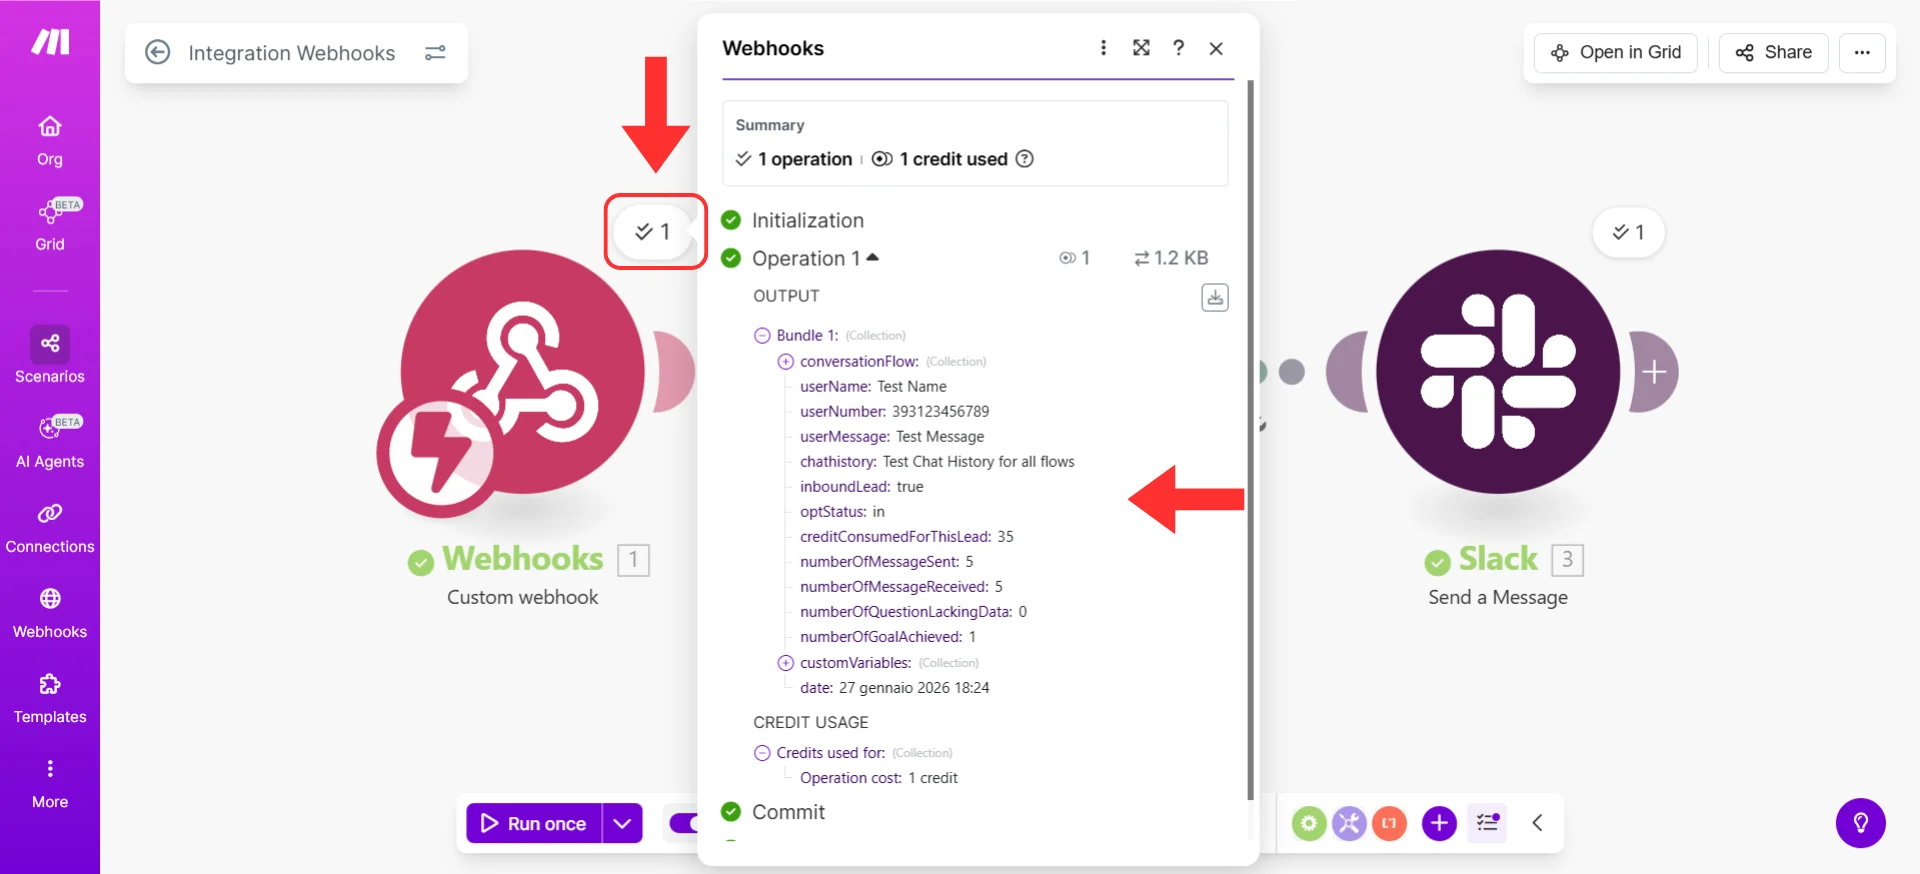
Expanded execution details showing the processed Irelia data
Verify it worked
Now check your destination to confirm:- Google Sheets
- Slack
- CRM
- Open your spreadsheet
- Look for a new row at the bottom with the test data
- You should see the prospect’s name, phone number, status, etc.
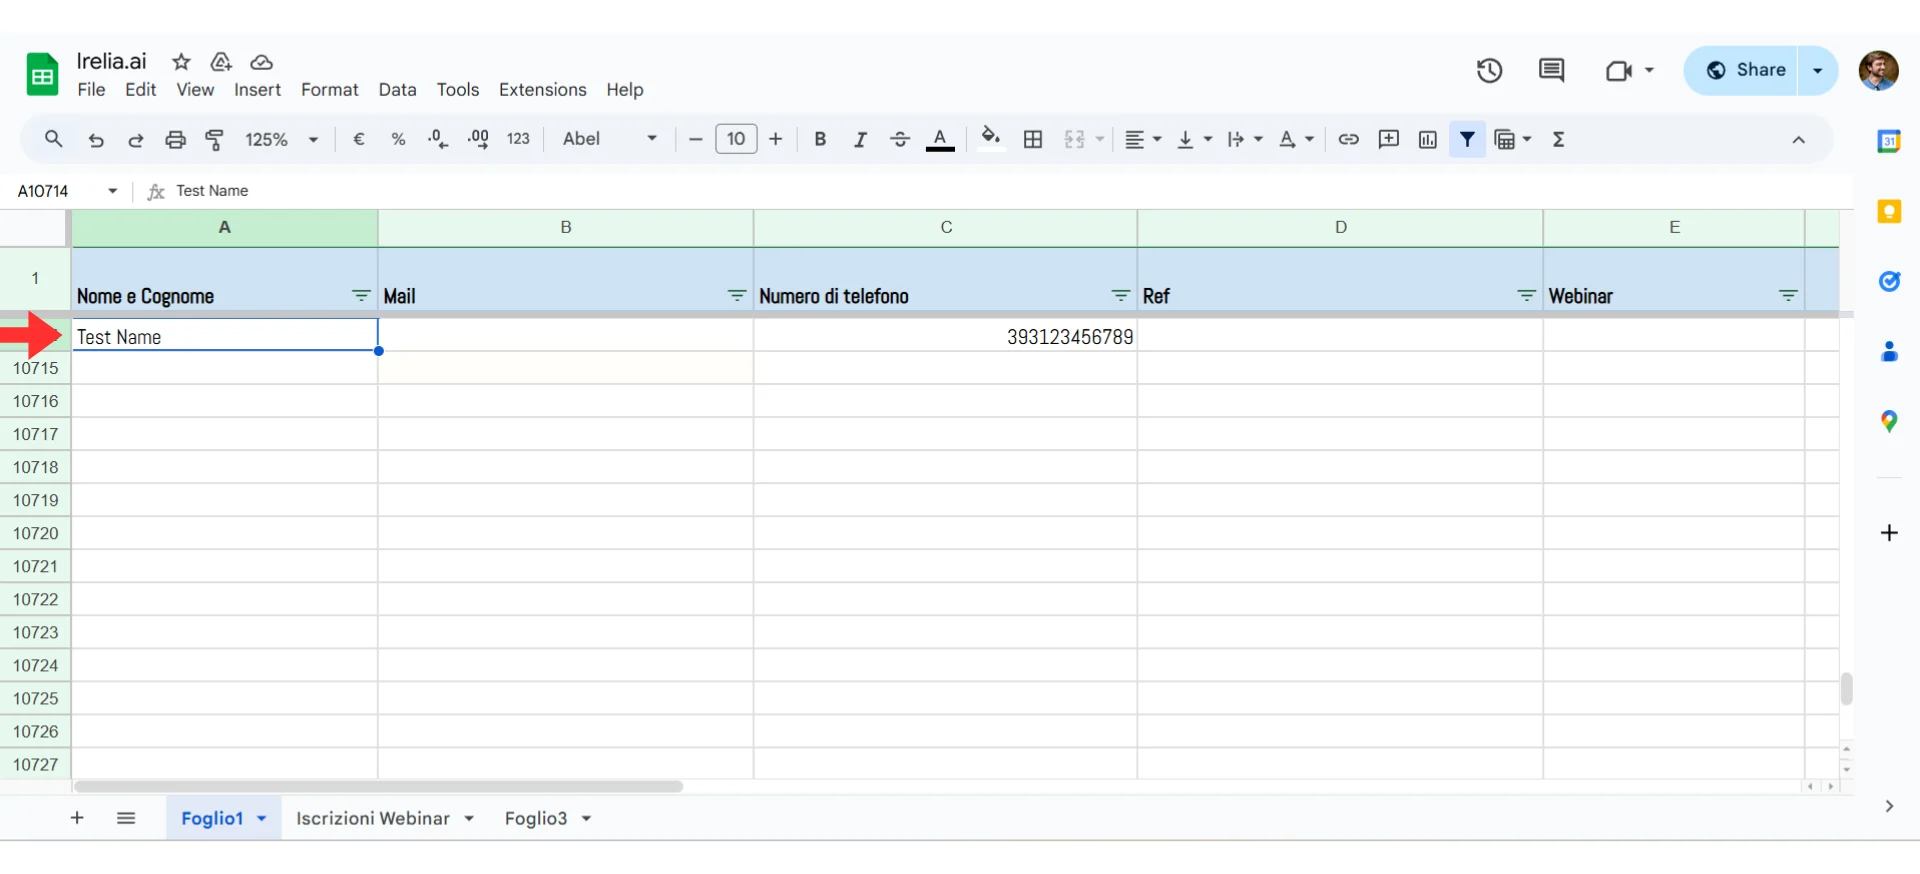
New row with test lead data added automatically
Step 6: Activate and Name Your Scenario
~1 minuteActivate your Scenario
- At the bottom left of your Scenario editor, find the toggle switch (it currently says “OFF”)
- Click the toggle to turn your Scenario ON
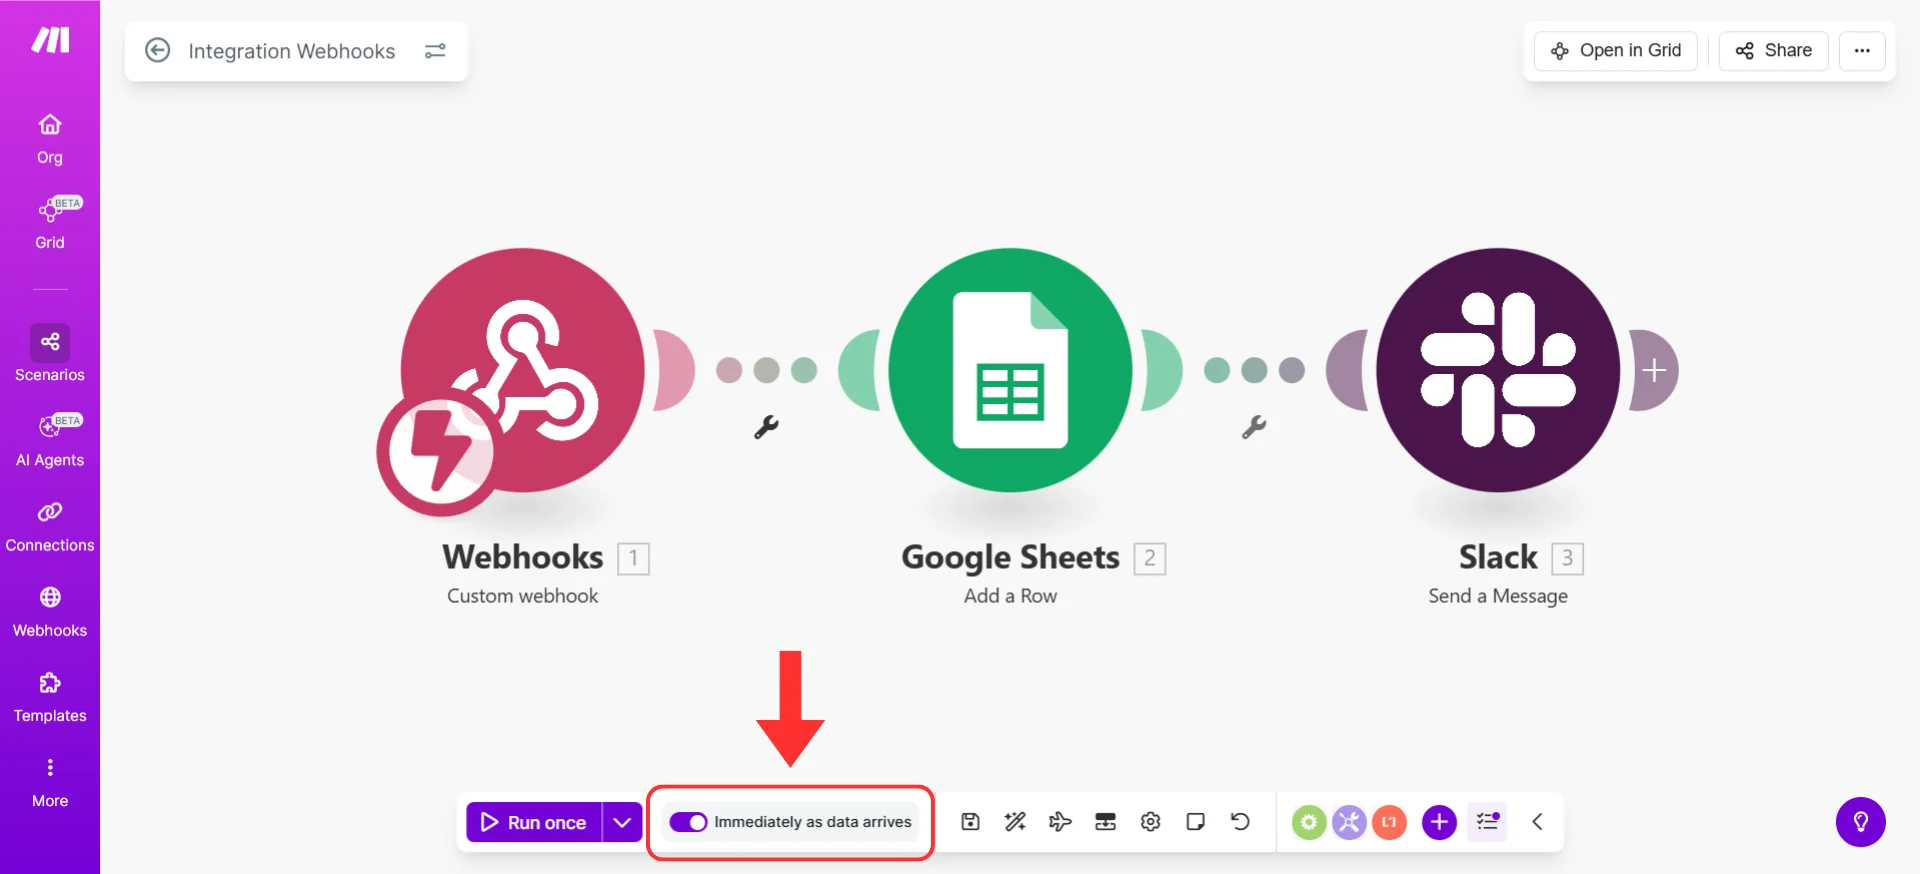
Toggle the Scenario from OFF to ON to activate it
- The toggle will turn blue/purple and display “ON”
Give your Scenario a name
- Click on the Scenario name at the top left (it probably says “New scenario” or similar)
- Rename it to something descriptive like: “Irelia: New Contact → Google Sheet”
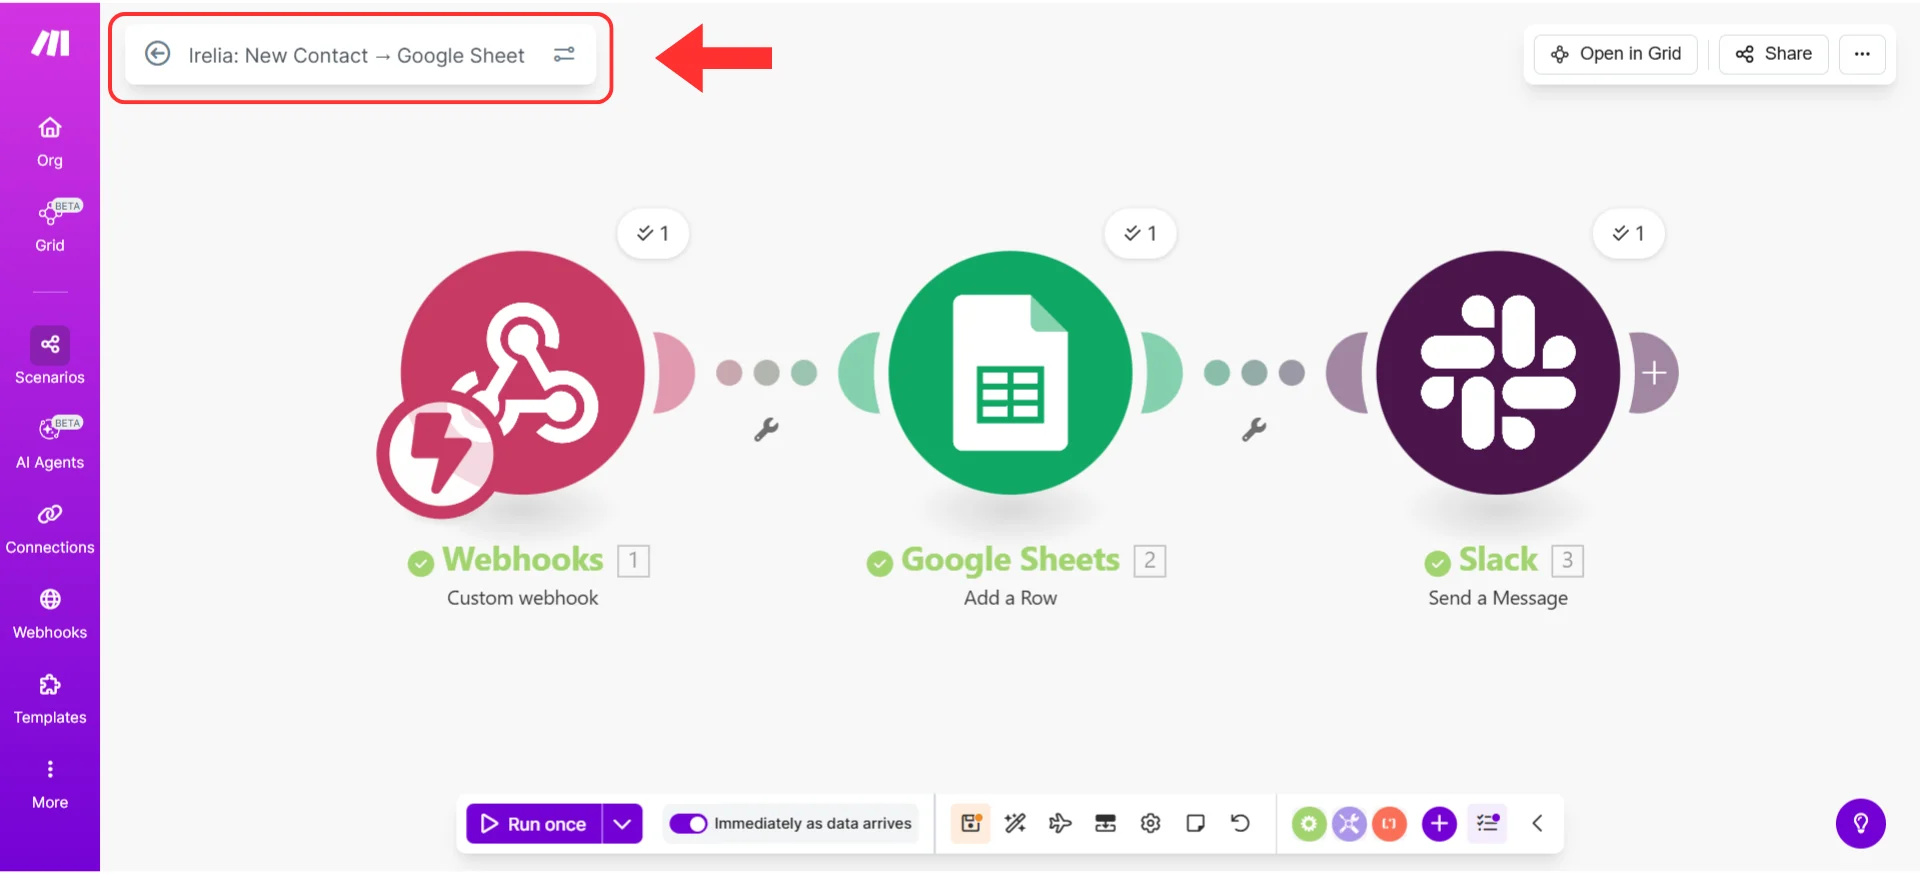
Rename your Scenario for easy identification
- Click the “Save” button (floppy disk icon) at the bottom of the screen to save your changes
Click the save icon to persist your Scenario configuration
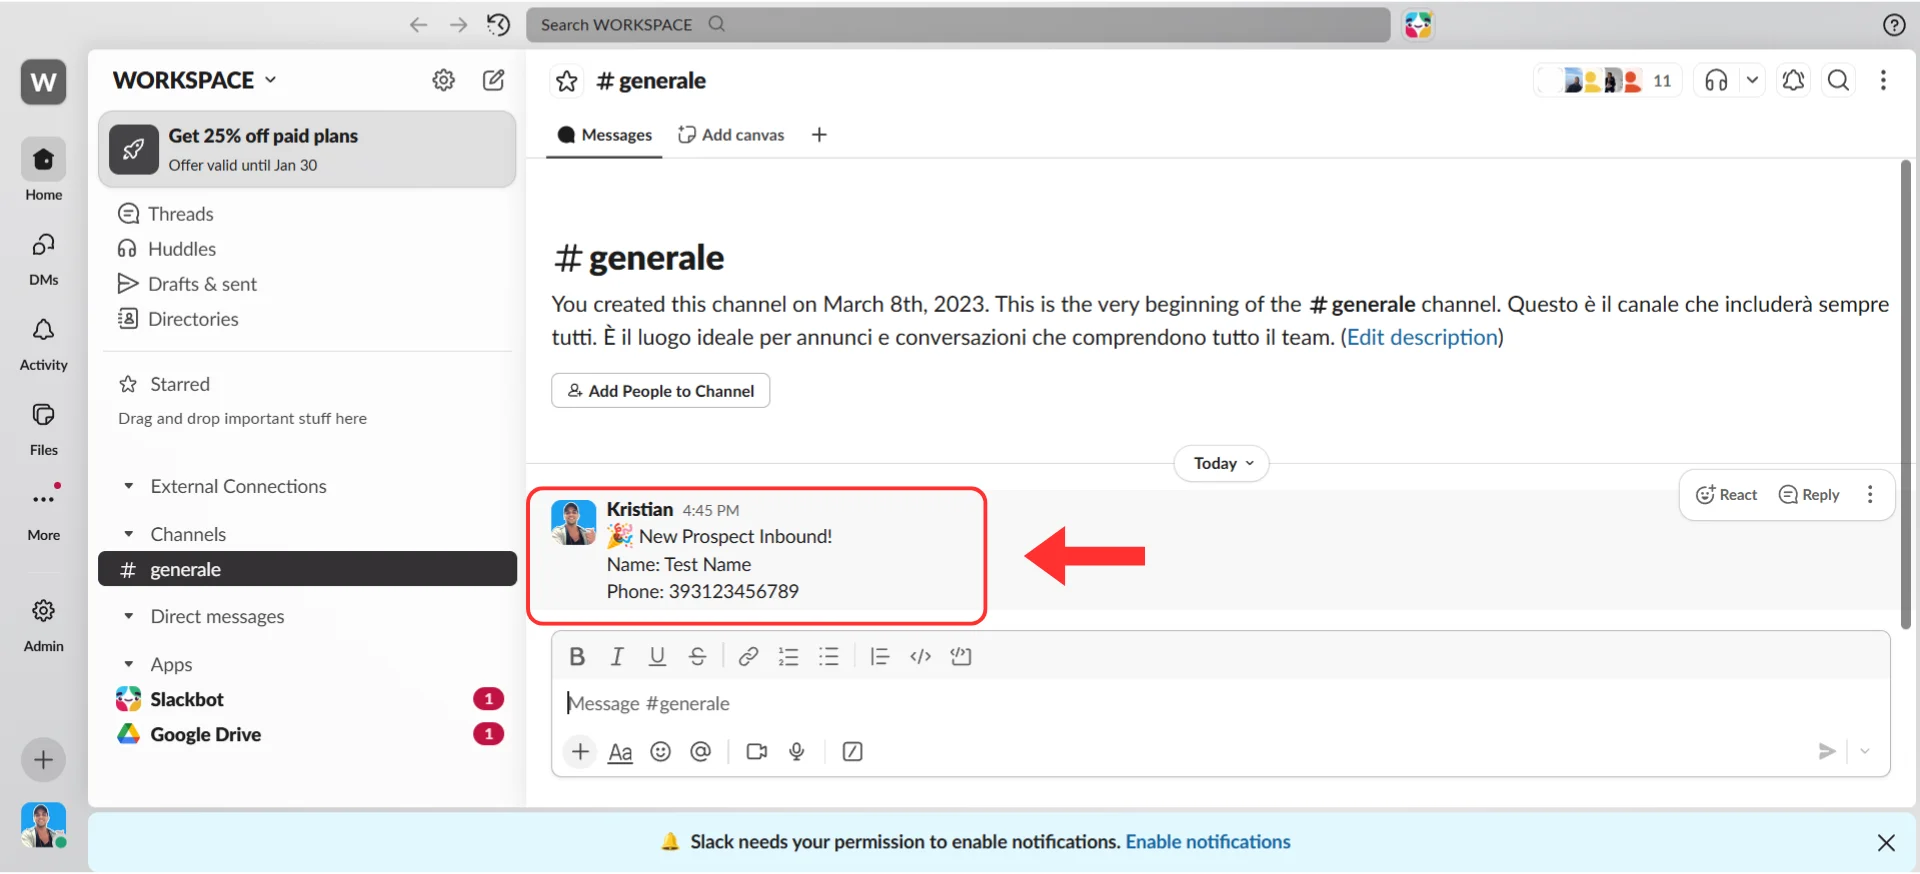
🎉 Congratulations! You Did It!
Take a moment to appreciate what you just built: ✅ Your AI agent now talks to your other tools automatically✅ Important moments trigger instant actions
✅ No more manual data entry or checking dashboards — your systems are always up-to-date
✅ Your leads get faster, better follow-up What happens now: Every time someone reaches out to your Irelia agent for the first time → Irelia automatically sends their information to Make.com → Make.com immediately performs your action → All without you lifting a finger.
What’s Next?
Now that you have one working automation, the possibilities are endless. If you want to connect to more events like “Data Gathered”, “Lead Qualified”, or “Goal Achieved”, simply repeat the steps and customize the actions (Step 4) to achieve your desired result. Your options from here:- 🎯 Want to track another event? Create a new Scenario and repeat this guide — just select a different event in Step 2
- ➕ Want this Scenario to do more things? Edit your Scenario and click the + button after your last Module to add more actions
- 🤖 Have another agent to connect? Repeat this guide for your other agents — each can have its own automations
- ⚡ Ready for advanced workflows? Check out the Advanced Automations section below
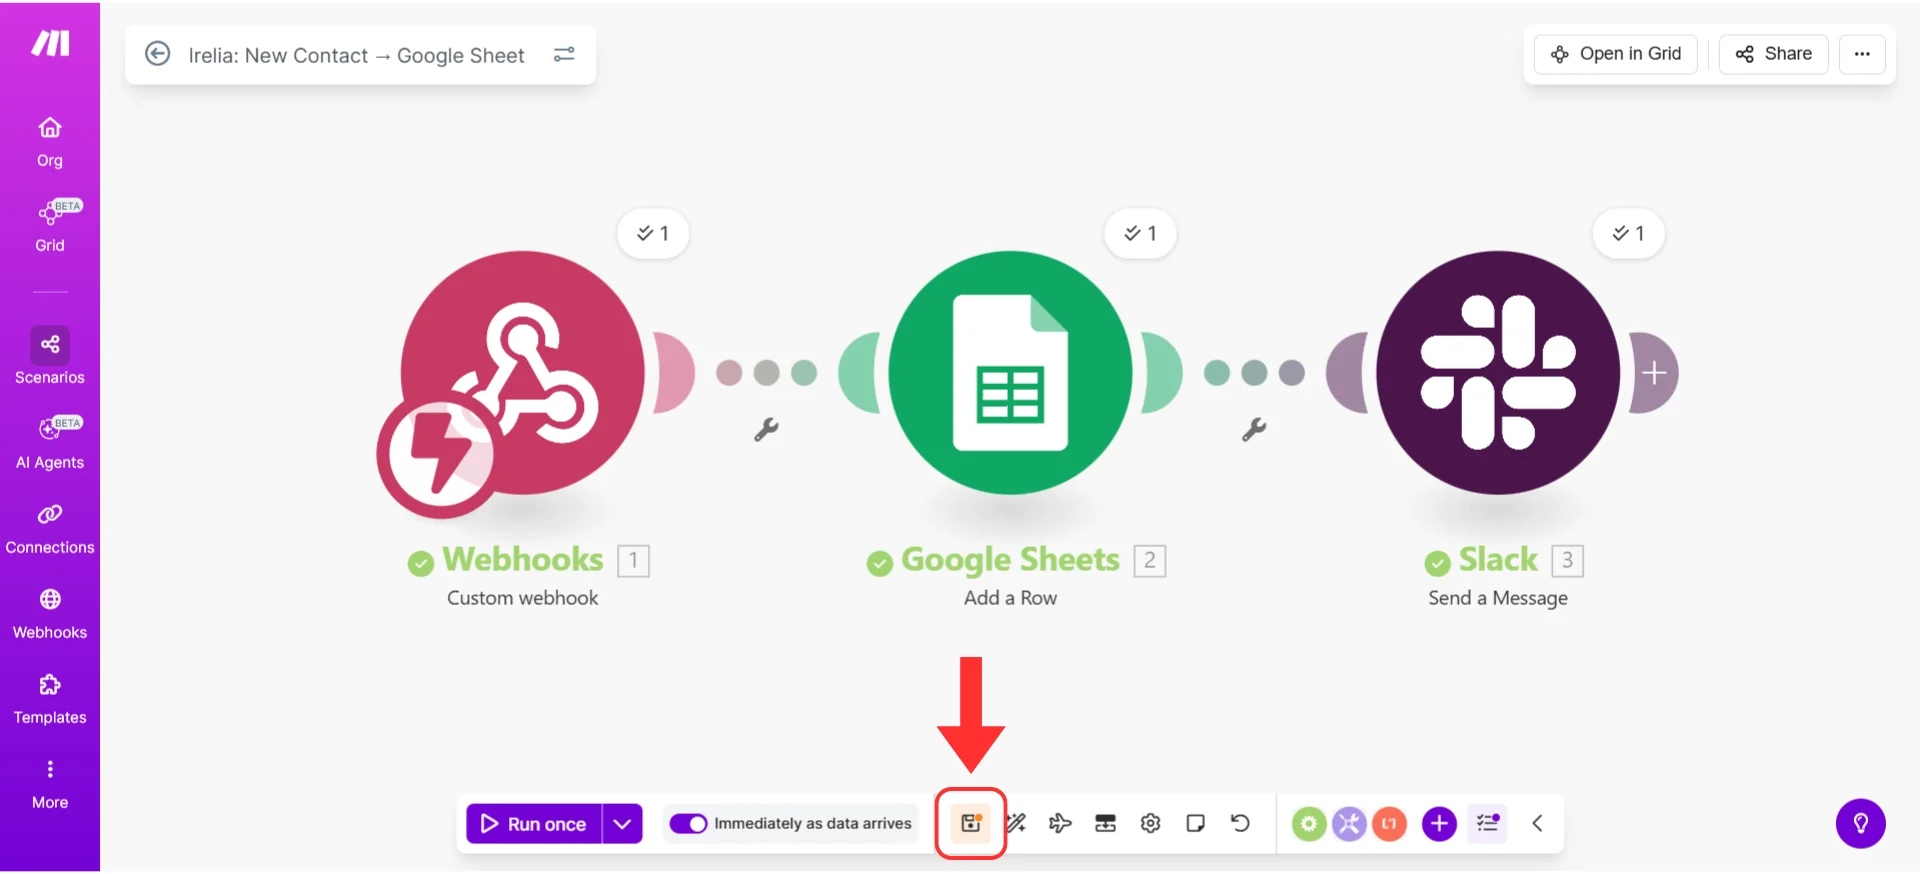
Monitoring Your Automation
Check your Scenario history
- Open your Scenario
- Click on the “History” tab at the top of the editor
- Here you can see every time your Scenario runs:
- ✅ Success (green indicators)
- ❌ Error (red indicators with details)
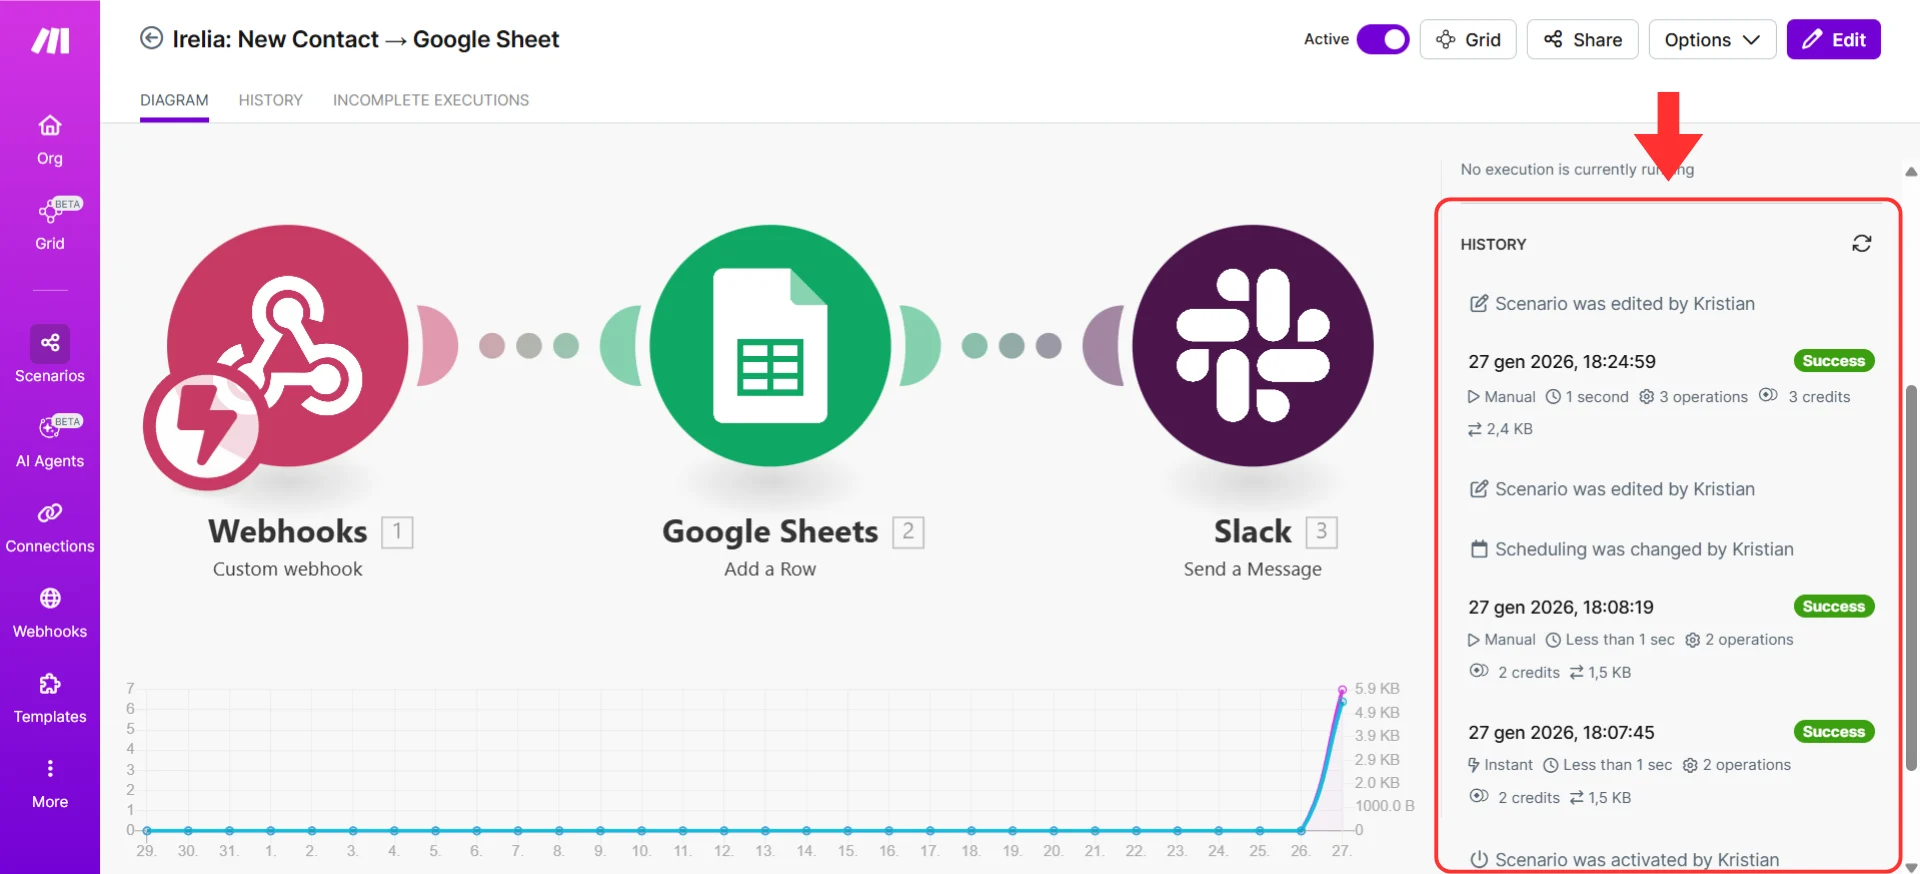
Scenario History showing successful runs with green indicators
- Click on any execution to see detailed information about what happened
What to monitor
First few days: Check daily to ensure Scenarios run successfully and data looks correct. Ongoing: Make.com can send you email notifications when Scenarios error out, so you don’t need to check constantly. Just verify things are working during the first few days.🚀 Advanced Automations
Search and Update Existing Records
Sometimes you don’t want to create a new record — you want to update an existing one. For example, when a lead you already added gets qualified, or when new data is gathered for someone already in your system. This requires a two-step approach: search first, then update. Example: Update an existing lead’s row when they get qualified Trigger: Lead Qualified (webhook) Modules:-
Search for the existing row
- Add Module: “Google Sheets” → “Search Rows”
- Set “Search Column” to “Phone”
- Set “Search Value” to
userNumberfrom Irelia - This finds the row matching the prospect’s phone number
-
Update that row with new data
- Add Module: “Google Sheets” → “Update a Row”
- Set “Row Number” to the row number returned from the search
- Map the fields you want to update (lead status, interest score, etc.)
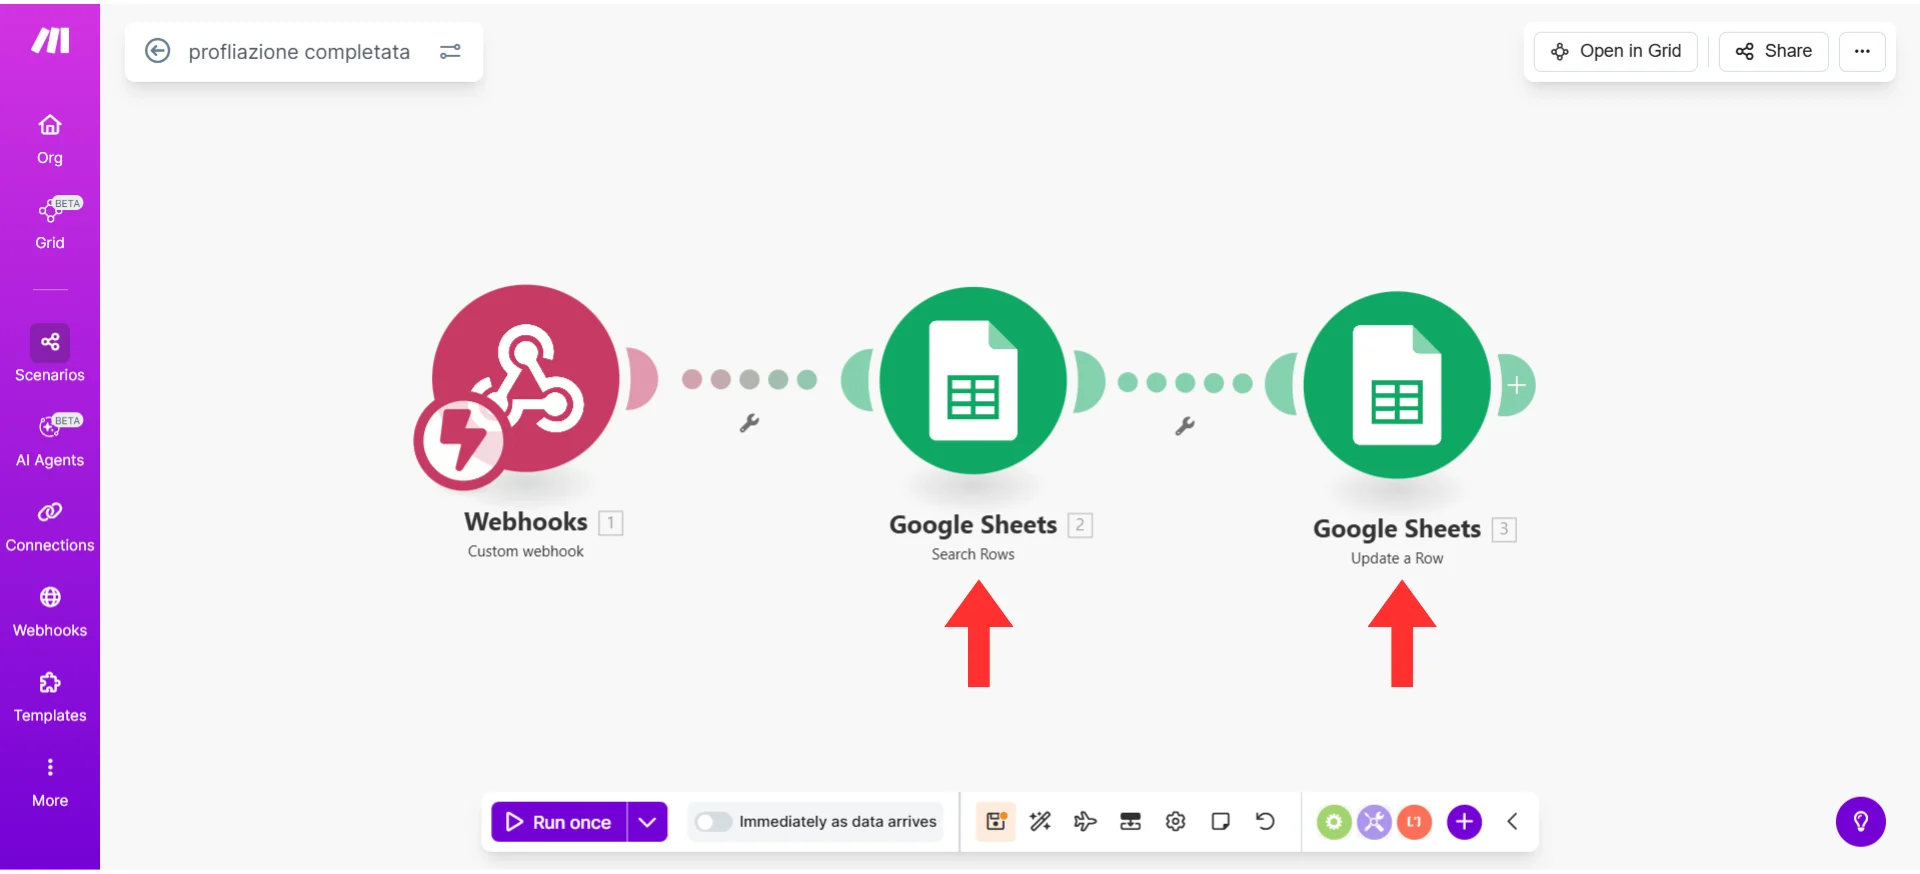
Three-Module setup: Webhook → Search Rows → Update a Row
Using Filters to Control When Actions Run
Filters let you add conditions so your action doesn’t run for EVERY event. Example: Only add to CRM if the prospect’s budget is “$10k-50k” or higher- Right-click on the connection line between your webhook and action Modules
- Select “Set up a filter”
- Set your condition:
- Label: “Budget Filter”
- Condition:
customVariables[].value→ “Text operators: Contains” →$10k
- Click “OK”
- Only leads meeting this criteria will continue to your action
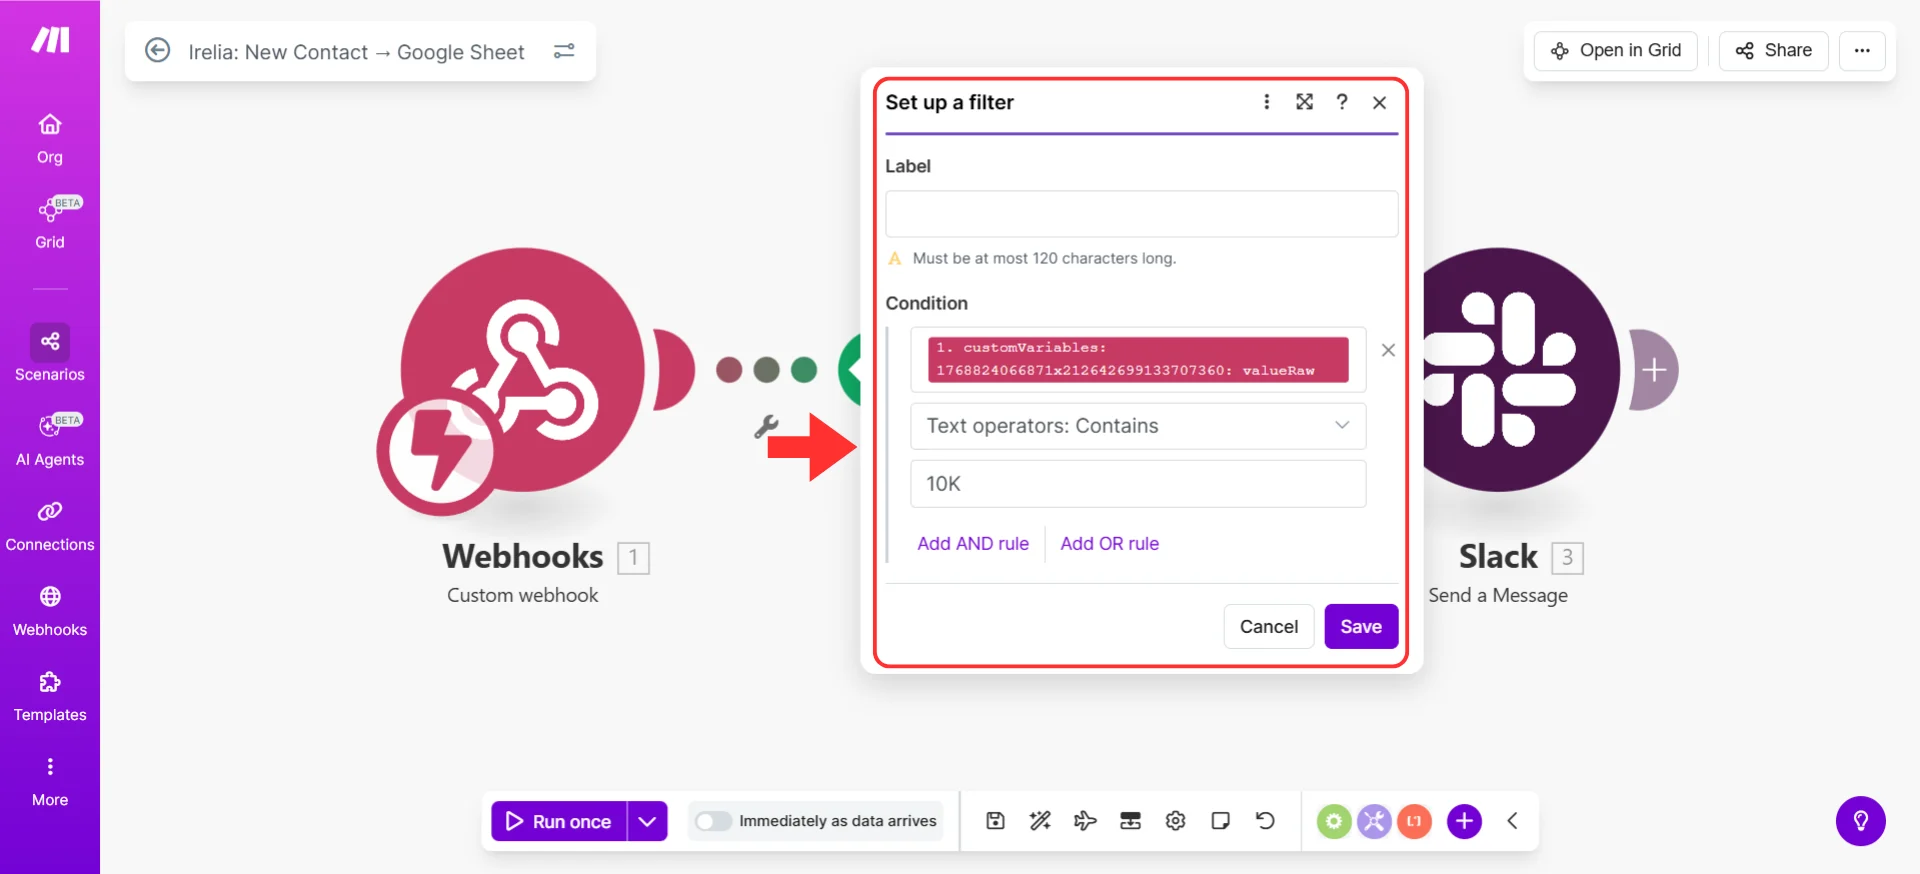
Filter configuration on the customVariables value field
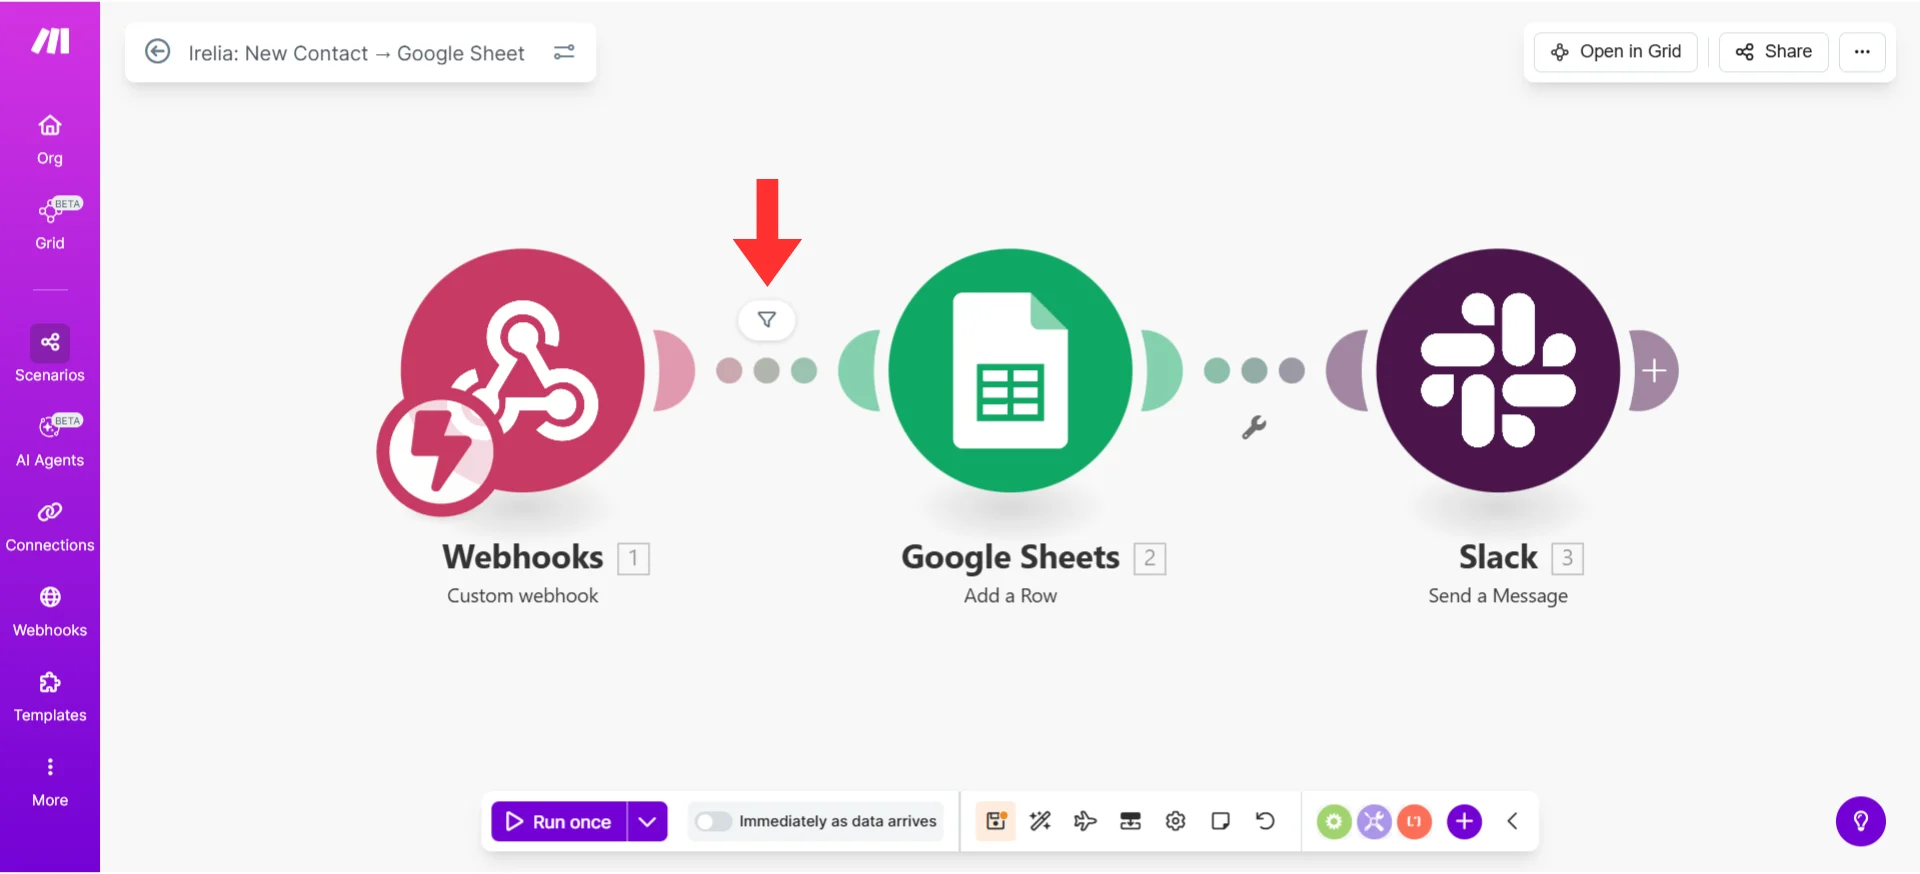
Funnel icon on the connection line indicates an active filter
- Only add to CRM if budget matches your target →
customVariables[].valueequals$10k-50k - Only notify team if company size is “Enterprise” →
customVariables[].valuecontainsEnterprise - Only send to sales if lead is qualified →
leadQualificationequalsfit
Multi-Step Scenarios
Why do one thing when you can do several? Example: When a lead is qualified:- Add to HubSpot CRM
- Send Slack notification to sales team
- Add to “Hot Leads” Google Sheet
- Send welcome email
- After your first action Module, hover over its right edge and click the + icon
- Select your second app and action
- Configure the Module
- Repeat for additional actions
Using Routers for Conditional Logic
Routers let you create branching logic based on data — similar to “Paths” in other automation tools. Example: Route leads based on qualification status- If
leadQualificationequals"fit"→ Route 1: Add to HubSpot + Notify sales - Else If
leadQualificationequals"not a fit"→ Route 2: Add to nurture campaign - Else (
"TBD") → Route 3: Add to “Needs Review” spreadsheet
- After your webhook Module, click the + icon
- Search for and select “Router” (under Flow Control or Tools)
- The Router will show multiple output paths
- Click + on each path to add Modules
- Set up filters on each path’s connection to control which data flows where
Router Module with three output paths for conditional lead routing
Using Built-in Tools for Data Transformation
Make.com has built-in functions that let you transform data before sending it:- 🔢 Format phone numbers consistently (add country code)
- ✂️ Split
userNameinto first name and last name using text functions - 📊 Convert
interestScorefrom decimal (0.85) to percentage (85%) using math functions - 📅 Change date formats to match your CRM using date functions
The function picker panel for transforming data before sending
Real-World Use Case Examples
Use Case 1: Qualified lead fast track
Trigger: Lead Qualified Modules:- Create contact in HubSpot with “Hot Lead” status
- Send Slack notification to sales team
- Add to “Qualified Leads” Google Sheet
- Send welcome email via Gmail
Use Case 2: Disqualified lead nurture
Trigger: Lead Disqualified Modules:- Add to Mailchimp nurture campaign
- Log in “Nurture Pipeline” spreadsheet
- Create task in Asana to follow up in 3 months
Use Case 3: Knowledge gap tracking
Trigger: Question Lacking Answer Modules:- Send Slack notification to content team so they can reply manually through the Irelia dashboard
- Log in “Knowledge Base Gaps” spreadsheet
Use Case 4: Goal achievement flow
Trigger: Goal Achieved Modules:- Send confirmation email with next steps
- Update CRM with goal completion
- Notify account manager in Slack
Use Case 5: Rich data capture
Trigger: Data Gathered Modules:- Update CRM with custom variables (budget, timeline, company size)
- Router to add to segment-specific sheet (Enterprise vs. SMB)
- Trigger personalized email based on answers
💻 Make.com-Specific Tips
Instant vs. scheduled Scenarios
For webhook-triggered Scenarios, Make.com runs them instantly when data is received. However, you can also set up scheduled checks if needed. To verify your Scenario runs instantly:- Click the three dots menu → “Scheduling”
- Ensure it’s set to run when triggered by webhooks
Operations and limits
Make.com charges based on operations (each Module execution = 1 operation). Plan accordingly:- A 3-Module Scenario uses 3 operations per run
- Free tier: ~1,000 operations/month
- Monitor your usage in your dashboard
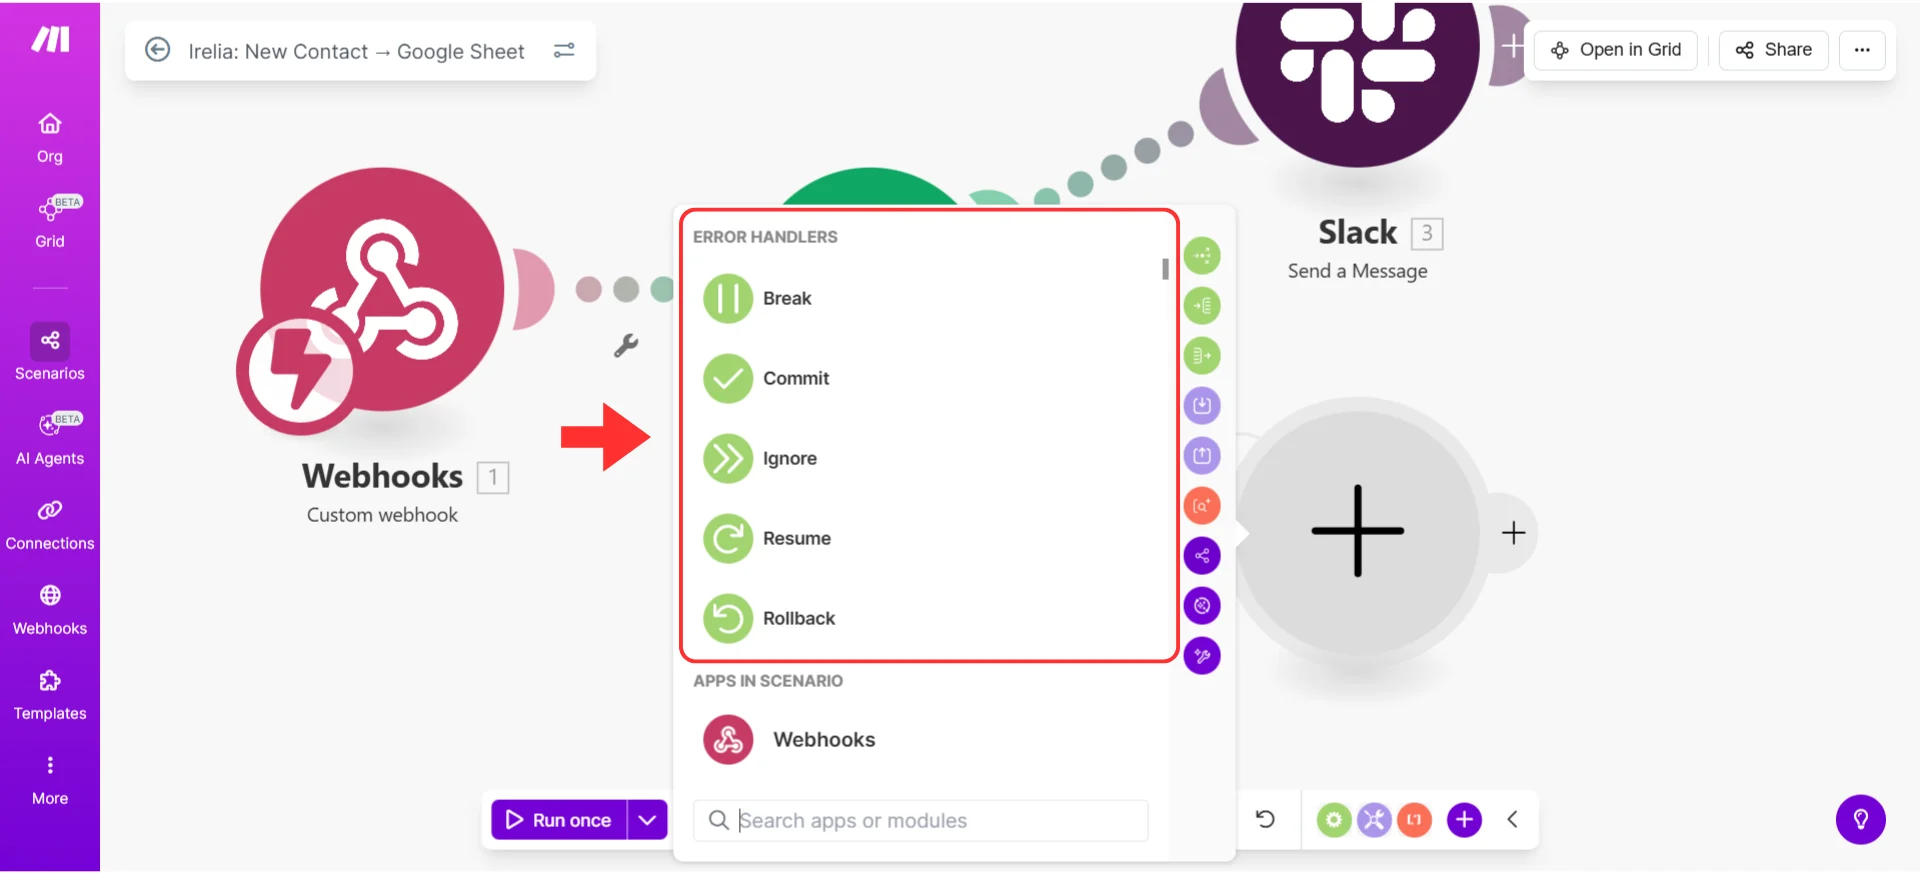
Error handling
Make.com has powerful error handling options:- Right-click on any Module → Select “Add error handler”
- Choose how to handle failures (ignore, retry, alert, etc.)
- This prevents one failure from stopping your entire Scenario
Error handling options for controlling Module failure behavior
Final Tips
- 🎯 Start simple — One event, one action. Master that before expanding.
- 🧪 Test thoroughly — Always use “Run once” to verify with real data before activating.
- 📊 Monitor regularly — Check Scenario History weekly, especially at first.
- 🔄 Iterate — Your first automation doesn’t have to be perfect. Refine over time.
- 💾 Save often — Click the save icon after every change to avoid losing work.
- 🤝 Ask for help — Both Irelia and Make.com have great support teams and communities.
✅ Quick Checklist
Use this to verify your setup is complete:Essential Setup
Essential Setup
- Webhook created in Make.com
- Webhook URL copied from Make.com
- URL pasted into Irelia for your chosen event
- Test data sent from Irelia
- Data structure determined in Make.com (“Successfully determined”)
- Action Module configured (Google Sheets, Slack, or CRM)
- “Run once” test completed successfully
- Scenario turned ON
- Scenario given a descriptive name
- Scenario saved
Verification
Verification
- Triggered a real event (or used the “Test” button)
- Confirmed data appeared in destination app
- Checked Scenario History shows successful run
🛠️ Troubleshooting & FAQs
Don’t panic! Here are the most common issues and exactly how to fix them.Make.com hasn't received any data from Irelia yet
Make.com hasn't received any data from Irelia yet
- Go to Irelia → “Events and Notifications”
- Check that the webhook URL is filled in for your event
- Make sure it matches EXACTLY the URL from Make.com (no extra spaces)
- Click the blue “Test” button in Irelia next to your webhook URL
- Wait 5–10 seconds
- Go back to Make.com — the webhook should show “Successfully determined”
- If still not working, click on your webhook Module in Make.com
- Create a new webhook with the “Add” button
- Copy the new URL and paste it into Irelia
- Click “Test” again in Irelia
Irelia is sending data correctly, but something's wrong with your action Module setup
Irelia is sending data correctly, but something's wrong with your action Module setup
- Click on the failed Module (shown with a red indicator)
- Make.com shows detailed error messages in the execution details
- Look for phrases like “Required field missing” or “Invalid credentials”
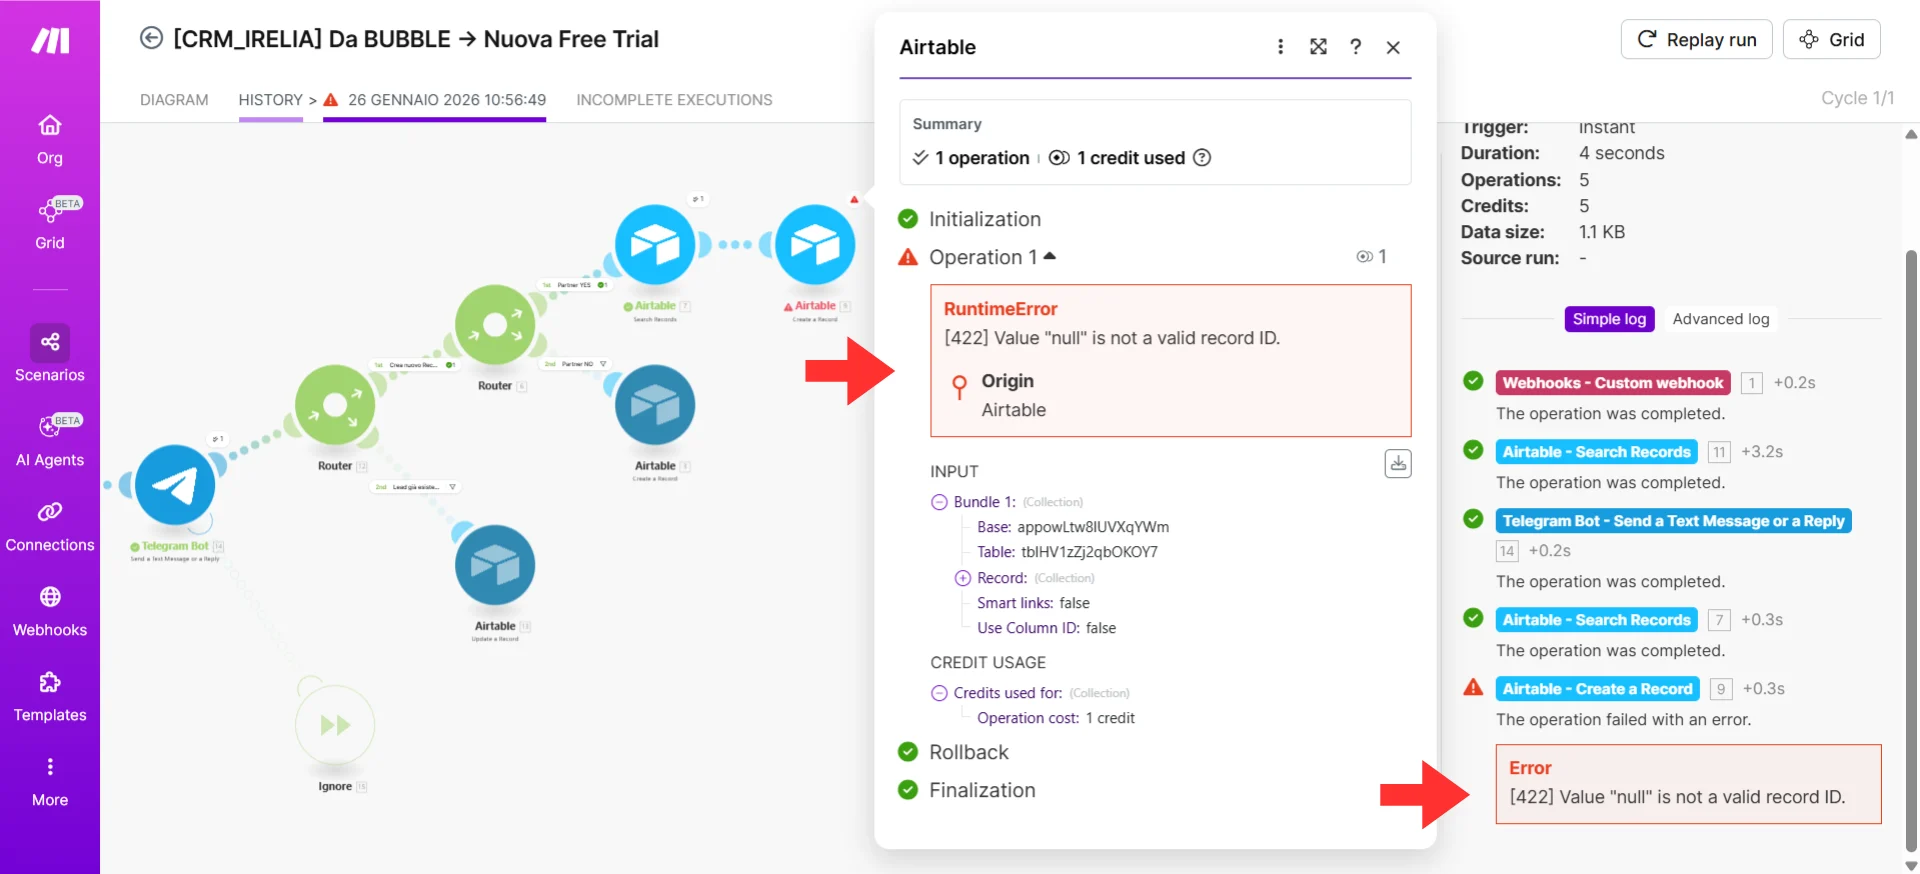
Module error detail view with key diagnostic information
- Open your action Module configuration
- Look for fields marked as required
- Make sure each required field has data mapped
- In your action Module, click on the connection dropdown
- Select “Add” to create a new connection
- Sign in again and grant permissions
- Run once to test again
- Google Sheets: Confirm the spreadsheet wasn’t deleted or renamed
- Slack: Check the channel wasn’t archived
- CRM: Verify pipeline/status values still exist
The Scenario says it succeeded, but you can't find the data
The Scenario says it succeeded, but you can't find the data
- Go to your Scenario → “History” tab
- Click on your recent run to expand details
- Look at the output data from each Module
Expanded Scenario History run with output data from each Module
- Google Sheets: Scroll to the bottom (new rows are added at the end). Try Ctrl+F to search.
- Slack: Check you’re in the right channel. Search for messages from “Make.”
- CRM: Search by phone number instead of name. Check if you’re in a filtered view.
- Go back to your Scenario editor
- Look for any filter Modules (funnel icons) between your webhook and action
- Click on the filter to verify your data passes the conditions
Your automation worked during testing but stopped working for real events
Your automation worked during testing but stopped working for real events
- Open your Scenario
- Look at the toggle at the bottom left
- If it shows “OFF”, turn it back on
- Click the three dots menu → “Settings”
- Make sure “Scheduling” is set to “Immediately” (not scheduled for specific times)
- For real-time webhooks, the Scenario should run “On demand”
- Look for any warning icons (⚠️) on your Modules
- Reconnect any apps that show warnings
- This is especially common with Google accounts after password changes
- Go to Irelia → “Events and Notifications”
- Confirm the webhook URL is still there and correct
- Go to your Make.com dashboard → “Organization” → “Operations”
- Free plans have limited operations per month
- If you’ve hit the limit, upgrade or wait for reset
The same contact is being processed multiple times
The same contact is being processed multiple times
- Check all your active Scenarios
- Look for duplicates with the same webhook trigger
- Turn off or delete duplicate Scenarios
- Verify each event has a UNIQUE webhook URL
- If you pasted the same URL in multiple events, that’s the problem
- In your Scenario, ensure you only have ONE webhook Module
- Multiple triggers can cause duplicate processing
The customVariables field is empty or doesn't have expected data
The customVariables field is empty or doesn't have expected data
- “New Inbound Contact” fires BEFORE data collection
- Use “Data Gathered”, “Goal Achieved”, or “Lead Qualified” events instead if you need collected data
- Custom variables are in an array (1, 2, 3, etc.)
- Make sure you’re mapping the correct index
- Use the data picker to navigate the array structure
- Instead of using the “Test” button, have a full conversation that reaches data collection
- Then check if data flows through
🆘 Need Help?
- Contact support in the WhatsApp priority support group or send an email to info@irelia.ai
- Include: screenshots of your configuration, the error message, and what you expected vs. what happened
- Visit: make.com/en/help
- Community: community.make.com
- Check: status.make.com for outages