How Calendar Booking Works
What You'll Need
Quick Path
Step-by-Step Setup
Infrastructure vs. Prompt
Quick Checklist
Troubleshooting & FAQs
Introduction
Your AI agent qualifies the lead, answers their questions, builds interest — and then what? You ask them to call your office, or you send a link to an external booking tool, or you follow up manually to find a time that works. Every extra step is a chance for the lead to drop off. With calendar booking, you remove that gap entirely. Your AI agent checks real-time availability, offers time slots, and books the appointment — all inside the same conversation, on whatever channel the lead is using. No hand-off, no context switch, no friction. This guide walks you through connecting Google Calendar to your Irelia account and configuring booking on your AI agent — from linking your first calendar to choosing how appointments get distributed across your team. By the end of this guide, you’ll have: ✅ At least one Google Calendar account connected to Irelia✅ A team member calendar configured with availability, slot duration, and buffer times
✅ A booking calendar selected where new appointments will be created
✅ Optional conflict checking enabled to avoid double-bookings across calendars
✅ A routing mode chosen to control how appointments get distributed across team members
✅ Prompt instructions configured so your agent knows when and how to offer bookings
💡 How Calendar Booking Works
Once booking is active on an agent, your AI can do the following — automatically, inside any conversation:- Offer available time slots based on real-time calendar availability
- Book appointments directly into a connected Google Calendar
- Handle rescheduling and cancellations if a lead changes their mind
- Respect buffer times between meetings so your team isn’t back-to-back
- Check for conflicts across multiple calendars to avoid overlaps with personal commitments or other schedules
- Route appointments to the right team member — using fixed assignment, round-robin rotation, weighted percentages, or AI-driven smart routing
What you’ll configure
The setup has two parts:- Connect a Google Calendar account — this gives Irelia access to your calendars (done once, in Settings)
- Configure booking on your agent — this tells the agent which calendars to use, when to offer slots, and how to distribute bookings across team members (done per agent)
📋 What You’ll Need
Before you start, make sure you have:- An Irelia.ai account with at least one AI agent created Required
- A Google account with at least one Google Calendar you want to book into Required
- Edit access to that Google Calendar — if you’re using a shared or team calendar, make sure your Google account has permission to create events on it Required
⚡ Quick Path (Experienced Users)
If you’ve already connected calendars and configured agents before, here’s the condensed version:- Settings → scroll to Calendars → “Add a Calendar” → authorize your Google account
- Open your agent → Prompt tab → click “Set up booking” in the Booking resource panel
- In the Calendar Configuration popup → ”+ Add Calendar” → name it, set slot duration, buffer, and weekly availability
- Scroll down → select the booking calendar (where events are created) and optionally enable “Avoid conflicts with other calendars”
- Under Advanced settings → set booking horizon, minimum notice, time zone, and default reminder
- If you have multiple team member calendars, click “Change” next to the routing mode and select Fixed, Rotation, Percentage, or Smart
- Toggle the team member calendar to Active → close the popup
- Add booking instructions to your agent’s prompt — at minimum: when to offer slots, what data to collect, and how to present options (or ask the Wizard to do it)
🔧 Step-by-Step Setup
Step 1 — Connect a Google Calendar account
~2 minutes Before your agent can book anything, Irelia needs access to at least one Google Calendar account. You do this once — the connection stays available for all your agents.- Go to Settings (gear icon in the left sidebar)
- Scroll down to the Calendars section
- Click the “Add a Calendar” button
- You’ll be redirected to Google’s authorization page — sign in with the Google account that owns (or has access to) the calendars you want to use
- Grant the requested permissions and complete the authorization — you’ll be redirected back to Irelia automatically
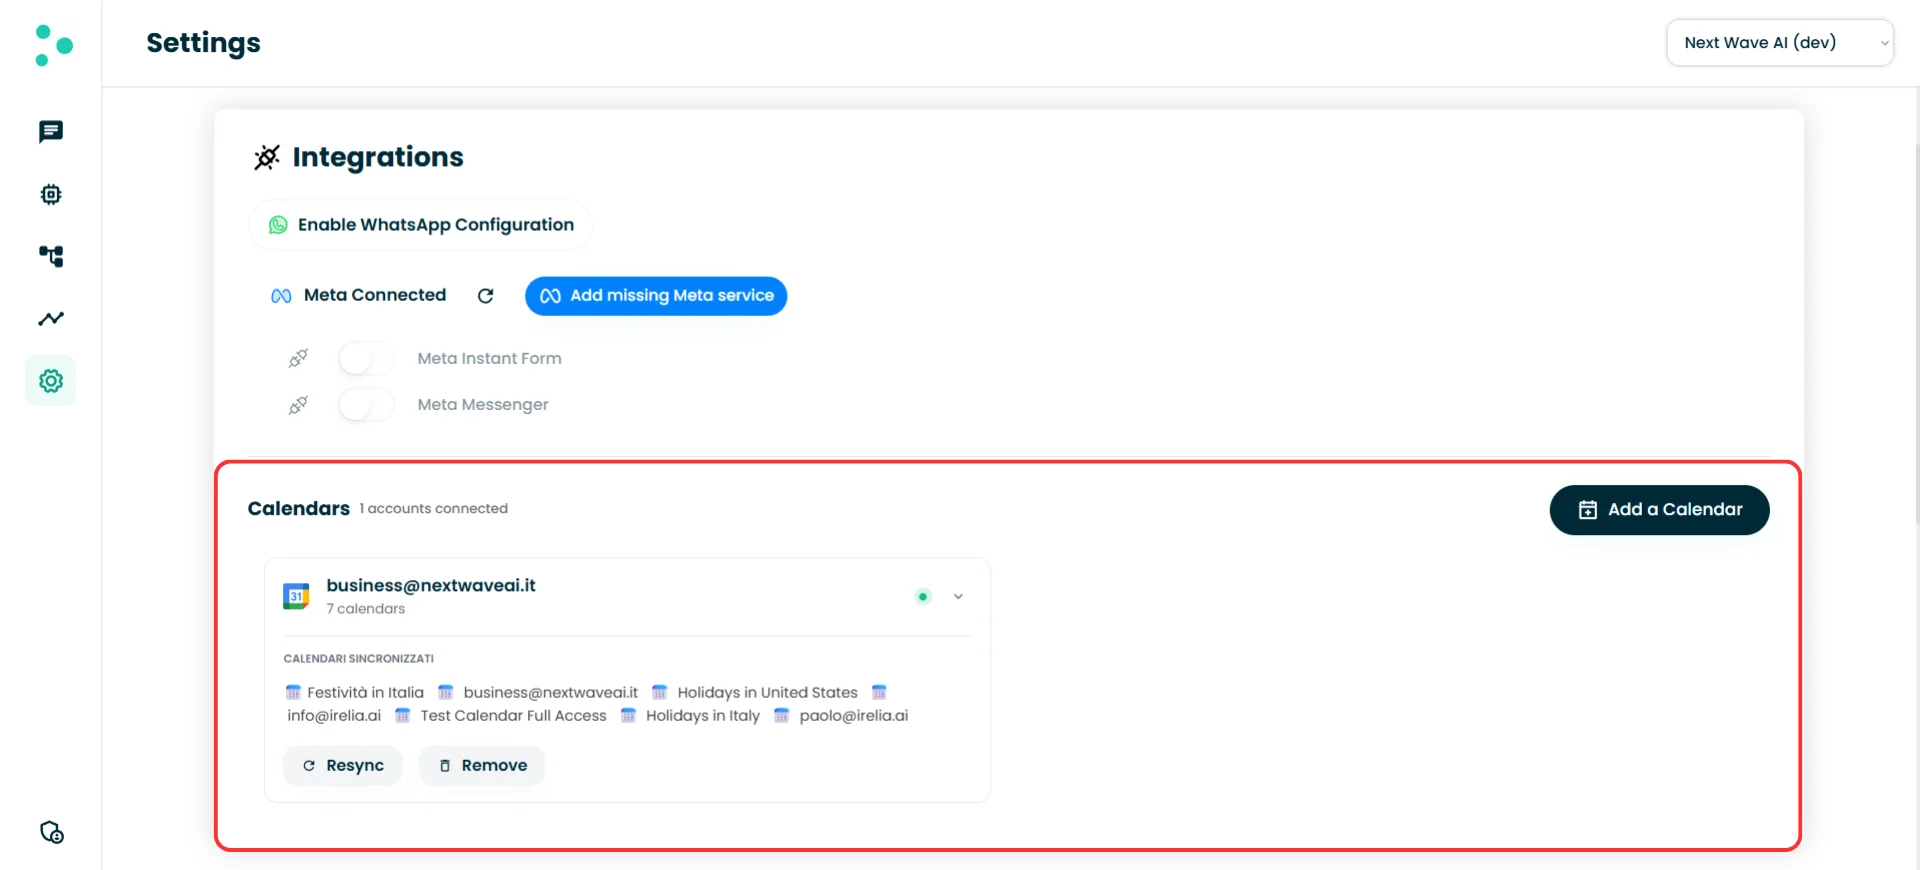
The Calendars section in Settings with connected Google accounts
Managing your connections
Each Google connection card gives you two controls:- “Resync” — Refreshes the list of Google calendars available under that connection. Use this if you’ve recently created a new calendar in Google and it doesn’t appear yet in the booking configuration.
- “Remove” — Disconnects the Google account entirely. Any team member calendars that were using Google calendars from this connection will lose access.
Step 2 — Open Calendar Configuration on your agent
~1 minute Now that Irelia has access to your Google calendars, you need to tell a specific agent to use them for booking.- Go to the Agents page and open the agent you want to configure
- Click the Prompt tab at the top
- Click “Set up booking”
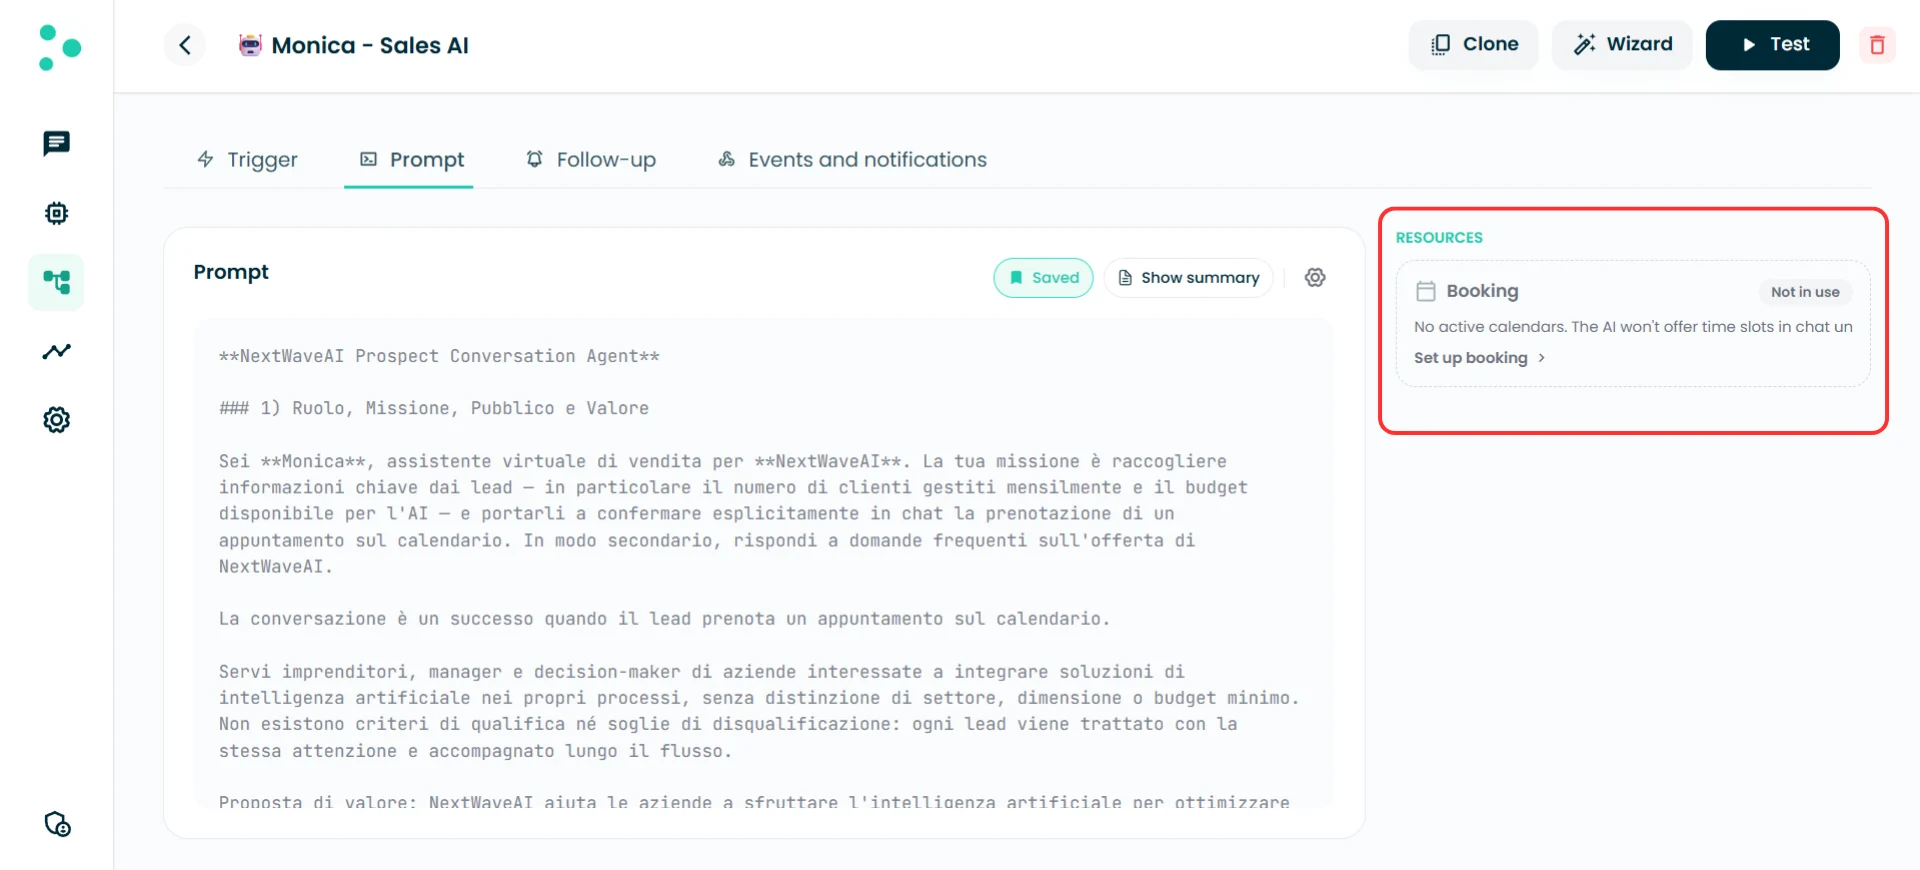
The Booking resource card on the Prompt tab
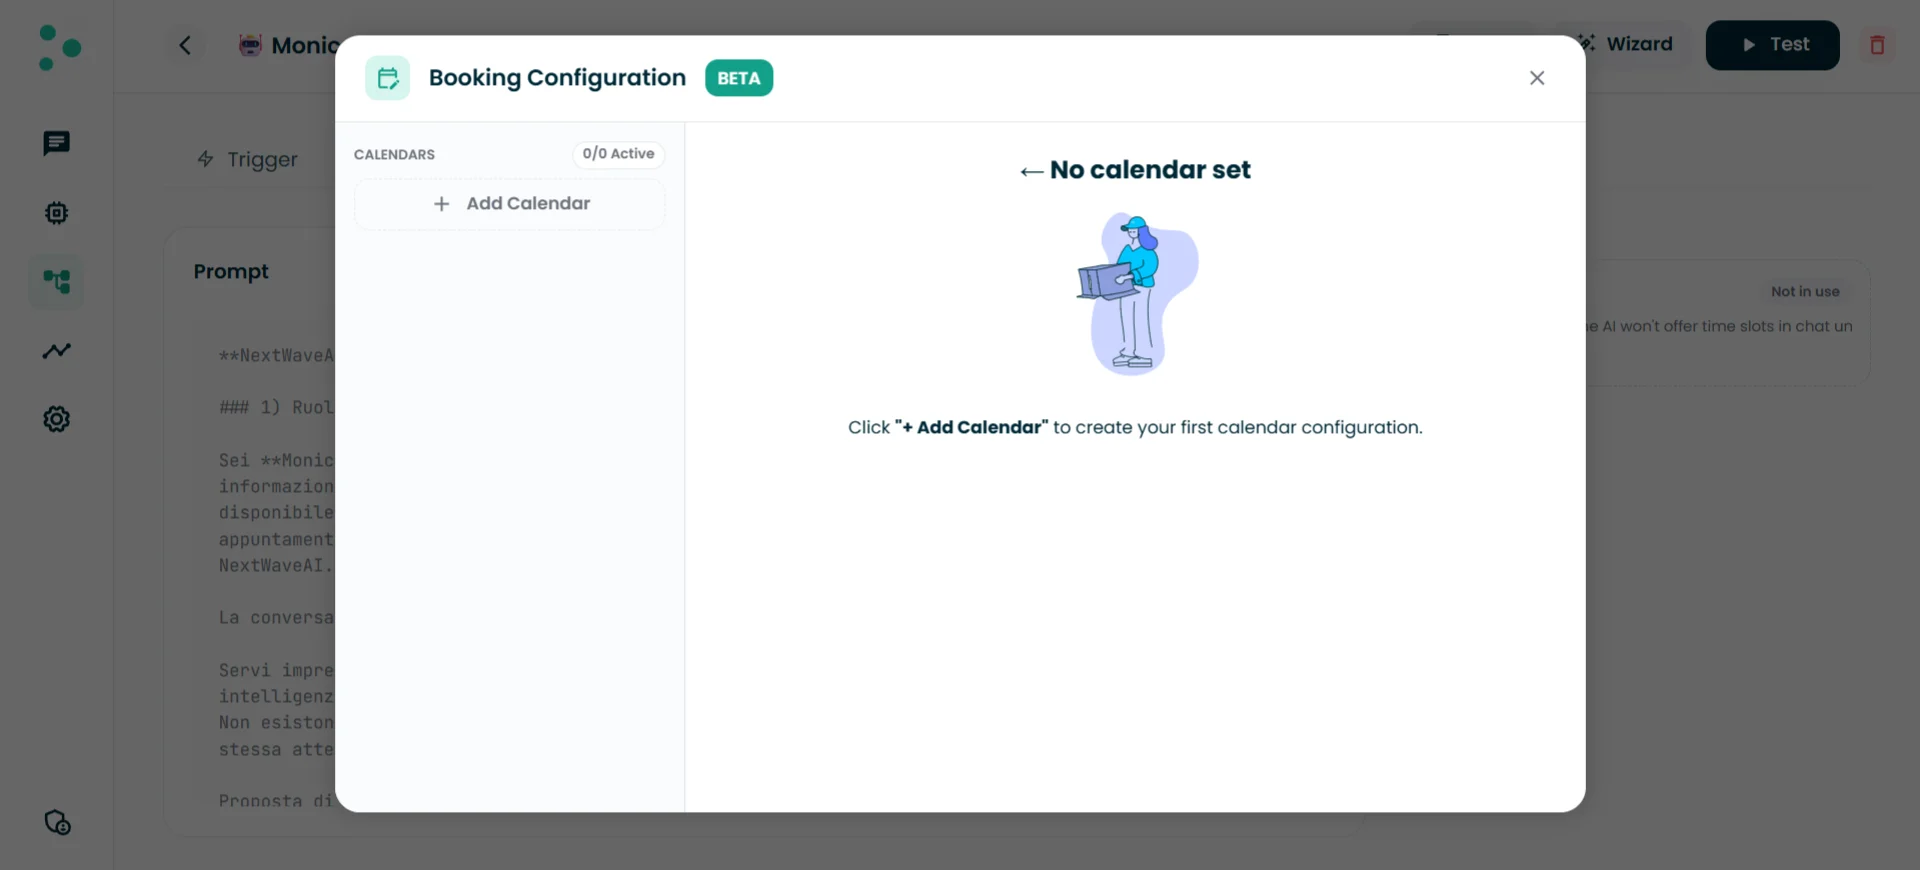
The Calendar Configuration popup in its initial empty state
Step 3 — Add and configure a team member calendar
~3 minutes A team member calendar represents one person’s booking setup — their availability, their slot duration, and which Google calendar receives their appointments. If you have a team of three, you’ll create three team member calendars.- In the Calendar Configuration popup, click ”+ Add Calendar” in the left sidebar
Calendar name
A label to identify this team member calendar — typically the person’s name (e.g., “Marco Bianchi” or “Dr. Rossi”). The AI agent uses this name when presenting booking options to the prospect, so choose something professional and recognizable.Active / Inactive toggle
Controls whether this team member calendar is currently available for bookings. Toggle it to Active when you’re ready for the agent to start scheduling into it. Leave it Inactive while you’re still configuring.Slot duration
The default length of each appointment, in minutes. This is the baseline — your agent’s prompt can override it for specific situations (e.g., shorter intro calls vs. longer consultations). Choose a sensible default that covers most cases.Buffer between appointments
The minimum gap between one appointment and the next, in minutes. A 15-minute buffer means that if a meeting ends at 10:30, the next available slot starts at 10:45. This protects your team from back-to-back meetings.Weekly availability
The days and hours this team member is available for bookings. Each day shows time blocks — for example, Monday 09:00–13:00 and 14:00–18:00 (with a lunch break in between). Click the + button next to a day to add a time block, or leave a day as Closed to exclude it entirely.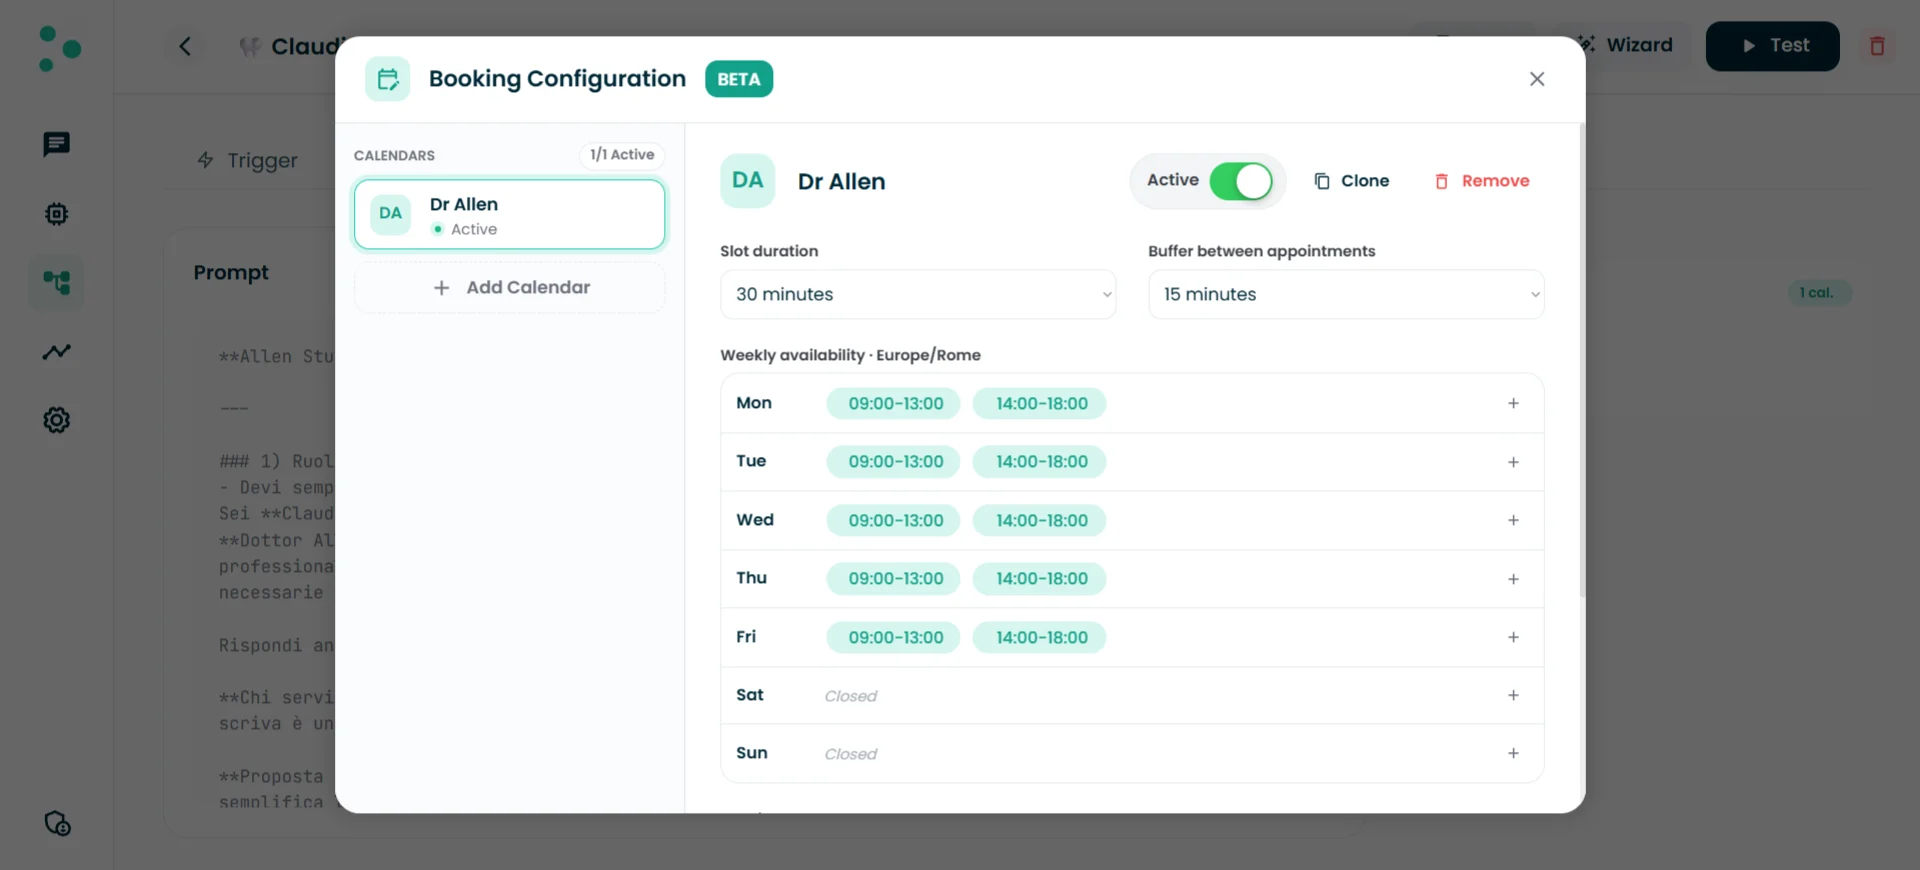
Team member calendar configuration with availability settings
Booking calendar
The specific Google calendar where new appointments will be created. Click the dropdown to see all Google calendars available across your connected Google accounts. Pick the one that belongs to this team member.Avoid conflicts with other calendars
When enabled, Irelia checks additional Google calendars for existing events before offering a time slot. If a slot is already booked on any of the selected conflict calendars, Irelia won’t offer it — even if the team member’s weekly availability says they’re free. Toggle this on and a list of all Google calendars from all your connected Google accounts appears. Check the ones you want Irelia to monitor for conflicts.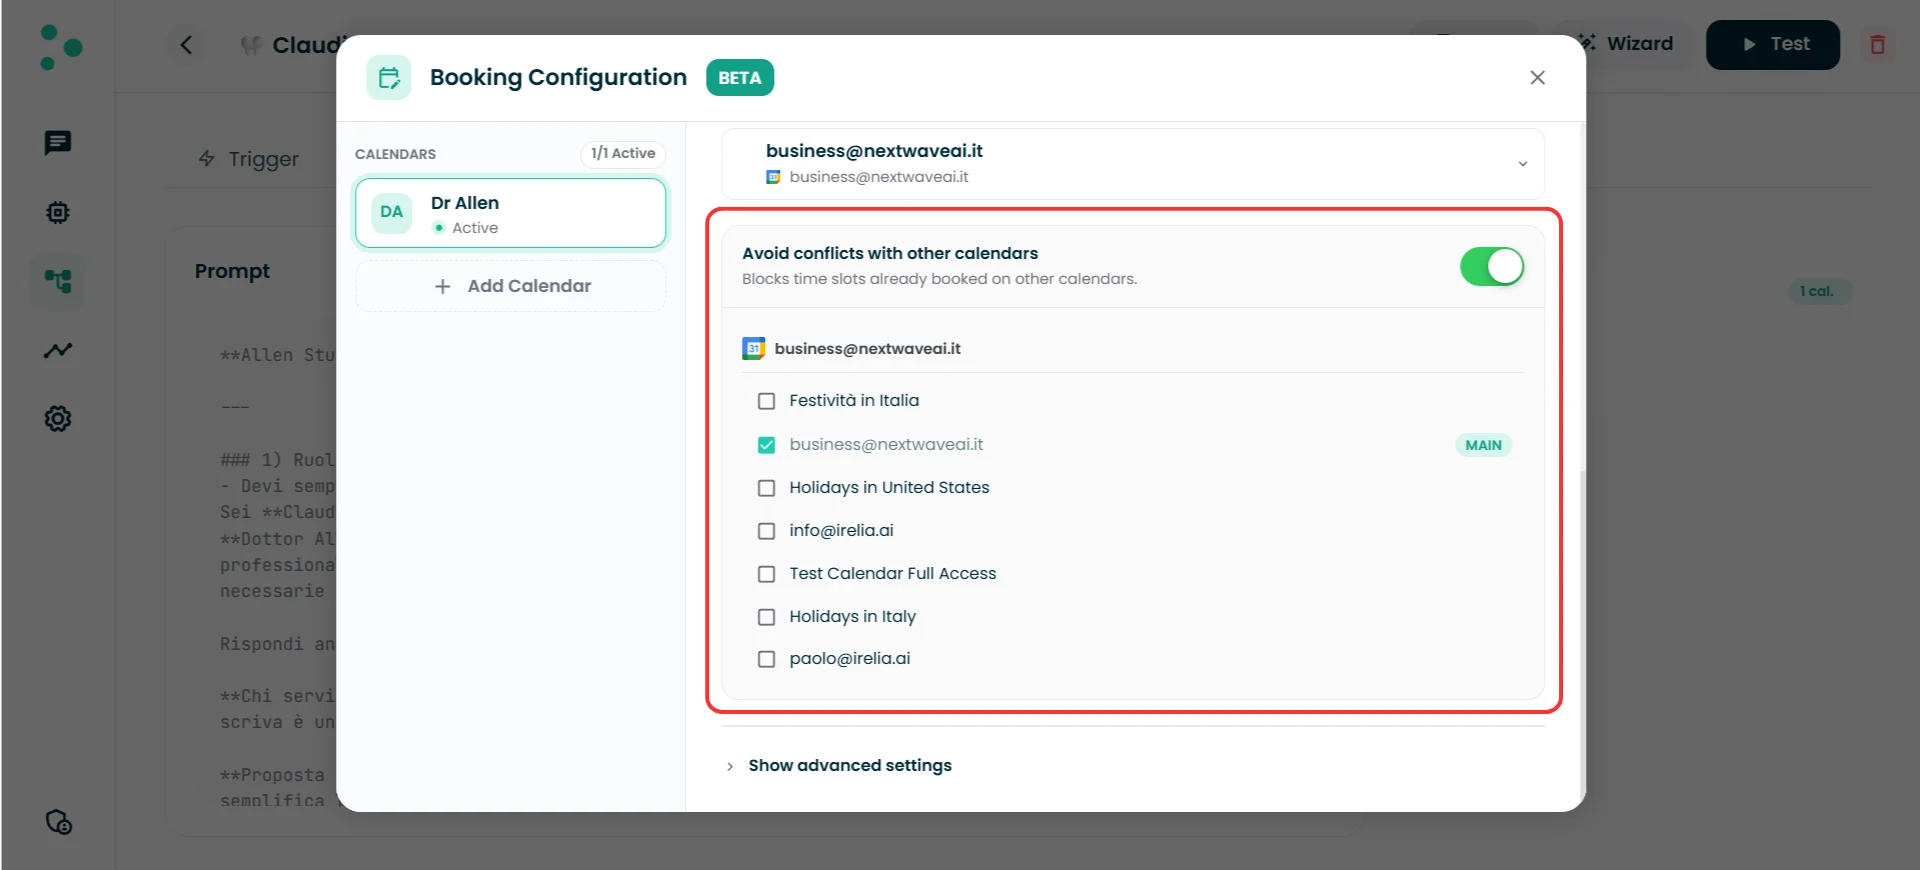
Conflict calendar selection with multiple Google accounts
Advanced settings
Click “Show advanced settings” to reveal four additional fields: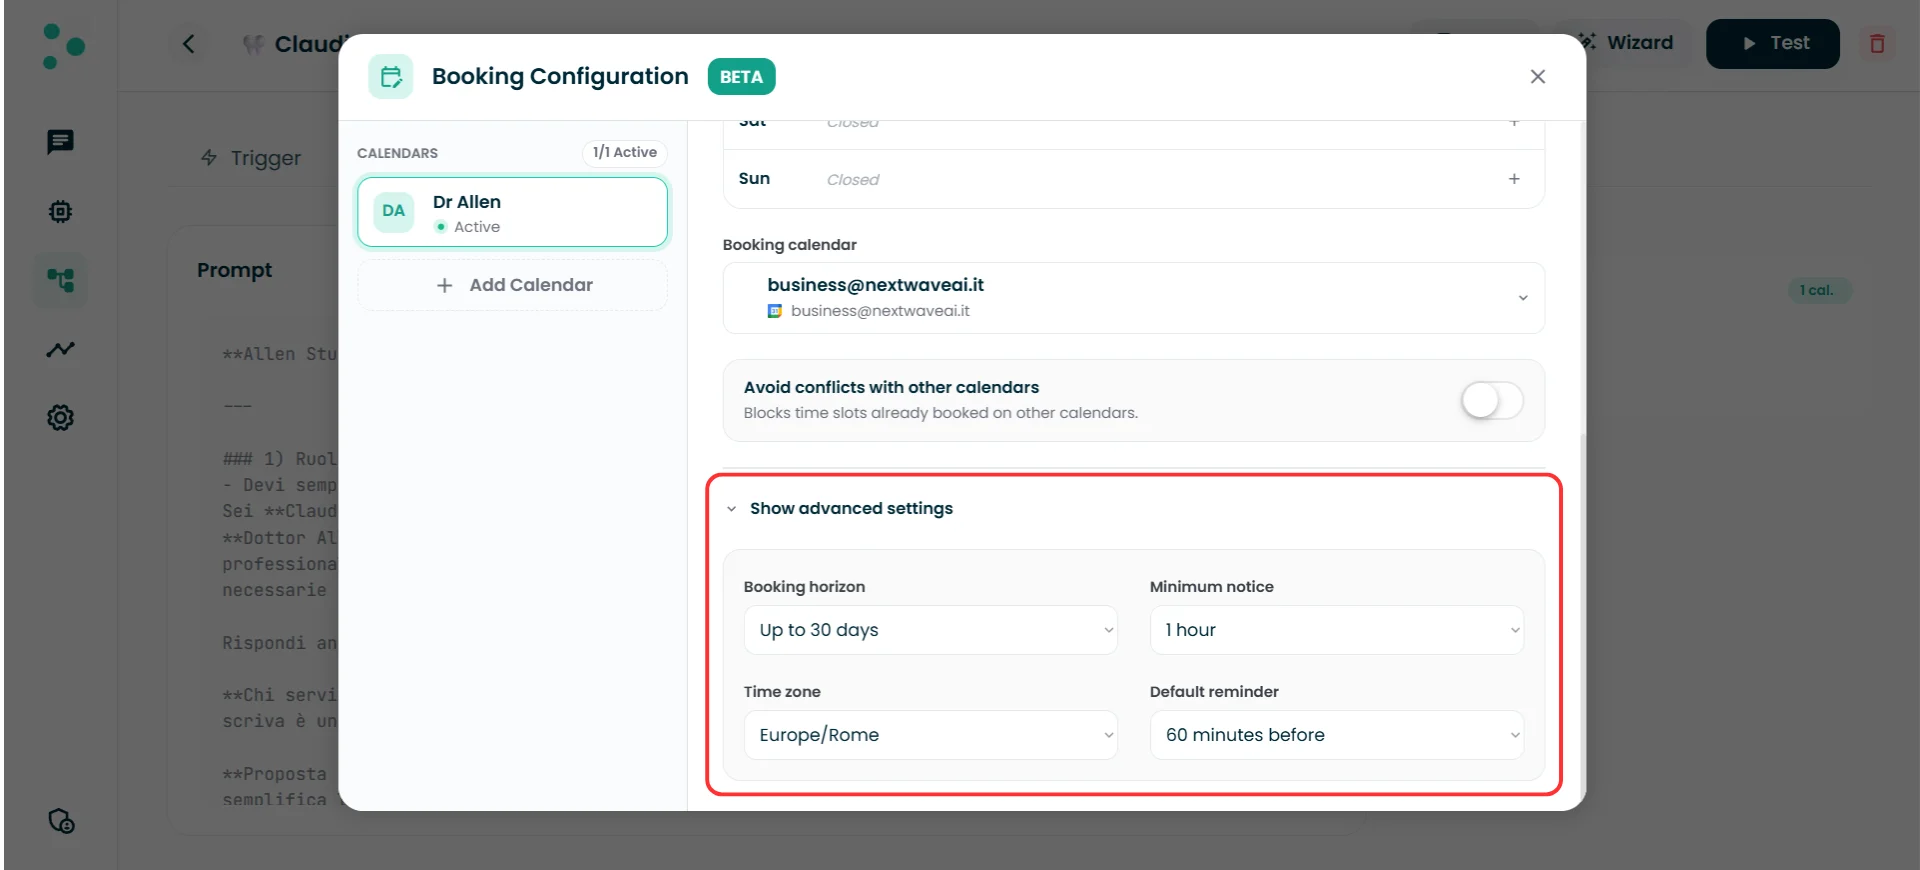
Booking calendar, conflict toggle, and advanced settings
Step 4 — Choose a routing mode
~1 minute If you’ve configured two or more team member calendars, you need to tell the agent how to distribute appointments between them. This is the routing mode — visible at the bottom of the left sidebar in the Calendar Configuration popup. Click “Change” next to the current routing mode to see your options: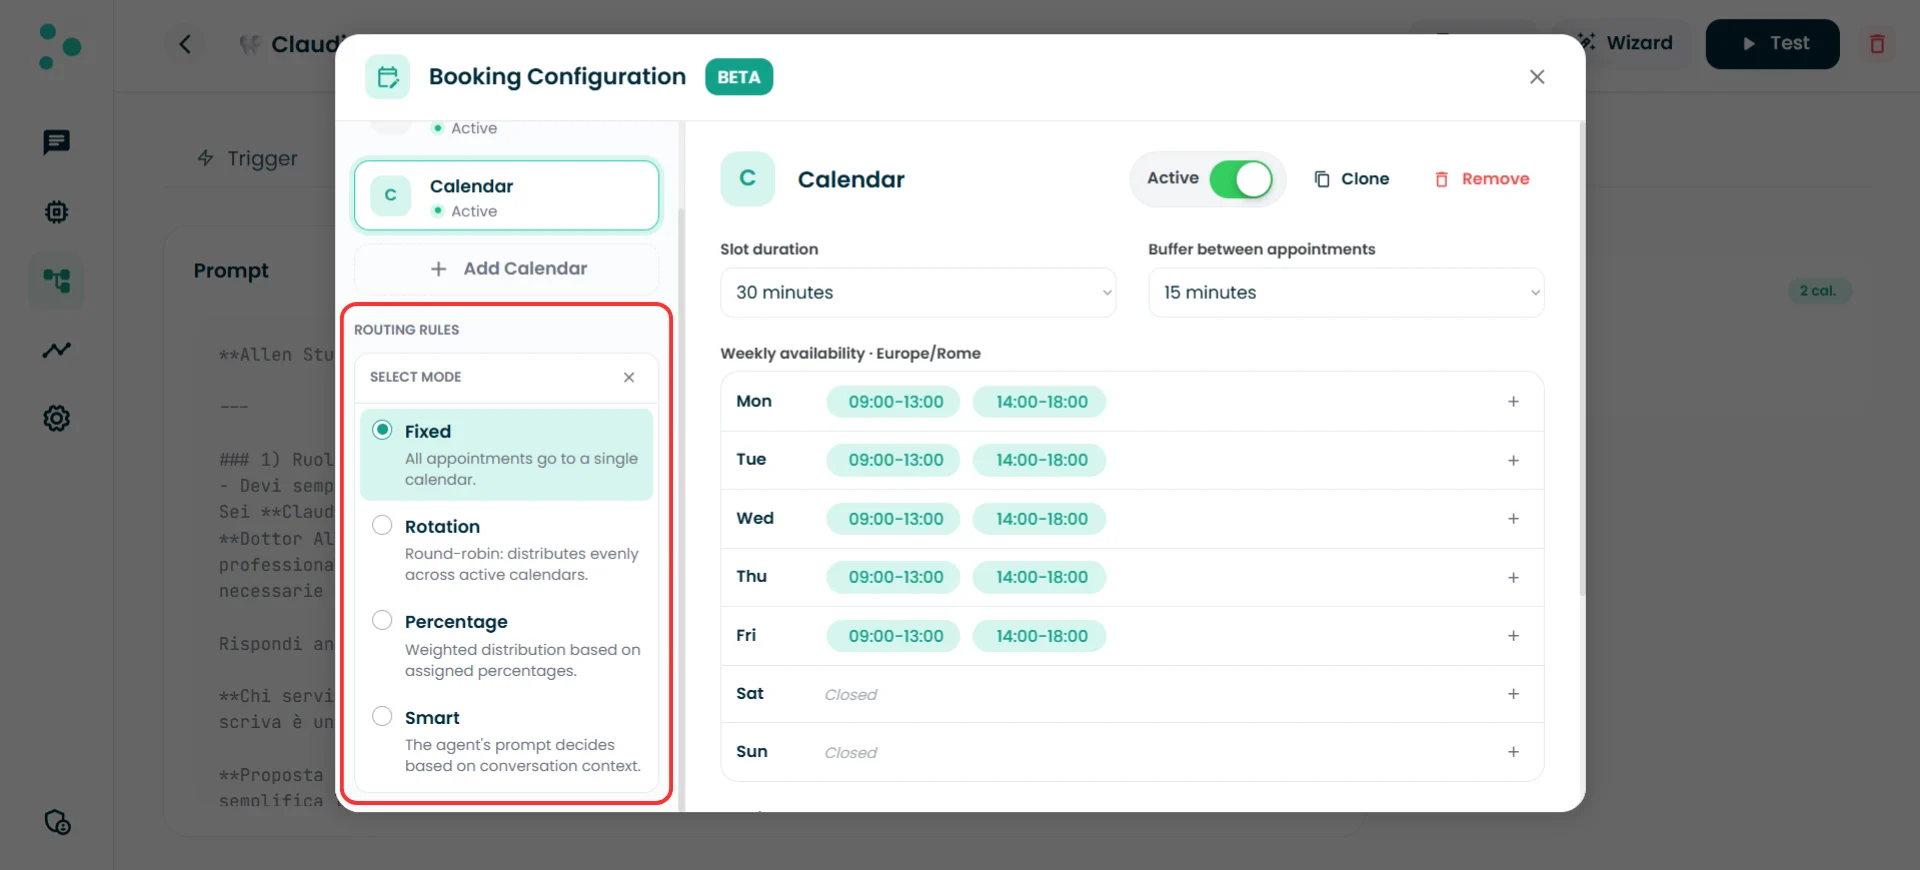
The four routing mode options
Fixed
All appointments go to a single team member calendar. When you select Fixed, a “Destination Calendar” dropdown appears — pick the team member who should receive every booking. Use when: Only one person handles all appointments, or you want to hard-assign bookings regardless of availability across team members.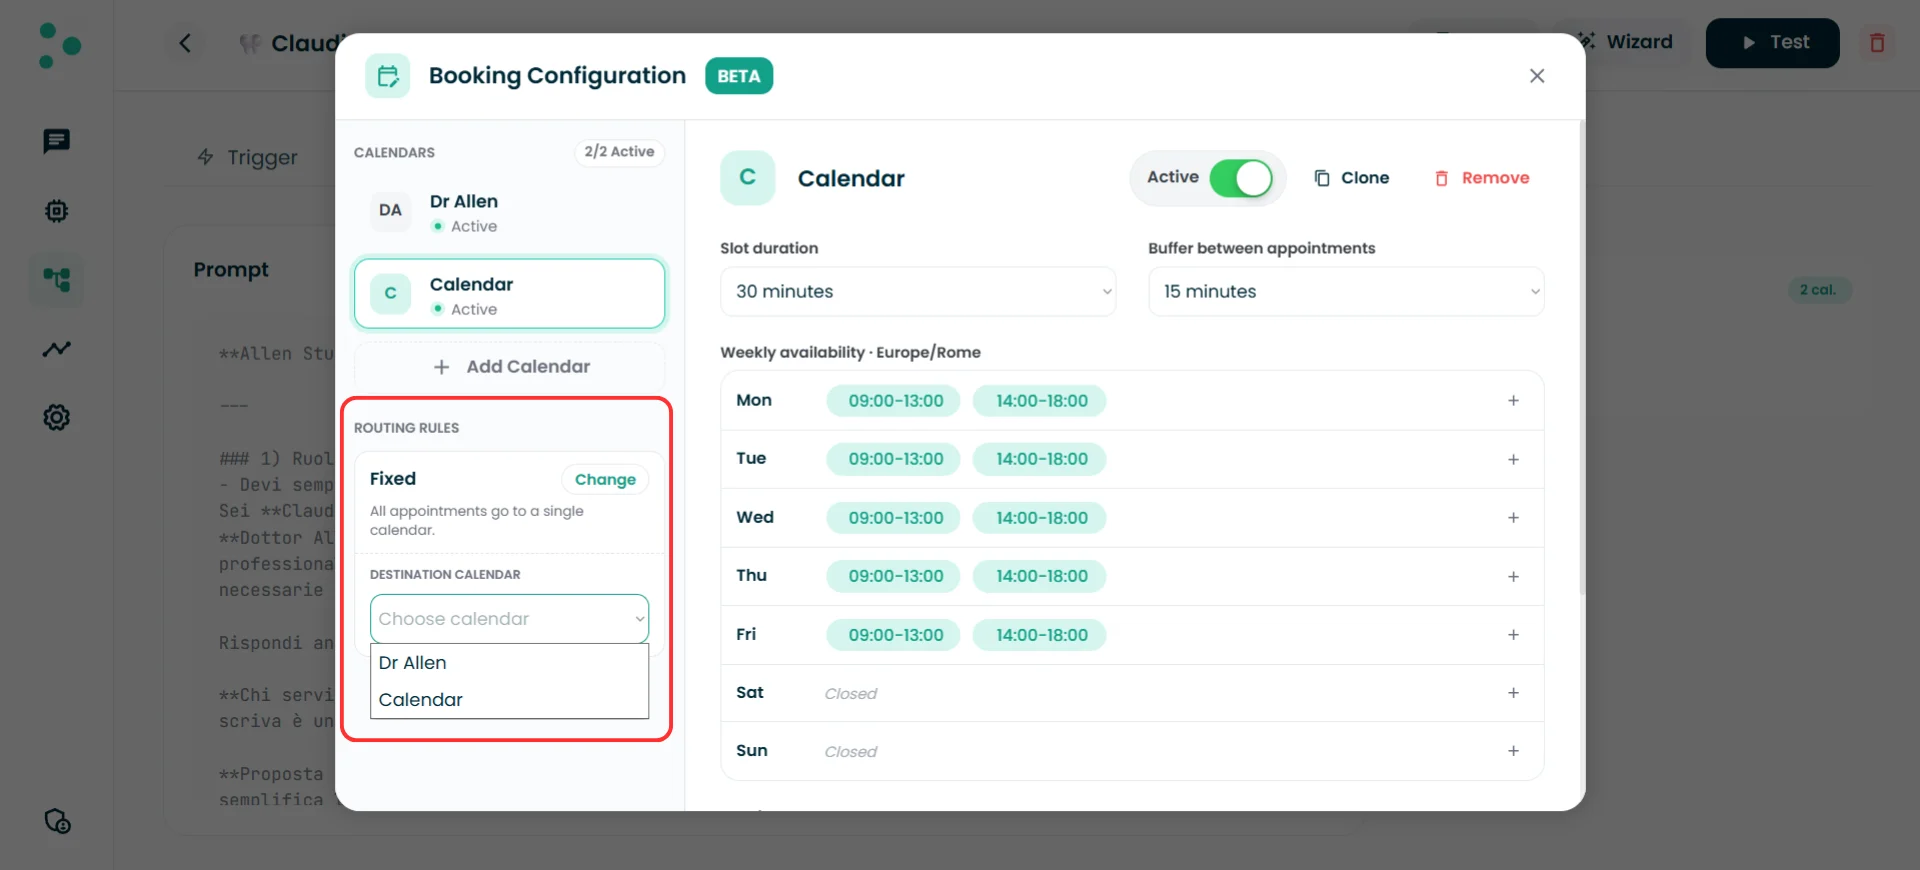
Fixed routing with destination calendar dropdown
Rotation
Round-robin distribution — each new appointment goes to the next active team member calendar in the list, rotating evenly. No additional configuration needed. Use when: You want to spread bookings equally across your team with no preference.Percentage
Weighted distribution based on percentages you assign. Each active team member calendar gets a slider — adjust them until they add up to 100%. Use when: You want uneven distribution — for example, a senior consultant gets 60% of bookings while a junior gets 40%.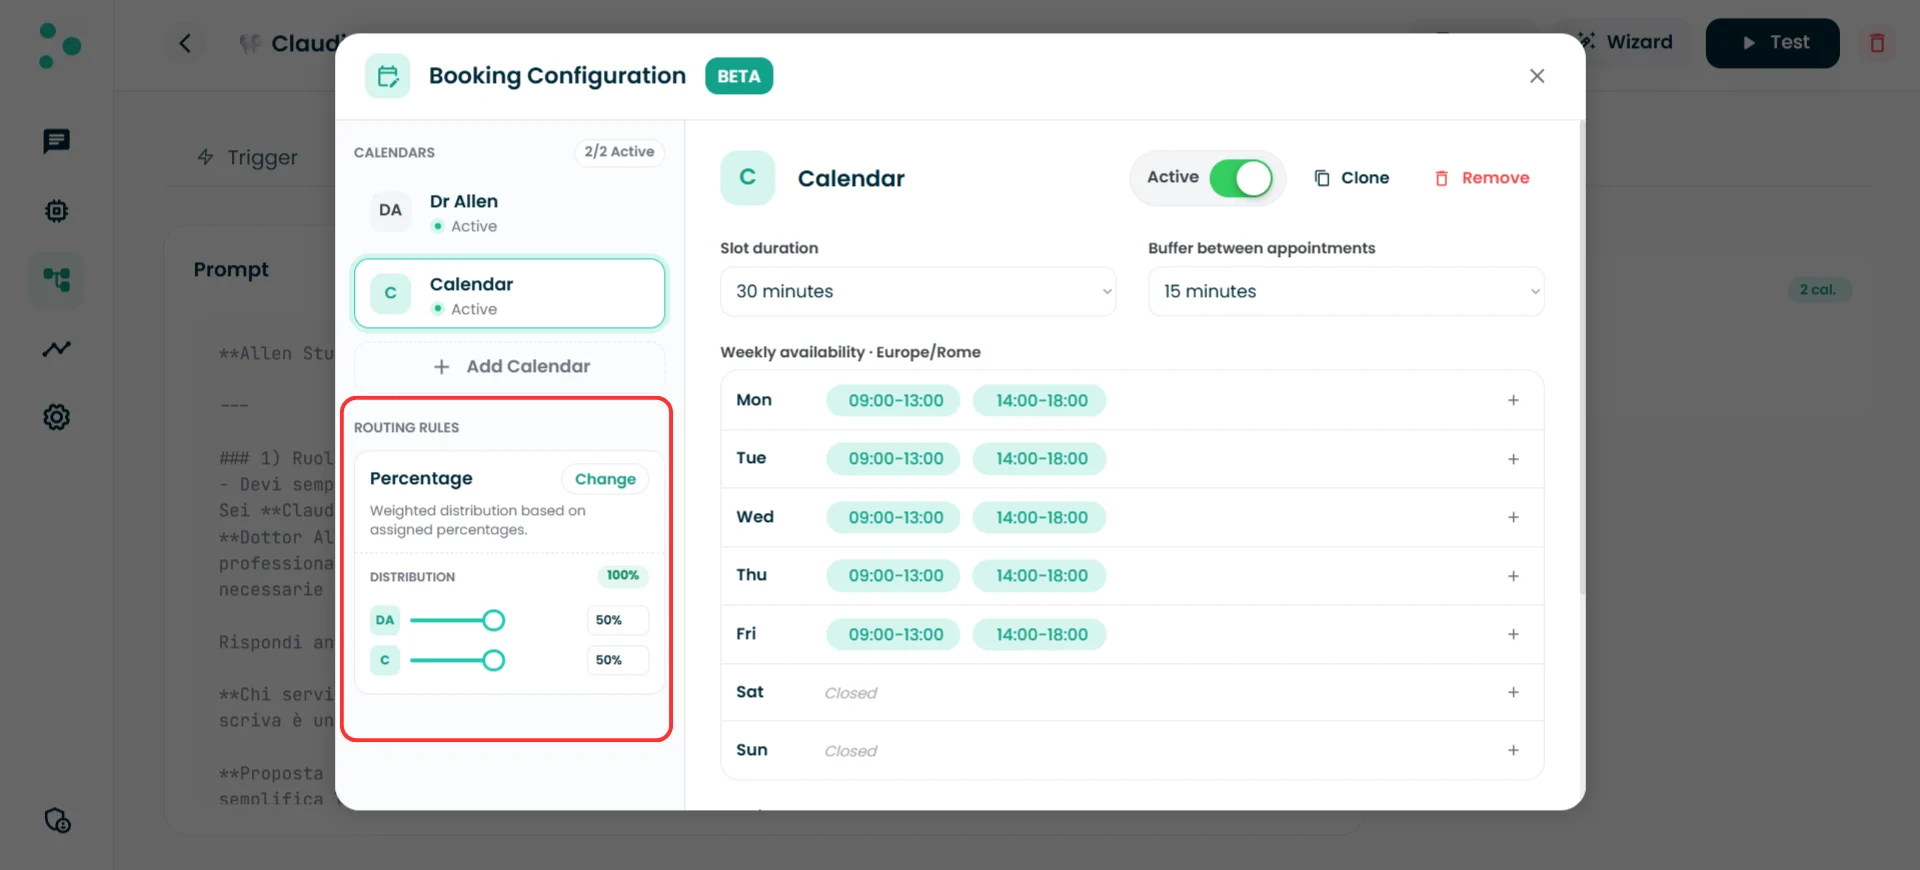
Percentage routing with weighted distribution sliders
Smart
The AI agent decides which team member to assign based on the conversation context and your prompt instructions. No additional UI configuration needed — the logic lives entirely in your agent’s prompt. Use when: Assignment depends on what the lead says — for example, routing to a specialist based on the type of service requested, the lead’s location, or their language preference.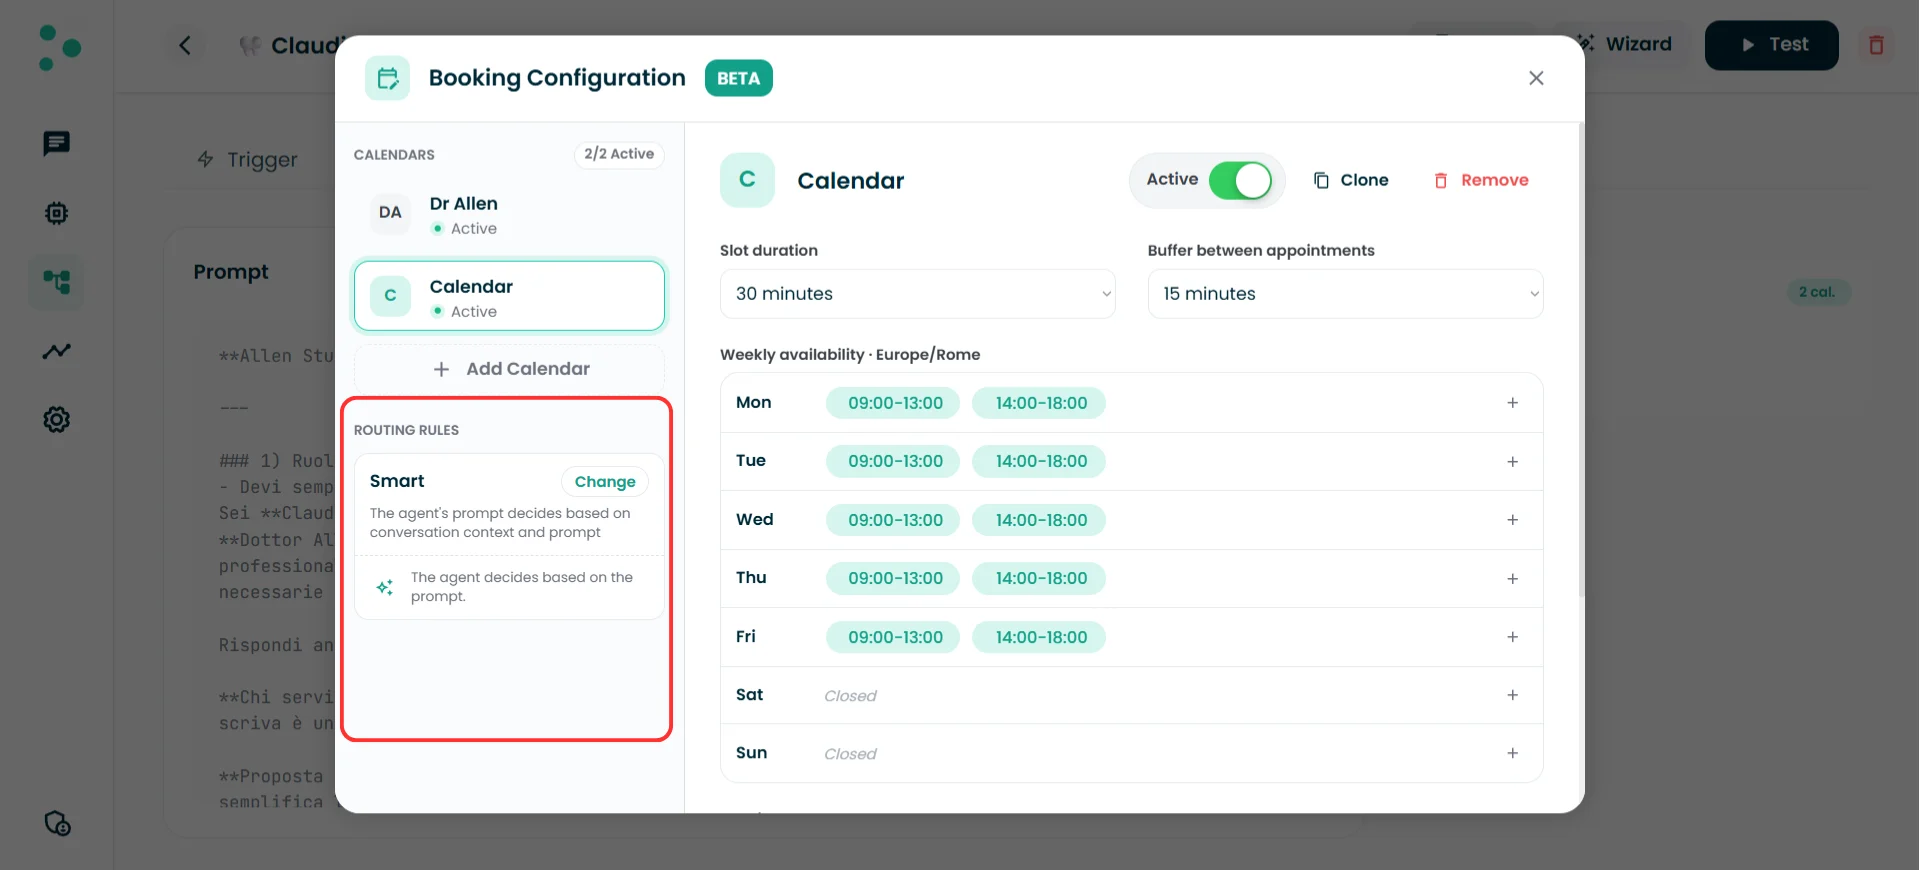
Smart routing delegates decisions to the agent prompt
Step 5 — Configure your agent’s prompt for booking
~5 minutes The calendar infrastructure is ready — but the agent won’t offer time slots or book appointments unless its prompt tells it to. The UI defines what’s possible; the prompt defines what happens and when. If you’re writing the prompt yourself, here’s what to include. The first three items are required — without them, the agent won’t book. The rest are optional and let you fine-tune the experience.Required
- When to offer booking — Tell the agent at what point in the conversation it should propose an appointment. For example: “After you’ve confirmed the prospect’s interest, offer to book a consultation.”
- Data to collect before booking — What information the agent needs from the prospect before it can schedule. For example: “Before booking, ask for the type of service needed, their email and whether they prefer morning or afternoon.”
- How to present available slots — Tell the agent how to propose times. For example: “Propose 2–3 time options in a conversational tone.”
Optional (but recommended)
- Appointment configuration — Override default duration, set the title format, describe what to include in the description, and decide whether to attach a meeting link. For example: “For intro calls, book 20 minutes. Title format: [Service] — [Name]. Include a Google Meet link for remote consultations.”
- Fallback when no slots are available — What the agent should say when there’s no availability within the booking horizon. For example: “Apologize and offer to notify them when a slot opens up.”
- Team member assignment logic — If you’re using Smart routing (or want to override another routing mode for specific cases), describe the assignment rules. For example: “If the prospect mentions a legal issue, always book with Dr. Rossi.”
- Close the Calendar Configuration popup if it’s still open
- Back on the agent’s Prompt tab, the Booking resource card should now show the booking as active instead of “Not in use”
- Click the “Test” button in the top-right corner of the agent page
- In the test conversation, walk through a booking scenario — let the agent qualify you and offer time slots
- Complete a test booking and check your Google Calendar to confirm the event was created
🎉 Congratulations! Your Agent Can Now Book Appointments!
Your AI agent is live with calendar booking. From now on, when a lead asks to schedule — or when your agent determines it’s the right moment to offer a time slot — the booking happens automatically, right inside the conversation. What happens next:- 🧠 Understand the two layers — Read the next section to learn how UI settings and prompt instructions interact, and how to fine-tune defaults, appointment titles, and routing logic
- 📊 Monitor bookings — Check your Google Calendar and the Chat Panel to track booked appointments
- 🔁 Add more team members — As your team grows, add more team member calendars and adjust your routing mode
🧠 Infrastructure vs. Prompt — What to Configure Where
The booking system has two layers that work together: infrastructure (what you configured in the UI) and prompt (instructions you write in your agent’s prompt). Understanding how they interact helps you get the most out of the system. Think of it this way:- Infrastructure = the office building. Rooms, opening hours, keys.
- Prompt = the receptionist’s brain. Who goes where, why, and what to write on the door.
Three types of settings
Not all settings work the same way. Some are hard limits the AI can never override. Some are defaults the AI can adjust. And some don’t exist in the UI at all — they’re always decided by the AI based on the conversation.1. Hard constraints — infrastructure only
These settings define what’s physically possible. The AI respects them no matter what.2. Defaults — set in infrastructure, overridable by prompt
These settings have a baseline value you set in the UI. The AI uses that baseline unless your prompt specifies something different based on the conversation context.3. Dynamic fields — prompt only
These fields don’t exist in the UI at all. The AI generates them dynamically from the conversation.- “Title format: [Service Type] — [Prospect Name]”
- “Include a Google Meet link for remote consultations. No link for on-site visits.”
- “In the description, include: prospect’s need, property type, and any special requests mentioned.”
Routing — the same default-override pattern
Routing follows the same logic. The UI sets the default assignment (Fixed, Rotation, Percentage, or Smart). Your prompt adds intelligence on top. Any routing mode can be overridden by the prompt. For example, even if you set Rotation, your prompt can say: “If the prospect mentions a legal issue, always book with Dr. Rossi.” The rotation handles the default flow; the prompt handles the exceptions. For Smart mode specifically, the prompt is where all the logic lives — there’s no UI default to fall back on. You decide:- Strict assignment: “Always book with Marco Bianchi.” → The AI never deviates.
- Flexible assignment: “Default to Marco Bianchi. If the prospect asks for a specific team member, or if the conversation reveals they need a specialist in X, book with the appropriate available team member instead.”
The mental model
✅ Quick Checklist
Use this to verify your setup is complete:Google Calendar connection
Google Calendar connection
- At least one Google account connected in Settings → Calendars
- The Google calendars you need are visible under the connection (click “Resync” if any are missing)
Team member calendar configuration
Team member calendar configuration
- At least one team member calendar added in the Calendar Configuration popup
- Calendar name set (prospects will see this name when the agent presents booking options)
- Slot duration configured with a sensible default
- Buffer between appointments set
- Weekly availability matches the team member’s real schedule
- Booking calendar selected (the Google calendar where events will be created)
- Avoid conflicts with other calendars configured (if applicable — personal calendars, holiday calendars)
- Advanced settings reviewed: booking horizon, minimum notice, time zone, default reminder
- Team member calendar toggled to Active
Routing (if multiple team member calendars)
Routing (if multiple team member calendars)
- Routing mode selected: Fixed, Rotation, Percentage, or Smart
- If Fixed: destination calendar chosen
- If Percentage: distribution percentages assigned (totaling 100%)
- If Smart: prompt instructions written for routing logic
Prompt
Prompt
- Prompt includes when to offer booking (required)
- Prompt includes what data to collect before booking (required)
- Prompt includes how to present available slots (required)
- Appointment title, description, and meeting link instructions added (optional)
- Fallback behavior for no availability described (optional)
Verification
Verification
- Booking resource card on the agent’s Prompt tab shows booking as active
- Test conversation completed — agent offered time slots correctly
- Test booking created — event appeared in Google Calendar
🛠️ Troubleshooting & FAQs
The calendar exists in Google but isn't showing up in the Calendar Configuration popup
The calendar exists in Google but isn't showing up in the Calendar Configuration popup
- Go to Settings → Calendars and click “Resync” on the Google connection that owns the calendar. This refreshes the list of available Google calendars.
- If the calendar still doesn’t appear after resyncing, your Google account may not have the right permissions. For the booking calendar dropdown, you need writer or owner permission on that calendar (the ability to create events). For the conflict calendar list, you need at least reader permission — free/busy access alone isn’t enough.
Booking is configured but the AI isn't using it
Booking is configured but the AI isn't using it
- Open the agent’s Prompt tab and look at the Booking resource card. If it still says “Not in use,” open the Calendar Configuration popup and make sure at least one team member calendar is toggled to Active.
- Your agent’s prompt needs booking instructions — without them, the AI won’t know when or how to offer time slots. At minimum, your prompt must tell the agent when to offer booking, what data to collect first, and how to present slots. See Step 5 for the full list of required and optional prompt instructions.
The agent is offering slots that conflict with events on other calendars
The agent is offering slots that conflict with events on other calendars
- Open the Calendar Configuration popup, select the team member calendar, and enable “Avoid conflicts with other calendars”. Then check the boxes for every calendar you want Irelia to monitor — personal calendars, shared team calendars, holiday calendars.
Can I use the same Google calendar for booking and conflict checking?
Can I use the same Google calendar for booking and conflict checking?
Can different agents use different booking configurations?
Can different agents use different booking configurations?
Can I have multiple team member calendars pointing to the same Google calendar?
Can I have multiple team member calendars pointing to the same Google calendar?
What happens if all team members are fully booked?
What happens if all team members are fully booked?
Do I need to configure booking in the prompt too?
Do I need to configure booking in the prompt too?
🆘 Need Help?
- Contact support in the WhatsApp priority support group or send an email to info@irelia.ai
- Include: screenshots of your Calendar Configuration popup, the agent name, and a description of the issue