What Comment-to-DM Is
All Posts vs. Specific Posts
What You'll Need
Step-by-Step Setup
Managing Your Automations
Quick Checklist
FAQs
Introduction
You post on Facebook. People comment. Some of those commenters are warm leads — they’re curious, they’re asking questions, they’re raising their hand. But replying in the comments is slow, public, and almost impossible to scale. By the time you DM them back, they’ve moved on. This guide walks you through setting up Comment-to-DM in Irelia — from understanding what it does and which scope to pick, to activating your first live automation on a Facebook post.✅ One or more Facebook posts configured to trigger automatic Messenger DMs
✅ A first message written and ready to greet every commenter
✅ Optional keyword triggers set so the automation only fires on specific comments
✅ Your automation activated and running live
💡 What Comment-to-DM Is in Irelia
In Irelia, Comment-to-DM is an automation that lives inside an AI agent’s Trigger tab. You point it at one or more Facebook posts and write the first Messenger message you want sent. The AI agent whose Trigger tab the automation lives in is the one that picks up the conversation afterwards. When someone comments on a configured post:- Irelia detects the comment in real time.
- Irelia sends the first Messenger message you wrote to that person, privately.
- From the second message onward, the AI agent takes over and handles the entire conversation — answering questions, qualifying the lead, and pushing toward your goal.
How it differs from ManyChat-style tools
If you’ve used ManyChat or similar tools, you already know the “comment X, get Y” mechanic: someone comments a keyword, the tool DMs them a pre-written message, and from there it’s a series of static replies and buttons. Irelia replaces the static part with a real AI conversation. The trigger and the first message work the same way — but instead of a scripted drip, your prospect lands in a live conversation with an AI agent who can answer follow-up questions, handle objections, and book the appointment. There’s no flowchart to maintain and no decision tree to debug.🧭 Two Scopes: All Posts vs. Specific Posts
Before you set anything up, there’s one decision that shapes your entire configuration: which posts should trigger the automation? Irelia gives you two scopes:📋 What You’ll Need
Before you start configuring Comment-to-DM, make sure you have:- ✅ A Facebook Page connected to Irelia through the Meta integration. If not, start with How to Connect Meta Messenger and Instant Forms to Irelia.ai. Required
- ✅ The Meta Messenger toggle enabled in your Channels Configuration — Messenger needs to be active for Irelia to send DMs. Required
- ✅ At least one AI agent created and configured. The Comment-to-DM automation lives inside the agent’s Trigger tab, and that same agent will handle every conversation it starts. Required
- ✅ One or more Facebook posts already published on your Page that you want to use as triggers (only needed if you plan to configure specific posts — All-posts works without any pre-existing post). Optional
🔧 Step-by-Step Setup
Open the Trigger tab on your agent
The Trigger tab showing the Comment-to-DM section with Configure new posts and Configure all posts buttons
Choose your scope
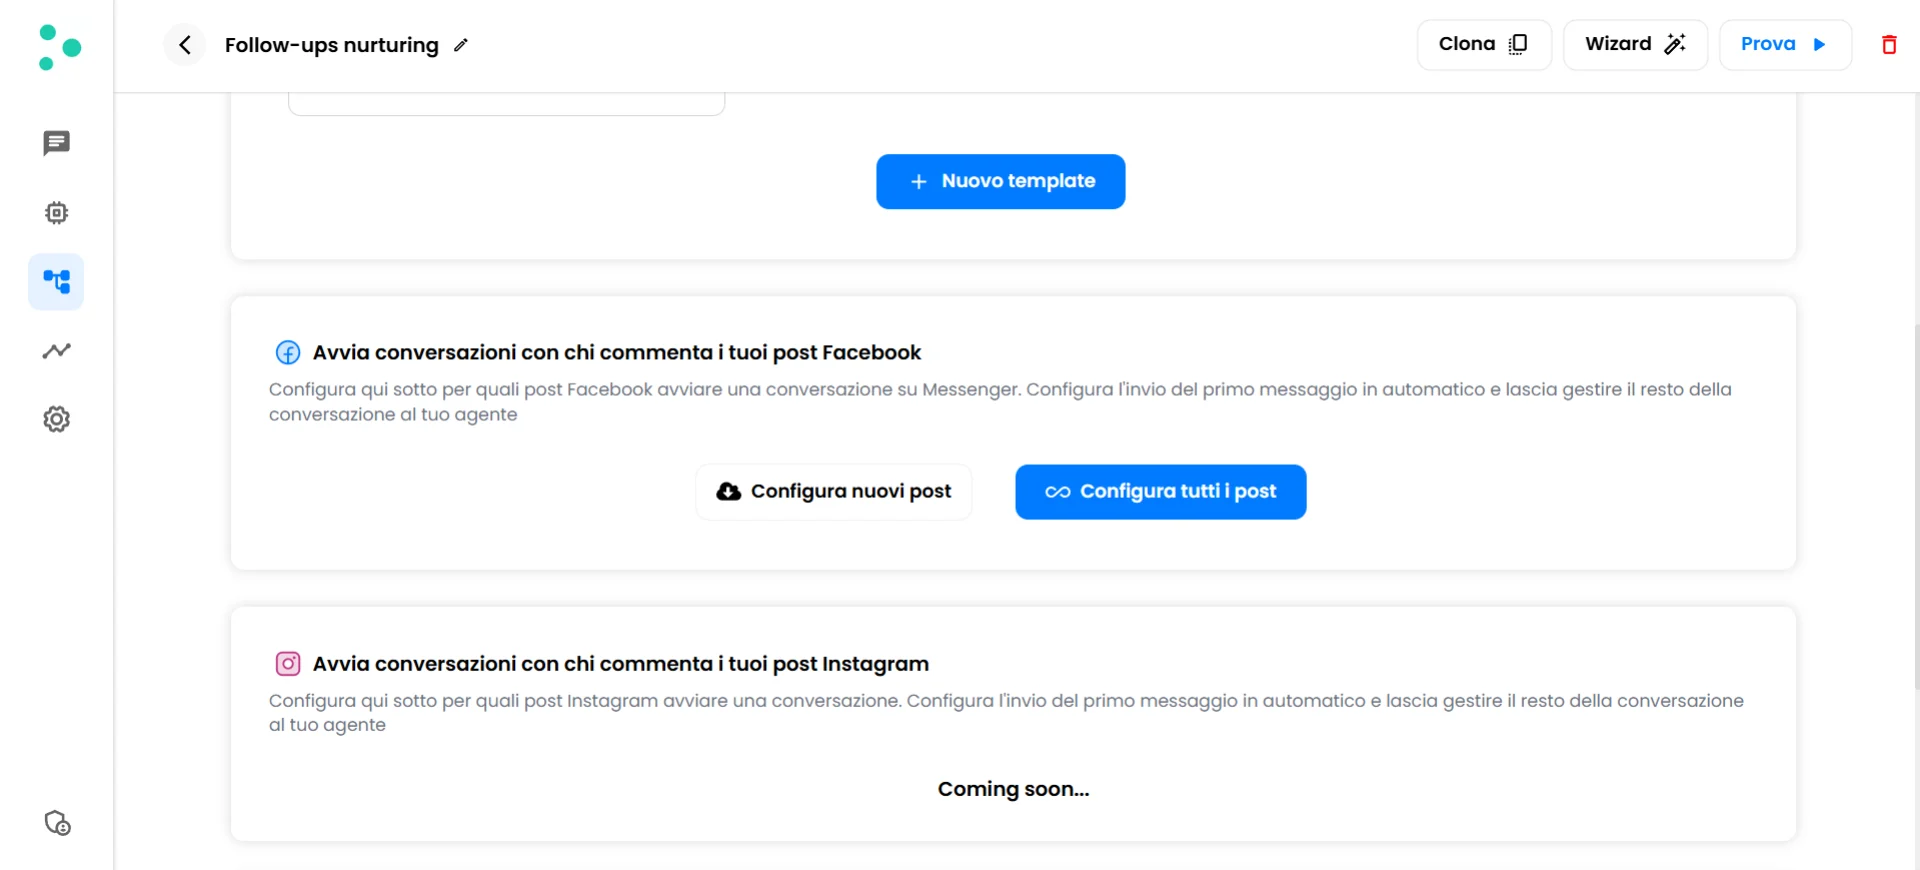
- All posts (page-wide default) → Click the blue “Configure all posts” button. This opens the configuration popup directly, since there’s only one All-posts configuration per page.
- A specific post → Click “Configure new posts”. Irelia pulls the list of posts from your Facebook Page and displays them as cards below the button. Browse the list and click the card for the post you want to configure.
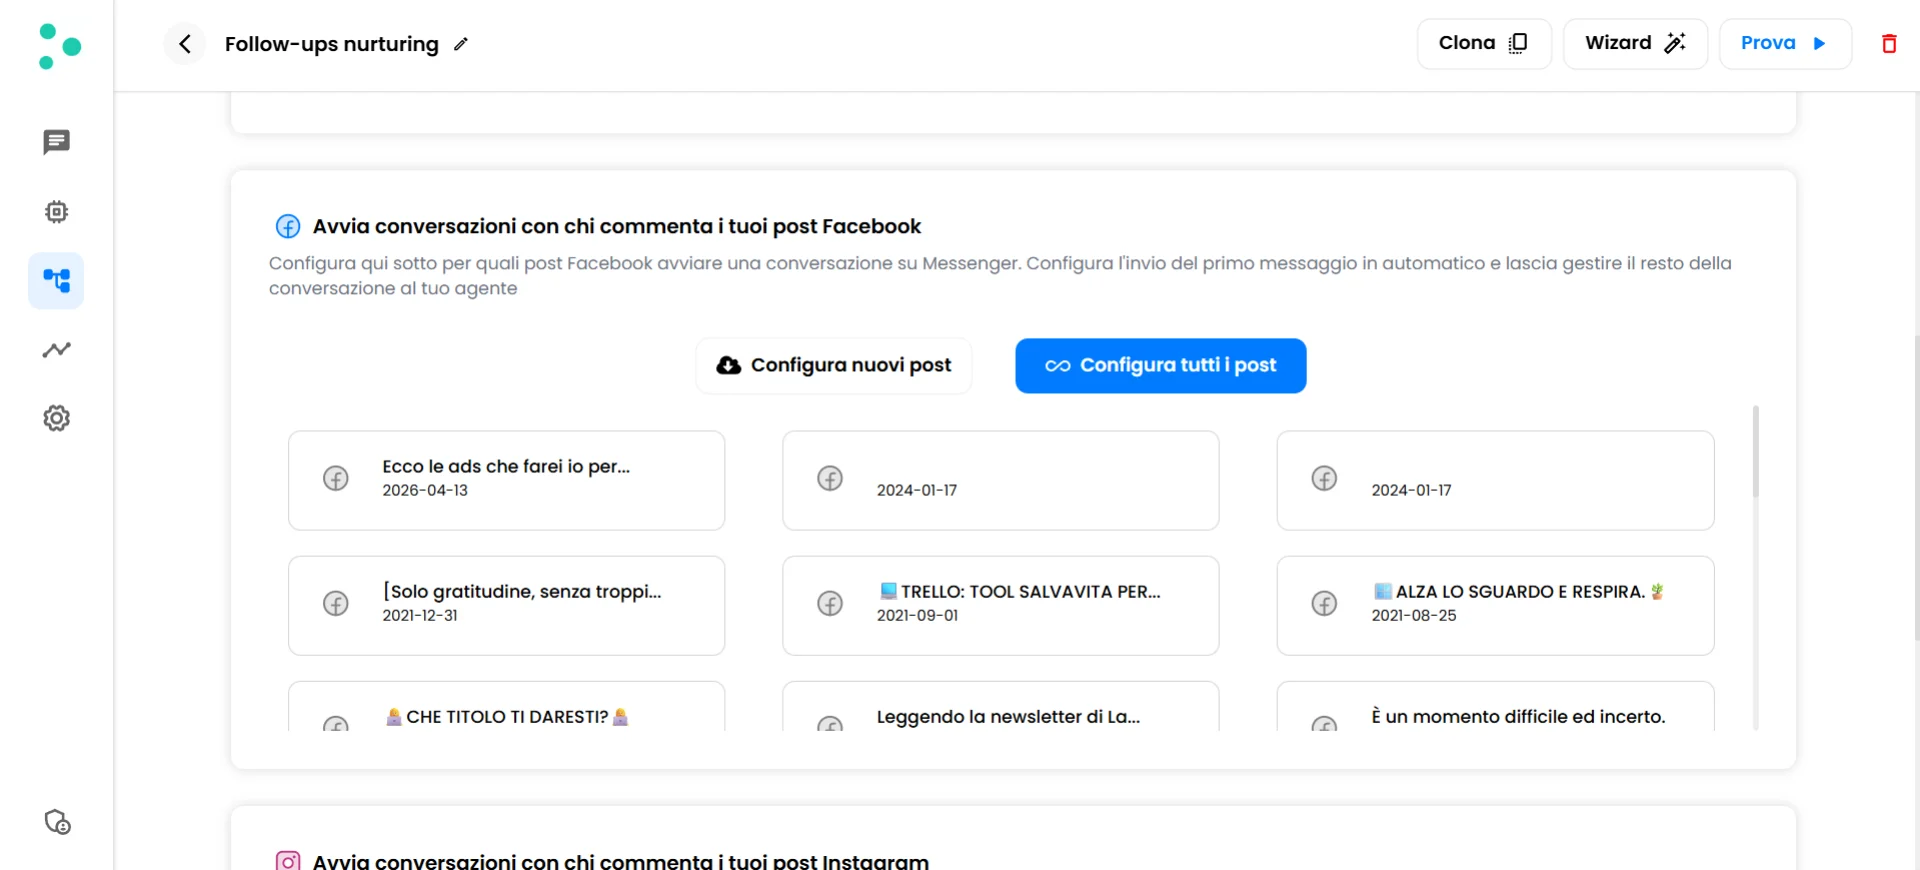
Facebook posts from your connected Page displayed as selectable cards
Configure the automation in the popup
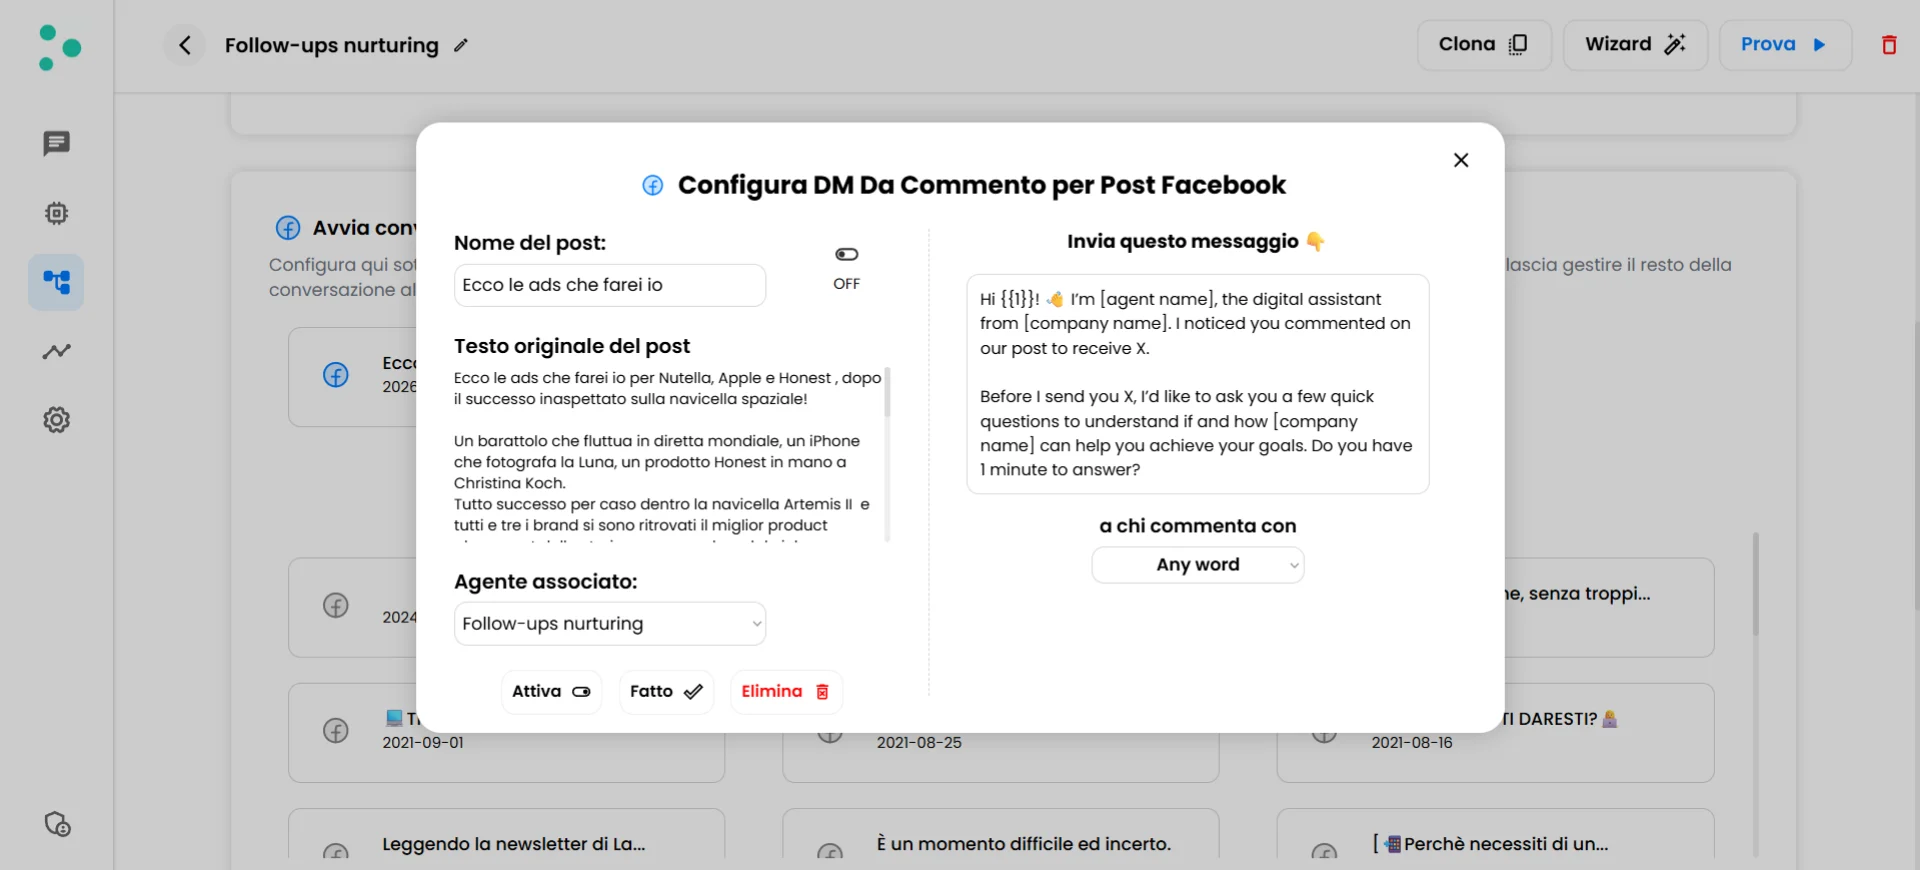
Configuration popup with first message, trigger condition, and keyword chips
- Write the first Messenger message — In the “Send this message” text area on the right, type the exact message you want sent privately to anyone who comments. Keep it warm, short, and human — it’s the first thing your prospect will read in their DMs. Mention what they commented on so the message feels personal and relevant.
-
Choose your trigger condition — Under “to anyone who comments with”, decide what counts as a trigger:
- Any comment → Pick the option that fires the DM on every comment, regardless of what the person wrote. Use this when the post itself is the qualifier (e.g., a post that says “comment anything to get the guide”).
- Specific keywords → Add one or more trigger words using the “new word…” input, then confirm. Each keyword appears as a chip. Only comments containing one of those words will trigger the DM. Use this when you want to filter for real intent (e.g., trigger on “info”, “price”, “book”).
Activate the automation
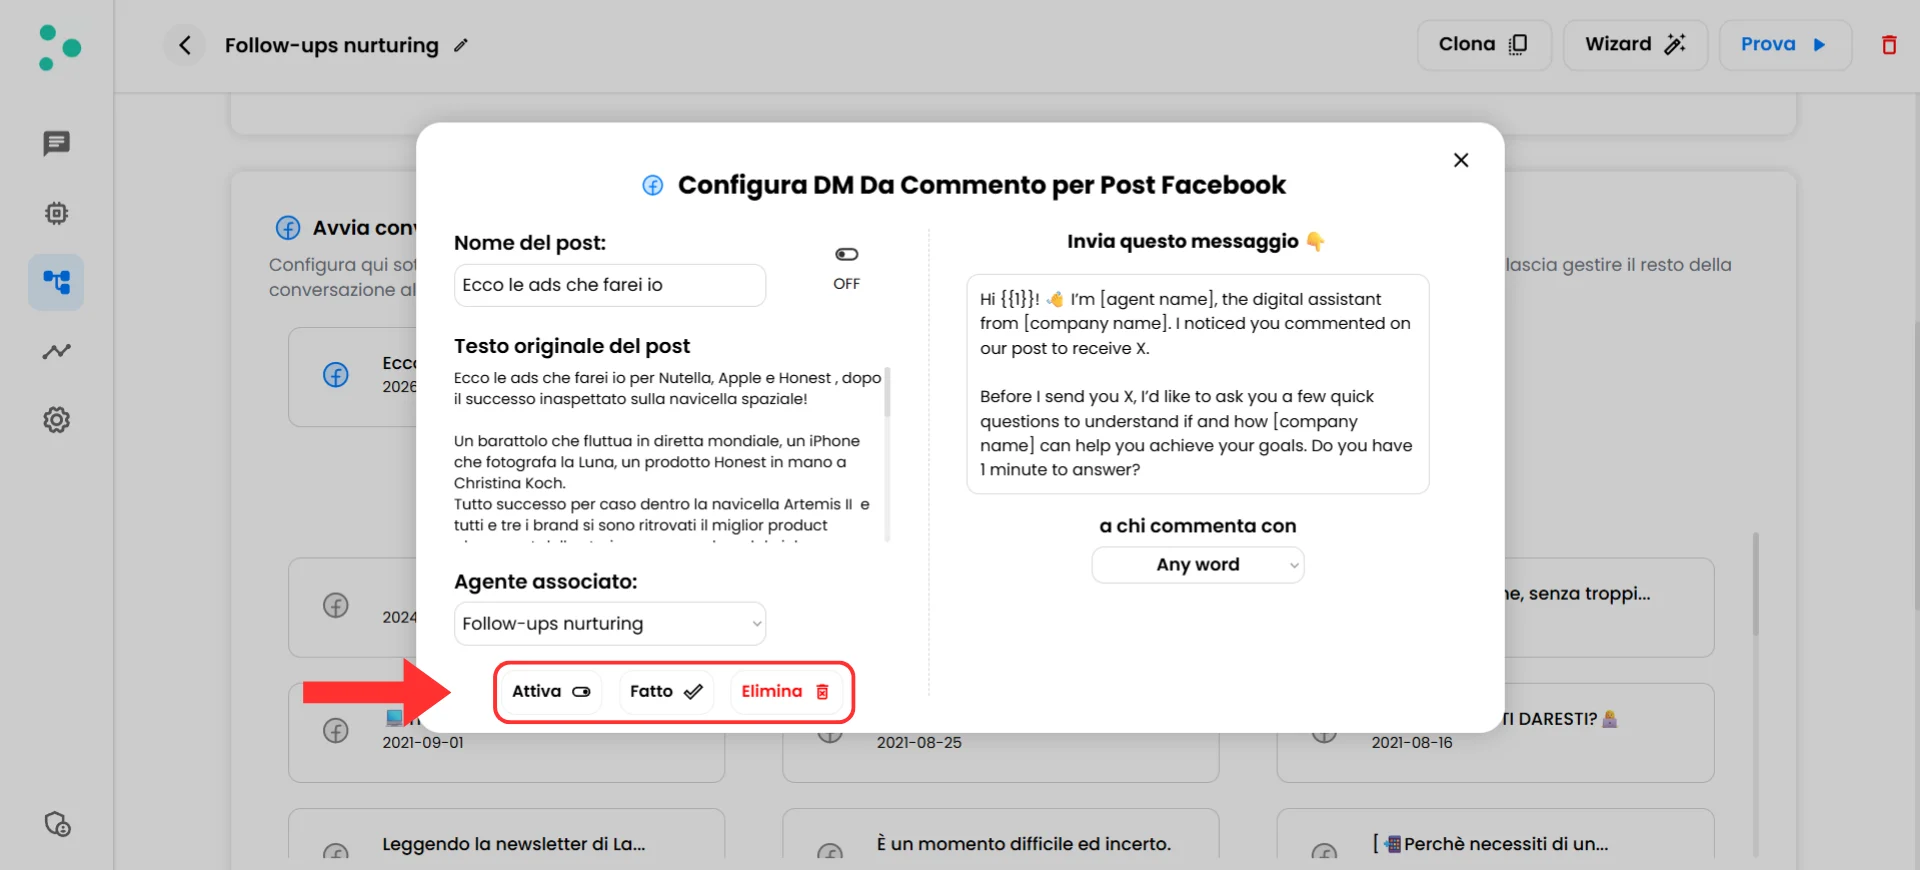
Activate toggle, Done button, and Delete button at the bottom of the popup
⚙️ Managing Your Automations
Once a configuration is saved, it appears in the list above the “Configure new posts” and “Configure all posts” buttons in the Trigger tab. From there you can manage it at any time.- Edit — Click the configured post (or the All-posts entry) to reopen the popup. Change the message or the keywords, then click “Done” to save.
- Pause — Reopen the popup and toggle “Activate” off. The configuration stays saved but stops triggering DMs until you turn it back on.
- Delete — Reopen the popup and click the red “Delete” button to remove the configuration entirely. Use this when you no longer want that post to trigger any DM at all.
✅ Quick Checklist
Before you consider your Comment-to-DM setup complete, verify:Prerequisites
Prerequisites
- Your Facebook Page is connected to Irelia through the Meta integration
- The Meta Messenger toggle is enabled in Channels Configuration
Configuration
Configuration
- You’ve chosen the right scope (All posts, specific posts, or both)
- Your first Messenger message is written, warm, and matches the trigger context
- Your trigger condition (any comment vs. specific keywords) is set correctly
- You’ve configured the automation inside the Trigger tab of the AI agent you want handling the conversation
Activation & Testing
Activation & Testing
- You’ve clicked “Activate” and the configuration appears in the list above the buttons
- You’ve commented on the post yourself (or asked someone to) to test that the DM arrives
❓ FAQs
Can I configure both All posts and specific posts at the same time?
Can I configure both All posts and specific posts at the same time?
How many specific posts can I configure?
How many specific posts can I configure?
Why is my All-posts configuration shown in blue?
Why is my All-posts configuration shown in blue?
The first message is fixed — does that mean Irelia replies to everyone the same way?
The first message is fixed — does that mean Irelia replies to everyone the same way?
Can different posts route to different AI agents?
Can different posts route to different AI agents?
Does Comment-to-DM work on Instagram?
Does Comment-to-DM work on Instagram?
What happens if I configure a post but my Meta Messenger toggle is off?
What happens if I configure a post but my Meta Messenger toggle is off?
Can I see the conversations that started from a Comment-to-DM trigger?
Can I see the conversations that started from a Comment-to-DM trigger?
Do I need to re-configure All posts when I publish a new post?
Do I need to re-configure All posts when I publish a new post?
🆘 Need Help?
- Contact support in the WhatsApp priority support group or send an email to info@irelia.ai
- Include: screenshots of your Trigger tab and the automation popup, the post you’re trying to configure, and what you expected vs. what happened