What You'll Need
Quick Path
Step-by-Step Setup
Quick Checklist
Troubleshooting & FAQs
Introduction
You’ve built your AI agent, written the perfect WhatsApp template, and it just got approved. Now you want to start sending it to real prospects. But how do you actually get their phone numbers and trigger that first outbound message? If you already have traffic flowing from landing pages, email campaigns, Google Ads, or your website — and you’re not ready to dive into the Irelia API or configure third-party automation tools — Irelia Forms is the fastest way to go from “template approved” to “prospects receiving WhatsApp messages.” In about ten minutes, not hours. Irelia Forms lets you create a simple, customizable landing page with a contact form. When a prospect fills in their name and phone number, Irelia automatically sends your WhatsApp template message to them — the first outbound message that kicks off a conversation handled entirely by your AI agent. No webhooks, no Zapier, no Make.com, no code.✅ Full control over the form’s look and feel — headlines, colors, images, and fonts
✅ A shareable URL you can start driving traffic to immediately
✅ The option to embed the form on your own website if you prefer
How This Works
Think of Irelia Forms as a one-click bridge between your web traffic and WhatsApp. Here’s the flow a prospect experiences:- They click a link in your email, ad, website, or social post — and land on your Irelia Form page (or your website with the embedded form)
- They type in their name and phone number and hit submit
- Irelia instantly sends them your connected WhatsApp template — the first outbound message
- Your AI agent picks up the conversation from there, automatically qualifying and assisting the prospect
X placeholder. If your template includes a X placeholder, it will be automatically filled with the name the prospect enters in the form. Templates with multiple placeholders (e.g., X and X) are not supported through Irelia Forms — use the API or an automation integration for those.What You’ll Do
- Select Irelia Forms for your approved WhatsApp template (~2 minutes)
- Customize your form’s content and style (~5 minutes)
- Save and publish your form (~1 minute)
- Share your form URL or embed it on your website (~2 minutes)
📋 What You’ll Need
- An Irelia.ai account with at least one active AI agent Required
- An approved WhatsApp template with at most one placeholder (
X) — learn how to create one here if you don’t have one yet Required - Sufficient Irelia credits to send outbound messages (each form submission consumes a credit) Required
- Your landing page copy ready (headline, sub-headline, button text) Required
- A logo or image to display on the form Optional
- Access to your website’s code (only if you want to embed the form on your own site) Optional
⚡ Quick Path (Experienced Users)
Already comfortable with Irelia? Here’s the condensed version:- Open your approved template → In the “Set up the sending of the WhatsApp template” popup, click the “Irelia Forms” card under “Configure form”
- Create the form → Click the “Create your Irelia form” button → A new tab opens with the form editor
- Customize → Fill in the “Content” tab (headline, sub-headline, image, button text, footer, thank-you page copy) → Switch to the “Style” tab (background color, button color, typography, font)
- Save → Click “Save and update content” and/or “Save and update style”
- Distribute → Copy the form URL directly from the editor tab, or go back to the template popup and click “Copy Irelia Form URL” or “Copy the code to insert on your website”
- Finalize → Click “I completed the configuration” in the template popup
🔧 Step-by-Step Setup
Select Irelia Forms as Your Sending Method
- In your Irelia dashboard, navigate to your WhatsApp templates
- Click on the approved template you want to connect to a form
- The “Set up the sending of the WhatsApp template” popup will appear
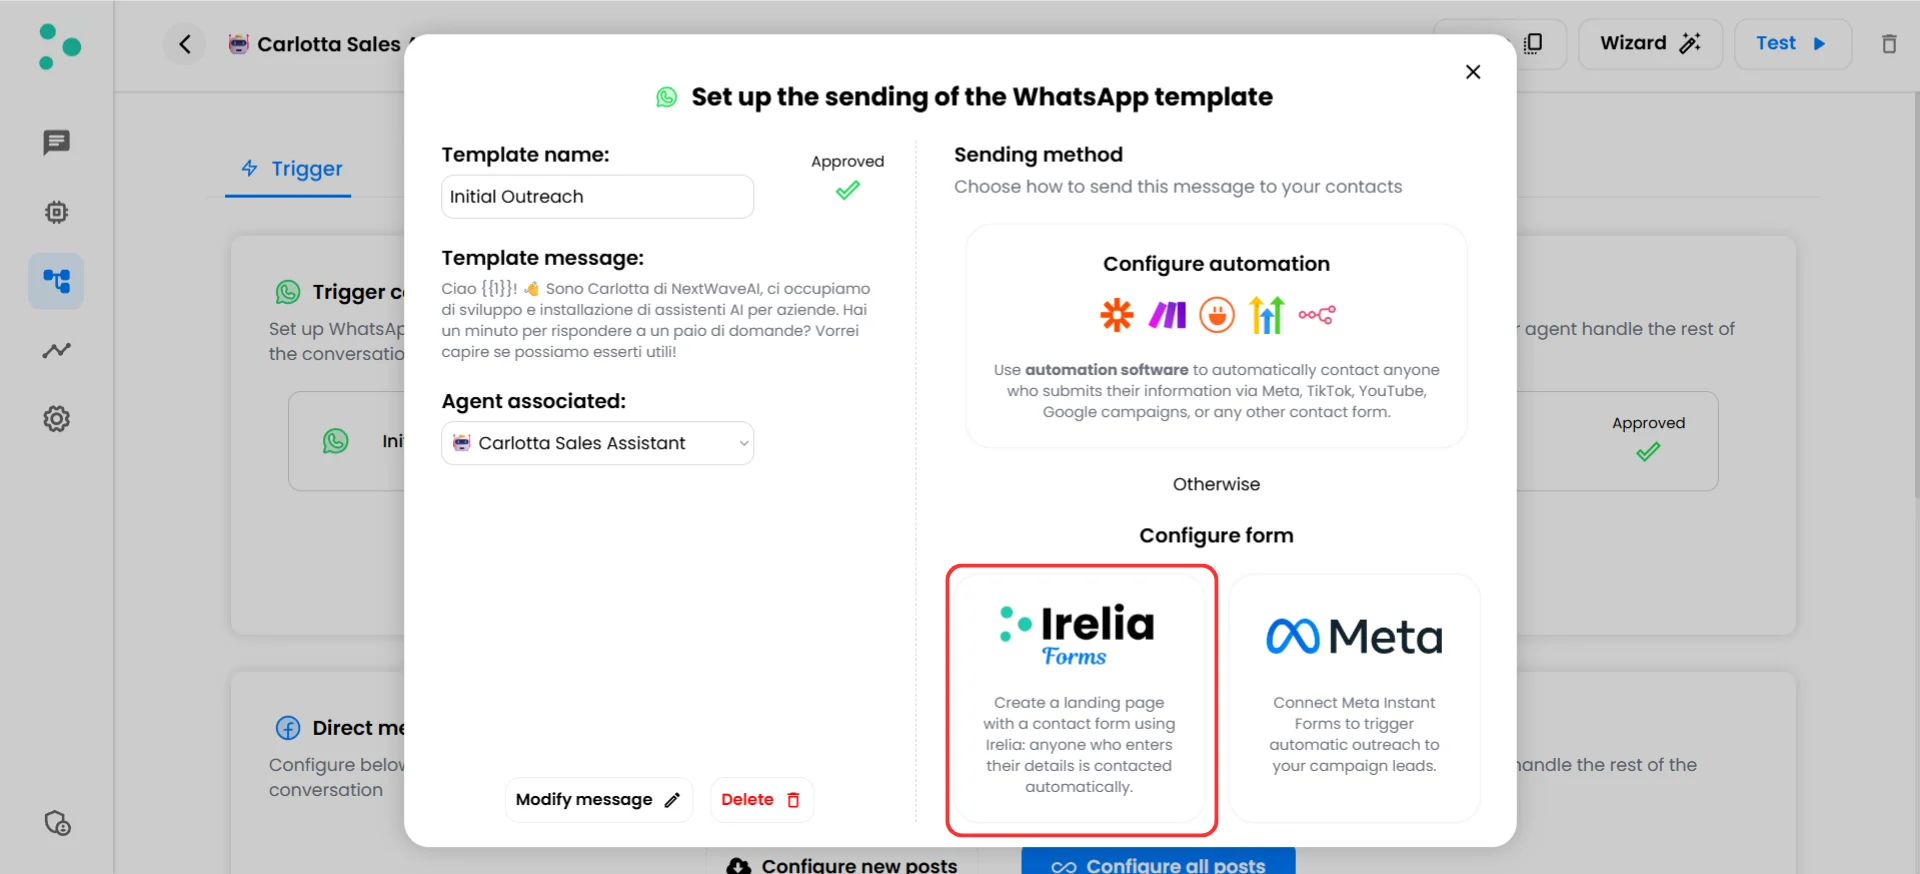
Template sending popup with automation and form configuration options
- Scroll down to the “Configure form” section
- Click the “Irelia Forms” card

Configure the landing page screen with the Create your Irelia form button
- Click the blue “Create your Irelia form” button
Customize Your Form
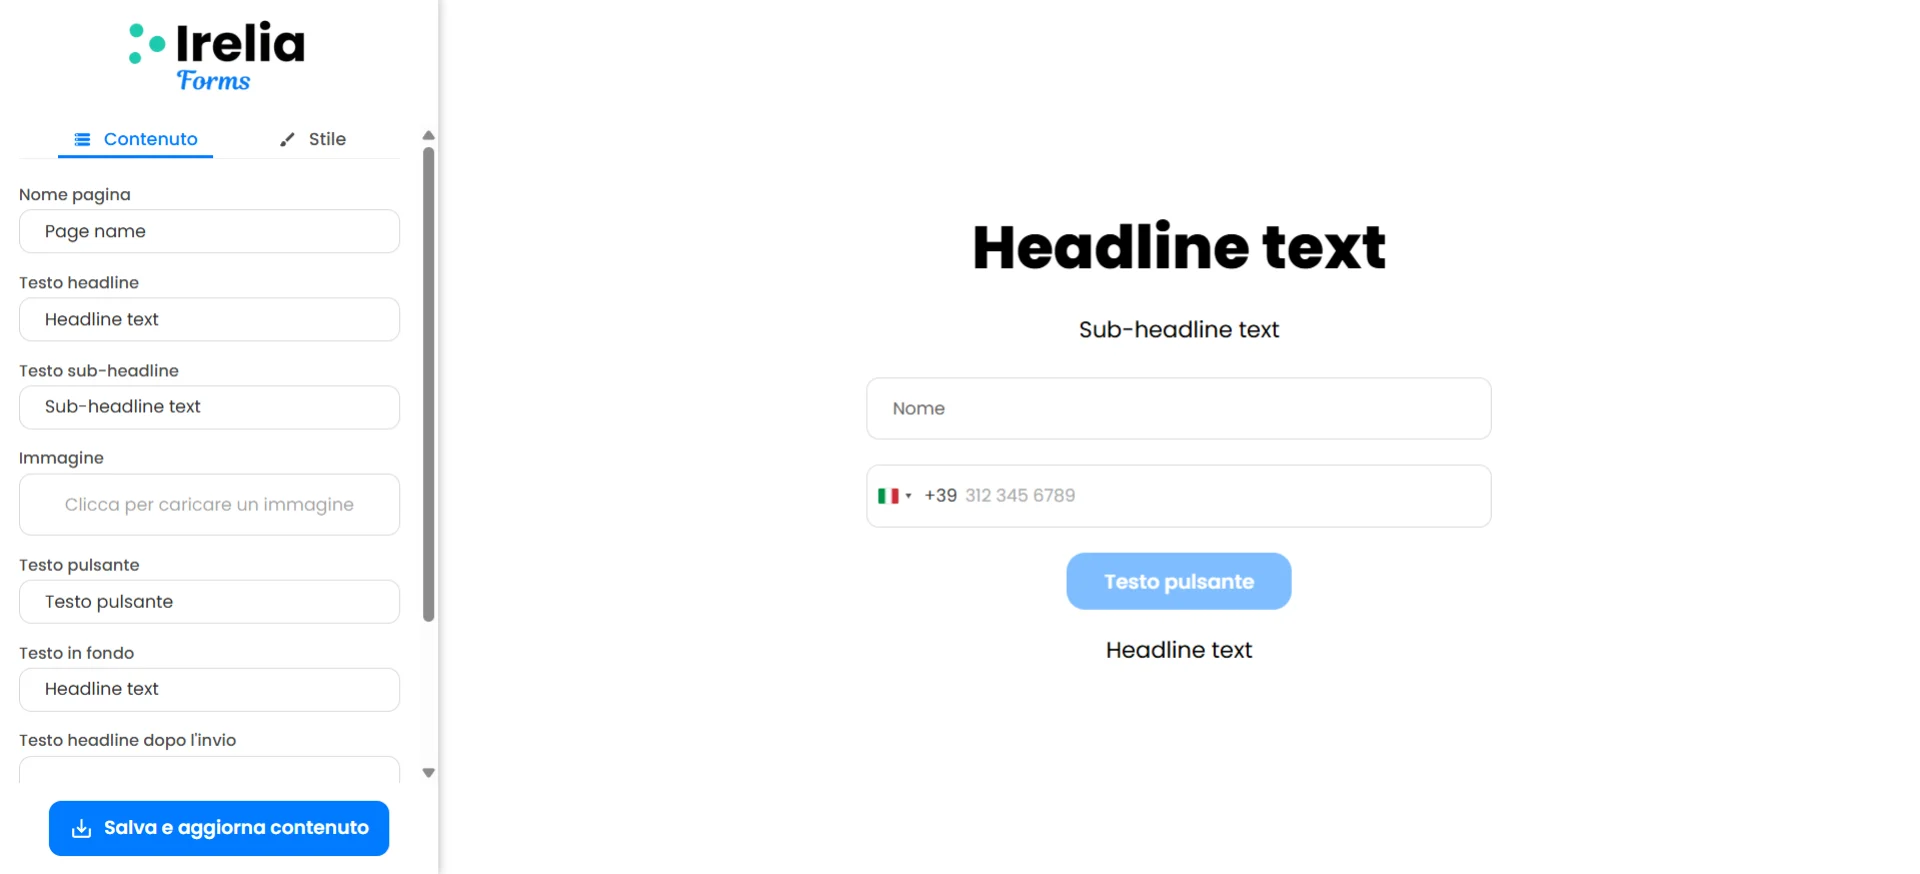
Form editor with Content tab, editable fields on the left, and live preview on the right
Customize the content
The “Content” tab controls all the text and media on your form. Here’s what each field does:Customize the style
Click the “Style” tab at the top of the sidebar to control the visual appearance of your form: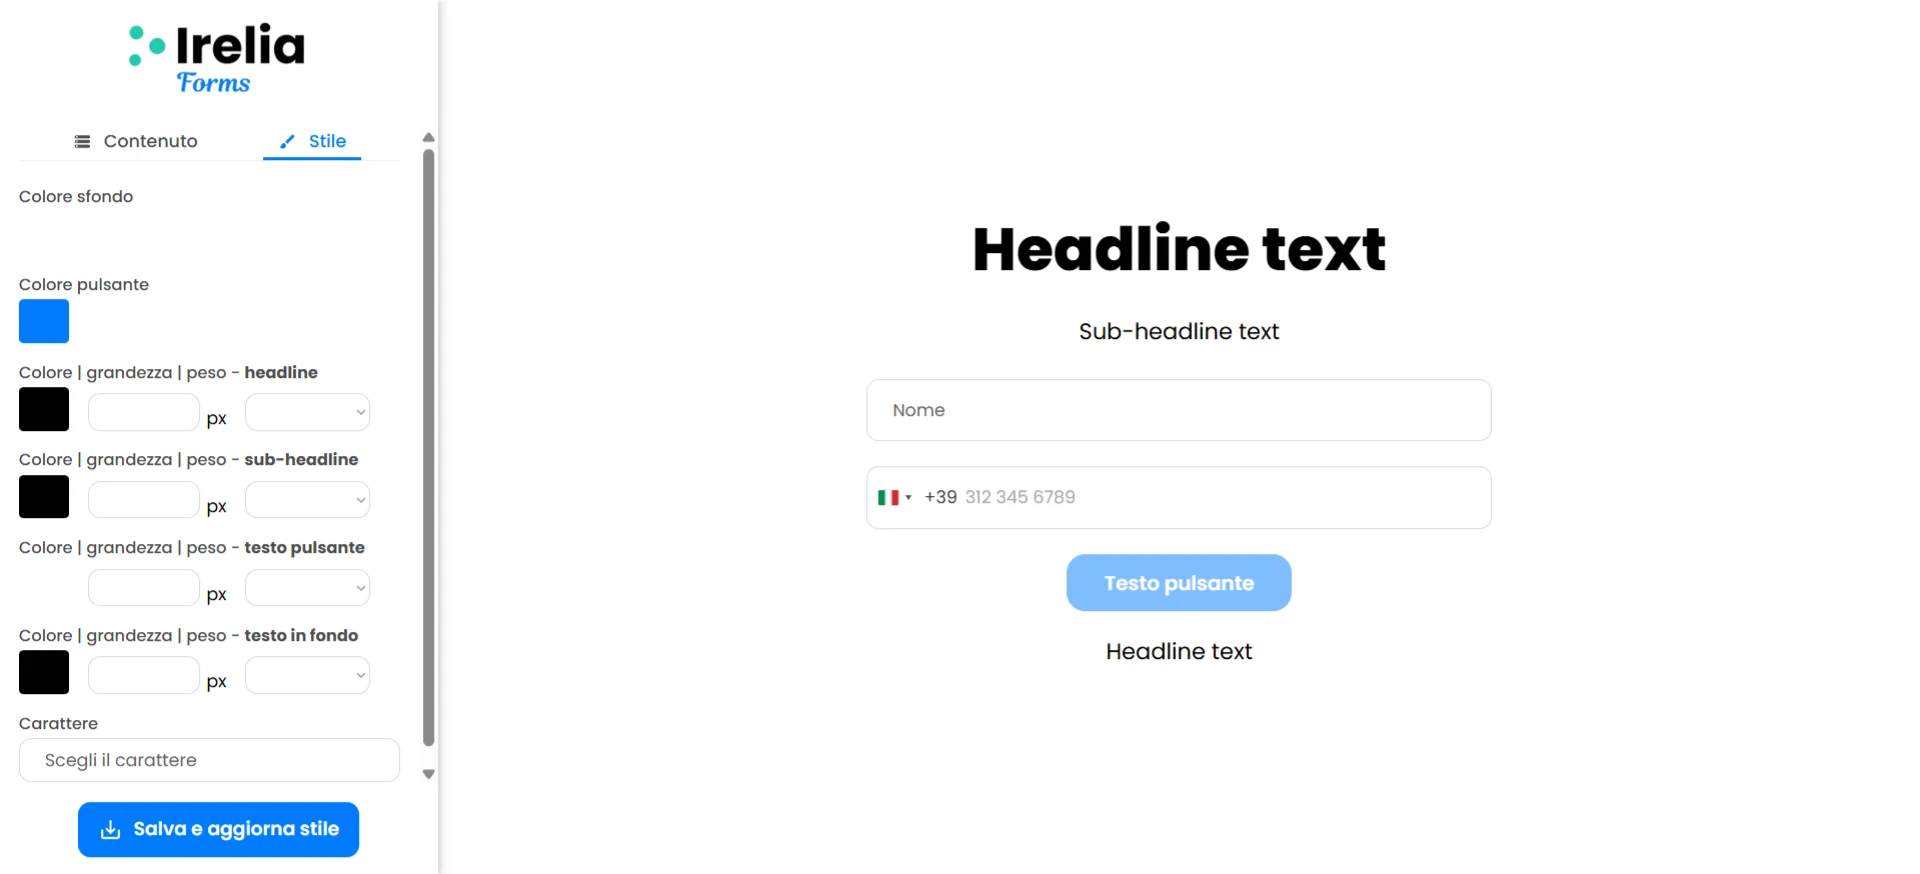
Style tab with color pickers, typography controls, and font selector
Save and Publish Your Form
- On the “Content” tab, click the “Save and update content” button at the bottom of the sidebar
- If you made changes on the “Style” tab, switch to it and click the “Save and update style” button
Share Your Form or Embed It on Your Website
Option A: Use the hosted Irelia Form URL (fastest)
Your form is already live and hosted on irelia.ai. To get the URL:- From the editor tab: Copy the URL directly from your browser’s address bar — that’s your public form URL.
- From the template popup: Switch back to the tab where you started, and click the “Copy Irelia Form URL” button.
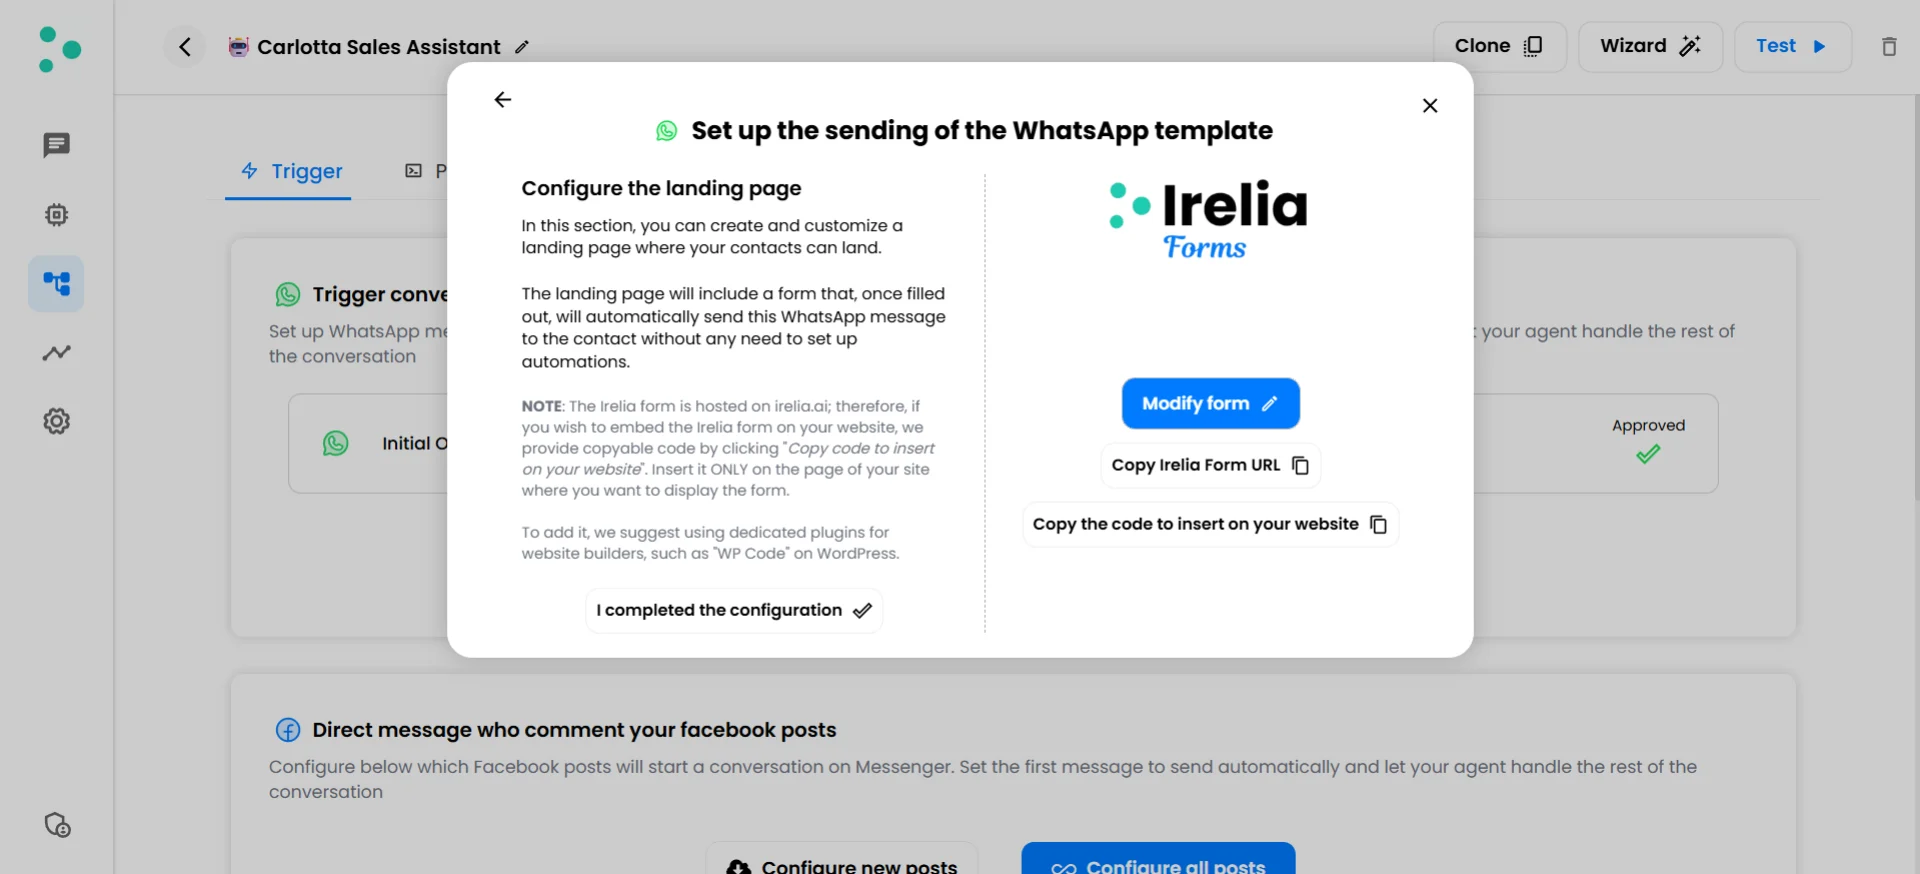
Template popup with Modify form, Copy URL, and Copy embed code buttons
Option B: Embed the form on your own website
If you’d rather have the form appear on your own domain — for brand consistency or to capture existing website visitors — you can embed it using a code snippet.- Go back to the template popup tab
- Click the “Copy the code to insert on your website” button
- Paste this code into a dedicated page on your website (platform-specific instructions below)
- Once everything is set up, click “I completed the configuration” at the bottom left
How the embed code works
The embed code is a<script> snippet that creates a full-screen frame (iframe) loading your Irelia Form. When a visitor opens the page, the form covers the entire viewport — it becomes the only thing they see. Here’s a simplified view of what the code looks like:For any website (direct HTML access)
If you or your developer have direct access to your website’s HTML files:- Create a new, dedicated HTML page for the form (e.g.,
get-started.html) - Paste the Irelia Form embed code just before the closing
</body>tag - Save the file and upload it to your server
- Visit the page — you should see your Irelia Form filling the screen
For WordPress (using WPCode — recommended)
Since the embed code is a<script>, the most reliable way to add it in WordPress is through the free WPCode plugin — it handles script injection cleanly without being stripped by WordPress’s content filters.- In your WordPress dashboard, go to “Plugins” → “Add New”
- Search for
WPCodeand install “WPCode — Insert Headers and Footers + Custom Code Snippets” - Click “Activate”
- In the left sidebar, go to “Code Snippets” → ”+ Add Snippet”
- Hover over “Add Your Custom Code (New Snippet)” and click the “Use Snippet” button
- Give your snippet a descriptive name (e.g.,
Irelia Form - Summer Promo) - In the “Code Type” dropdown, select “HTML Snippet”
- Paste the full Irelia Form embed code (the entire
<script>...</script>block) into the code editor area - Scroll down to the “Insertion” section and configure it to load only on the specific page where you want the form — use WPCode’s page-targeting rules to select your dedicated form page
- Toggle the snippet to “Active” and click the “Save Snippet” button
For Wix
- Create a new page in your Wix site for the form (e.g., “Get Started”)
- Go to your Wix Dashboard → “Settings” → scroll to “Advanced” → “Custom Code”
- Click the ”+ Add Custom Code” button
- Paste the full Irelia Form embed code into the code box
- Give it a name (e.g.,
Irelia Lead Form) - Under “Add Code to Pages”, select “Choose specific pages” and pick only your dedicated form page
- Under “Place Code in”, select “Body - end”
- Click “Apply”
For other platforms (Squarespace, Shopify, Webflow, etc.)
Every modern platform has a way to add custom code to specific pages. The principle is the same everywhere: create a dedicated page, then inject the embed script on that page only.- Squarespace: Create a new page → click the gear icon (Page Settings) → “Advanced” → paste the code in the “Page Header Code Injection” field
- Shopify: Go to “Online Store” → “Pages” → create a new page → use a Custom Liquid section in the page template, or go to “Themes” → “Edit Code” and create a dedicated template that includes the embed script
- Webflow: Create a new page → “Page Settings” → “Custom Code” → paste in the “Before
</body>tag” field
🎉 Congratulations! Your Irelia Form Is Live!
Here’s what you’ve just set up: ✅ A branded landing page that captures prospect names and phone numbers✅ An automatic WhatsApp outbound message triggered the instant someone submits
✅ Your AI agent ready to pick up every conversation — zero manual work required
✅ A shareable URL (and optionally, an embedded version on your own website) Here’s what happens now: Prospect clicks your link → lands on your form → enters their name and phone number → hits submit → Irelia instantly sends your WhatsApp template (the first outbound message) → your AI agent handles the entire conversation → you get qualified leads on autopilot.
What’s Next?
Now that your first Irelia Form is live, here are some natural next steps:- 📢 Drive traffic to your form — Share the URL in your email campaigns, Google Ads, social media bios, QR codes at events, website CTAs, or anywhere your audience already is
- 🎨 Create more forms for different campaigns — Each WhatsApp template can have its own Irelia Form with different messaging and styling. Run multiple campaigns simultaneously
- 🔗 Add more sending methods for the same template — Irelia Forms handles web traffic beautifully, but you can layer on additional methods for other channels:
- Running Meta ads? Set up Irelia’s native Meta Instant Forms integration to capture leads directly from Facebook and Instagram ads — no landing page needed
- Need CRM-triggered messages? Connect Irelia to Zapier, Make.com, or your automation tool of choice via the Irelia API/webhooks
- All methods work in parallel for the same template — each captures leads from a different channel
- 📊 Monitor your results — Keep an eye on your Irelia dashboard to track incoming conversations triggered by form submissions
✅ Quick Checklist
Use this to verify your setup is complete:Template & Form Setup
Template & Form Setup
- WhatsApp template created and approved
- Sufficient Irelia credits available to send outbound messages
- “Irelia Forms” selected as a sending method in the template popup
- Irelia Form created via the “Create your Irelia form” button
- Content customized — headline, sub-headline, button text, footer, thank-you page copy
- Style customized — colors, font sizes, font family to match your brand
- Content saved via “Save and update content”
- Style saved via “Save and update style” (if style was changed)
Distribution
Distribution
- Form URL copied and ready to share — OR — embed code pasted on a dedicated page on your website
- “I completed the configuration” clicked in the template popup
Verification
Verification
- Tested the form by submitting with your own phone number
- Received the WhatsApp template message on your phone
- AI agent started the conversation correctly after the template was delivered
🛠️ Troubleshooting & FAQs
Something is preventing the template from being delivered after the form submission
Something is preventing the template from being delivered after the form submission
- Go back to your template in Irelia and confirm it shows “Approved” — if the template was rejected or is still pending, no message will be sent
- Each form submission that triggers a WhatsApp message consumes a credit. If your credits are depleted, the form will accept submissions but the message won’t go out. Check your credit balance in your Irelia dashboard and top up if needed
- Make sure the phone number was entered with the correct country code (the form includes a country-code selector — double-check it was set correctly)
- Confirm the phone number has an active WhatsApp account — template messages can only be delivered to WhatsApp users
- Delivery can occasionally take a few seconds. Wait 30 seconds and check WhatsApp again
- If still nothing, try submitting the form with a different phone number to isolate the issue
The embed script isn't loading or executing on your page
The embed script isn't loading or executing on your page
- Make sure you pasted the complete
<script>...</script>block — including both the opening<script>and closing</script>tags
- If using WPCode on WordPress, confirm the code type is set to “HTML Snippet” — not “JavaScript Snippet” or “PHP Snippet”
- If using another platform, make sure the code injection field supports script tags
- Some security plugins or content-security policies may block inline scripts. Try disabling security plugins temporarily to test
- Open your browser’s developer console (right-click → “Inspect” → “Console” tab) and look for error messages
Can I have multiple Irelia Forms for the same WhatsApp template?
Can I have multiple Irelia Forms for the same WhatsApp template?
Can I use Irelia Forms AND other sending methods for the same template?
Can I use Irelia Forms AND other sending methods for the same template?
Can I edit my form after publishing it?
Can I edit my form after publishing it?
What's the difference between using the hosted URL and the embed code?
What's the difference between using the hosted URL and the embed code?
Should I use Irelia Forms or the Meta Instant Forms integration?
Should I use Irelia Forms or the Meta Instant Forms integration?
Why should I use Irelia Forms instead of the API?
Why should I use Irelia Forms instead of the API?
- Test outbound WhatsApp messaging quickly without any technical setup
- Launch a campaign in minutes rather than hours
- Skip dealing with APIs, webhooks, or third-party automation platforms entirely
Can I add more fields to the form (like email or company name)?
Can I add more fields to the form (like email or company name)?
🆘 Need Help?
- Contact support in the WhatsApp priority support group or send an email to info@irelia.ai
- Include: a screenshot of your form configuration, the template name, your current credit balance, and a description of what you expected vs. what happened